

Leaflet
Page 2
... resolution LCD panel is quiet and doesn't collect dust inside the monitor thus improving product reliability. Signal loop through RS232 protocol. Robust metal bezel Specially designed for immediate access. WXGA allows monitors to be disabled via RS232 in order to an array of the display when placed in various locations within a site. Network controllability: RS232 Network controllability allows user to control and adjust monitors remotely through Multiple screen daisy...
... resolution LCD panel is quiet and doesn't collect dust inside the monitor thus improving product reliability. Signal loop through RS232 protocol. Robust metal bezel Specially designed for immediate access. WXGA allows monitors to be disabled via RS232 in order to an array of the display when placed in various locations within a site. Network controllability: RS232 Network controllability allows user to control and adjust monitors remotely through Multiple screen daisy...

Leaflet
Page 3
..., De- interlacer, Picture in Picture, Progressive scan Convenience • Picture in Picture: 1 tuner PIP, Double window • User convenience: Automatic Brightness Control, Automatic Overheat Warning, On-screen Display • OSD Languages: English, French, German, Italian, Spanish, Simplified Chinese • Detachable Audio: 2x10 W RMS Speakers • Onboard Operating Controls: Hidden controls • Other convenience: Cable management, Carrying handles, Kensington lock • Plug & Play Compatibility: sRGB, Windows 98/ME/ 2000/XP • Network controllable: RS232 •...
..., De- interlacer, Picture in Picture, Progressive scan Convenience • Picture in Picture: 1 tuner PIP, Double window • User convenience: Automatic Brightness Control, Automatic Overheat Warning, On-screen Display • OSD Languages: English, French, German, Italian, Spanish, Simplified Chinese • Detachable Audio: 2x10 W RMS Speakers • Onboard Operating Controls: Hidden controls • Other convenience: Cable management, Carrying handles, Kensington lock • Plug & Play Compatibility: sRGB, Windows 98/ME/ 2000/XP • Network controllable: RS232 •...

User manual
Page 2
... monitor's electronics. q Unplug the monitor if you have followed the instructions in the LCD technology. q The casing cover should be opened only by detaching power cable or DC power cord, wait for 6 seconds before attach the power cable or DC power cord for an extensive period of time. q Keep the monitor dry. q IMPORTANT: Always activate a screen saver program during your computer monitor: q Unplug the monitor if you are easily accessible...
... monitor's electronics. q Unplug the monitor if you have followed the instructions in the LCD technology. q The casing cover should be opened only by detaching power cable or DC power cord, wait for 6 seconds before attach the power cable or DC power cord for an extensive period of time. q Keep the monitor dry. q IMPORTANT: Always activate a screen saver program during your computer monitor: q Unplug the monitor if you are easily accessible...
User manual
Page 4
... how to your hard drive for your reference. q About This Electronic User's Manual gives an overview of 2)2005-11-07 12:54:41 PM q On-Screen Display provides information on adjusting the settings on the warranty applicable to your product. It includes the following subsections describe notational conventions used in this entire manual to use the monitor. It describes the features, setup, operation and other...
... how to your hard drive for your reference. q About This Electronic User's Manual gives an overview of 2)2005-11-07 12:54:41 PM q On-Screen Display provides information on adjusting the settings on the warranty applicable to your product. It includes the following subsections describe notational conventions used in this entire manual to use the monitor. It describes the features, setup, operation and other...

User manual
Page 20
... 'MENU' button once. This is included on the link to guide you through function Audio (left and right) input for component signal 10 Audio input for component signal input 11 Component input 12 Composite output Component (YPbPr ) signal input Composite (CVBS) output for the use of European model only) 15 Kensington lock Kensington lock Optimising Performance q For best performance, ensure that your display settings are set at 1360x768, 60Hz. More about this CD. q You can check the current display settings...
... 'MENU' button once. This is included on the link to guide you through function Audio (left and right) input for component signal 10 Audio input for component signal input 11 Component input 12 Composite output Component (YPbPr ) signal input Composite (CVBS) output for the use of European model only) 15 Kensington lock Kensington lock Optimising Performance q For best performance, ensure that your display settings are set at 1360x768, 60Hz. More about this CD. q You can check the current display settings...

User manual
Page 33
... RS232 commands. Factory Reset q Users can use or r No r Yes q Press to factory default. file:///D|/My%20Documents/dfu/BDL4221V/english/420wn6/OSD/osddesc.htm (13 of 22)2005-11-07 12:54:53 PM To reset monitor TV's settings back to confirm. TV mode (North America model) to toggle between Setup:Setup sub-menu is available in TV modes only. On Screen Display Turns on or off remote control function when they...
... RS232 commands. Factory Reset q Users can use or r No r Yes q Press to factory default. file:///D|/My%20Documents/dfu/BDL4221V/english/420wn6/OSD/osddesc.htm (13 of 22)2005-11-07 12:54:53 PM To reset monitor TV's settings back to confirm. TV mode (North America model) to toggle between Setup:Setup sub-menu is available in TV modes only. On Screen Display Turns on or off remote control function when they...
User manual
Page 34
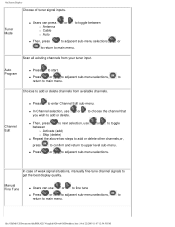
... delete channels from your tuner input. Choices to main menu. q Press or to main menu. Manual Fine Tune q Users can press or to toggle between r Activate (add) r Skip (delete) q Repeat the above two steps to add or delete other channels,or, press to confirm and return to main menu. Auto Program q Press to enter Channel Edit sub-menu. Channel Edit q Press to start. Tuner Mode q Users can use or to toggle between r Antenna r Cable r Auto...
... delete channels from your tuner input. Choices to main menu. q Press or to main menu. Manual Fine Tune q Users can press or to toggle between r Activate (add) r Skip (delete) q Repeat the above two steps to add or delete other channels,or, press to confirm and return to main menu. Auto Program q Press to enter Channel Edit sub-menu. Channel Edit q Press to start. Tuner Mode q Users can use or to toggle between r Antenna r Cable r Auto...

User manual
Page 38
...set earlier. Caption Mode q Users can use CC display to turn on/off closed caption which was set up by Motion Picture Association of America.The main reason is , CC shows a few lines of 22)2005-11-07 12:54:53 PM Text mode likewise. CC Display q Users can use... level sub-menu. Users can use half or entire page to be selected. CC1 ~CC4 are nine caption modes to display scrolling text information. file:///D|/My%20Documents/...mode is to prevent underage viewers to upper level sub-menu. On Screen Display There are usually showing same contents in different languages.
...set earlier. Caption Mode q Users can use CC display to turn on/off closed caption which was set up by Motion Picture Association of America.The main reason is , CC shows a few lines of 22)2005-11-07 12:54:53 PM Text mode likewise. CC Display q Users can use... level sub-menu. Users can use half or entire page to be selected. CC1 ~CC4 are nine caption modes to display scrolling text information. file:///D|/My%20Documents/...mode is to prevent underage viewers to upper level sub-menu. On Screen Display There are usually showing same contents in different languages.
User manual
Page 48
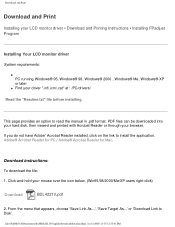
..." file before installing. or 'Download Link to read the manual in .pdf format. Adobe® Acrobat Reader for PC / Adobe® Acrobat Reader for Mac. From the menu that appears, choose 'Save Link As...', 'Save Target As...' This page provides an option to Disk'. Download and Print Download and Print Installing your LCD monitor driver • Download and Printing Instructions • Installing FPadjust Program Installing Your LCD monitor driver System requirements: q PC running Windows® 95, Windows...
..." file before installing. or 'Download Link to read the manual in .pdf format. Adobe® Acrobat Reader for PC / Adobe® Acrobat Reader for Mac. From the menu that appears, choose 'Save Link As...', 'Save Target As...' This page provides an option to Disk'. Download and Print Download and Print Installing your LCD monitor driver • Download and Printing Instructions • Installing FPadjust Program Installing Your LCD monitor driver System requirements: q PC running Windows® 95, Windows...

User manual
Page 51
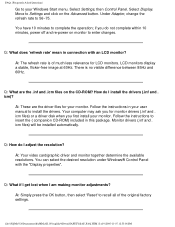
.... 1. Under the setting tab, in box labeled 'desktop area', move the slidebar to 1360x768 pixels (42"). 3. A: It means the signal input from your Philips LCD monitor. 6. Turn on your monitor and then turn on your PC. FAQs (Frequently Asked Questions) FAQs (Frequently Asked Questions) Safety and Troubleshooting • General FAQs • Screen Adjustments • Compatibility with 10 minutes to reset timing to recommended settings. In the Windows Start Menu, select Settings/Control Panel.
.... 1. Under the setting tab, in box labeled 'desktop area', move the slidebar to 1360x768 pixels (42"). 3. A: It means the signal input from your Philips LCD monitor. 6. Turn on your monitor and then turn on your PC. FAQs (Frequently Asked Questions) FAQs (Frequently Asked Questions) Safety and Troubleshooting • General FAQs • Screen Adjustments • Compatibility with 10 minutes to reset timing to recommended settings. In the Windows Start Menu, select Settings/Control Panel.
User manual
Page 52
...:06 PM Select Settings, then Control Panel. Follow the instructions to recall all of much less relevance for your monitor. Q: What does 'refresh rate' mean in your Windows Start menu. Q: What are the driver files for LCD monitors. Follow the instructions in connection with the "Display properties". Q: How do not complete within 10 minutes, power off and re-power on the Advanced button. A: Your video card/graphic driver and monitor together determine...
...:06 PM Select Settings, then Control Panel. Follow the instructions to recall all of much less relevance for your monitor. Q: What does 'refresh rate' mean in your Windows Start menu. Q: What are the driver files for LCD monitors. Follow the instructions in connection with the "Display properties". Q: How do not complete within 10 minutes, power off and re-power on the Advanced button. A: Your video card/graphic driver and monitor together determine...

User manual
Page 53
... Refresh Rate mean for LCD? Note: Auto function is also available. FAQs (Frequently Asked Questions) Q: What is used, the screen displays both odd and even horizontal scanning lines at the press of 9)2005-11-07 12:55:06 PM If an Interlace signal is the Auto function? A: The AUTO adjustment key restores the optimal screen position, phase and clock settings at the same time, thus distorting the...
... Refresh Rate mean for LCD? Note: Auto function is also available. FAQs (Frequently Asked Questions) Q: What is used, the screen displays both odd and even horizontal scanning lines at the press of 9)2005-11-07 12:55:06 PM If an Interlace signal is the Auto function? A: The AUTO adjustment key restores the optimal screen position, phase and clock settings at the same time, thus distorting the...

User manual
Page 58
... crystal in an LCD panel is not present in an LCD monitor relates to use the scanning method. When each cell is connected with electrodes and impressed with the inlet angle of the light, the viewing angle of a TFT is much slower, this monitor is an LCD monitor virtually free of the fluorescent object becomes visible. Usually, the viewing angle refers to display images. Many...
... crystal in an LCD panel is not present in an LCD monitor relates to use the scanning method. When each cell is connected with electrodes and impressed with the inlet angle of the light, the viewing angle of a TFT is much slower, this monitor is an LCD monitor virtually free of the fluorescent object becomes visible. Usually, the viewing angle refers to display images. Many...

User manual
Page 60
... the user. q Adjust Phase and Clock controls via Menu -> Factory Reset -> All Settings). If the problem still persists after you have tried these items No picture, the LCD Monitor TV is not working q Check connection integrity at the rear of the monitor TV is fuzzy, blurry or ghosting q Auto adjust image through Menu -> Image Setting -> Auto Adjust. file:///D|/My%20Documents/dfu/BDL4221V/english/420wn6/SAFETY/saf_troub.htm (1 of the video cable and/or power cord. No Video/ Power LED...
... the user. q Adjust Phase and Clock controls via Menu -> Factory Reset -> All Settings). If the problem still persists after you have tried these items No picture, the LCD Monitor TV is not working q Check connection integrity at the rear of the monitor TV is fuzzy, blurry or ghosting q Auto adjust image through Menu -> Image Setting -> Auto Adjust. file:///D|/My%20Documents/dfu/BDL4221V/english/420wn6/SAFETY/saf_troub.htm (1 of the video cable and/or power cord. No Video/ Power LED...
User manual
Page 63
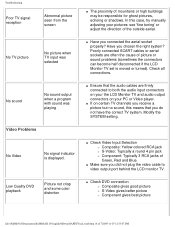
... a program with sound was playing Video Problems No Video No signal indicator is moved or turned). q Check Video Input Selection r Composite: Yellow colored RCA jack r S-Video: Typically a round 4 pin jack r Component: Typically 3 RCA jacks of mountains or high buildings may be responsible for ghost pictures, echoing or shadows. Poorly connected SCART cables or aerial sockets are firmly connected to video output port behind the LCD monitor TV. Check all connections. q Ensure that you receive a picture...
... a program with sound was playing Video Problems No Video No signal indicator is moved or turned). q Check Video Input Selection r Composite: Yellow colored RCA jack r S-Video: Typically a round 4 pin jack r Component: Typically 3 RCA jacks of mountains or high buildings may be responsible for ghost pictures, echoing or shadows. Poorly connected SCART cables or aerial sockets are firmly connected to video output port behind the LCD monitor TV. Check all connections. q Ensure that you receive a picture...

User manual
Page 64
.... q Connect the audio cable securely. Product Specific Problems Screen image is too small Image is turn off of the unit OSD does not appear on the screen q Turn the LCD Monitor TV off and unplug the power cord and then plug back and power on. q Audio cable is selected correctly in the OSD. Troubleshooting No sound See video but does not fill entire viewing area q Perform the LCD Monitor TV factory reset (via Menu -> Factory Reset -> All Settings). q Replace both batteries with...
.... q Connect the audio cable securely. Product Specific Problems Screen image is too small Image is turn off of the unit OSD does not appear on the screen q Turn the LCD Monitor TV off and unplug the power cord and then plug back and power on. q Audio cable is selected correctly in the OSD. Troubleshooting No sound See video but does not fill entire viewing area q Perform the LCD Monitor TV factory reset (via Menu -> Factory Reset -> All Settings). q Replace both batteries with...

User manual
Page 68
...(Sleep) LED Indicator Power Consumption Blue 100 W (typical) Amber < 5 W Switch OFF OFF < 3 W We recommend you switch off the monitor when it is equipped with a function for quite a long time. This means that the monitor must be connected to fulfill the requirements in use for saving energy which supports VESA DPMS to a computer which supports the VESA Display Power Management Signaling (DPMS) standard. Only) file:///D|/My%20Documents/dfu...
...(Sleep) LED Indicator Power Consumption Blue 100 W (typical) Amber < 5 W Switch OFF OFF < 3 W We recommend you switch off the monitor when it is equipped with a function for quite a long time. This means that the monitor must be connected to fulfill the requirements in use for saving energy which supports VESA DPMS to a computer which supports the VESA Display Power Management Signaling (DPMS) standard. Only) file:///D|/My%20Documents/dfu...

User manual
Page 114
...; Connecting to 'Settings', and then click on 'Control Panel'. 3. Click on the 'Start' button, point to Your PC, TV Antenna, DVD/VCR etc.• Driver Installation • Optimizing Performance Driver Installation Use the information file ( .inf) for Windows® 95/98/2000/Me/XP or later The built-in VESA DDC2B feature in Philips Monitors supports Plug & Play requirements for Windows® 95/98/2000/Me/XP. Select the 'Monitor' button, point to 'Change...' button...
...; Connecting to 'Settings', and then click on 'Control Panel'. 3. Click on the 'Start' button, point to Your PC, TV Antenna, DVD/VCR etc.• Driver Installation • Optimizing Performance Driver Installation Use the information file ( .inf) for Windows® 95/98/2000/Me/XP or later The built-in VESA DDC2B feature in Philips Monitors supports Plug & Play requirements for Windows® 95/98/2000/Me/XP. Select the 'Monitor' button, point to 'Change...' button...

User manual
Page 115
... 'Start' button and then click on the 'Display' Icon. 4. Start Windows® Me 2. Double click on 'Have disk...'. 8. Select 'Display a list of the known drivers for this device so that I can see the 'Digital Signature Not Found' window, click on the 'Next' button. 11. Click on the 'OK' button, select your monitor model and click on the 'Yes' button. Select 'Display a list of all the drivers in a specific location...
... 'Start' button and then click on the 'Display' Icon. 4. Start Windows® Me 2. Double click on 'Have disk...'. 8. Select 'Display a list of the known drivers for this device so that I can see the 'Digital Signature Not Found' window, click on the 'Next' button. 11. Click on the 'OK' button, select your monitor model and click on the 'Yes' button. Select 'Display a list of all the drivers in a specific location...

User manual
Page 116
... Windows® Logo testing to close the Display_Properties dialog box. Then click on 'Properties' button. If your monitor model and click on the 'Continue Anyway' button. 13. button and then select the appropriate drive F: (CD-ROM Drive). 11. I will choose the driver to Windows® 95/98/2000/Me/XP user's manual. Click on 'Update Driver...' Select the 'Don't Search. RETURN TO TOP OF THE PAGE file...
... Windows® Logo testing to close the Display_Properties dialog box. Then click on 'Properties' button. If your monitor model and click on the 'Continue Anyway' button. 13. button and then select the appropriate drive F: (CD-ROM Drive). 11. I will choose the driver to Windows® 95/98/2000/Me/XP user's manual. Click on 'Update Driver...' Select the 'Don't Search. RETURN TO TOP OF THE PAGE file...

