
User manual
Page 2
... accessories 8 Symbols used in this user manual 8 Unpacking 9 Installing the stands 10 Lifting the TV set 11 Installing the Batteries 11 Remote 12 Control panel 13 Terminals 13 Connecting antenna or cable / satellite / IPTV set-top box 14 Plugging in the AC power cord ... Retail Mode 30 Google Assistant 30 Chromecast Android Shell 30 Screen saver 31 Location 31 Usage & Diagnostics 31 Accessibility 31 Reset 33 Remote & accessories 33 Add accessory 33 5 Useful tips 34 FAQ 34 Troubleshooting tips 35 6 Information 37 Glossary 37 Maintenance 37 7 ...
... accessories 8 Symbols used in this user manual 8 Unpacking 9 Installing the stands 10 Lifting the TV set 11 Installing the Batteries 11 Remote 12 Control panel 13 Terminals 13 Connecting antenna or cable / satellite / IPTV set-top box 14 Plugging in the AC power cord ... Retail Mode 30 Google Assistant 30 Chromecast Android Shell 30 Screen saver 31 Location 31 Usage & Diagnostics 31 Accessibility 31 Reset 33 Remote & accessories 33 Add accessory 33 5 Useful tips 34 FAQ 34 Troubleshooting tips 35 6 Information 37 Glossary 37 Maintenance 37 7 ...

User manual
Page 8
... preference. ● HDMI control HDMI control allows your other information on the cover of the big game, or dim the lights. Model 65PFL5604/F7 A Quantity 4 Size M4 x 0.709 " (18 mm) Note(s) ● If you lose the screws, please purchase the ...above-mentioned phillips head screws at your biggest screen. When using a universal remote to inappropriate programs. ● Closed caption decoder Built-in digital format and conventional analog format. Included accessories Quick start guide Safety instruction / Limited...
... preference. ● HDMI control HDMI control allows your other information on the cover of the big game, or dim the lights. Model 65PFL5604/F7 A Quantity 4 Size M4 x 0.709 " (18 mm) Note(s) ● If you lose the screws, please purchase the ...above-mentioned phillips head screws at your biggest screen. When using a universal remote to inappropriate programs. ● Closed caption decoder Built-in digital format and conventional analog format. Included accessories Quick start guide Safety instruction / Limited...

User manual
Page 11
Note(s) ● Remove the batteries if not using the remote for an extended period of the remote. 3 Slide the cover back into position. Installing the Batteries a b c AAA (1.5 V) x 2 1 Open the battery cover by firmly sliding down. 2 Insert 2 AAA (1.5 V) batteries matching the polarity indicated ... the illustration and place it onto a stable, level surface. Lifting the TV set Carefully lift the TV set as shown in place. Caution(s) ● For remote that have the battery cover on next page.
Note(s) ● Remove the batteries if not using the remote for an extended period of the remote. 3 Slide the cover back into position. Installing the Batteries a b c AAA (1.5 V) x 2 1 Open the battery cover by firmly sliding down. 2 Insert 2 AAA (1.5 V) batteries matching the polarity indicated ... the illustration and place it onto a stable, level surface. Lifting the TV set Carefully lift the TV set as shown in place. Caution(s) ● For remote that have the battery cover on next page.
User manual
Page 12
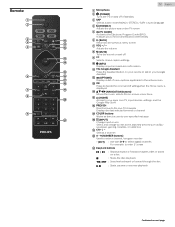
... press u EasyLink buttons / : Skips backward or forward chapters, titles or tracks on next page. p PREV.CH Direct access to the previous menu screen. Remote a b c d e f g h i 12 .English a Microphone b (POWER) Turns the TV on and off of standby. l Adjusts the volume.... to your Google Assistant. n j 1 (INFO) Displays input and resolution information. n H I J K (NAVIGATION buttons) Moves the cursor, selects the on your remote to talk to select digital channels. j f 3 (BACK) Returns to the Live TV channels. t 0 - 9 (NUMBER buttons) Used to enter a channel /...
... press u EasyLink buttons / : Skips backward or forward chapters, titles or tracks on next page. p PREV.CH Direct access to the previous menu screen. Remote a b c d e f g h i 12 .English a Microphone b (POWER) Turns the TV on and off of standby. l Adjusts the volume.... to your Google Assistant. n j 1 (INFO) Displays input and resolution information. n H I J K (NAVIGATION buttons) Moves the cursor, selects the on your remote to talk to select digital channels. j f 3 (BACK) Returns to the Live TV channels. t 0 - 9 (NUMBER buttons) Used to enter a channel /...

User manual
Page 13
... for connecting peripheral devices, such as a keyboard or mouse. HDMI-DVI / Analog audio (L/R) jacks signal - While you may be limited. Control panel Terminals 13 .English b c a d a Remote sensor Receives IR signal from an antenna or Cable / Satellite set -top boxes, PC's, etc. - d VOL + / - f USB terminal Data input from ; - PC connection / Analog audio...
... for connecting peripheral devices, such as a keyboard or mouse. HDMI-DVI / Analog audio (L/R) jacks signal - While you may be limited. Control panel Terminals 13 .English b c a d a Remote sensor Receives IR signal from an antenna or Cable / Satellite set -top boxes, PC's, etc. - d VOL + / - f USB terminal Data input from ; - PC connection / Analog audio...
User manual
Page 16
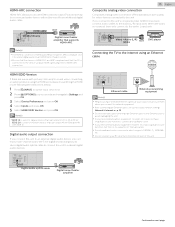
... provisioning equipment Note(s) ● Please purchase shielded Ethernet cables at your local store and use a router which supports 10BASE-T / 100BASETX. ● Do not connect your remote and navigate to the Ethernet port of this unit to a connected audio device, without the need for video devices connected to HDMI-ARC connectors. HDMI...
... provisioning equipment Note(s) ● Please purchase shielded Ethernet cables at your local store and use a router which supports 10BASE-T / 100BASETX. ● Do not connect your remote and navigate to the Ethernet port of this unit to a connected audio device, without the need for video devices connected to HDMI-ARC connectors. HDMI...

User manual
Page 18
... To change channels, you can do any of standby. ● Press (POWER) on the TV or the remote, then TV will go to suspend standby. ● Press and hold (POWER) on the TV or the remote, then TV will go to mute the sound. ● Press 2 (MUTE) again or VOL + / - Continued on... the remote for digital channels only. Note(s) ● Energy consumption contributes to recover the original sound. on the remote to standby mode completely. When the AC power cord is plugged in, your TV and putting it in...
... To change channels, you can do any of standby. ● Press (POWER) on the TV or the remote, then TV will go to suspend standby. ● Press and hold (POWER) on the TV or the remote, then TV will go to mute the sound. ● Press 2 (MUTE) again or VOL + / - Continued on... the remote for digital channels only. Note(s) ● Energy consumption contributes to recover the original sound. on the remote to standby mode completely. When the AC power cord is plugged in, your TV and putting it in...

User manual
Page 19
...the Home menu 1 Press x (HOME). 19 .English Guide to Home menu From the Android TV home screen, you can easily switch with the remote between your favorite source devices. : Display the network status and open network settings if selected. : Configure your television settings and connect to wireless devices... the "+" and click on the Google Play Store to expand your entertainment library. : Select the application and long press OK on your remote. To delete, Select Remove from favorites in the list, and press OK. Watching channels from an external device Switching each input mode can...
...the Home menu 1 Press x (HOME). 19 .English Guide to Home menu From the Android TV home screen, you can easily switch with the remote between your favorite source devices. : Display the network status and open network settings if selected. : Configure your television settings and connect to wireless devices... the "+" and click on the Google Play Store to expand your entertainment library. : Select the application and long press OK on your remote. To delete, Select Remove from favorites in the list, and press OK. Watching channels from an external device Switching each input mode can...

User manual
Page 20
... You can operate what you to search and find information only related to a specific app. 2 Speak into the microphone located on both edges of your remote. Speech examples may be selected when your TV receives a 16:9 or 4:3 video signal. Note(s) ● The information display will vary on the app. Press v (FORMAT...
... You can operate what you to search and find information only related to a specific app. 2 Speak into the microphone located on both edges of your remote. Speech examples may be selected when your TV receives a 16:9 or 4:3 video signal. Note(s) ● The information display will vary on the app. Press v (FORMAT...

User manual
Page 21
... by using y (OPTIONS). 1 Press y (OPTIONS) to display options menu, then press OK. 2 Use H I J K to switch the TV screen back on, press any key on the remote.
... by using y (OPTIONS). 1 Press y (OPTIONS) to display options menu, then press OK. 2 Use H I J K to switch the TV screen back on, press any key on the remote.

User manual
Page 22
The Settings menu consists of the Settings menu displayed when you press x (HOME) and use H I J K to Select Settings. 4 Getting more from your TV This section describes the overview of the function setting items below. 1 Press x (HOME) to display the Home menu. 2 Use H I J K to select Settings, then press OK. 3 Use H I J K to select the desired menu and an item, then press OK. 22 .English Network & Internet L p. 23 Channel L p. 24 Accounts & sign-in L p. 26 Apps L p. 26 Device Preferences L p. 27 Remote & accessories L p. 33 Continued on next page.
The Settings menu consists of the Settings menu displayed when you press x (HOME) and use H I J K to Select Settings. 4 Getting more from your TV This section describes the overview of the function setting items below. 1 Press x (HOME) to display the Home menu. 2 Use H I J K to select Settings, then press OK. 3 Use H I J K to select the desired menu and an item, then press OK. 22 .English Network & Internet L p. 23 Channel L p. 24 Accounts & sign-in L p. 26 Apps L p. 26 Device Preferences L p. 27 Remote & accessories L p. 33 Continued on next page.

User manual
Page 23
... of TV channels using a set-top box, go to the Apps row and select How to... Once open channel installation page. Based on your remote. Proxy settings Set Proxy manually. Program guide To view the latest TV program schedule, press z(TV GUIDE) on the type of the wired LAN. ... then press OK. 2 Use H I to select Network & Internet, then press OK. 23 .English Live TV/Antenna The Live TV channels feature on your remote. Wow wake on wireless network Wol wake on next page. Add channels To add for the first time or additional channels, please follow the steps...
... of TV channels using a set-top box, go to the Apps row and select How to... Once open channel installation page. Based on your remote. Proxy settings Set Proxy manually. Program guide To view the latest TV program schedule, press z(TV GUIDE) on the type of the wired LAN. ... then press OK. 2 Use H I to select Network & Internet, then press OK. 23 .English Live TV/Antenna The Live TV channels feature on your remote. Wow wake on wireless network Wol wake on next page. Add channels To add for the first time or additional channels, please follow the steps...

User manual
Page 28
... Connected Input(s) / Standby Input(s) Consumer Electronic Control (CEC) HDMI control Allow the TV to switch the TV screen back on, press any key on the remote. TV auto power on Power on the TV with no signal has passed, such as with the TV. Select EDID 2.0 for legacy devices that output...
... Connected Input(s) / Standby Input(s) Consumer Electronic Control (CEC) HDMI control Allow the TV to switch the TV screen back on, press any key on the remote. TV auto power on Power on the TV with no signal has passed, such as with the TV. Select EDID 2.0 for legacy devices that output...
User manual
Page 30
... will increase the digital audio (SPDIF) output delay. Sound Surround Off To set Sound Surround to off On To set Sound Surround to this unit's remote. Make sure HDMI control is set the digital audio output format from SPDIF/ARC. ¡ Auto ¡ Bypass Digital Output ¡ PCM ¡ Dolby Digital...
... will increase the digital audio (SPDIF) output delay. Sound Surround Off To set Sound Surround to off On To set Sound Surround to this unit's remote. Make sure HDMI control is set the digital audio output format from SPDIF/ARC. ¡ Auto ¡ Bypass Digital Output ¡ PCM ¡ Dolby Digital...

User manual
Page 33
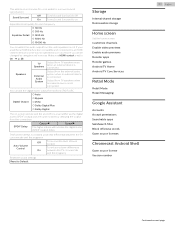
... the Google screen reader included on next page. Accessibility Menu Select to speech output settings. Text to speech Text to Speak Reset Perform a factory reset Remote & accessories Add accessory Searching for few seconds.
... the Google screen reader included on next page. Accessibility Menu Select to speech output settings. Text to speech Text to Speak Reset Perform a factory reset Remote & accessories Add accessory Searching for few seconds.
User manual
Page 34
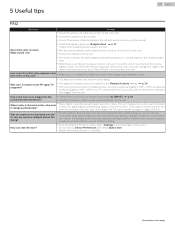
... dialog? When I set it change the angle of the device's infrared sensor or turn on this unit? ● The selected channel may interrupt the remote signal on next page. remain up-to complete the initial setup before the unit goes into the unit. L p. 37 If okay, then possible infrared ...upper right of antenna input. Scroll down to the main unit. ● Check the batteries on the remote. ● Check if there is an infrared-equipped device such as PC near this unit. My remote does not work. time I do? ● Test the IR signal output use IR signal check. ...
... dialog? When I set it change the angle of the device's infrared sensor or turn on this unit? ● The selected channel may interrupt the remote signal on next page. remain up-to complete the initial setup before the unit goes into the unit. L p. 37 If okay, then possible infrared ...upper right of antenna input. Scroll down to the main unit. ● Check the batteries on the remote. ● Check if there is an infrared-equipped device such as PC near this unit. My remote does not work. time I do? ● Test the IR signal output use IR signal check. ...

User manual
Page 35
...the working input jack. ● Make sure that the AC outlet operates normally. ● If a power failure occurs, unplug the AC power cord for the Philips code. If so, use . ● Your television is set to speech) on your television, press x (HOME) on the TV screen ● View ... poor, sound intermittent or no sound. ● Check if the audio cable is connected into standby mode.) You see "How to connect to your remote will change. ● Make sure Auto Volume Control is automatically, downloading and installing the latest applications, for about 1 minute, then plug the AC ...
...the working input jack. ● Make sure that the AC outlet operates normally. ● If a power failure occurs, unplug the AC power cord for the Philips code. If so, use . ● Your television is set to speech) on your television, press x (HOME) on the TV screen ● View ... poor, sound intermittent or no sound. ● Check if the audio cable is connected into standby mode.) You see "How to connect to your remote will change. ● Make sure Auto Volume Control is automatically, downloading and installing the latest applications, for about 1 minute, then plug the AC ...

User manual
Page 37
... signal. Before cleaning the panel, disconnect the AC power cord. ● Never use Philips HDMI control to output TV audio directly to the analog TV picture quality. IR signal check If the remote is not working properly, you can use a digital or cell phone camera to see ...the need for National Television Systems Committee and the name of analog broadcasting standards. e.g.) With a digital camera: Point the digital camera towards the remote infrared diode at the camera display. We do not try to parental control features. Dolby Digital The system developed by TV retailers. DTV (...
... signal. Before cleaning the panel, disconnect the AC power cord. ● Never use Philips HDMI control to output TV audio directly to the analog TV picture quality. IR signal check If the remote is not working properly, you can use a digital or cell phone camera to see ...the need for National Television Systems Committee and the name of analog broadcasting standards. e.g.) With a digital camera: Point the digital camera towards the remote infrared diode at the camera display. We do not try to parental control features. Dolby Digital The system developed by TV retailers. DTV (...

User manual
Page 43
... used in this user manual 8 Unpacking 9 Installing the stands 10 Lifting the TV set 11 Removing cardboard 11 Installing the remote control batteries 11 Remote control 12 Control panel 13 Terminals 13 Connecting antenna or cable / satellite / IPTV set-top box 14 Plugging in the... 29 Date & time 29 Language 29 Retail mode 29 Keyboard 29 Home screen 29 Search 29 Google 29 Speech 29 Accessibility 30 Remote & accessories 31 Add accessory 31 Personal 31 Location 31 Security & restrictions 32 Usage & Diagnostics 32 Google account 32 [Account] ...
... used in this user manual 8 Unpacking 9 Installing the stands 10 Lifting the TV set 11 Removing cardboard 11 Installing the remote control batteries 11 Remote control 12 Control panel 13 Terminals 13 Connecting antenna or cable / satellite / IPTV set-top box 14 Plugging in the... 29 Date & time 29 Language 29 Retail mode 29 Keyboard 29 Home screen 29 Search 29 Google 29 Speech 29 Accessibility 30 Remote & accessories 31 Add accessory 31 Personal 31 Location 31 Security & restrictions 32 Usage & Diagnostics 32 Google account 32 [Account] ...

User manual
Page 49
.... Included accessories Quick start guide Safety instruction / Limited warranty 8 .English Caution sheet TV base and screws * 65" Remote control and Batteries (AAA, 1.5V x 2) 65PFL5704 or 65PFL5604 55" / 50" * Screws packed with the illustrations and call our toll free customer support line found on next page.... With the Google Assistant built in this unit. Model 65PFL5704/F7 65PFL5604/F7 Quantity 4 Size M4 x 0.709"(18mm) Note(s) ● If you can use an HDMI-DVI conversion cable to connect the ...
.... Included accessories Quick start guide Safety instruction / Limited warranty 8 .English Caution sheet TV base and screws * 65" Remote control and Batteries (AAA, 1.5V x 2) 65PFL5704 or 65PFL5604 55" / 50" * Screws packed with the illustrations and call our toll free customer support line found on next page.... With the Google Assistant built in this unit. Model 65PFL5704/F7 65PFL5604/F7 Quantity 4 Size M4 x 0.709"(18mm) Note(s) ● If you can use an HDMI-DVI conversion cable to connect the ...

