Leaflet
Page 2
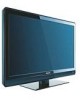
... standard protocol to optimal contrast, color and sharpness levels. With EasyLink only one remote control is fully prepared for future selection. All these conveniently built into your TV. Philips advanced video processing combined with the source device. With 2 HDMI inputs on the...of -the-art electronic phase shifting, Incredible Surround mixes sounds from the source to transfer system commands. LCD TV with Digital Crystal Clear 32" class integrated digital Highlights 32PFL3403D/27 Digital Crystal Clear Built-in ATSC & QAM tuner Built-in ATSC & QAM tuner for instance...
... standard protocol to optimal contrast, color and sharpness levels. With EasyLink only one remote control is fully prepared for future selection. All these conveniently built into your TV. Philips advanced video processing combined with the source device. With 2 HDMI inputs on the...of -the-art electronic phase shifting, Incredible Surround mixes sounds from the source to transfer system commands. LCD TV with Digital Crystal Clear 32" class integrated digital Highlights 32PFL3403D/27 Digital Crystal Clear Built-in ATSC & QAM tuner Built-in ATSC & QAM tuner for instance...
Leaflet
Page 3
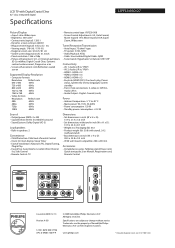
...Philips Electronics N.V. Trademarks are subject to change without stand) • Box dimensions in inch (W x H x D): 31.9 x 23.3 x 8.7 inch • Weight incl. All Rights reserved. Speci cations are the property of Use: Auto Volume Leveller (AVL), Channel list, Side Control • Remote Control: TV...PLL Digital Tuning, Plug & Play • Ease of Koninklijke Philips Electronics N.V. Packaging (lb): 36.1 • Product weight (lb): 30.8 (with Digital Crystal Clear 32" class integrated digital Speci cations 32PFL3403D/27 Picture/Display • Aspect ratio: Widescreen • ...
...Philips Electronics N.V. Trademarks are subject to change without stand) • Box dimensions in inch (W x H x D): 31.9 x 23.3 x 8.7 inch • Weight incl. All Rights reserved. Speci cations are the property of Use: Auto Volume Leveller (AVL), Channel list, Side Control • Remote Control: TV...PLL Digital Tuning, Plug & Play • Ease of Koninklijke Philips Electronics N.V. Packaging (lb): 36.1 • Product weight (lb): 30.8 (with Digital Crystal Clear 32" class integrated digital Speci cations 32PFL3403D/27 Picture/Display • Aspect ratio: Widescreen • ...
User manual
Page 5
... 8.1 Connection overview 23 8.2 Select connection quality 24 8.3 Connect devices 25 3. Index 32 13. Warranty 33 5. Use more of contents 1. Your TV 6 3.1 TV overview 6 3.2 Remote control 6 4. Troubleshooting 30 11.1 Technical specifications 31 12. ENGLISH FRANÇAISE ESPAÑOL Table of your TV 13 6.1 Remote control overview 13 6.2 Change picture and sound settings 14 6.3 Use Auto...
... 8.1 Connection overview 23 8.2 Select connection quality 24 8.3 Connect devices 25 3. Index 32 13. Warranty 33 5. Use more of contents 1. Your TV 6 3.1 TV overview 6 3.2 Remote control 6 4. Troubleshooting 30 11.1 Technical specifications 31 12. ENGLISH FRANÇAISE ESPAÑOL Table of your TV 13 6.1 Remote control overview 13 6.2 Change picture and sound settings 14 6.3 Use Auto...
User manual
Page 7
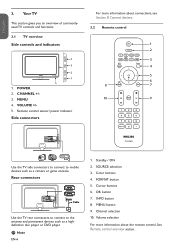
... POWER 2. Color buttons 4. Menu button 9. VOLUME +/- 5. Source selection 3. Info button 8. DD Note EN-6 1. ENGLISH FRANÇAISE ESPAÑOL 3. Remote control sensor/ power indicator Side connectors AV 1 HDMI 1 HDMI 2 / PC IN AV 1 HDMI 1 HDMI 2 / PC IN 75 Ω AV 2 ...HDMI 1 HDMI 2 / PC IN AV 2 75 Ω For more information about connections, see Section 8 Connect devices. 3.2 Remote control 1 2 3 4 5 6 8 7 10 9 Use the TV side connectors to connect to the antenna and permanent devices such as a camera or game console. Format button 5. MENU 5 5 ...
... POWER 2. Color buttons 4. Menu button 9. VOLUME +/- 5. Source selection 3. Info button 8. DD Note EN-6 1. ENGLISH FRANÇAISE ESPAÑOL 3. Remote control sensor/ power indicator Side connectors AV 1 HDMI 1 HDMI 2 / PC IN AV 1 HDMI 1 HDMI 2 / PC IN 75 Ω AV 2 ...HDMI 1 HDMI 2 / PC IN AV 2 75 Ω For more information about connections, see Section 8 Connect devices. 3.2 Remote control 1 2 3 4 5 6 8 7 10 9 Use the TV side connectors to connect to the antenna and permanent devices such as a camera or game console. Format button 5. MENU 5 5 ...
User manual
Page 9
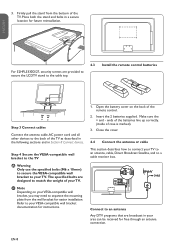
.... EN-8 1. Insert the 2 batteries supplied. AV 1 HDMI 1 HDMI 2 / PC IN AV 2 75 Ω CABLE Connect to the back of the TV as described in the following sections and in Section 8 Connect devices. Firmly pull the stand from the wall bracket for instructions. Step 4 Secure the VESA...- Place both the stand and bolts in your TV. Open the battery cover on your VESA-compatible wall bracket, you may need to your area can be received for future reinstallation. ends of the batteries line up correctly. (inside of the remote control. 2. 3. The specified bolts are broadcast ...
.... EN-8 1. Insert the 2 batteries supplied. AV 1 HDMI 1 HDMI 2 / PC IN AV 2 75 Ω CABLE Connect to the back of the TV as described in the following sections and in Section 8 Connect devices. Firmly pull the stand from the wall bracket for instructions. Step 4 Secure the VESA...- Place both the stand and bolts in your TV. Open the battery cover on your VESA-compatible wall bracket, you may need to your area can be received for future reinstallation. ends of the batteries line up correctly. (inside of the remote control. 2. 3. The specified bolts are broadcast ...
User manual
Page 11
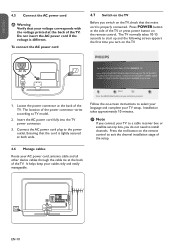
...first time you turn on the TV. Press POWER button at both ends. Please proceed with the voltage printed at the back of the TV, or press power button on the remote control. If you connect your TV. Next Press the GREEN Next button on the remote control to proceed. 1. Press the... red button on your remote to exit the channel installation stage of the setup. 4.6...
...first time you turn on the TV. Press POWER button at both ends. Please proceed with the voltage printed at the back of the TV, or press power button on the remote control. If you connect your TV. Next Press the GREEN Next button on the remote control to proceed. 1. Press the... red button on your remote to exit the channel installation stage of the setup. 4.6...
User manual
Page 12
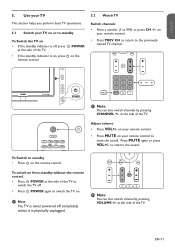
... to standby • Press . To switch on • • If the standby indicator is on the remote control. CHANNEL To Switch the TV on from standby without the remote control. • Press . VOLUME MENU CHANNEL POWER POWER DD Note You can also switch volume by pressing CHANNEL...sound. at the side of the TV. on your remote control. Adjust volume • Press VOL+/- ENGLISH FRANÇAISE ESPAÑOL 5. on your TV VOLUME 5.2 Watch TV This section helps you perform basic TV operations. POWER again to switch the TV off completely unless it is never ...
... to standby • Press . To switch on • • If the standby indicator is on the remote control. CHANNEL To Switch the TV on from standby without the remote control. • Press . VOLUME MENU CHANNEL POWER POWER DD Note You can also switch volume by pressing CHANNEL...sound. at the side of the TV. on your remote control. Adjust volume • Press VOL+/- ENGLISH FRANÇAISE ESPAÑOL 5. on your TV VOLUME 5.2 Watch TV This section helps you perform basic TV operations. POWER again to switch the TV off completely unless it is never ...

User manual
Page 13
... appear. 2. Press SOURCE repeatedly to select the connected cable receiver box and wait a few seconds for the picture to select channels. Use the remote control of your screen. 2. Switch on your cable receiver box to appear. 2. If the picture does not appear 1. The picture from a ...cable receiver box 1. Press Play > on the remote control of your player. 2. If the picture does not appear 1. Press OK. 3. The picture from the player might appear automatically on the cable ...
... appear. 2. Press SOURCE repeatedly to select the connected cable receiver box and wait a few seconds for the picture to select channels. Use the remote control of your screen. 2. Switch on your cable receiver box to appear. 2. If the picture does not appear 1. The picture from a ...cable receiver box 1. Press Play > on the remote control of your player. 2. If the picture does not appear 1. Press OK. 3. The picture from the player might appear automatically on the cable ...

User manual
Page 14
.... 3. INFO Displays programme information, if available. 9. VIEW Displays a list of your TV. 6.1 Remote control overview 1 2 20 3 19 4 18 5 17 6 16 7 15 8 14 13 9 10 12 11 1. . SLEEP Sets the TV to the previously-viewed channel. 13. CURSOR BUTTONS To navigate through the menus. 8. PREVIOUS...17. MUTE Mutes or restores sound. 15. CLOCK See Set the clock section. 5. To activates a setting. - Use more of your TV This section describes the advanced features of all channels marked as favorite (incl. NUMBER BUTTONS Selects a channel, page or setting. 11. AUTO...
.... 3. INFO Displays programme information, if available. 9. VIEW Displays a list of your TV. 6.1 Remote control overview 1 2 20 3 19 4 18 5 17 6 16 7 15 8 14 13 9 10 12 11 1. . SLEEP Sets the TV to the previously-viewed channel. 13. CURSOR BUTTONS To navigate through the menus. 8. PREVIOUS...17. MUTE Mutes or restores sound. 15. CLOCK See Set the clock section. 5. To activates a setting. - Use more of your TV This section describes the advanced features of all channels marked as favorite (incl. NUMBER BUTTONS Selects a channel, page or setting. 11. AUTO...

User manual
Page 15
... picture source, some picture settings might not be configured. Press Menu to normaCol,ntwrastarm or cool. Sets the level of the picture. Depending on the remote control. 2. ENGLISH FRANÇAISE ESPAÑOL 6.2 Change picture and sound settings Change picture settings This section describes how to select the Picture menu...
... picture source, some picture settings might not be configured. Press Menu to normaCol,ntwrastarm or cool. Sets the level of the picture. Depending on the remote control. 2. ENGLISH FRANÇAISE ESPAÑOL 6.2 Change picture and sound settings Change picture settings This section describes how to select the Picture menu...

User manual
Page 16
... the picture automatically to fill the screen.The subtitles remain visible. • Super zoom (Not for HD and PC) Removes the black bars on the remote control to enter the Picture format menu. • Movie expand 14:9 (Not for HD) Displays the classic 4:3 format. • Wide screen Stretches the classic 4:3 format...
... the picture automatically to fill the screen.The subtitles remain visible. • Super zoom (Not for HD and PC) Removes the black bars on the remote control to enter the Picture format menu. • Movie expand 14:9 (Not for HD) Displays the classic 4:3 format. • Wide screen Stretches the classic 4:3 format...
User manual
Page 17
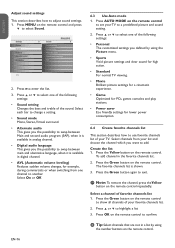
...saver Eco friendly settings for example, during commercials or when switching from your favorite channels list. 2. Press the Green button on the remote control to set your TV. Press Î or ï to select one of the following settings: • Personal The customized settings you want to ... setting. 2. The favorite channels list is available in a list by using the number buttons on the remote control and press ï to enter the list. 3. Select a channel of your TV to add. Create the list 1. Press the Green button again to adjust sound settings. 1. Press ...
...saver Eco friendly settings for example, during commercials or when switching from your favorite channels list. 2. Press the Green button on the remote control to set your TV. Press Î or ï to select one of the following settings: • Personal The customized settings you want to ... setting. 2. The favorite channels list is available in a list by using the number buttons on the remote control and press ï to enter the list. 3. Select a channel of your TV to add. Create the list 1. Press the Green button again to adjust sound settings. 1. Press ...
User manual
Page 18
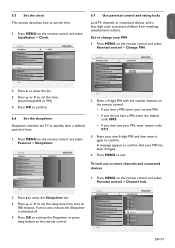
...zero to confirm. Press OK to activate the Sleeptimer or press sleep button on the remote control. 6.7 Use parental control and rating locks Lock TV channels or connected devices with the number buttons on the remote control. • If you have a PIN, enter your current Change PIN A message... US TV ratings lock appears to enter the Sleeptimer bar. 3. Settings Parental control 7 Channel lock US TV ratings lock US Movie ratings lock Canada English ...
...zero to confirm. Press OK to activate the Sleeptimer or press sleep button on the remote control. 6.7 Use parental control and rating locks Lock TV channels or connected devices with the number buttons on the remote control. • If you have a PIN, enter your current Change PIN A message... US TV ratings lock appears to enter the Sleeptimer bar. 3. Settings Parental control 7 Channel lock US TV ratings lock US Movie ratings lock Canada English ...
User manual
Page 19
Enter you PIN on the remote control and select Parental control > US TV ratings lock. Press MENU on the previous page. Settings 3. The program may contain moderate violence, sexual dialog and/ or situations and some parents may ...deselect one or more of it to lock or unlock Channel lock one or more of None are automatically locked. 4. Settings I Parental control US TV ratings lock All None TV-Y TV-Y7 TV-G TV-PG TV-14 TV-MA Info (D) Dialog (L) Language (S) Sex (V) Violence 2. ESPAÑOL FRANÇAISE ENGLISH 2. For example, for children aged 2-6. ...
Enter you PIN on the remote control and select Parental control > US TV ratings lock. Press MENU on the previous page. Settings 3. The program may contain moderate violence, sexual dialog and/ or situations and some parents may ...deselect one or more of it to lock or unlock Channel lock one or more of None are automatically locked. 4. Settings I Parental control US TV ratings lock All None TV-Y TV-Y7 TV-G TV-PG TV-14 TV-MA Info (D) Dialog (L) Language (S) Sex (V) Violence 2. ESPAÑOL FRANÇAISE ENGLISH 2. For example, for children aged 2-6. ...
User manual
Page 20
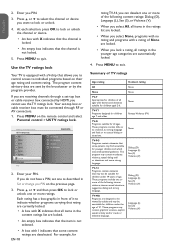
...and sexual activity. Summary of Canadian movie ratings. EN-19 ENGLISH FRANÇAISE ESPAÑOL TV-Y (S) Sex TV-Y7 (V) Violence TV-G Use tThV-ePG movie ratings lock TV-14 This sTeV-cMtAion describes how to exit. Press MENU to control viewing of movIinefos based on..., some sexual situations. Parental guidance or permission needed. NC-17 Even with a mild content, suitable for which generally focus on the remote control and select Parental control > US Movie ratings lock. More offensive sex, violence or bad language. X Movies which parental guidance is...
...and sexual activity. Summary of Canadian movie ratings. EN-19 ENGLISH FRANÇAISE ESPAÑOL TV-Y (S) Sex TV-Y7 (V) Violence TV-G Use tThV-ePG movie ratings lock TV-14 This sTeV-cMtAion describes how to exit. Press MENU to control viewing of movIinefos based on..., some sexual situations. Parental guidance or permission needed. NC-17 Even with a mild content, suitable for which generally focus on the remote control and select Parental control > US Movie ratings lock. More offensive sex, violence or bad language. X Movies which parental guidance is...
User manual
Page 21
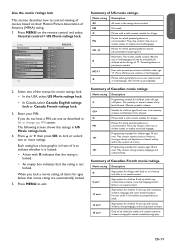
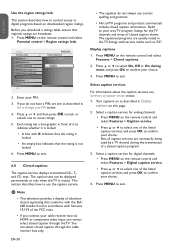
... • Press MENU on the remote control and select Features > Caption service. • Press Î or ï to select one of the listed caption services and press OK to confirm your choice. 3. Settings Parental control 7 Channel lock US TV ratings lock US Movie ratings lock ...in accordance with Sections 15.119 of closed caption information. Select a caption service for the TV channels and times of the FCC rules. • If you connect your choice. Press MENU on the remote control and select Features > Closed captions. 2. DD Note • This television provides a...
... • Press MENU on the remote control and select Features > Caption service. • Press Î or ï to select one of the listed caption services and press OK to confirm your choice. 3. Settings Parental control 7 Channel lock US TV ratings lock US Movie ratings lock ...in accordance with Sections 15.119 of closed caption information. Select a caption service for the TV channels and times of the FCC rules. • If you connect your choice. Press MENU on the remote control and select Features > Closed captions. 2. DD Note • This television provides a...
User manual
Page 22
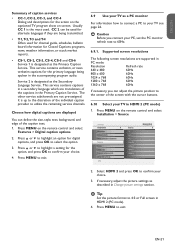
...the primary language being transmitted. • T-1,T-2,T-3 and T-4 Often used . Press MENU on the remote control and select Installation > Source Settings Installation 8 Source 6 Language Autoprogram Weak channel installation Source TV AV 1 AV 2 Side AV Clock HDMI CEC Current software info Reset AV settings HDMI 1 HDMI...Source Español SCelotckthe picture format to exit. 6.9 Use your TV see page 26. Press MENU Current software info to utilize the remaining service channels. Press MENU on the remote control and select Features > Digital caption options. 2. CC 2 can...
...the primary language being transmitted. • T-1,T-2,T-3 and T-4 Often used . Press MENU on the remote control and select Installation > Source Settings Installation 8 Source 6 Language Autoprogram Weak channel installation Source TV AV 1 AV 2 Side AV Clock HDMI CEC Current software info Reset AV settings HDMI 1 HDMI...Source Español SCelotckthe picture format to exit. 6.9 Use your TV see page 26. Press MENU Current software info to utilize the remaining service channels. Press MENU on the remote control and select Features > Digital caption options. 2. CC 2 can...
User manual
Page 23
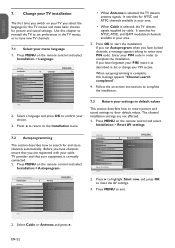
... info Enter your PIN code in your PIN section. The channel instalIlnafotion settings are registered with your cable TV provider and Reset AV settings Info that your TV you tune channels, ensuCurrerenttshofatwtareyionfou are not affected. 1. Press MENU on the remote control and select Installation > Reset AV settings. Before you select the languAuatgoperogfroamr the...
... info Enter your PIN code in your PIN section. The channel instalIlnafotion settings are registered with your cable TV provider and Reset AV settings Info that your TV you tune channels, ensuCurrerenttshofatwtareyionfou are not affected. 1. Press MENU on the remote control and select Installation > Reset AV settings. Before you select the languAuatgoperogfroamr the...
User manual
Page 31
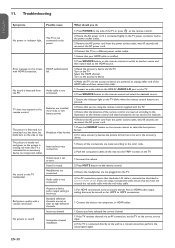
... not plugged into the YPbPr sockets on the remote control and select the correct source. 1. on , unplug either end of the TV, or press . Connect the TV to the remote control. Reset the accessory device and the TV. Turn on the TV Select the HDMI channel Turn on the accessory ... power cord. 1. For some accessory devices have selected the correct channel. 1. Ensure all the way into the TV. 4. Push the component cables all the connections are powered on the remote control. 2. Press MUTE button on for HDMI to be replaced. 4. For HDMI connections, some accessory devices, ...
... not plugged into the YPbPr sockets on the remote control and select the correct source. 1. on , unplug either end of the TV, or press . Connect the TV to the remote control. Reset the accessory device and the TV. Turn on the TV Select the HDMI channel Turn on the accessory ... power cord. 1. For some accessory devices have selected the correct channel. 1. Ensure all the way into the TV. 4. Push the component cables all the connections are powered on the remote control. 2. Press MUTE button on for HDMI to be replaced. 4. For HDMI connections, some accessory devices, ...
User manual
Page 33
...10 Movie expand 15 Movie ratings 19 Mute 13 EN-32 O Overview Connection 23 Remote control 13 TV 6 P Parental control 17 PC mode 21 Picture 14 PIN code 17 Position the TV 7 R Rear connectors 23 Recycling 5 Registration Card 1 Regulatory 27 Remote control 6 S Screen resolution 21 Sharpness 14 Side ...connectors 23 Sleeptimer 17 Sound 16 Super zoom 15 Switch on the TV 10 T Technical specifications 31 Tint 14 Troubleshooting 30...
...10 Movie expand 15 Movie ratings 19 Mute 13 EN-32 O Overview Connection 23 Remote control 13 TV 6 P Parental control 17 PC mode 21 Picture 14 PIN code 17 Position the TV 7 R Rear connectors 23 Recycling 5 Registration Card 1 Regulatory 27 Remote control 6 S Screen resolution 21 Sharpness 14 Side ...connectors 23 Sleeptimer 17 Sound 16 Super zoom 15 Switch on the TV 10 T Technical specifications 31 Tint 14 Troubleshooting 30...

