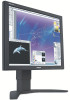

Brochure
Page 2
...screen. Fast response time Faster response time delivers improved display of Koninklijke Philips Electronics N.V. Thanks to 40 °C • Power supply: 100... AV inputs accommodate a variety of an analog signal for a theater-like audio experience. 32MF605W/17 32" LCD HD flat TV Product specifications Picture/Display • Aspect ratio: 16:9 ...Ease of Use: Auto Volume Leveller (AVL), Smart Picture Control, Smart Sound Control, Closed Captioning Full Text • Remote control type: RC1112713/17B • Remote Control: TV • Screen Format Adjustments: 4:3, Superwide, Widescreen...
...screen. Fast response time Faster response time delivers improved display of Koninklijke Philips Electronics N.V. Thanks to 40 °C • Power supply: 100... AV inputs accommodate a variety of an analog signal for a theater-like audio experience. 32MF605W/17 32" LCD HD flat TV Product specifications Picture/Display • Aspect ratio: 16:9 ...Ease of Use: Auto Volume Leveller (AVL), Smart Picture Control, Smart Sound Control, Closed Captioning Full Text • Remote control type: RC1112713/17B • Remote Control: TV • Screen Format Adjustments: 4:3, Superwide, Widescreen...

Brochure
Page 3
...32MF605W/17 32" LCD HD flat TV Product specifications (continued) • Set dimensions with stand (W x H x D): 925 x 548 x 213 mm • Set dimensions with stand in inch (W x H x D): 36.4 x 21.6 x 8.4 inch Accessories • Included Accessories: Batteries for remote control, Power cord, Quick Use Guide, Remote Control..., Right angle antenna adaptor, User Manual, Warranty certificate Date of issue 2007 07 17 Version: 2.0 12 NC: 8639 000 16051 UPC: 0 37849 95944 2 Specifications are the property of Koninklijke Philips ...
...32MF605W/17 32" LCD HD flat TV Product specifications (continued) • Set dimensions with stand (W x H x D): 925 x 548 x 213 mm • Set dimensions with stand in inch (W x H x D): 36.4 x 21.6 x 8.4 inch Accessories • Included Accessories: Batteries for remote control, Power cord, Quick Use Guide, Remote Control..., Right angle antenna adaptor, User Manual, Warranty certificate Date of issue 2007 07 17 Version: 2.0 12 NC: 8639 000 16051 UPC: 0 37849 95944 2 Specifications are the property of Koninklijke Philips ...

User Manual
Page 4
...block viewing of available channels. On-screen Menus: Helpful messages (in and disposed of as on The Wall 6 Basic TV and Remote Control Operations 7 Remote Control 8 Antenna Connection 9 Connecting the Power cord 9 Basic Cable TV Connection 9 Cable Box Connections 10 VCR, DVD Player, or other...Language Settings 17 Tuner Mode Control 18 Auto Program (Setting Up Channels 19 Channel Edit Control 20 Factory Reset 21 Smart Picture and Smart Sound Smart Picture Control 22 Smart Sound Control 22 Picture Menu TV Picture Menu Controls 23 Sound Menu TV Sound Menu Controls 24 Features...
...block viewing of available channels. On-screen Menus: Helpful messages (in and disposed of as on The Wall 6 Basic TV and Remote Control Operations 7 Remote Control 8 Antenna Connection 9 Connecting the Power cord 9 Basic Cable TV Connection 9 Cable Box Connections 10 VCR, DVD Player, or other...Language Settings 17 Tuner Mode Control 18 Auto Program (Setting Up Channels 19 Channel Edit Control 20 Factory Reset 21 Smart Picture and Smart Sound Smart Picture Control 22 Smart Sound Control 22 Picture Menu TV Picture Menu Controls 23 Sound Menu TV Sound Menu Controls 24 Features...

User Manual
Page 7
...lid. 2 MENU OK SOURCE PIP CC 3 6 5 7 7 Or, press VOLUME - to select channels. 4 Point the remote control toward on the front of the LCD TV when operating the LCD TV with the remote. 2 3 1 4 BATTERY INSTALLATION 5 Remove the battery compartment lid on the LCD TV. 2 Press VOLUME + to lower ...the sound level. 3 Press CH+ or CH- Be sure the (+) and (-) ends of the remote. 6 Place two AAA batteries in the remote. to increase the sound level...
...lid. 2 MENU OK SOURCE PIP CC 3 6 5 7 7 Or, press VOLUME - to select channels. 4 Point the remote control toward on the front of the LCD TV when operating the LCD TV with the remote. 2 3 1 4 BATTERY INSTALLATION 5 Remove the battery compartment lid on the LCD TV. 2 Press VOLUME + to lower ...the sound level. 3 Press CH+ or CH- Be sure the (+) and (-) ends of the remote. 6 Place two AAA batteries in the remote. to increase the sound level...

User Manual
Page 8
... Press repeatedly to turn the LCD TV on or off . Channel button Press to confirm the option you selected in the onscreen menu. REMOTE CONTROL Number buttons Press to change the size of the desired channel. Sleep button Press to set the LCD TV to select among the four screen...
... Press repeatedly to turn the LCD TV on or off . Channel button Press to confirm the option you selected in the onscreen menu. REMOTE CONTROL Number buttons Press to change the size of the desired channel. Sleep button Press to set the LCD TV to select among the four screen...

User Manual
Page 10
... the S-Video cable to connect the Cable Box's S-Video Out jacks to the TV's Video and Audio In jacks. Use the SOURCE button on the remote control to select AV 1 (or AV2, AV3, S-Video1, or S-Video2 if you have a Cable Box, follow either set of these steps to complete your Cable Box...
... the S-Video cable to connect the Cable Box's S-Video Out jacks to the TV's Video and Audio In jacks. Use the SOURCE button on the remote control to select AV 1 (or AV2, AV3, S-Video1, or S-Video2 if you have a Cable Box, follow either set of these steps to complete your Cable Box...

User Manual
Page 11
... yellow, red, and white), connect the VCR's Video and Audio Out jacks to the TV's Video and Audio In jacks. 2 Use SOURCE button on the remote control to these jacks.To view the material playing on the rear of Component Video Connection for highest color and picture resolution in video playback. 1 AV...
... yellow, red, and white), connect the VCR's Video and Audio Out jacks to the TV's Video and Audio In jacks. 2 Use SOURCE button on the remote control to these jacks.To view the material playing on the rear of Component Video Connection for highest color and picture resolution in video playback. 1 AV...

User Manual
Page 12
... sources before making any connections. 1 Using a Component Video cable (not supplied), connect the DVD player's Y, Pb, Pr jacks to the Y, Pb, Pr jacks on the remote control to select COMPONENT to provide sound. 1 Accessory device equipped with DVD player.
... sources before making any connections. 1 Using a Component Video cable (not supplied), connect the DVD player's Y, Pb, Pr jacks to the Y, Pb, Pr jacks on the remote control to select COMPONENT to provide sound. 1 Accessory device equipped with DVD player.
User Manual
Page 13
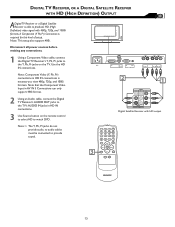
... power sources before making any connections. 1 Using a Component Video cable, connect the Digital TV Receiver's Y, Pb, Pr jacks to the Y, Pb, Pr jacks on the remote control to select HD to view 480p, 720p, and 1080i formats. The Y, Pb, Pr jacks do not provide audio, so audio cables must be connected to...
... power sources before making any connections. 1 Using a Component Video cable, connect the Digital TV Receiver's Y, Pb, Pr jacks to the Y, Pb, Pr jacks on the remote control to select HD to view 480p, 720p, and 1080i formats. The Y, Pb, Pr jacks do not provide audio, so audio cables must be connected to...

User Manual
Page 14
It is present) to the Audio outputs of the DVI IN connection. 3 Use Source button on the remote control to select DVI to utilize the full bandwidth of your HD device (e.g. DVI HDCP technology allows content providers the ability to watch the programs. Note: 1. ...
It is present) to the Audio outputs of the DVI IN connection. 3 Use Source button on the remote control to select DVI to utilize the full bandwidth of your HD device (e.g. DVI HDCP technology allows content providers the ability to watch the programs. Note: 1. ...
User Manual
Page 15
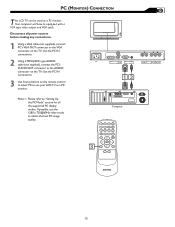
... PIP CC 15 PC (MONITOR) CONNECTION T his LCD TV can be used as a PC monitor. Use the PC IN connections. 3 Use Source button on the remote control to select PC to use the 1280 x 720@60Hz video mode to the AUDIO connector on the TV. Please refer to "Setting Up the PC...
... PIP CC 15 PC (MONITOR) CONNECTION T his LCD TV can be used as a PC monitor. Use the PC IN connections. 3 Use Source button on the remote control to select PC to use the 1280 x 720@60Hz video mode to the AUDIO connector on the TV. Please refer to "Setting Up the PC...

User Manual
Page 17
... only the TV's onscreen MENU items appear in either English, French or Spanish. 1 Press the MENU MENU button on the remote control to see the onscreen menu. 2 Press the (CH-) button to highlight the INSTALL menu. 3 Press the (VOL+) button to enter the INSTALL menu. 4 Press ... � INSTALL LANGUAGE TUNER MODE AUTO PROGRAM CHANNEL EDIT MANUAL FINE TUNE FACTORY RESET ENGLISH 17 LANGUAGE SETTINGS For English, French or Spanish-speaking TV owners, an onscreen LANGUAGE option is present. The LANGUAGE control enables you to set the TV's onscreen menu to be shown in English, French or ...
... only the TV's onscreen MENU items appear in either English, French or Spanish. 1 Press the MENU MENU button on the remote control to see the onscreen menu. 2 Press the (CH-) button to highlight the INSTALL menu. 3 Press the (VOL+) button to enter the INSTALL menu. 4 Press ... � INSTALL LANGUAGE TUNER MODE AUTO PROGRAM CHANNEL EDIT MANUAL FINE TUNE FACTORY RESET ENGLISH 17 LANGUAGE SETTINGS For English, French or Spanish-speaking TV owners, an onscreen LANGUAGE option is present. The LANGUAGE control enables you to set the TV's onscreen menu to be shown in English, French or ...

User Manual
Page 18
... Menu MENU button to clear the menu from a cable TV signal or an antenna signal. Before making adjustment, press SOURCE button on your remote control to switch your LCD TV will search automatically for the LCD TV to know if you to change the LCD TV's signal input to Cable... or Air (antenna). It's important for antenna and cable channels. 18 button to highlight the � MAIN CONTROLS PICTURE AUDIO FEATURES INSTALL LANGUAGE TUNER MODE AUTO PROGRAM CHANNEL EDIT MANUAL FINE TUNE FACTORY RESET INSTALL LANGUAGE TUNER MODE AUTO PROGRAM CHANNEL EDIT MANUAL...
... Menu MENU button to clear the menu from a cable TV signal or an antenna signal. Before making adjustment, press SOURCE button on your remote control to switch your LCD TV will search automatically for the LCD TV to know if you to change the LCD TV's signal input to Cable... or Air (antenna). It's important for antenna and cable channels. 18 button to highlight the � MAIN CONTROLS PICTURE AUDIO FEATURES INSTALL LANGUAGE TUNER MODE AUTO PROGRAM CHANNEL EDIT MANUAL FINE TUNE FACTORY RESET INSTALL LANGUAGE TUNER MODE AUTO PROGRAM CHANNEL EDIT MANUAL...

User Manual
Page 19
... cable TV signal must first be connected to your area by pressing the CH (+) or CH (-) button. 1 Press the MENU MENU button on the remote control to show the onscreen menu. 2 Press the (CH-) button to highlight the INSTALL menu. 3 Press the (VOL+) button to enter the INSTALL menu. 4 ...Press the (CH-) button to highlight the AUTO PROGRAM control. 5 Press the (VOL+) button to start the AUTO PROGRAM scanning of this owner's manual). This makes it easy for local area (or cable TV) channels....
... cable TV signal must first be connected to your area by pressing the CH (+) or CH (-) button. 1 Press the MENU MENU button on the remote control to show the onscreen menu. 2 Press the (CH-) button to highlight the INSTALL menu. 3 Press the (VOL+) button to enter the INSTALL menu. 4 ...Press the (CH-) button to highlight the AUTO PROGRAM control. 5 Press the (VOL+) button to start the AUTO PROGRAM scanning of this owner's manual). This makes it easy for local area (or cable TV) channels....

User Manual
Page 21
... MODE AUTO PROGRAM CHANNEL EDIT MANUAL FINE TUNE FACTORY RESET YES 21 FACTORY RESET Your TV can be erased. However, your present setting on the remote control to see the onscreen menu. 2 Press the (CH-) button to highlight the INSTALL menu. 3 Press the (VOL+) button to enter the INSTALL menu.... 4 Press the (CH-) button to highlight the FACTORY RESET control. 5 Press the (VOL+) button to reset the TV to the original factory settings. 6 Press the MENU MENU button repeatedly to page 25 for details. ...
... MODE AUTO PROGRAM CHANNEL EDIT MANUAL FINE TUNE FACTORY RESET YES 21 FACTORY RESET Your TV can be erased. However, your present setting on the remote control to see the onscreen menu. 2 Press the (CH-) button to highlight the INSTALL menu. 3 Press the (VOL+) button to enter the INSTALL menu.... 4 Press the (CH-) button to highlight the FACTORY RESET control. 5 Press the (VOL+) button to reset the TV to the original factory settings. 6 Press the MENU MENU button repeatedly to page 25 for details. ...

User Manual
Page 22
... mode can create your own preferred video settings. 1 Press the PICTURE button on the remote control. In the Personal smart picture mode you can be adjusted in sound control within the onscreen menu. SMART SOUND CONTROL S mart Sound allows you to select from three user presets and a personal mode that... which can be adjusted in your home. Following these steps to you are watching. Personal 1 Press the Sound button on the remote control. MENU OK SOURCE PIP CC � � 22 Movies Sports Weak Signal Multimedia Night News Music Theatre SMART PICTURE...
... mode can create your own preferred video settings. 1 Press the PICTURE button on the remote control. In the Personal smart picture mode you can be adjusted in sound control within the onscreen menu. SMART SOUND CONTROL S mart Sound allows you to select from three user presets and a personal mode that... which can be adjusted in your home. Following these steps to you are watching. Personal 1 Press the Sound button on the remote control. MENU OK SOURCE PIP CC � � 22 Movies Sports Weak Signal Multimedia Night News Music Theatre SMART PICTURE...

User Manual
Page 30
MAIN CONTROLS PICTURE AUDIO FEATURES INSTALL SOURCE PICTURE FORMAT PICTURE ALIGNMENT AUTOLOCK CLOSED CAPTION FEATURES SOURCE PICTURE FORMAT 4:3 PICTURE ALIGNMENT AUTOLOCK CLOSED CAPTION ZOOM 16:9 Vertically extend ... signal is not accessible in native 1w6:i9deasspcerceten ratio (i.e., a HDTV broadcasting program). You can change the picture format by pressing the FORMAT button on your remote control. 2. In HD and DVI MODE, the Picture Format Function is only accessible when input video signal is SD (e.g. 480i/480p). Picture Format 4:3 Display pictures of...
MAIN CONTROLS PICTURE AUDIO FEATURES INSTALL SOURCE PICTURE FORMAT PICTURE ALIGNMENT AUTOLOCK CLOSED CAPTION FEATURES SOURCE PICTURE FORMAT 4:3 PICTURE ALIGNMENT AUTOLOCK CLOSED CAPTION ZOOM 16:9 Vertically extend ... signal is not accessible in native 1w6:i9deasspcerceten ratio (i.e., a HDTV broadcasting program). You can change the picture format by pressing the FORMAT button on your remote control. 2. In HD and DVI MODE, the Picture Format Function is only accessible when input video signal is SD (e.g. 480i/480p). Picture Format 4:3 Display pictures of...

User Manual
Page 31
Note:Closed Caption can also be activated by broadcast stations during the transmission of a program offering Closed Captioning. MAIN CONTROLS PICTURE AUDIO FEATURES INSTALL SOURCE PICTURE FORMAT PICTURE ALIGNMENT AUTOLOCK CLOSED CAPTION 1 6 MENU OK SOURCE CC 2 4 6 3 PIP 5 FEATURES SOURCE PICTURE ...the (VOL+) button to select the closed caption you to your area's TV program listings for the stations and times of television programs on your remote control. CLOSED CAPTIONS Closed Captioning (CC) allows you want: CC MUTE, CC1, CC2, CC3, CC4, Txt1, Txt2, Txt3 or Txt4. Refer to...
Note:Closed Caption can also be activated by broadcast stations during the transmission of a program offering Closed Captioning. MAIN CONTROLS PICTURE AUDIO FEATURES INSTALL SOURCE PICTURE FORMAT PICTURE ALIGNMENT AUTOLOCK CLOSED CAPTION 1 6 MENU OK SOURCE CC 2 4 6 3 PIP 5 FEATURES SOURCE PICTURE ...the (VOL+) button to select the closed caption you to your area's TV program listings for the stations and times of television programs on your remote control. CLOSED CAPTIONS Closed Captioning (CC) allows you want: CC MUTE, CC1, CC2, CC3, CC4, Txt1, Txt2, Txt3 or Txt4. Refer to...

User Manual
Page 32
...button to adjust the item. 5 Press MENU MENU repeatedly to adjust. � Smart Picture: Adjust the color temperature of the picture. MAIN CONTROLS PICTURE AUDIO FEATURES INSTALL SMART PICTURE BRIGHTNESS CONTRAST AUTO ADJUST MANUAL ADJUST 2 � When the PICTURE menu is highlighted, press the (VOL+)... or the TV will automatically adjust to adjust the picture. A PC video signal must be used as it appears on the remote control to "sharpen" the Picture quality. Contrast: Adjust to see the onscreen menu. Horizontal-adjust the horizontal placement of the picture ...
...button to adjust the item. 5 Press MENU MENU repeatedly to adjust. � Smart Picture: Adjust the color temperature of the picture. MAIN CONTROLS PICTURE AUDIO FEATURES INSTALL SMART PICTURE BRIGHTNESS CONTRAST AUTO ADJUST MANUAL ADJUST 2 � When the PICTURE menu is highlighted, press the (VOL+)... or the TV will automatically adjust to adjust the picture. A PC video signal must be used as it appears on the remote control to "sharpen" the Picture quality. Contrast: Adjust to see the onscreen menu. Horizontal-adjust the horizontal placement of the picture ...
User Manual
Page 33
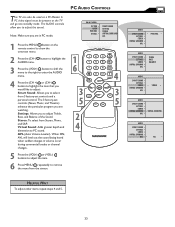
...to adjust Treble, Bass, and Balance of the Sound. Note: Make sure you are watching. Stereo: To select from 3 factory-set controls and a personal control. A PC video signal must be used as a PC Monitor. Virtual Sound: Adds greater depth and dimension to remove the menu from the...N GS STEREO VIRTUAL SURROUND AVL VIRTUAL SURROUND AUDIO SMART SOUND S E T T I N GS STEREO VIRTUAL SURROUND AVL 1 Press the MENU MENU button on the remote control to show the onscreen menu. 2 Press the (CH-) button to highlight the AUDIO menu. 3 Press the (VOL+) button to shift the menu to the right...
...to adjust Treble, Bass, and Balance of the Sound. Note: Make sure you are watching. Stereo: To select from 3 factory-set controls and a personal control. A PC video signal must be used as a PC Monitor. Virtual Sound: Adds greater depth and dimension to remove the menu from the...N GS STEREO VIRTUAL SURROUND AVL VIRTUAL SURROUND AUDIO SMART SOUND S E T T I N GS STEREO VIRTUAL SURROUND AVL 1 Press the MENU MENU button on the remote control to show the onscreen menu. 2 Press the (CH-) button to highlight the AUDIO menu. 3 Press the (VOL+) button to shift the menu to the right...


