
Owner's Manual
Page 2
...the sewing foot 14 Cleaning and oiling 24 Drawing up the bobbin thread 9 Dual feed 11 Electrical connection and foot control 3 Electronic bobbin thread monitor 4 Electronic top speed selector 4 Inserting the bobbin 7 Inserting the bobbin case 7 Master switch 4 Master selector dial 12 Needle ...Opening the hinged top cover 2 Ornamental stitches 17 Overlock setting 20 Presser bar lifter and Stopmatic control 5 Removing bobbin case and bobbin Removing and opening the carrying case cover Removing and opening the detachable work support Reverse sewing and dropping the ...
...the sewing foot 14 Cleaning and oiling 24 Drawing up the bobbin thread 9 Dual feed 11 Electrical connection and foot control 3 Electronic bobbin thread monitor 4 Electronic top speed selector 4 Inserting the bobbin 7 Inserting the bobbin case 7 Master switch 4 Master selector dial 12 Needle ...Opening the hinged top cover 2 Ornamental stitches 17 Overlock setting 20 Presser bar lifter and Stopmatic control 5 Removing bobbin case and bobbin Removing and opening the carrying case cover Removing and opening the detachable work support Reverse sewing and dropping the ...
Owner's Manual
Page 4
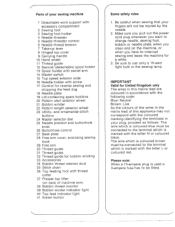
... in accordance with the following code: Blue: Neutral Brown: Live As the colours of the wires in the mains lead of machine arm) 38 Bobbin thread monitor 39 Bobbin winder indicator light 40 Top feed indicator light 41 Eraser button 4 Some safety rules 1. 4 Parts of your sewing machine 1 Detachable work support with...be connected to be injured by the needle. 2. Make sure you pull out the power cord plug whenever you want to change needle, sewing foot, bobbin or needle plate, when you clean and oil the machine, or when you have to interrupt sewing and leave the machine for reverse sewing and...
... in accordance with the following code: Blue: Neutral Brown: Live As the colours of the wires in the mains lead of machine arm) 38 Bobbin thread monitor 39 Bobbin winder indicator light 40 Top feed indicator light 41 Eraser button 4 Some safety rules 1. 4 Parts of your sewing machine 1 Detachable work support with...be connected to be injured by the needle. 2. Make sure you pull out the power cord plug whenever you want to change needle, sewing foot, bobbin or needle plate, when you clean and oil the machine, or when you have to interrupt sewing and leave the machine for reverse sewing and...
Owner's Manual
Page 5
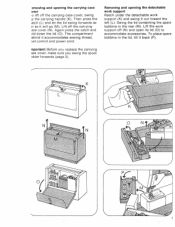
...: Before you replace the carrying ase cover, make sure you swing the spool older forwards (page 2). Lift off the carrying ase cover (N). To place spare bobbins in the lid, tilt it will go (M). The compartment ehind it out toward the left (L). Swing the lid containing the spare... bobbins to accommodate accessories. Removing and opening the carrying case over o lift off the carrying case cover, swing p the carrying handle (K). Lift the work support (K) and ...
...: Before you replace the carrying ase cover, make sure you swing the spool older forwards (page 2). Lift off the carrying ase cover (N). To place spare bobbins in the lid, tilt it will go (M). The compartment ehind it out toward the left (L). Swing the lid containing the spare... bobbins to accommodate accessories. Removing and opening the carrying case over o lift off the carrying case cover, swing p the carrying handle (K). Lift the work support (K) and ...
Owner's Manual
Page 6
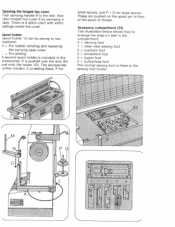
second spool holder(is fitted to two ositions: = For bobbin winding and replacing the carrying case cover. - = For sewing. Accessory compartment (33) The illustration below shows how to arrange the snap-on the spool pin ...
second spool holder(is fitted to two ositions: = For bobbin winding and replacing the carrying case cover. - = For sewing. Accessory compartment (33) The illustration below shows how to arrange the snap-on the spool pin ...
Owner's Manual
Page 8
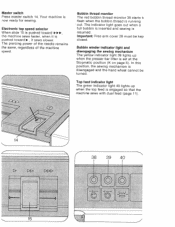
... it is resumed. The piercing power of the needle remains the same, regardless of the machine speed. The indicator light goes out when a full bobbin is inserted and sewing is pushed toward , it sews slower. In this position, the sewing mechanism is disengaged and the hand wheel cannot be kep... so that the machine sews with dual feed (page 11), Ii Important: Free arm cover 28 must be turned. Bobbin thread monitor The red bobbin thread monitor 38 starts tc flash when the bobbin thread is now ready for sewing. Master switch Press master switch 14. Your machine is running out...
... it is resumed. The piercing power of the needle remains the same, regardless of the machine speed. The indicator light goes out when a full bobbin is inserted and sewing is pushed toward , it sews slower. In this position, the sewing mechanism is disengaged and the hand wheel cannot be kep... so that the machine sews with dual feed (page 11), Ii Important: Free arm cover 28 must be turned. Bobbin thread monitor The red bobbin thread monitor 38 starts tc flash when the bobbin thread is now ready for sewing. Master switch Press master switch 14. Your machine is running out...
Owner's Manual
Page 9
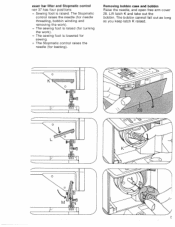
The Stopmatic control raises the needle (for needle threading, bobbin winding and removing the work). = The sewing foot is raised (for turning the work). = The sewing foot is raised. The bobbin cannot fall out as long as you keep latch K raised. esser bar litter and Stopmatic control ver 37 has four positions: = Sewing foot is lowered for sewing. = The Stopmatic control raises the needle (for basting). Lift latch K and take out the bobbin. Removing bobbin case and bobbin Raise the needle, and open free arm cover 28.
The Stopmatic control raises the needle (for needle threading, bobbin winding and removing the work). = The sewing foot is raised (for turning the work). = The sewing foot is raised. The bobbin cannot fall out as long as you keep latch K raised. esser bar litter and Stopmatic control ver 37 has four positions: = Sewing foot is lowered for sewing. = The Stopmatic control raises the needle (for basting). Lift latch K and take out the bobbin. Removing bobbin case and bobbin Raise the needle, and open free arm cover 28.

Owner's Manual
Page 10
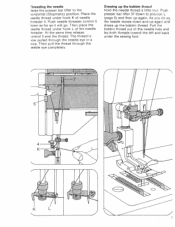
...39 lights up into guide 32. Wind a few turns of thread on spindle 21 so that pin K enters slot L. Push a suitable unreeling disc M on the bobbin clockwise. Draw the needle thread under the sewing foot, to its horizontal (K) position. Pull the thread from the spool, pass it . If you want to... start the bobbin winder and hold the thread end at the beginning. Swing spool holder 39 forwards and place a spool of thread on the spool pin. The yellow...
...39 lights up into guide 32. Wind a few turns of thread on spindle 21 so that pin K enters slot L. Push a suitable unreeling disc M on the bobbin clockwise. Draw the needle thread under the sewing foot, to its horizontal (K) position. Pull the thread from the spool, pass it . If you want to... start the bobbin winder and hold the thread end at the beginning. Swing spool holder 39 forwards and place a spool of thread on the spool pin. The yellow...

Owner's Manual
Page 11
Latch K and stud M must always be flush. Inserting the bobbin case Lift latch K and push the bobbin case onto stud M as far as it will go, making sure cutout L points upwards. It must be kept closed during sewing so that the thread unreels toward the ack (K). L M 7 Release latch K. Close free arm cover 28. Then draw the thread into slot L nd under the spring into the bobbin ase so that the photo-electronic bobbin thread monitor can function properly. serting the bobbin sert the filled bobbin into eye M.
Latch K and stud M must always be flush. Inserting the bobbin case Lift latch K and push the bobbin case onto stud M as far as it will go, making sure cutout L points upwards. It must be kept closed during sewing so that the thread unreels toward the ack (K). L M 7 Release latch K. Close free arm cover 28. Then draw the thread into slot L nd under the spring into the bobbin ase so that the photo-electronic bobbin thread monitor can function properly. serting the bobbin sert the filled bobbin into eye M.
Owner's Manual
Page 13
... Hold the needle thread a little taut. Push presser bar lifter 37 down and up again and draws up the bobbin thread. Place the ieedle thread under hook K of the needle hreader. Push needle threader control 5 lown as far as it will go. Then pull the .... As you do so, the needle moves down to the orizontaI (Stopmatic) position. The thread is iow pulled through the ieedle eye completely. Pull the bobbin thread out of the needle hole and lay both threads toward the left and back under hook L of needle hreader 4.
... Hold the needle thread a little taut. Push presser bar lifter 37 down and up again and draws up the bobbin thread. Place the ieedle thread under hook K of the needle hreader. Push needle threader control 5 lown as far as it will go. Then pull the .... As you do so, the needle moves down to the orizontaI (Stopmatic) position. The thread is iow pulled through the ieedle eye completely. Pull the bobbin thread out of the needle hole and lay both threads toward the left and back under hook L of needle hreader 4.
Owner's Manual
Page 14
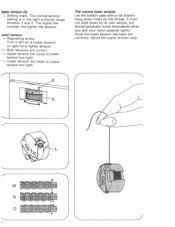
... down freely by its own weight, but should gradually move downwards when you jerk your hand upwards lightly. The correct lower tension Let the bobbin case with a full bobbin hang down by the thread. ower tension = Regulating screw. Once the lower tension has been set correctly, adjust the upper tension only. 4 L M N 0 Turn...
... down freely by its own weight, but should gradually move downwards when you jerk your hand upwards lightly. The correct lower tension Let the bobbin case with a full bobbin hang down by the thread. ower tension = Regulating screw. Once the lower tension has been set correctly, adjust the upper tension only. 4 L M N 0 Turn...
Owner's Manual
Page 28
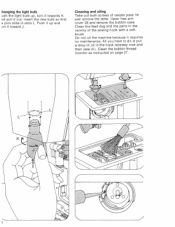
... hook raceway now and then (see ill.). All you have to do is put a drop of needle plate 18 and remove the latter. Clean the bobbin thread monitor as instructed on page 27. Clean the feed dog and the parts in slots L. Push it up , turn it towards K nd pull it...
... hook raceway now and then (see ill.). All you have to do is put a drop of needle plate 18 and remove the latter. Clean the bobbin thread monitor as instructed on page 27. Clean the feed dog and the parts in slots L. Push it up , turn it towards K nd pull it...

Owner's Manual
Page 29
Be careful when sewing that your fingers will not be obtained om your local Pfaff dealer. lachines with 11OV are without fuse. 4 Some safety rules 1. isert a new fuse in the holder and place the holder, pushing it in the sewing ..., release it nd take it clockwise a uarter turn. Make sure you pull out the power cord plug whenever you want to change needle, sewing foot, bobbin or needle plate, when you clean and oil the machine, or when you have to use only a 15-watt light bulb in with the crewd...
Be careful when sewing that your fingers will not be obtained om your local Pfaff dealer. lachines with 11OV are without fuse. 4 Some safety rules 1. isert a new fuse in the holder and place the holder, pushing it in the sewing ..., release it nd take it clockwise a uarter turn. Make sure you pull out the power cord plug whenever you want to change needle, sewing foot, bobbin or needle plate, when you clean and oil the machine, or when you have to use only a 15-watt light bulb in with the crewd...
Owner's Manual
Page 30
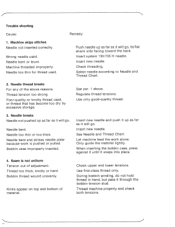
...bent and strikes needle plate because work alone. When inserting the bobbin case, press against it until it through the bobbin tension stud. Use first-class thread only. Needle bent or blunt. See par. 1 above reasons. Bobbin thread wound unevenly. Kinks appear on top and bottom of ...adjustment. Machine skips stitches Needle not inserted correctly. Select needle according to Needle and Thread Chart. 2. Bobbin case improperly inserted. Insert new needle. Let machine feed the work is not uniform Tension out of material. Push needle up as ...
...bent and strikes needle plate because work alone. When inserting the bobbin case, press against it until it through the bobbin tension stud. Use first-class thread only. Needle bent or blunt. See par. 1 above reasons. Bobbin thread wound unevenly. Kinks appear on top and bottom of ...adjustment. Machine skips stitches Needle not inserted correctly. Select needle according to Needle and Thread Chart. 2. Bobbin case improperly inserted. Insert new needle. Let machine feed the work is not uniform Tension out of material. Push needle up as ...

Owner's Manual
Page 31
Flick lever 17 to switch off and on , but machine is a piece of fabric under the sewing foot. Electronic bobbin thread monitor does not work properly Thread ends and lint have to leave the machine, even for a short while, be sure to the right. 6. Replace ... ends and dirt. 8. Yellow indicator remains on again. Switch master switch off and on the photo-electronic eye in the free arm cover, in the bobbin case and in hook raceway. Secure attachment in overlock seam Overlock-stitch attachment fitted loosely, Seam does not look neat. Check thread tensions. 11. Machine...
Flick lever 17 to switch off and on , but machine is a piece of fabric under the sewing foot. Electronic bobbin thread monitor does not work properly Thread ends and lint have to leave the machine, even for a short while, be sure to the right. 6. Replace ... ends and dirt. 8. Yellow indicator remains on again. Switch master switch off and on the photo-electronic eye in the free arm cover, in the bobbin case and in hook raceway. Secure attachment in overlock seam Overlock-stitch attachment fitted loosely, Seam does not look neat. Check thread tensions. 11. Machine...

