Pfaff 86 Support and Manuals
Get Help and Manuals for this Pfaff item

Pfaff 86 Videos

Gornik v Bayern (1985-86) (Pt. 2)
Duration: 3:48
Total Views: 2,424
Duration: 3:48
Total Views: 2,424
Bayern v Gladbach (1985-86) (3/10)
Duration: 2:53
Total Views: 989
Duration: 2:53
Total Views: 989
Gornik v Bayern (1985-86) (Pt. 4)
Duration: 3:25
Total Views: 1,580
Duration: 3:25
Total Views: 1,580
Dortmund v Bayern (1985-86) (Pt. 4)
Duration: 3:50
Total Views: 1,426
Duration: 3:50
Total Views: 1,426
Popular Pfaff 86 Manual Pages
Owner's Manual - Page 3

... you will always enjoy sewing with your machine. If you have any time. Instructions
CPFAFFI 84 and 85
Foreword Your new Pfaff sewing machine will enable you to help you at any sewing problems, please do not hesitate to contact your Pfaff dealer who will be glad to master a large variety of sewing, embroidering...
Owner's Manual - Page 4

Essential Parts of Your Pfaff 84 17
2
1 Face cover 2 Take-up lever 3 Thread guide 4 Top cover 5 Thread retainer stud 6 Spool pins 7 Bobbin winder 8 Balance wheel 9 Stop motion knob 10 Motor disengaging mechanism 11 Stitch... 17 Light switch 18 Stitch width control 19 Needle position lever 20 Needle thread tension 21 Presser bar lifter
(on back of machine arm) 22 Needle set screw 23 Sewing foot
I
Owner's Manual - Page 5

Essential Parts of Your Pfaff 85
12
3 4 5 -G-
7
II I
fI
8
9
15- 14
1 Face cover
2 Take-up lever
3 Thread guide 4 Top cover 5 Thread retainer stud 6 Spool pins
7 Bobbin winder
8 Balance wheel 9 Stop motion knob 10 Motor ... switch 18 Stitch width control 19 Needle position lever 20 Needle thread tension 21 Presser bar lifter
(On back of machine arm) 22 Needle set screw 23 Sewing foot
Owner's Manual - Page 10

... and swing ing up the lever on the back of the machine (2) until it will go (1). Press the workplate support against the baseplate of the machine.
10
4
3
The sewing area of the Pfaff 84 Portable is enlarged with the aid of an extension (4).
On machines having no carrying case base, the workplate...
Owner's Manual - Page 11

Upper threading is placed be
tween any two of the discs of tension (20),
3
pulled clockwise around the tension stud and drawn toward the right with a jerk (see
ill.). Thread the needle from front to back.
3
-20
11
Please note that the thread is illustrated opposite. As you do this, hold the thread steady
somewhere between the spool and the ten
sion.
Owner's Manual - Page 16
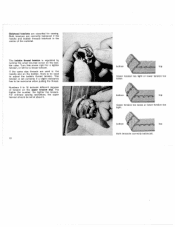
... tension too tight. Both tensions are essential for a looser tension. Balanced tensions are correctly balanced if the needle and bobbin threads interlock in the needle and on the bobbin, there is set at about 5.
16
bottom
top
Upper tension too tight or lower tension too loose. For ordinary sewing operations, the upper...
Owner's Manual - Page 22

... foot. Feed the fabric edge into the hemmer by pulling both threads backwards, as instructed on soft fabrics, use zigzag stitches.
Draw the fabric into the hemmer foot scroll with, your Pfaff dealer). Stitch length: 1.5 to secure the folded edge in the drawing.
Set the stitch width, as shown in place.
To produce an...
Owner's Manual - Page 23

... needle (which can be ob tained from your cording more prominent, in sert a filler cord. To render your Pfaff dealer).
with grooves is abt. 1/4 inch. Hold both needle threads lightly and
rotate the balance bobbin thread. wheel
to suit the type of the cording feet listed below. Stitch length: 1.5 to separate pair
of...
Owner's Manual - Page 26

... larger than the hole and place it under the hole, matching its throw. Elastic materials are stitched twice (see ill.). Set the stitch length control on the right of the fabric. Set the stitch length control on the wrong side. Stitch width: medium
Larger holes can be patched quickly. Then turn the...
Owner's Manual - Page 29

... left groove of medium size in the left position and put the stitch width control in notch R 1 (see Figs. 2 and 3),
When using No. 50 embroidery thread, set the stitch length control so that the white dot is opposite the groove (see Fig. 4). To obtain more prominent buttonholes, place a filler cord of the...
Owner's Manual - Page 31
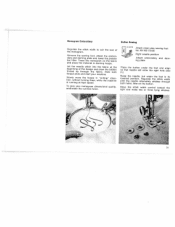
... the beginning of the monogram. Monogram Embroidery
Button Sewing
Regulate the stitch width to suit the size of the design and draw the bobbin thread up through both thread ends and start your monogram dimensional quality, embroider the outlines twice.
- 93OOI79
Attach clear-view sewing foot No. 93-1 00 179-00 Right...
Owner's Manual - Page 32
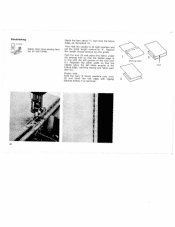
... foot No. 91-100 179-00. Baste the hem about I16 inch from the fabric
edge, as illustrated (1). Reduce the needle thread tension by one fabric yarn
(see
Basting seam
ill.). Fold the hem (2) and place the fabric under
the sewing toot so that... stitch width so that the folded edge is hemmed.
32
Then flick the needle to its right position and set the stitch length control at "4".
Owner's Manual - Page 36

...parts in the machine arm and in the vicinity of the machine base and tilt the machine back cautiously (3).
36
-
2 On port able machines, loosen the screw on the bottom of the sew ing hook with the bobbin. Pfaff... 84 machines are tilted back. To this end, re move the needle, the sewing foot and the bobbin case with a soft brush.
I
1 On Piaft 85 machines, loosen the set screw...
Owner's Manual - Page 38

Please remember to restore the normal set ting after you have completed your sewing machine will not normally jam, even if the machine should be balanced correctly (p. 16).
• Don't force the feeding motion, merely guide the material lightly.
• Clean and oil the machine as instructed (pp. 36 & 37).
• Make sure there...
Owner's Manual - Page 40
... ing Removing the Face Cover Reverse Sewing Sewing Buttonholes Sewing Curtains Straight Stitching Trouble Shooting Upper Threading Winding the Bobbin Workplate of Pfaff 85 . . Workplate of Pfaff 84 . .
Engaging and Mechanism
Disengaging
the
Sewing
Essential Parts of Pfaff 84 Essential Parts of
Machine
Operation
Hemstitching
Inserting a Full Bobbin
13 22 24 .8
40
Page...
Pfaff 86 Reviews
We have not received any reviews for Pfaff yet.