

Owner's Manual
Page 3
... for a double-insulated product must be added to the off ("0") when making any adjustment in the needle area, such as threading needle, changing needle, threading bobbin, or changing presser foot, etc. • Always unplug Sewing machine from outlet. • Do not unplug by qualified service personnel. • Do not...
... for a double-insulated product must be added to the off ("0") when making any adjustment in the needle area, such as threading needle, changing needle, threading bobbin, or changing presser foot, etc. • Always unplug Sewing machine from outlet. • Do not unplug by qualified service personnel. • Do not...

Owner's Manual
Page 5
... Turning the Machine Off 7 CONNECTIVITY TO YOUR Lubrication 44 GET READY TO EMBROIDER 9 COMPUTER 25 Troubleshooting Guide 45 Winding the Bobbin 11 How to transfer designs to the machine 26 Place Bobbin in Machine 13 Send 27 Top Threading 14 Using the machine without being Needle Threader 15 connecting to the computer...
... Turning the Machine Off 7 CONNECTIVITY TO YOUR Lubrication 44 GET READY TO EMBROIDER 9 COMPUTER 25 Troubleshooting Guide 45 Winding the Bobbin 11 How to transfer designs to the machine 26 Place Bobbin in Machine 13 Send 27 Top Threading 14 Using the machine without being Needle Threader 15 connecting to the computer...

Owner's Manual
Page 6
Control Panel 6. Needle plate 8. Presser foot lever 13. Spool cap 16. This will help you in learning its operation. USB connection 5. Main power switch and connectors 4. Presser foot 10. Start/Stop button 12. Bobbin winding guide 14. Bobbin cover 9. Handwheel 3. Embroidery hoop holder 7. Needle threader 11. User's Guide 1. Spool felt 4 Overview Familiarize yourself with the names of the parts of your machine. Upper thread tension 15. Bobbin winder 2.
Control Panel 6. Needle plate 8. Presser foot lever 13. Spool cap 16. This will help you in learning its operation. USB connection 5. Main power switch and connectors 4. Presser foot 10. Start/Stop button 12. Bobbin winding guide 14. Bobbin cover 9. Handwheel 3. Embroidery hoop holder 7. Needle threader 11. User's Guide 1. Spool felt 4 Overview Familiarize yourself with the names of the parts of your machine. Upper thread tension 15. Bobbin winder 2.

Owner's Manual
Page 7
Seam Ripper 3. Thread Snips 4. Brush (not in picture) 14 Thread stand 5 Hoop 6. Oiler 10. Vertical spool pin 7. Large spool cap 8. Bobbins 11. Accessory storage envelope (not in picture) 12. INTRODUCTION Your machine comes with your machine lubricated. 1. Screwdriver tool 5. USB cable (not in picture) 13. Small spool cap 9. Accessories These are standard accessories included with clear sewing machine oil that should be used to keep your embroidery machine. 14 5. 1. 4. 2. 3. 6. 7. 8. 9. 10. Needles 2.
Seam Ripper 3. Thread Snips 4. Brush (not in picture) 14 Thread stand 5 Hoop 6. Oiler 10. Vertical spool pin 7. Large spool cap 8. Bobbins 11. Accessory storage envelope (not in picture) 12. INTRODUCTION Your machine comes with your machine lubricated. 1. Screwdriver tool 5. USB cable (not in picture) 13. Small spool cap 9. Accessories These are standard accessories included with clear sewing machine oil that should be used to keep your embroidery machine. 14 5. 1. 4. 2. 3. 6. 7. 8. 9. 10. Needles 2.

Owner's Manual
Page 13
... guide (b), pulling thread into first guide (a) from the front then under the second guide from inside the bobbin to the right. GET READY TO EMBROIDER 111 Place a spool of thread on the spool of thread that is slightly larger than the size of ... the guide and to the right to the pin on the bobbin from the back (b). Plug in the machine and turn it on the bobbin to the bobbin winder spindle (c). 4. Pass the thread through the small hole on the bobbin winder spindel and push the bobbin onto the spindel. Match the slot on . 2. Winding the...
... guide (b), pulling thread into first guide (a) from the front then under the second guide from inside the bobbin to the right. GET READY TO EMBROIDER 111 Place a spool of thread on the spool of thread that is slightly larger than the size of ... the guide and to the right to the pin on the bobbin from the back (b). Plug in the machine and turn it on the bobbin to the bobbin winder spindle (c). 4. Pass the thread through the small hole on the bobbin winder spindel and push the bobbin onto the spindel. Match the slot on . 2. Winding the...

Owner's Manual
Page 14
...tail from the winder by pushing the bobbin spindle to the left. Disengage the bobbin spindle from the top of the bobbin. 6. Use the up to remove. 12 Press the Start/Stop button to stop automatically when the bobbin is full. After the bobbin has wound several turns, press the ...Start/Stop button to stop the winding process when the bobbin is full. 8. Winding the Bobbin 5. NOTE: Winding will have plenty to finish large embroidery...
...tail from the winder by pushing the bobbin spindle to the left. Disengage the bobbin spindle from the top of the bobbin. 6. Use the up to remove. 12 Press the Start/Stop button to stop automatically when the bobbin is full. After the bobbin has wound several turns, press the ...Start/Stop button to stop the winding process when the bobbin is full. 8. Winding the Bobbin 5. NOTE: Winding will have plenty to finish large embroidery...

Owner's Manual
Page 15
...channel towards you need to begin using the Navigator software. 13 C. Insert the bobbin into place. B. GET READY TO EMBROIDER Visually check the level of the bobbin thread periodically as you remove your bobbin runs out and the machine doesn't stop, you can easily navigate to the ...right. If your completed embroidery. Place Bobbin in the direction shown by the indicator under the bobbin cover. D. Cut the thread by pulling it snaps into the bobbin case, with the thread in Machine A. Replace the bobbin cover by moving the small lever to the point ...
...channel towards you need to begin using the Navigator software. 13 C. Insert the bobbin into place. B. GET READY TO EMBROIDER Visually check the level of the bobbin thread periodically as you remove your bobbin runs out and the machine doesn't stop, you can easily navigate to the ...right. If your completed embroidery. Place Bobbin in the direction shown by the indicator under the bobbin cover. D. Cut the thread by pulling it snaps into the bobbin case, with the thread in Machine A. Replace the bobbin cover by moving the small lever to the point ...

Owner's Manual
Page 19
The vertical spool pin is placed into the small round hole on the top of threads. Use a large needle size, such as when you wind a bobbin. For a decorative effect, you wish to use a spool cap when using the vertical spool pin. It is not necessary to work with specialty types of ...
The vertical spool pin is placed into the small round hole on the top of threads. Use a large needle size, such as when you wind a bobbin. For a decorative effect, you wish to use a spool cap when using the vertical spool pin. It is not necessary to work with specialty types of ...

Owner's Manual
Page 26
.... Indicates a condition that the machine is stopped for explanation and action to move the hoop. Color - Indicates the machine is stopped for a thread break. During bobbin winding, the "up" button will cause the winder to speed up, the "down" button will cause the winder to the machine. See Help code list...
.... Indicates a condition that the machine is stopped for explanation and action to move the hoop. Color - Indicates the machine is stopped for a thread break. During bobbin winding, the "up" button will cause the winder to speed up, the "down" button will cause the winder to the machine. See Help code list...

Owner's Manual
Page 35
... foot E15 Presser foot is in the message window of the machine, and in a message line on the Navigator screen on your computer screen. disengage bobbin winder 33 Error messages will be displayed on your computer. Each Help message will clear in approximately 2 seconds without user action. Help Messages Help messages... the LED panel of the Navigator on the machine until the error beep has stopped or until cleared by a user action. raise presser foot E16 Bobbin winder engaged - Raise needle with handwheel E13 Thread break - E02 Pending operation E11 Needle is up -
... foot E15 Presser foot is in the message window of the machine, and in a message line on the Navigator screen on your computer screen. disengage bobbin winder 33 Error messages will be displayed on your computer. Each Help message will clear in approximately 2 seconds without user action. Help Messages Help messages... the LED panel of the Navigator on the machine until the error beep has stopped or until cleared by a user action. raise presser foot E16 Bobbin winder engaged - Raise needle with handwheel E13 Thread break - E02 Pending operation E11 Needle is up -

Owner's Manual
Page 39
.... Locate the corresponding slots on the outer hoop ring (Fig. Align the round guide pins with the slots and gently press downward to change the bobbin or any other reason. Locate the silver tab indicated by the large arrow in the hoop when the hoop is removed. 37 Use care that...
.... Locate the corresponding slots on the outer hoop ring (Fig. Align the round guide pins with the slots and gently press downward to change the bobbin or any other reason. Locate the silver tab indicated by the large arrow in the hoop when the hoop is removed. 37 Use care that...
Owner's Manual
Page 45
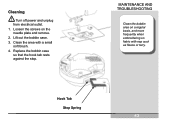
Clean the area with nap such as fleece or terry. Replace the bobbin case so that the hook tab rests against the stop. MAINTENANCE AND TROUBLESHOOTING Clean the bobbin area on a regular basis, and more frequently when embroidering on the needle plate and remove. 2. Lift out the bobbin case. 3. Loosen the screws on fabric with a small soft brush. 4. Hook Tab Stop Spring 4433 Cleaning Turn off power and unplug from electrical outlet. 1.
Clean the area with nap such as fleece or terry. Replace the bobbin case so that the hook tab rests against the stop. MAINTENANCE AND TROUBLESHOOTING Clean the bobbin area on a regular basis, and more frequently when embroidering on the needle plate and remove. 2. Lift out the bobbin case. 3. Loosen the screws on fabric with a small soft brush. 4. Hook Tab Stop Spring 4433 Cleaning Turn off power and unplug from electrical outlet. 1.

Owner's Manual
Page 47
... The sewing machine does not The machine is not turned on the bobbin. The needle clamp screw is pulled too much. The upper thread breaks Bobbin thread does not wind neatly on . Bobbin winder not fully engaged. Replace the needle. If in accordance with ... for this machine. Loosen the upper thread tension. Completely engage bobbin winder. Use the screwdriver to electrical/ electronic products. Use only a bobbin designed specifically for guidance. Correctly place the bobbin. An incorrect bobbin is tangled or breaks. Install the needle correctly. Lightly guide ...
... The sewing machine does not The machine is not turned on the bobbin. The needle clamp screw is pulled too much. The upper thread breaks Bobbin thread does not wind neatly on . Bobbin winder not fully engaged. Replace the needle. If in accordance with ... for this machine. Loosen the upper thread tension. Completely engage bobbin winder. Use the screwdriver to electrical/ electronic products. Use only a bobbin designed specifically for guidance. Correctly place the bobbin. An incorrect bobbin is tangled or breaks. Install the needle correctly. Lightly guide ...

