

Owner's Manual
Page 3
... air openings blocked. Close attention is necessary when this sewing machine is being used or where oxygen is used as threading needle, changing needle, threading bobbin, or changing presser foot, etc. • Always unplug the sewing machine from outlet. • Do not unplug by or near children or infirm person. •...
... air openings blocked. Close attention is necessary when this sewing machine is being used or where oxygen is used as threading needle, changing needle, threading bobbin, or changing presser foot, etc. • Always unplug the sewing machine from outlet. • Do not unplug by or near children or infirm person. •...

Owner's Manual
Page 4
... THE UPPER THREAD USING THE NEEDLE THREADER TOP THREAD TENSION BRINGING UP THE BOBBIN THREAD CUTTING THE THREAD PRESSER FOOT LIFT RAISE OR LOWER THE FEED DOGS OPERATION BUTTONS Reverse button Auto-lock button Needle up/down button FUNCTION ...
... THE UPPER THREAD USING THE NEEDLE THREADER TOP THREAD TENSION BRINGING UP THE BOBBIN THREAD CUTTING THE THREAD PRESSER FOOT LIFT RAISE OR LOWER THE FEED DOGS OPERATION BUTTONS Reverse button Auto-lock button Needle up/down button FUNCTION ...

Owner's Manual
Page 6
PRINCIPAL PARTS OF THE MACHINE Tension dial Presser foot pressure Face plate 0 Operation buttons Thread cutter Buttonhole lever Needle plate Accessory tray Hole for second spool pin Handwheel Main power switch Power cord Foot control connector 6 Pattern plate Bobbin winder LCD screen 1 Function buttons 3 Memory buttons Selection buttons 0 Function buttons Speed adjustment lever Horizontal spool pin Handle Presser foot lift Feed dog adjustment lever
PRINCIPAL PARTS OF THE MACHINE Tension dial Presser foot pressure Face plate 0 Operation buttons Thread cutter Buttonhole lever Needle plate Accessory tray Hole for second spool pin Handwheel Main power switch Power cord Foot control connector 6 Pattern plate Bobbin winder LCD screen 1 Function buttons 3 Memory buttons Selection buttons 0 Function buttons Speed adjustment lever Horizontal spool pin Handle Presser foot lift Feed dog adjustment lever

Owner's Manual
Page 11
Blindhem foot (F) 6. Pack of needles 11. Spool cap (Large) 10 15. Spool cap (Small) 16. Bobbin 18. Button sewIng foot 8. 1/4' Quilting foot (P) 9. Second spool pin 13. Spool pin felt 12. Seam guide 17. Hard cover 15 2 3 4 11 / 13 L 14 16 17 18 V I 1 aD 0000 0000 c0 30 } 11 Zipperfoot(l) 1 3. Satin stitch foot (A) 7. Buttonhole foot (D) 4. Overcasting foot (E) 5. Brush/ Seam ripper 14. Screwdriver (L & 5) 19. Free-motion/darning foot 10. __I® ACCESSORIES 1 Standard foot (T) 2.
Blindhem foot (F) 6. Pack of needles 11. Spool cap (Large) 10 15. Spool cap (Small) 16. Bobbin 18. Button sewIng foot 8. 1/4' Quilting foot (P) 9. Second spool pin 13. Spool pin felt 12. Seam guide 17. Hard cover 15 2 3 4 11 / 13 L 14 16 17 18 V I 1 aD 0000 0000 c0 30 } 11 Zipperfoot(l) 1 3. Satin stitch foot (A) 7. Buttonhole foot (D) 4. Overcasting foot (E) 5. Brush/ Seam ripper 14. Screwdriver (L & 5) 19. Free-motion/darning foot 10. __I® ACCESSORIES 1 Standard foot (T) 2.

Owner's Manual
Page 15
...-cotton, satin, sailcloth, double knits, lightweight wool. Use the same thread for thin fabric, tighten by turning the screw counter clockwise, and for needle and bobbin. 15 ADJUSTING PRESSER FOOT PRESSURE The presser foot pressure of fabric which will be used for sewing heavy fabrics. - FABRIC! Most threads sold are used...
...-cotton, satin, sailcloth, double knits, lightweight wool. Use the same thread for thin fabric, tighten by turning the screw counter clockwise, and for needle and bobbin. 15 ADJUSTING PRESSER FOOT PRESSURE The presser foot pressure of fabric which will be used for sewing heavy fabrics. - FABRIC! Most threads sold are used...

Owner's Manual
Page 17
For smaller spools of the inner holes in the bobbin as illustrated and place empty bobbin on to the thread tail and push the bobbin to the spool or use the small spool cap. 2. Place the thread and spool cap onto the spool pin. Wind the thread clockwise around the bobbin winder tension discs. 4 H 4. WINDING THE BOBBIN TJ Bobbin winding 1. Place the thread end through one of thread, place spool cap with the small side next to right. 17 Hold on the spindle. 5. Snap the thread into the thread guide. 3.
For smaller spools of the inner holes in the bobbin as illustrated and place empty bobbin on to the thread tail and push the bobbin to the spool or use the small spool cap. 2. Place the thread and spool cap onto the spool pin. Wind the thread clockwise around the bobbin winder tension discs. 4 H 4. WINDING THE BOBBIN TJ Bobbin winding 1. Place the thread end through one of thread, place spool cap with the small side next to right. 17 Hold on the spindle. 5. Snap the thread into the thread guide. 3.

Owner's Manual
Page 18
... near the hole of the bobbin. Please Note: When the bobbin winder switch is shown on the foot control to left. 10. When the bobbin winder spindle is pushed to the right, "bobbin winding position", the symbol "D"is pushed to the right, 'bobbin winding position", the machine will... not sew and the handwheel will disappear from the LCD screen when the bobbin winder spindle is full. Push the bobbin winder spindle to start sewing, push the bobbin winder switch to the left "sewing position". 18 It will not turn, To start the sewing machine...
... near the hole of the bobbin. Please Note: When the bobbin winder switch is shown on the foot control to left. 10. When the bobbin winder spindle is pushed to the right, "bobbin winding position", the symbol "D"is pushed to the right, 'bobbin winding position", the machine will... not sew and the handwheel will disappear from the LCD screen when the bobbin winder spindle is full. Push the bobbin winder spindle to start sewing, push the bobbin winder switch to the left "sewing position". 18 It will not turn, To start the sewing machine...

Owner's Manual
Page 19
... slips into the notch (B) being sure that the thread does not slip out of thread and slide on the bobbin cover (C). 19 INSERTING THE BOBBIN Attention: Turn power switch to off (0") before inserting or removing the bobbin. Pull out about 15 cm (6 inches) of the slit (A). 4. Pull the thread through the slit (A). 3. Remove...
... slips into the notch (B) being sure that the thread does not slip out of thread and slide on the bobbin cover (C). 19 INSERTING THE BOBBIN Attention: Turn power switch to off (0") before inserting or removing the bobbin. Pull out about 15 cm (6 inches) of the slit (A). 4. Pull the thread through the slit (A). 3. Remove...
Owner's Manual
Page 23
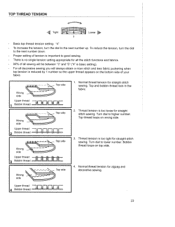
... tension setting: "4" - Proper setting of your fabric. Wrong side Upper thread Bobbin thread Top side Top side Wrong side 2 Upper thread Bobbin thread :JJ:!j-1s-1.r1J::: Top side Wrong side Upper thread Bobbin thread side Wrong side 1. For all sewing will always obtain a nicer stitch ...setting). - Normal thread tension for zigzag and decorative sewing. Upper thread Bobbin thread 23 There is no single tension setting appropriate for straight stitch sewing. Top and bobbin thread lock in the fabric. 2. Bobbin thread loops on wrong side. 3. To increase the tension, turn ...
... tension setting: "4" - Proper setting of your fabric. Wrong side Upper thread Bobbin thread Top side Top side Wrong side 2 Upper thread Bobbin thread :JJ:!j-1s-1.r1J::: Top side Wrong side Upper thread Bobbin thread side Wrong side 1. For all sewing will always obtain a nicer stitch ...setting). - Normal thread tension for zigzag and decorative sewing. Upper thread Bobbin thread 23 There is no single tension setting appropriate for straight stitch sewing. Top and bobbin thread lock in the fabric. 2. Bobbin thread loops on wrong side. 3. To increase the tension, turn ...

Owner's Manual
Page 24
Turn the handwheel toward you (counterclockwise) lowering, then raising the needle. 2. CUTTING THE THREAD 24 Raise the presser foot. Remove the fabric, draw the threads to the left hand. The threads are cut using the thread cutter. Gently pull on the upper thread to bring the bobbin thread up in a loop. 3. Pull both threads to the back under the presser foot. BRINGING UP THE BOBBIN THREAD 1 Hold the upper thread with the left side of the face cover and cut at the proper length to start the next seam. The bobbin thread will come up through the needle plate hole.
Turn the handwheel toward you (counterclockwise) lowering, then raising the needle. 2. CUTTING THE THREAD 24 Raise the presser foot. Remove the fabric, draw the threads to the left hand. The threads are cut using the thread cutter. Gently pull on the upper thread to bring the bobbin thread up in a loop. 3. Pull both threads to the back under the presser foot. BRINGING UP THE BOBBIN THREAD 1 Hold the upper thread with the left side of the face cover and cut at the proper length to start the next seam. The bobbin thread will come up through the needle plate hole.

Owner's Manual
Page 56
... control, the security switch will give a warning sound of pattern: 2-short beeps - Instruction animation message display z LcgJ F l IIi I'' Bobbin winding The bobbin winder is still not solved, please contact your local dealer. Please look through the Troubleshooting guide to sew. WARNING FUNCTIONS Warning animation message display...beeping sound - In order to sew, the machine will stop to sewing position If you have not pushed back the bobbin to the left when the bobbin is full and press any button or try to restart the sewing machine, clean out the thread that the thread is...
... control, the security switch will give a warning sound of pattern: 2-short beeps - Instruction animation message display z LcgJ F l IIi I'' Bobbin winding The bobbin winder is still not solved, please contact your local dealer. Please look through the Troubleshooting guide to sew. WARNING FUNCTIONS Warning animation message display...beeping sound - In order to sew, the machine will stop to sewing position If you have not pushed back the bobbin to the left when the bobbin is full and press any button or try to restart the sewing machine, clean out the thread that the thread is...

Owner's Manual
Page 58
... it once in the hook, this way, wipe the surface again with a brush. 58 Clean the bobbin holder with a dry cloth. Check regularly and clean the stitching mechanism when necessary. Remove the bobbin cover plate and bobbin. 2. Cleaning the sewing machine surface If the surface of the sewing machine is dirty, wipe it...
... it once in the hook, this way, wipe the surface again with a brush. 58 Clean the bobbin holder with a dry cloth. Check regularly and clean the stitching mechanism when necessary. Remove the bobbin cover plate and bobbin. 2. Cleaning the sewing machine surface If the surface of the sewing machine is dirty, wipe it...

Owner's Manual
Page 60
...not threaded correctly. 6.The presser foot pressure is too thick for the fabric. Loose stitches 1 .The machine is not correctly threaded. 2.The bobbin case is not correctly threaded. 3.Needle/fabric/thread combination is wrong. 4.Thread tension is too tight. Problem Upper thread breaks Cause 1 ..... 6.Attach the presser foot that is appropriate for the type of purchase or your nearest authorized dealer. Lower thread 1 .The bobbin case is damaged. _____ TROUBLESHOOTING GUIDE Before calling for service, check the following items. If the problem still persists, contact the ...
...not threaded correctly. 6.The presser foot pressure is too thick for the fabric. Loose stitches 1 .The machine is not correctly threaded. 2.The bobbin case is not correctly threaded. 3.Needle/fabric/thread combination is wrong. 4.Thread tension is too tight. Problem Upper thread breaks Cause 1 ..... 6.Attach the presser foot that is appropriate for the type of purchase or your nearest authorized dealer. Lower thread 1 .The bobbin case is damaged. _____ TROUBLESHOOTING GUIDE Before calling for service, check the following items. If the problem still persists, contact the ...

Owner's Manual
Page 61
...foot is not used , 3.The needle is damaged. 4 Humming sound coming from internal motor. 5.Thread is caught in . Remove the upper thread and bobbin case, turn the handwheel backwards and forwards by hand and remove the thread and mt. 1 Select a better quality thread. 2.Remove the... on . 2,The presser foot lever is raised. 3.The machine is too tight. Problem Seam puckering Patterns are packed with lint, 1 Poor quality thread. 2.The bobbin case is threaded wrong. 3.Fabric has been pulled. 1 .The machine is not turned on the machine. 2Lower the presser foot lever. 3.Connect the power line...
...foot is not used , 3.The needle is damaged. 4 Humming sound coming from internal motor. 5.Thread is caught in . Remove the upper thread and bobbin case, turn the handwheel backwards and forwards by hand and remove the thread and mt. 1 Select a better quality thread. 2.Remove the... on . 2,The presser foot lever is raised. 3.The machine is too tight. Problem Seam puckering Patterns are packed with lint, 1 Poor quality thread. 2.The bobbin case is threaded wrong. 3.Fabric has been pulled. 1 .The machine is not turned on the machine. 2Lower the presser foot lever. 3.Connect the power line...


