Pfaff synchromatic 1216 Support and Manuals
Get Help and Manuals for this Pfaff item

View All Support Options Below
Free Pfaff synchromatic 1216 manuals!
Problems with Pfaff synchromatic 1216?
Ask a Question
Free Pfaff synchromatic 1216 manuals!
Problems with Pfaff synchromatic 1216?
Ask a Question
Most Recent Pfaff synchromatic 1216 Questions

Overlock
hi i am missing the overlock foot. You know where i can get it? It is for the 1216 pfaf
hi i am missing the overlock foot. You know where i can get it? It is for the 1216 pfaf
(Posted by apolloniahalder 1 year ago)

Why Won't The Master Selector Dial Not Turn
(Posted by grannydot63 2 years ago)

Is This A Low Shank Machine?
(Posted by susanchase2006 2 years ago)

Pfaff 1216 Foot Control Circuit Diagram Required
Pfaff 1216 foot control circuit diagram required as its VDR (voltage dependent resistor burnt) which...
Pfaff 1216 foot control circuit diagram required as its VDR (voltage dependent resistor burnt) which...
(Posted by srinath124 4 years ago)

How Can I Adjust The Motor Belt In Order To Be More Tight?
The old motor belt was replaced because it was slipping. The new one looks like is slipping too. The...
The old motor belt was replaced because it was slipping. The new one looks like is slipping too. The...
(Posted by luismontanov 9 years ago)
Pfaff synchromatic 1216 Videos

Jan Roosendaal PFAFF Synchromatic 1216 Leer stikken
Duration: 2:16
Total Views: 24
Duration: 2:16
Total Views: 24
Jan Roosendaal PFAFF Synchromatic 1216
Duration: 1:59
Total Views: 18
Duration: 1:59
Total Views: 18
Popular Pfaff synchromatic 1216 Manual Pages
Owner's Manual - Page 3

...
9
Sewing feet
1 2, 1 6
Sewing mechanism
3
Slot-threading
6
Special accessories
22
Special sewing feet
17
Stitch program chart
26-30
Straight stitch
8
Thread cutter
7
Thread tensions
11
Trouble shooting
24, 25
Upper threading
6
Utility-stitch combinations
16
Utility stitches
1 3, 14
Winding
4
Work...
Owner's Manual - Page 5
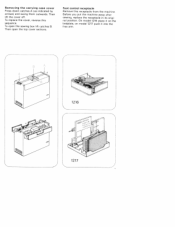
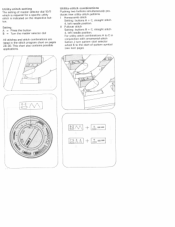
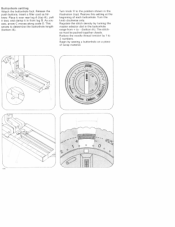
... lift catches B.
Before you put the machine away after sewing, replace the receptacle in its origi nal position. Foot control receptacle
Remove this sequence. On model 1216 place it on the bedplate, on model 1217 push it into the free arm.
1216 1217 Then lift the cover off. To replace the cover, reverse this receptacle from the machine.
Owner's Manual - Page 9
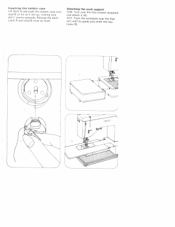
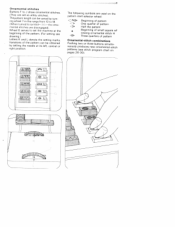
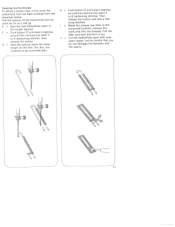
inserting the bobbin case
Lift latch A and push the bobbin case onto stud B as tar as t will go, making sure
slot C points upwards.
Release the latch. Latch A and stud B must be flush. Attaching the work support 1216: Turn over the foot control receptack and attach t (A).
1217: Push the workplate over the free arm until its guide pins enter the two holes (B).
Owner's Manual - Page 12
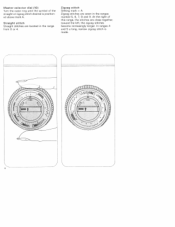
... from 0 or 4. In ranges 4 and 5 a long, narrow zigzag stitch is position ed above mark A. toward the left, the zigzag stitches become increasingly longer.
Zigzag stitch Setting mark = A Zigzag stitches are located in the ranges marked 5, 6, 7, 8 and 9. At the right of the straight or zigzag stitch desired is made.
--------
Owner's Manual - Page 15
The normal tension
setting is in the light-coloured range between 3 and 5, depending on the work.
D = Upper tension too loose... slTde down freely by its own weight, but should gradually move downwards wher you jerk your hand upwards lightly. Once the lower tension has been set cor rectly, adjust the upper tension only.
4
/
\_\
1
I
4
4
) Lower tension B = Regulating screw. Turn it left for a
...
Owner's Manual - Page 18
... stitch
4, left needle position. For utility-stitch combinations A to the start-of master selector dial 10/11 which is required for a specific utility stitch is indicated on pages 26-30. Setting: A = Press the button B = Turn the master selector dial
All stitches and stitch combinations are listed in conjunction with ornamental-stitch button...
Owner's Manual - Page 19
... position.
1
- Ornamental stitches Buttons F to J show ornamental stitches. (They are used on the pattern start selector wheel:
OZsfl1D The pattern length can be varied by setting the needle at the beginning of the pattern can be obtained by turn ing wheel 7 in the range from 10 to 18. (When turned to...
Owner's Manual - Page 21
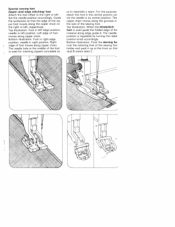
...: Foot in its central position. For this purpose, attach the foot in the central position an set the needle in left . The needle position is used for inserting zippers concealed so
as to the right or left ...chain on the right or left position Left edge of the foot is used guide the folded edge of the sewing fool holder and push it up at the front so thai stud B enters...
Owner's Manual - Page 23
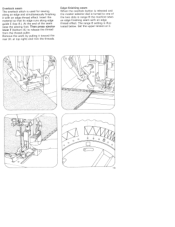
... seam with an edge-thread effect. Remove the work by pulling it with an edge thread effect. The range 8 setting is illus trated below, Set the upper tension at top right) and trim the threads.
Insert the material so that its edge runs along an ...-finshng seam When the overlock button is released and the master selector dial is used for sewing along edge
guide E (top ill.).
Owner's Manual - Page 24
... D. This serves to the position shown in front lug B. Begin by turning the master selector dial in the buttonhole range from + to 2 numbers. Restore this setting at the beginning of scrap material.
4
)
Owner's Manual - Page 25
... 4 to 6 bartacking stitches. Sewhiq buttonholes To afford a better view of the buttonhole foot for
ward as far as the first. (For this, the machine is set automatically.>
H = Push button 12 and keep it too. F = Push button 12 and keep it will go. Pull the filler cord taut and trim it depress...
Owner's Manual - Page 26
... edge stitching Accessory
Ordering No,
Cording set
Cording foot, 3 grooves (twin needle...31
Straight-stitch foot
-.-.-,
Needle plate with round needle hole for free-arm models
Edge guide with screw
93-847496-00
93-040 94' 35
,
93-053077-25...eyeletting
For hemming edges with 1.8-, 2.0- They can be obtained from your Pfaff dealer. Not all the sewing feet listed below are at present available as...
Owner's Manual - Page 27
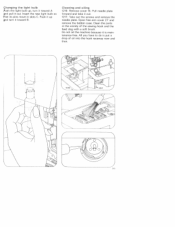
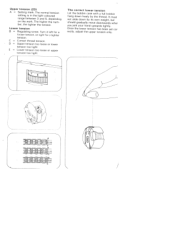
Cleaning and oiling 1216: Remove cover 15. Open free arm cover 27 and remove the bobbin case.
Do not oil the machine because it out. Insert ... have to do is put a drop of the sewing hook and the feed dog with a soft brush. Push it up , turn it out. 1217: Take out the screws and remove the needle plate. Clean the parts in slots C. Pull needle plate forward and take it tovvard B.
Owner's Manual - Page 30
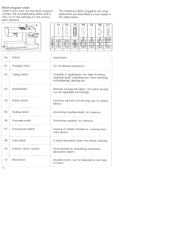
the stitch density can be adjusted to IV the settings for edge finishing, appliqué work, inserting lace, satin stitching, embroidering, darning etc.
Ornamentations resembling handsewn decorative seams.
Invisible hems; A €D 0-2
05
'
7
S.. Versatile in ines I ...
Owner's Manual - Page 31
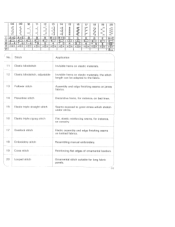
BB
9
5
E___
13 14
-
-n
•.-.j i
---ii
-"
'_-\
.-i' -\\
.-,'
B÷C B+D
4 -5
-
15 HI Ill fl fl C
4
16
-
'
"
C
9
17 18 19 20
X
'x:
h
"
y
'
B 1-4
11 12
(
-
< ._
(
'zZ
(
- 08 09
-
\/\
4
-1I \/\
\/\
,
A÷D A÷E
IT
m
V
24
.6
-i
--
10
-
Pfaff synchromatic 1216 Reviews
We have not received any reviews for Pfaff yet.