

Owner's Manual
Page 3
....3,4 Bobbin case . 3, 5 Bobbin thread 7 Buttonholing 20, 21 Carrying case cover 1 Cleanrng 23 Dual feed 10 Electrical connection 2 Foot control 2 Foot control receptacle 1 Light bulb 23 Machine feed 9 Master selector dial 8 Needle 13 Needle position 9 Oiling 23 Ornamental stitches 15 Overlock seam 18, 19 Presser bar lifter 10 Reverse sewing 9 Sewing feet 1 2, 1 6 Sewing mechanism 3 Slot-threading 6 Special accessories 22 Special sewing feet 17 Stitch program chart 26-30 Straight stitch 8 Thread cutter 7 Thread tensions 11 Trouble shooting...
....3,4 Bobbin case . 3, 5 Bobbin thread 7 Buttonholing 20, 21 Carrying case cover 1 Cleanrng 23 Dual feed 10 Electrical connection 2 Foot control 2 Foot control receptacle 1 Light bulb 23 Machine feed 9 Master selector dial 8 Needle 13 Needle position 9 Oiling 23 Ornamental stitches 15 Overlock seam 18, 19 Presser bar lifter 10 Reverse sewing 9 Sewing feet 1 2, 1 6 Sewing mechanism 3 Slot-threading 6 Special accessories 22 Special sewing feet 17 Stitch program chart 26-30 Straight stitch 8 Thread cutter 7 Thread tensions 11 Trouble shooting...

Owner's Manual
Page 4
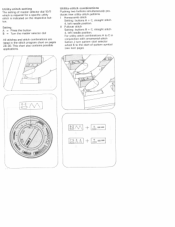
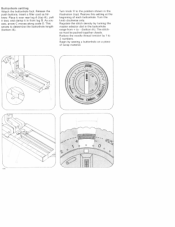
... and leave the machine for a while, 3. Parts of your sewing machine 1 Take-up ever 2 Thread retainer stud 3 Eraser button 4 Top cover lid 5 Spool pins 6 Pattern start selector wheel 7 Pattern length selector wheel 8 Bobbin winder 9 Balance wheel with stop motion knob 10 Master selector dial 11 Needle position knob 1 2 Buttonhole control 1 3 Master switch 1 4 Base of portable machines 1 5 Bed cover 1 6 Sewing foot 1 7 Sewing foot holder 1 8 Needle threader 1 9 Needle threader control 20 Upper tension 21 Control for reverse sewing and dropping the feed dog 22 Presser bar lifter (on back...
... and leave the machine for a while, 3. Parts of your sewing machine 1 Take-up ever 2 Thread retainer stud 3 Eraser button 4 Top cover lid 5 Spool pins 6 Pattern start selector wheel 7 Pattern length selector wheel 8 Bobbin winder 9 Balance wheel with stop motion knob 10 Master selector dial 11 Needle position knob 1 2 Buttonhole control 1 3 Master switch 1 4 Base of portable machines 1 5 Bed cover 1 6 Sewing foot 1 7 Sewing foot holder 1 8 Needle threader 1 9 Needle threader control 20 Upper tension 21 Control for reverse sewing and dropping the feed dog 22 Presser bar lifter (on back...
Owner's Manual
Page 5
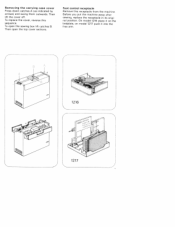
To replace the cover, reverse this receptacle from the machine. Foot control receptacle Remove this sequence. To open the top cover sections. Then open the sewing box lift catches B. On model 1216 place it on the bedplate, on model 1217 push it into the free arm. 1216 1217 Removing the carrying case cover Press down catches A (as indicated by arrows) and swing them outwards. Before you put the machine away after sewing, replace the receptacle in its origi nal position. Then lift the cover off.
To replace the cover, reverse this receptacle from the machine. Foot control receptacle Remove this sequence. To open the top cover sections. Then open the sewing box lift catches B. On model 1216 place it on the bedplate, on model 1217 push it into the free arm. 1216 1217 Removing the carrying case cover Press down catches A (as indicated by arrows) and swing them outwards. Before you put the machine away after sewing, replace the receptacle in its origi nal position. Then lift the cover off.

Owner's Manual
Page 7
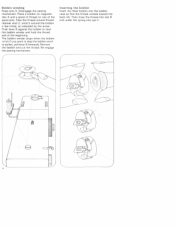
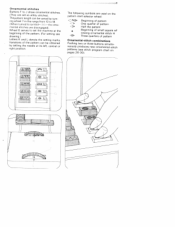
Hold the balance wheel steady and turn the stop motion knob toward you keep latch A raised. Removing bobbin case and bobbin Raise the needle. The bobbin cannot fall out as long as you . Disengaging the sewing mechanism Before you start winding the bobbin, disengage the sewing mechanism. After bobbin winding, tighten the knob again. Remove bed cover 15 or open free arm cap 27. Lift larch A, pull out the bobbin case, release the latch arid take out the bobbin.
Hold the balance wheel steady and turn the stop motion knob toward you keep latch A raised. Removing bobbin case and bobbin Raise the needle. The bobbin cannot fall out as long as you . Disengaging the sewing mechanism Before you start winding the bobbin, disengage the sewing mechanism. After bobbin winding, tighten the knob again. Remove bed cover 15 or open free arm cap 27. Lift larch A, pull out the bobbin case, release the latch arid take out the bobbin.
Owner's Manual
Page 8
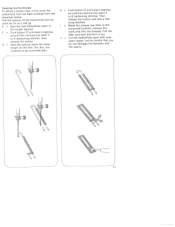
... bobbin wind er earlier, pull lever 8 forwards, Remove the bobbin and cut the thread. Inserting the bobbin Insert the filled bobbin into eye C. Bobbin winding Raise pins 5. Pass the thread around thread retainer stud 2, wind it around the bobbin a few times, as indicated by the arrow. Then draw the thread into slot B and under the spring into the bobbin case so that the thread unreels toward the back (A>. Place a bobbin on magnetic disc A and a spool...
... bobbin wind er earlier, pull lever 8 forwards, Remove the bobbin and cut the thread. Inserting the bobbin Insert the filled bobbin into eye C. Bobbin winding Raise pins 5. Pass the thread around thread retainer stud 2, wind it around the bobbin a few times, as indicated by the arrow. Then draw the thread into slot B and under the spring into the bobbin case so that the thread unreels toward the back (A>. Place a bobbin on magnetic disc A and a spool...

Owner's Manual
Page 11
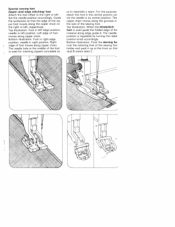
Pull the bobbin thread out of the machine toward the back. Pull the work out of the needle hole and lay both threads toward you until the needle moves down and up aqain and the takeup lever is located at the hack c top feeding foot 23. Drawing up . Turn balance wheel 9 toward the left and hack under the sewing toot. Place the threads n thread cut ter slot A and pull them downwards to ci them. Thread cutter The thread cutter is up the bobbin thread Hold the needle thread a little taut.
Pull the bobbin thread out of the machine toward the back. Pull the work out of the needle hole and lay both threads toward you until the needle moves down and up aqain and the takeup lever is located at the hack c top feeding foot 23. Drawing up . Turn balance wheel 9 toward the left and hack under the sewing toot. Place the threads n thread cut ter slot A and pull them downwards to ci them. Thread cutter The thread cutter is up the bobbin thread Hold the needle thread a little taut.
Owner's Manual
Page 12
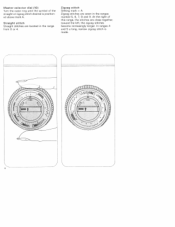
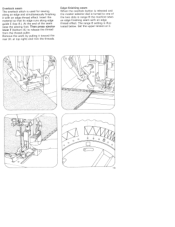
Zigzag stitch Setting mark = A Zigzag stitches are sewn in the range from 0 or 4. toward the left, the zigzag stitches become increasingly longer. Master selector dial (10) Turn the outer ring until the symbol of this range, the stitches are located in the ranges marked 5, 6, 7, 8 and 9. At the right of the straight or zigzag stitch desired is made. -------- In ranges 4 and 5 a long, narrow zigzag stitch is position ed above mark A. Straight stitch Straight stitches are close together;
Zigzag stitch Setting mark = A Zigzag stitches are sewn in the range from 0 or 4. toward the left, the zigzag stitches become increasingly longer. Master selector dial (10) Turn the outer ring until the symbol of this range, the stitches are located in the ranges marked 5, 6, 7, 8 and 9. At the right of the straight or zigzag stitch desired is made. -------- In ranges 4 and 5 a long, narrow zigzag stitch is position ed above mark A. Straight stitch Straight stitches are close together;
Owner's Manual
Page 13
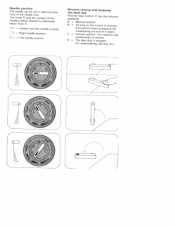
... needle position Reverse sewing and dropping the feed dog Reverse-feed control 21 has the fol(owin positions: A = Normal position B = As long a-s the control is positioned below mark A. D 4 c 4 / 7- D VI Turn knob 11 until the symbol of a seam(. The machine se permanently in the needle hole. Needle position The needle can be set to different posi tions in reverse. D = The feed dog is dropped (for backtacking the end of the needle position desired is pressed, the machine sews backwards (for embroidering, darning, etc...
... needle position Reverse sewing and dropping the feed dog Reverse-feed control 21 has the fol(owin positions: A = Normal position B = As long a-s the control is positioned below mark A. D 4 c 4 / 7- D VI Turn knob 11 until the symbol of a seam(. The machine se permanently in the needle hole. Needle position The needle can be set to different posi tions in reverse. D = The feed dog is dropped (for backtacking the end of the needle position desired is pressed, the machine sews backwards (for embroidering, darning, etc...

Owner's Manual
Page 14
Presser bar lifter Lever 22 has two positions: A = Sewing foot is raised. (Before you remove the work, turn the balance wheel toward you engage or disengage the dual feed, raise the sewing foot, To engage: Push top feeding foot 23 down slightly, then pull it back and let it snaps into place. To disengage: Push the top feeding foot down until it swing up lever 1.) B = The sewing foot is lowered for sewing. Before you to raise the needle and take-up . Dual feed (Synchronized top and bottom feed) This feed mechanism prevents one ply from creeping ahead of the other.
Presser bar lifter Lever 22 has two positions: A = Sewing foot is raised. (Before you remove the work, turn the balance wheel toward you engage or disengage the dual feed, raise the sewing foot, To engage: Push top feeding foot 23 down slightly, then pull it back and let it snaps into place. To disengage: Push the top feeding foot down until it swing up lever 1.) B = The sewing foot is lowered for sewing. Before you to raise the needle and take-up . Dual feed (Synchronized top and bottom feed) This feed mechanism prevents one ply from creeping ahead of the other.
Owner's Manual
Page 18
... two buttons simultaneously pro duces new utility-stitch patterns. I H- H Pullover stitch Setting: buttons B + C, straight stitch 4, left needle position. _ ___ UtiHty-stitch setting The setting of -pattern symbol (see next page>. 0-2 /' /\ 6 TO-2 f\1 jEED' "I Honeycomb stitch Setting: buttons A + C, straight stitch 4, left needle position. Setting: A = Press the button B = Turn the master selector dial All stitches and stitch combinations are listed in conjunction with ornamental-stitch button J turn pattern start selector wheel 6 to the start-of master selector dial 10...
... two buttons simultaneously pro duces new utility-stitch patterns. I H- H Pullover stitch Setting: buttons B + C, straight stitch 4, left needle position. _ ___ UtiHty-stitch setting The setting of -pattern symbol (see next page>. 0-2 /' /\ 6 TO-2 f\1 jEED' "I Honeycomb stitch Setting: buttons A + C, straight stitch 4, left needle position. Setting: A = Press the button B = Turn the master selector dial All stitches and stitch combinations are listed in conjunction with ornamental-stitch button J turn pattern start selector wheel 6 to the start-of master selector dial 10...
Owner's Manual
Page 19
The pattern length can be varied by setting the needle at the beginning of the pattern. (For setting see drawing.) Letters K and L denote the setting marks. o:;the orna mental stitches are disengaged) Wheel 6 serves to symbol- H HE The following symbols are set the machine at its left, central or right position. 1 - Variations of the pattern can be obtained by turn ing wheel 7 in the range from 10 to 18. (When turned to set as utility stitches). Ornamental stitches Buttons F to J show ornamental stitches. (They are used on the pattern start selector wheel: OZsfl1D
The pattern length can be varied by setting the needle at the beginning of the pattern. (For setting see drawing.) Letters K and L denote the setting marks. o:;the orna mental stitches are disengaged) Wheel 6 serves to symbol- H HE The following symbols are set the machine at its left, central or right position. 1 - Variations of the pattern can be obtained by turn ing wheel 7 in the range from 10 to 18. (When turned to set as utility stitches). Ornamental stitches Buttons F to J show ornamental stitches. (They are used on the pattern start selector wheel: OZsfl1D
Owner's Manual
Page 21
... so thai stud B enters slots C. Set the needle position accordingly. Top illustration: Foot in the middle of the sewing foot. The needle position is used for inserting zippers concealed so as to the right or left -edge position. Bottom illustration: Push the darning fo over the retaining fork of th material along zipper chain. Special sewing feet Zipper (and edge stitching) foot Attach the foot offset to resemble a seam. The needle hole in left .
... so thai stud B enters slots C. Set the needle position accordingly. Top illustration: Foot in the middle of the sewing foot. The needle position is used for inserting zippers concealed so as to the right or left -edge position. Bottom illustration: Push the darning fo over the retaining fork of th material along zipper chain. Special sewing feet Zipper (and edge stitching) foot Attach the foot offset to resemble a seam. The needle hole in left .
Owner's Manual
Page 23
... lever F (bottom ill.) to one of the seam raise the sewing foot. Insert the material so that its edge runs along an edge and simultaneously finishing it toward the rear (ill, at 3. 10 Overlook seam The overlock stitch is used for sewing along edge guide E (top ill.). The range 8 setting is turned to release the thread from the thread puller. Edge-finshng seam When the overlock button...
... lever F (bottom ill.) to one of the seam raise the sewing foot. Insert the material so that its edge runs along an edge and simultaneously finishing it toward the rear (ill, at 3. 10 Overlook seam The overlock stitch is used for sewing along edge guide E (top ill.). The range 8 setting is turned to release the thread from the thread puller. Edge-finshng seam When the overlock button...
Owner's Manual
Page 24
... position shown in the buttonhole range from + to - (bottom ill.). Reduce the needle thread tension by sewing a buttonhole on a piece of each button bole. Buttonhole settinq ttach the buttonhole foot. The stitch es must be packed together closely. Release the push buttons. insert a fiHer cord as fol lows: Place it over rear lug A (top ill), pull it taut, and clamp it in front lug B. Restore this setting...
... position shown in the buttonhole range from + to - (bottom ill.). Reduce the needle thread tension by sewing a buttonhole on a piece of each button bole. Buttonhole settinq ttach the buttonhole foot. The stitch es must be packed together closely. Release the push buttons. insert a fiHer cord as fol lows: Place it over rear lug A (top ill), pull it taut, and clamp it in front lug B. Restore this setting...
Owner's Manual
Page 25
... machine is set automatically.> H = Push button 12 and keep it depress ed until the machine has sewn 4 to 6 bartacking stitches, then release the button. E = Sew the first buttonhole seam in the length desired. Pull the filler cord taut and trim it will go. Pull the bottom of the work and trim the threads. Then release the button and sew a few tying stitches. = Raise the presser bar lifter to 6 bartacking stitches...
... machine is set automatically.> H = Push button 12 and keep it depress ed until the machine has sewn 4 to 6 bartacking stitches, then release the button. E = Sew the first buttonhole seam in the length desired. Pull the filler cord taut and trim it will go. Pull the bottom of the work and trim the threads. Then release the button and sew a few tying stitches. = Raise the presser bar lifter to 6 bartacking stitches...
Owner's Manual
Page 26
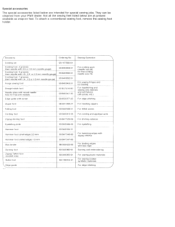
... 2.5mm needle gauge) Cording foot, 7 grooves (twin needle with 1.4-, 1.6 or 1.8-mm needle gauge) Fringe sewing foot 93-107560-91 93-040948-31 93 4 0950 - 3 1 93-040952-31 93-040943-31 Straight-stitch foot -.-.-, Needle plate with round needle hole for free-arm models Edge guide with Darning and embroidering For sewing plastic materials - etc.) For edge stitching For inserting zippers For felled seams For cording and appliqué work For shirring valances For eyeletting For hemming edges with screw 93-847496...
... 2.5mm needle gauge) Cording foot, 7 grooves (twin needle with 1.4-, 1.6 or 1.8-mm needle gauge) Fringe sewing foot 93-107560-91 93-040948-31 93 4 0950 - 3 1 93-040952-31 93-040943-31 Straight-stitch foot -.-.-, Needle plate with round needle hole for free-arm models Edge guide with Darning and embroidering For sewing plastic materials - etc.) For edge stitching For inserting zippers For felled seams For cording and appliqué work For shirring valances For eyeletting For hemming edges with screw 93-847496...
Owner's Manual
Page 27
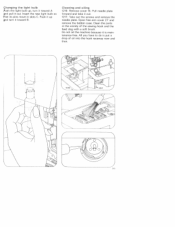
... put a drop of the sewing hook and the feed dog with a soft brush. Open free arm cover 27 and remove the bobbin case. Do not oil the machine because it tovvard B. Pull needle plate forward and take it out. Clean the parts in slots C. Changing the light bulb Push the light bulb up nd turn it toward A and pull it out. 1217: Take out the screws and remove the needle plate. Insert the new light bulb so that its pins move in...
... put a drop of the sewing hook and the feed dog with a soft brush. Open free arm cover 27 and remove the bobbin case. Do not oil the machine because it tovvard B. Pull needle plate forward and take it out. Clean the parts in slots C. Changing the light bulb Push the light bulb up nd turn it toward A and pull it out. 1217: Take out the screws and remove the needle plate. Insert the new light bulb so that its pins move in...
Owner's Manual
Page 28
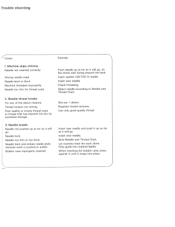
... bobbin case, press against it until it will go . Wrong needle used . 2. Use only good-quality thread Insert new needle and push it up as far as it will go . Bobbin case improperly inserted. Check threading. Machine skips stitches Needle not inserted correctly. Poor-quality or knotty thread used, or thread that has become too dry by excessive storage. 3. Regulate thread tensions. Let machine feed the work is pushed or pulled. Machine threaded improperly. Only guide the material lightly. Needle breaks Needle...
... bobbin case, press against it until it will go . Wrong needle used . 2. Use only good-quality thread Insert new needle and push it up as far as it will go . Bobbin case improperly inserted. Check threading. Machine skips stitches Needle not inserted correctly. Poor-quality or knotty thread used, or thread that has become too dry by excessive storage. 3. Regulate thread tensions. Let machine feed the work is pushed or pulled. Machine threaded improperly. Only guide the material lightly. Needle breaks Needle...
Owner's Manual
Page 29
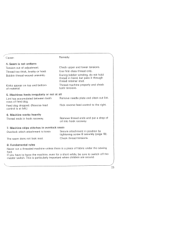
... oil into hook raceway. 7. Thread machine properly and check both tensions. 5. Machines feeds irregulady or not at left.) 6. Feed dog dropped. (Reverse-feed Flick reverse-feed control to switch off the master switch. control is at all Lint has accumulated between tooth Remove needle plate and clean out lint. Machine works heavily Thread ends in position by tightening screw B securely (page 18> The seam does not look neat. During bobbin winding, do not hold thread in overlock seam Overlock-stitch attachment is a piece of feed dog. Remove thread...
... oil into hook raceway. 7. Thread machine properly and check both tensions. 5. Machines feeds irregulady or not at left.) 6. Feed dog dropped. (Reverse-feed Flick reverse-feed control to switch off the master switch. control is at all Lint has accumulated between tooth Remove needle plate and clean out lint. Machine works heavily Thread ends in position by tightening screw B securely (page 18> The seam does not look neat. During bobbin winding, do not hold thread in overlock seam Overlock-stitch attachment is a piece of feed dog. Remove thread...
Owner's Manual
Page 30
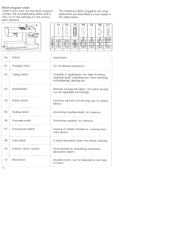
... ' 7 S.. for instance. the stitch density can be adjusted to IV the settings for instance. Sewing on elastic fabrics. Decorating napkins, for edge finishing, appliqué work, inserting lace, satin stitching, embroidering, darning etc. Stitch 01 Straight stitch 02 Zigzag stitch 03 Buttonholes 04 Elastic stitch 05 Scallop stitch 06 Viennese stitch 07 Honeycomb stitch 08 Cord stitch Feather stitch, narrow Blindstitch Application For all sewing operations. Without turning the fabric; can he regulated accordingly. Versatile in the table below. 01 II...
... ' 7 S.. for instance. the stitch density can be adjusted to IV the settings for instance. Sewing on elastic fabrics. Decorating napkins, for edge finishing, appliqué work, inserting lace, satin stitching, embroidering, darning etc. Stitch 01 Straight stitch 02 Zigzag stitch 03 Buttonholes 04 Elastic stitch 05 Scallop stitch 06 Viennese stitch 07 Honeycomb stitch 08 Cord stitch Feather stitch, narrow Blindstitch Application For all sewing operations. Without turning the fabric; can he regulated accordingly. Versatile in the table below. 01 II...


