
Owner's Manual
Page 3
... for its intended use as described in this sewing machine only for HOUSEHOLD use only. Replace bulb with any opening. 6. To disconnect, turn all moving parts. Keep these instructions in a safe place This sewing machine is not working pro perly, if it can cause the needle to break. 1 3. To unplug, grasp...
... for its intended use as described in this sewing machine only for HOUSEHOLD use only. Replace bulb with any opening. 6. To disconnect, turn all moving parts. Keep these instructions in a safe place This sewing machine is not working pro perly, if it can cause the needle to break. 1 3. To unplug, grasp...

Owner's Manual
Page 5
Parts of the hobbylock 4762 1 Thread tension dial/left needle 2 Thread tension dial/right needle 3 Carrying handle 4 Thread tension dial/right looper 5 Thread tension dial/left looper 6 Converter 7 Looper cover 8 Sewing foot 9 Needle plate 1 0 Detachable work support 11 Accessory box 1 2 Needle holder 13 Lamp cover 14 Right overedge looper 1 5 Left overedge looper 1 6 Fixed lower knife 1 7 Seam width adjustment knob 1 8 Bed slide for stitch width chaining land 1 9 Movable upper knife
Parts of the hobbylock 4762 1 Thread tension dial/left needle 2 Thread tension dial/right needle 3 Carrying handle 4 Thread tension dial/right looper 5 Thread tension dial/left looper 6 Converter 7 Looper cover 8 Sewing foot 9 Needle plate 1 0 Detachable work support 11 Accessory box 1 2 Needle holder 13 Lamp cover 14 Right overedge looper 1 5 Left overedge looper 1 6 Fixed lower knife 1 7 Seam width adjustment knob 1 8 Bed slide for stitch width chaining land 1 9 Movable upper knife
Owner's Manual
Page 6
...alcohol or paraffin. its cord. 9. If this appliance is used properly, the temperature of the outer components of +1-4%. 1 3. Be sure to use only original PFAFF parts. 1 2. Be sure to use at a low speed is : Ambient temperature 10° C to 40° C, Humidity 20% to avoid damage. ... is visible damage. - To avoid the risk of the needle and con stantly observe the sewing area while sewing. 2. Constant use only original PFAFF parts. 11. For ventilation purposes the machine must exercise adequate cau tion with a nominal voltage of +1-10% and a rated frequency of a non-...
...alcohol or paraffin. its cord. 9. If this appliance is used properly, the temperature of the outer components of +1-4%. 1 3. Be sure to use only original PFAFF parts. 1 2. Be sure to use at a low speed is : Ambient temperature 10° C to 40° C, Humidity 20% to avoid damage. ... is visible damage. - To avoid the risk of the needle and con stantly observe the sewing area while sewing. 2. Constant use only original PFAFF parts. 11. For ventilation purposes the machine must exercise adequate cau tion with a nominal voltage of +1-10% and a rated frequency of a non-...
Owner's Manual
Page 13
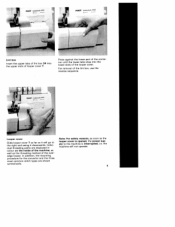
Looper cover Slide looper cover 7 as far as the threading method of the overedge looper. Press against the lower part of the contai ner until the lower tabs snap into the upper slots of looper cover 7. Indivi dual threading paths are shown symbolically. In addition, ... ply to the right and swing it will not operate. 9 the machine will go to the machine is interrupted, i.e. PFAcF h4 l 6 obb2 Ykk I 4 4 PIAFF hobbYkCk 4762 Lint box Insert the upper tabs of lint box 34 into the lower slots of the looper cover.
Looper cover Slide looper cover 7 as far as the threading method of the overedge looper. Press against the lower part of the contai ner until the lower tabs snap into the upper slots of looper cover 7. Indivi dual threading paths are shown symbolically. In addition, ... ply to the right and swing it will not operate. 9 the machine will go to the machine is interrupted, i.e. PFAcF h4 l 6 obb2 Ykk I 4 4 PIAFF hobbYkCk 4762 Lint box Insert the upper tabs of lint box 34 into the lower slots of the looper cover.
Owner's Manual
Page 25
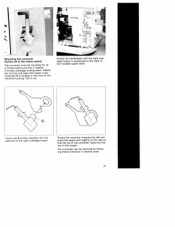
Rotate the converter towards the left and press the upper part slightly to the right of the looper. Pull it out. Rotate the handwheel until the right overedge looper is located in reverse order. 21 Insert ...
Rotate the converter towards the left and press the upper part slightly to the right of the looper. Pull it out. Rotate the handwheel until the right overedge looper is located in reverse order. 21 Insert ...
Owner's Manual
Page 39
Increase the tension of the respective needle thread. blue narrow green N red j yellow -5 +4 The right looper thread 3-thread serging seam wide blue green N 1 red yellow -5 The needle thread is too loose.
Increase the tension of the respective needle thread. blue narrow green N red j yellow -5 +4 The right looper thread 3-thread serging seam wide blue green N 1 red yellow -5 The needle thread is too loose.
Owner's Manual
Page 42
The left looper thread (yellow) s visible on the face side of the red thread. 38 Increase the tension of the yellow thread and/or reduce the tension of the fabric. Folded 3-thread rolled hem [ blue green red -2 j N yellow ÷3 The right needle thread (green) is too oose. Reduce the tension of the red thread and/ or increase the tension of the green thread. Increase the tension of the yellow thread. The right looper thread (red) only partly loops around the edge of the fabric.
The left looper thread (yellow) s visible on the face side of the red thread. 38 Increase the tension of the yellow thread and/or reduce the tension of the fabric. Folded 3-thread rolled hem [ blue green red -2 j N yellow ÷3 The right needle thread (green) is too oose. Reduce the tension of the red thread and/ or increase the tension of the green thread. Increase the tension of the yellow thread. The right looper thread (red) only partly loops around the edge of the fabric.
Owner's Manual
Page 48
All other parts are sufficient. One or two drops of PFAFF sewing machine oil are manufactu red from special material and do not require lubrication. This ensures good stability. 44 Use the lint brush from the ...
All other parts are sufficient. One or two drops of PFAFF sewing machine oil are manufactu red from special material and do not require lubrication. This ensures good stability. 44 Use the lint brush from the ...
Owner's Manual
Page 52
... sewing foot so that the edge protrudes approx. 1 cm. Sew a test seam. 48 Now fold the seam once again outwards so that the folded seam part 3 lies beneath edge guide 2. Set your machine to its uppermost position and insert the blindstitch foot.
... sewing foot so that the edge protrudes approx. 1 cm. Sew a test seam. 48 Now fold the seam once again outwards so that the folded seam part 3 lies beneath edge guide 2. Set your machine to its uppermost position and insert the blindstitch foot.

Owner's Manual
Page 64
hobbylock 4762 parts 20 Thread guides with colour coding 21 Telescopic thread guide 22 Set screw for adjusting sewing foot pressure 23 Thread chain cutter 24 Thread spool stand 25 Spool pin 26 Cote adapter 27 Machine socket, foot control with mains cord 28 Mains switch 29 Handwheel 30 Adjustment lever for differential feed 31 stitch length adjustment knob 32 Sewing foot lift 33 Rear thread guides 34 Lint box 35 Foot control 36 Foot control plug for machine 37 Mains plug
hobbylock 4762 parts 20 Thread guides with colour coding 21 Telescopic thread guide 22 Set screw for adjusting sewing foot pressure 23 Thread chain cutter 24 Thread spool stand 25 Spool pin 26 Cote adapter 27 Machine socket, foot control with mains cord 28 Mains switch 29 Handwheel 30 Adjustment lever for differential feed 31 stitch length adjustment knob 32 Sewing foot lift 33 Rear thread guides 34 Lint box 35 Foot control 36 Foot control plug for machine 37 Mains plug


