

Owner's Manual
Page 3
... as described in the instruction manual. 17. Return the appliance to break. 1 5. Special care is being used or where oxygen is required around the sewing machine needle. 1 2. Replace bulb with any opening. 6. Unplug immediately. 4. Do not place or store a sewing machine where it to the nearest authorized dealer or service centerfor examination, repair, electrical or mecha nical adjustment. 4, Never operate the sewing machine with same type rated 1 5 Watts. 3. V(ARNlNG...
... as described in the instruction manual. 17. Return the appliance to break. 1 5. Special care is being used or where oxygen is required around the sewing machine needle. 1 2. Replace bulb with any opening. 6. Unplug immediately. 4. Do not place or store a sewing machine where it to the nearest authorized dealer or service centerfor examination, repair, electrical or mecha nical adjustment. 4, Never operate the sewing machine with same type rated 1 5 Watts. 3. V(ARNlNG...

Owner's Manual
Page 5
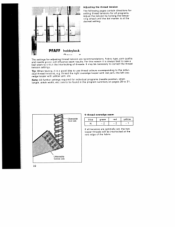
Parts of the hobbylock 4762 1 Thread tension dial/left needle 2 Thread tension dial/right needle 3 Carrying handle 4 Thread tension dial/right looper 5 Thread tension dial/left looper 6 Converter 7 Looper cover 8 Sewing foot 9 Needle plate 1 0 Detachable work support 11 Accessory box 1 2 Needle holder 13 Lamp cover 14 Right overedge looper 1 5 Left overedge looper 1 6 Fixed lower knife 1 7 Seam width adjustment knob 1 8 Bed slide for stitch width chaining land 1 9 Movable upper knife
Parts of the hobbylock 4762 1 Thread tension dial/left needle 2 Thread tension dial/right needle 3 Carrying handle 4 Thread tension dial/right looper 5 Thread tension dial/left looper 6 Converter 7 Looper cover 8 Sewing foot 9 Needle plate 1 0 Detachable work support 11 Accessory box 1 2 Needle holder 13 Lamp cover 14 Right overedge looper 1 5 Left overedge looper 1 6 Fixed lower knife 1 7 Seam width adjustment knob 1 8 Bed slide for stitch width chaining land 1 9 Movable upper knife
Owner's Manual
Page 6
...: - This is disturbed - The user must be free-standing, on a surface which can be adjusted by knocking or dropping. When used for domestic sewing machines accordance with regard to the up to avoid damage. Notes on Safety Notes on the machine. 7. its cord. 9. If this appliance is used properly, the temperature of the outer components of a non-elec tronically controlled foot control can repair.
...: - This is disturbed - The user must be free-standing, on a surface which can be adjusted by knocking or dropping. When used for domestic sewing machines accordance with regard to the up to avoid damage. Notes on Safety Notes on the machine. 7. its cord. 9. If this appliance is used properly, the temperature of the outer components of a non-elec tronically controlled foot control can repair.
Owner's Manual
Page 8
Contents Accessory box Accessories . Adjusting the seam width Adjusting the stitch length Adjusting the thread tension Bead sewing foot Blind stitch foot Changing the light bulb (sewing light) Changing the lower knife Changing the needle Changing the sewing foot Cleaning rubber feet Cleaning the machine Connecting foot control Cording foot Differential feed Elastic tape sewing foot Engaging/disengaging the upper knife Folded 2-thread rolled hem Folded 3-thread rolled hem Free arm Lace sewing foot Lint box Looper cover Lubricating the machine Machine cover Machine maintenance Mains switch ...
Contents Accessory box Accessories . Adjusting the seam width Adjusting the stitch length Adjusting the thread tension Bead sewing foot Blind stitch foot Changing the light bulb (sewing light) Changing the lower knife Changing the needle Changing the sewing foot Cleaning rubber feet Cleaning the machine Connecting foot control Cording foot Differential feed Elastic tape sewing foot Engaging/disengaging the upper knife Folded 2-thread rolled hem Folded 3-thread rolled hem Free arm Lace sewing foot Lint box Looper cover Lubricating the machine Machine cover Machine maintenance Mains switch ...
Owner's Manual
Page 9
...Thread spool net Thread unreeling disc Threading/guide wires Threading right overedge looper (red) Threading left overedge looper (yellow) Threading right needle A (green) Threading left needle B (blue) Thread reel change on threaded machine Thread chain cutter Thread table for 2-, 3- and 4-thread overedge seam 2-needle, 3-thread overedge closing seam. . 2-thread overedge seam FLATLOCK (wide, narrow). 2-thread serging seam (wide, narrow) 2-thread rolled hem 3-thread overedge seam (wide, narrow) 3-thread serging seam (wide, narrow) 3-thread decorative seam serging FLATLOCK/wide, narrow 3-thread...
...Thread spool net Thread unreeling disc Threading/guide wires Threading right overedge looper (red) Threading left overedge looper (yellow) Threading right needle A (green) Threading left needle B (blue) Thread reel change on threaded machine Thread chain cutter Thread table for 2-, 3- and 4-thread overedge seam 2-needle, 3-thread overedge closing seam. . 2-thread overedge seam FLATLOCK (wide, narrow). 2-thread serging seam (wide, narrow) 2-thread rolled hem 3-thread overedge seam (wide, narrow) 3-thread serging seam (wide, narrow) 3-thread decorative seam serging FLATLOCK/wide, narrow 3-thread...
Owner's Manual
Page 12
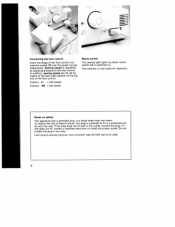
...foot control Insert the plugs of the foot control. Sewing speed is intended to fit in any way. The machine is switched on safety This appliance has a polarized plug (one way. Foot control sewing machine, foot controller type AE 033 has to be set by applying pressure to install the proper outlet. In addition, sewing speed can be used... adjuster at the top end of the foot control into machine socket 27 and the power source respectively. Position = half speed Position 44 = full speed Mains switch The sewing light lights up when mains switch 28 is now ready for operation...
...foot control Insert the plugs of the foot control. Sewing speed is intended to fit in any way. The machine is switched on safety This appliance has a polarized plug (one way. Foot control sewing machine, foot controller type AE 033 has to be set by applying pressure to install the proper outlet. In addition, sewing speed can be used... adjuster at the top end of the foot control into machine socket 27 and the power source respectively. Position = half speed Position 44 = full speed Mains switch The sewing light lights up when mains switch 28 is now ready for operation...
Owner's Manual
Page 16
... spools. Return the carrying handle to be found behind the looper cover, i.e. 4 Faden 3 Faden linke rechte Nadel Nadel Threading A colour-coded threading diagram for quick reference is lodged between the latter. inside the machine. Thread the individual threads - The colour markings are to the colour coding. Right needle = green 4. Now pull the thread between the tension discs and press it is to its closed position...
... spools. Return the carrying handle to be found behind the looper cover, i.e. 4 Faden 3 Faden linke rechte Nadel Nadel Threading A colour-coded threading diagram for quick reference is lodged between the latter. inside the machine. Thread the individual threads - The colour markings are to the colour coding. Right needle = green 4. Now pull the thread between the tension discs and press it is to its closed position...

Owner's Manual
Page 22
...-insert the looper thread first, then re-thread the needle(s). Set all the thread tensions to the thread spool and set the new thread reels in place. The thread must always be inser ted last in the machine and the new threads, and pull the threads out of the needles. Tie together the threads still in order to the left looper thread and thread breakage or missed stitches. Now pull on the needle threads...
...-insert the looper thread first, then re-thread the needle(s). Set all the thread tensions to the thread spool and set the new thread reels in place. The thread must always be inser ted last in the machine and the new threads, and pull the threads out of the needles. Tie together the threads still in order to the left looper thread and thread breakage or missed stitches. Now pull on the needle threads...

Owner's Manual
Page 26
... 2.3 mm, i.e. R is can be continuously adjusted from 3.0 mm to 6.7 mm. 22 For the left needle, the set value is pushed slightly to the right needle only. 11 Adjusting seam width Switch off at the mains switch Detach the mt box. The seam width can be more easily adjusted if the upper knife holder is increased by turning seam width adjustment knob 17.
... 2.3 mm, i.e. R is can be continuously adjusted from 3.0 mm to 6.7 mm. 22 For the left needle, the set value is pushed slightly to the right needle only. 11 Adjusting seam width Switch off at the mains switch Detach the mt box. The seam width can be more easily adjusted if the upper knife holder is increased by turning seam width adjustment knob 17.
Owner's Manual
Page 28
... same amount of fabric used. The result is set to be fed through only half as much fabric as silk and taffeta. The standard adjustment is stretched, This prevents the seam from becoming gathered when sewing very delicate fabrics such as the rear feed dog. Note: The effectiveness of the differential feed also depends on the stitch lenght selected and the type of fabric. i.e. It can...
... same amount of fabric used. The result is set to be fed through only half as much fabric as silk and taffeta. The standard adjustment is stretched, This prevents the seam from becoming gathered when sewing very delicate fabrics such as the rear feed dog. Note: The effectiveness of the differential feed also depends on the stitch lenght selected and the type of fabric. i.e. It can...
Owner's Manual
Page 29
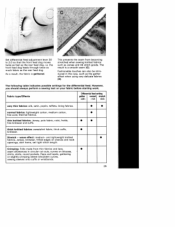
... openings, skirt hems, set tight stitch length. wave effect: medium- thin knitted fabrics: Jersey, polo fabric, nicki, frotté, fine knitwear and cuffs, thick knitted fabrics: sweatshirt fabric, thick cuffs, knitwear. The following table indicates possible settings for the differential feed. As a result, the fabric is a smooth seam (C). Crimping: Frills made from becoming stretched when sewing knitted fabrics such as the rear feed dog. The result is gathered. Fabric type/Effects Differential feed setting gather...
... openings, skirt hems, set tight stitch length. wave effect: medium- thin knitted fabrics: Jersey, polo fabric, nicki, frotté, fine knitwear and cuffs, thick knitted fabrics: sweatshirt fabric, thick cuffs, knitwear. The following table indicates possible settings for the differential feed. As a result, the fabric is a smooth seam (C). Crimping: Frills made from becoming stretched when sewing knitted fabrics such as the rear feed dog. The result is gathered. Fabric type/Effects Differential feed setting gather...

Owner's Manual
Page 30
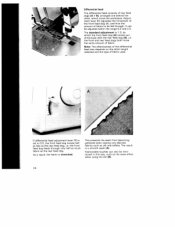
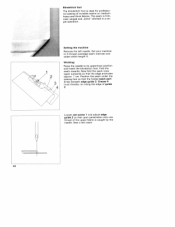
Sewing with the machine cover, then slide it to the right until it is particularly useful for sewing tubular items such as trouser legs and sleeves. The free arm is level with the free arm Detach the work support pcAFF Remove the lint box and pull detachable work support so that it locks into position. 26 Reattaching the work support Position the detachable work support 10 towards the left. Insert the article over the free arm. Reattach the lint box.
Sewing with the machine cover, then slide it to the right until it is particularly useful for sewing tubular items such as trouser legs and sleeves. The free arm is level with the free arm Detach the work support pcAFF Remove the lint box and pull detachable work support so that it locks into position. 26 Reattaching the work support Position the detachable work support 10 towards the left. Insert the article over the free arm. Reattach the lint box.
Owner's Manual
Page 32
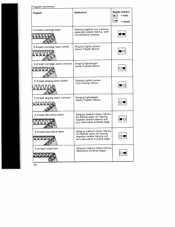
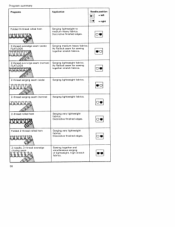
... Needle position = links = rechts Sewing together any material, especially elastic fabrics, with simultaneous serging. 3-thread overedge seam (wide) Serging tightly-woven (easily frayed) fabrics 3-thread-overedge seam (narrow) Serging lightweight (easily-frayed) fabrics 3-thread serging seam (wide) Serging tightly-woven (non-fraying) fabrics 3-thread serging seam (narrow) tsLsLt;\ Serging lightweight (easily-frayed) fabrics 3-thread decorative seam \ 3-thread decorative seam Serging medium-heavy fabrics. Decorative finished edges. As flatlock seam for sewing together stretch...
... Needle position = links = rechts Sewing together any material, especially elastic fabrics, with simultaneous serging. 3-thread overedge seam (wide) Serging tightly-woven (easily frayed) fabrics 3-thread-overedge seam (narrow) Serging lightweight (easily-frayed) fabrics 3-thread serging seam (wide) Serging tightly-woven (non-fraying) fabrics 3-thread serging seam (narrow) tsLsLt;\ Serging lightweight (easily-frayed) fabrics 3-thread decorative seam \ 3-thread decorative seam Serging medium-heavy fabrics. Decorative finished edges. As flatlock seam for sewing together stretch...
Owner's Manual
Page 34
As flatlock seam for sewing together stretch fabncs 2-thread o FLATLOCK •je seam (narrow> Serging lightweight fabrics. Program summary Programs Folded 3-thread rolled hem Application Serging lightweight to medium-heavy fabrics. Needle position =Ieft 2!J = right 2-thread oeredge seam (wide) FLATLOCK Serging medium-heavy fabrics. As flatlock seam for sewing together stretch fabrics. 2-thread serging seam (wide> Serging lightweight fabrics. . Decorative finished edges.
As flatlock seam for sewing together stretch fabncs 2-thread o FLATLOCK •je seam (narrow> Serging lightweight fabrics. Program summary Programs Folded 3-thread rolled hem Application Serging lightweight to medium-heavy fabrics. Needle position =Ieft 2!J = right 2-thread oeredge seam (wide) FLATLOCK Serging medium-heavy fabrics. As flatlock seam for sewing together stretch fabrics. 2-thread serging seam (wide> Serging lightweight fabrics. . Decorative finished edges.
Owner's Manual
Page 36
...: All further settings length, stitch width, etc.) required for individual programs (needle position, stitch are to be found in the program summary on pages 28 to cnc the interlocking of the fabric 32 Tip: dual When testrig, it is a e.g. PFAFF hobbylock The settrngs for adjusting thread tension are optimally set, the two looper threads will influence seam results. good idea to use thread the right thread colours corresponding...
...: All further settings length, stitch width, etc.) required for individual programs (needle position, stitch are to be found in the program summary on pages 28 to cnc the interlocking of the fabric 32 Tip: dual When testrig, it is a e.g. PFAFF hobbylock The settrngs for adjusting thread tension are optimally set, the two looper threads will influence seam results. good idea to use thread the right thread colours corresponding...
Owner's Manual
Page 52
... seam. 48 N ) Loosen set screw 1 and adjust edge guide 2 so that upon penetration only one thread of the upper fabric is trim med, serged and ,,blind' stitched in a sin gle operation. Raise the needle to 3-thread overedge seam (narrow) and select stitch length 4. Position the seam under the sewing foot so that the edge protrudes approx. 1 cm. Setting the machine Remove the left needle. Now fold the seam once again outwards so that the folded seam part...
... seam. 48 N ) Loosen set screw 1 and adjust edge guide 2 so that upon penetration only one thread of the upper fabric is trim med, serged and ,,blind' stitched in a sin gle operation. Raise the needle to 3-thread overedge seam (narrow) and select stitch length 4. Position the seam under the sewing foot so that the edge protrudes approx. 1 cm. Setting the machine Remove the left needle. Now fold the seam once again outwards so that the folded seam part...
Owner's Manual
Page 55
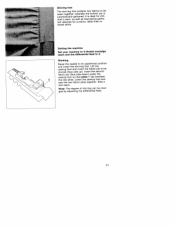
... for curtains, table linen or tiered skirts. Sew a test seam. Setting the machine Set your machine to 4-thread overedge seam and the differential feed to its uppermost position and insert the shirring foot. Lift the sewing foot and insert the fabric ply to be chan ged by adjusting the differential feed. 51 Working Raise the needle to 2. It is automatically gathered. Insert the second fabric ply (face side down> under the sewing foot so that plate 1 lies between...
... for curtains, table linen or tiered skirts. Sew a test seam. Setting the machine Set your machine to 4-thread overedge seam and the differential feed to its uppermost position and insert the shirring foot. Lift the sewing foot and insert the fabric ply to be chan ged by adjusting the differential feed. 51 Working Raise the needle to 2. It is automatically gathered. Insert the second fabric ply (face side down> under the sewing foot so that plate 1 lies between...
Owner's Manual
Page 57
..., lead and ordinary cords. Insert the string of beads into the fabric as shown to the left, the needle thread tension must be between 3 and 4. Ii you wish to its uppermost position and insert the bead sewing foot. Setting the machine Set your machine to reverse side and guide the crease past the upper knife while sewing. Pull the fabric apart; Lay the material reverse side to 3-thread overedge seam (narrow or...
..., lead and ordinary cords. Insert the string of beads into the fabric as shown to the left, the needle thread tension must be between 3 and 4. Ii you wish to its uppermost position and insert the bead sewing foot. Setting the machine Set your machine to reverse side and guide the crease past the upper knife while sewing. Pull the fabric apart; Lay the material reverse side to 3-thread overedge seam (narrow or...
Owner's Manual
Page 60
... Incorrect setting of the kind described below may occur due to minor adjustment and operating errors. The converter is attached Solution Insert new needle (see page 11). Check whether thread catches at reel stand etc. Use needle system EL X 705. Insert needle correctly (see page 11). Sewing problems and their solutions These machines have been developed for ease of operation and no difficult adjustments must be detached. 56 Sewing problems of thread tensions...
... Incorrect setting of the kind described below may occur due to minor adjustment and operating errors. The converter is attached Solution Insert new needle (see page 11). Check whether thread catches at reel stand etc. Use needle system EL X 705. Insert needle correctly (see page 11). Sewing problems and their solutions These machines have been developed for ease of operation and no difficult adjustments must be detached. 56 Sewing problems of thread tensions...
Owner's Manual
Page 64
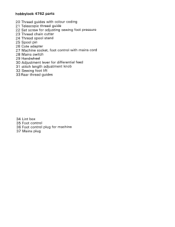
hobbylock 4762 parts 20 Thread guides with colour coding 21 Telescopic thread guide 22 Set screw for adjusting sewing foot pressure 23 Thread chain cutter 24 Thread spool stand 25 Spool pin 26 Cote adapter 27 Machine socket, foot control with mains cord 28 Mains switch 29 Handwheel 30 Adjustment lever for differential feed 31 stitch length adjustment knob 32 Sewing foot lift 33 Rear thread guides 34 Lint box 35 Foot control 36 Foot control plug for machine 37 Mains plug
hobbylock 4762 parts 20 Thread guides with colour coding 21 Telescopic thread guide 22 Set screw for adjusting sewing foot pressure 23 Thread chain cutter 24 Thread spool stand 25 Spool pin 26 Cote adapter 27 Machine socket, foot control with mains cord 28 Mains switch 29 Handwheel 30 Adjustment lever for differential feed 31 stitch length adjustment knob 32 Sewing foot lift 33 Rear thread guides 34 Lint box 35 Foot control 36 Foot control plug for machine 37 Mains plug


