
Owner's Manual
Page 2
... please fold this appliance may not correspond with the colour coding of the terminals in the mains lead are available from electrical suppliers or the PFAFF agencies. I nor to a plug with the letter L or coloured red. Live As the colours of the wires in the mains lead of this or ... The leads must definitely not be connected to the safety lead terminal I You will find the Contents on page 2. Only 3 A spare fuses must be used without fuse cover. Spare fuse covers are coloured accor ding to the terminal which is marked with the correspon ding colour code. The plug must...
... please fold this appliance may not correspond with the colour coding of the terminals in the mains lead are available from electrical suppliers or the PFAFF agencies. I nor to a plug with the letter L or coloured red. Live As the colours of the wires in the mains lead of this or ... The leads must definitely not be connected to the safety lead terminal I You will find the Contents on page 2. Only 3 A spare fuses must be used without fuse cover. Spare fuse covers are coloured accor ding to the terminal which is marked with the correspon ding colour code. The plug must...
Owner's Manual
Page 3
..., electric shock, or injury to off ("0") when making any object into water or other user servicing adjustments mentioned in this manual. Use only attachments recommended by pulling on page 2. Keep ventilation ope nings of the sewing machine and foot control free from the accumulation of... 1 5 Watts. 3. Replace bulb with any opening. 6. Never operate on a soft surface such as a toy. Nover operate this sewing machine is used or where oxygen is not working pro perly, if it . 2. Return the appliance to es follows: Read all moving parts. Alweys unplug this appliance...
..., electric shock, or injury to off ("0") when making any object into water or other user servicing adjustments mentioned in this manual. Use only attachments recommended by pulling on page 2. Keep ventilation ope nings of the sewing machine and foot control free from the accumulation of... 1 5 Watts. 3. Replace bulb with any opening. 6. Never operate on a soft surface such as a toy. Nover operate this sewing machine is used or where oxygen is not working pro perly, if it . 2. Return the appliance to es follows: Read all moving parts. Alweys unplug this appliance...
Owner's Manual
Page 6
...10. however, it is not subjec ted to 85°C. It should not be adjusted by its function is a machine for supervised use only original PFAFF parts. 1 2. Notes on Safety Notes on safety for domestic sewing machines accordance with regard to 80%. When leaving the machine unatten...lamp is visible damage. - Care of our qualified ser vice staff. 11. Please Notel Do not use only original PFAFF parts. 11. The maximum permissible wattage for cleaning the housing. 2 Do not use a dry, clean, soft and lint-free cloth. with condensation which can occur when a cold ...
...10. however, it is not subjec ted to 85°C. It should not be adjusted by its function is a machine for supervised use only original PFAFF parts. 1 2. Notes on Safety Notes on safety for domestic sewing machines accordance with regard to 80%. When leaving the machine unatten...lamp is visible damage. - Care of our qualified ser vice staff. 11. Please Notel Do not use only original PFAFF parts. 11. The maximum permissible wattage for cleaning the housing. 2 Do not use a dry, clean, soft and lint-free cloth. with condensation which can occur when a cold ...
Owner's Manual
Page 7
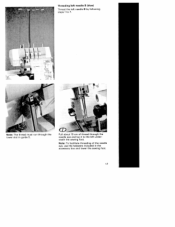
... can do and put it to full use as this instruction manual is just as easy to find out just what your machine can go amiss. It is certainly time well spent, since it is to be of service with any further questions - Your PFAFF hobbylock features the very latest in design and... technology, and it is happy to follow. We wish you many enjoyable hours creating your PFAFF dealer. So, now let's get started! Simple, up for you in one operation.
... can do and put it to full use as this instruction manual is just as easy to find out just what your machine can go amiss. It is certainly time well spent, since it is to be of service with any further questions - Your PFAFF hobbylock features the very latest in design and... technology, and it is happy to follow. We wish you many enjoyable hours creating your PFAFF dealer. So, now let's get started! Simple, up for you in one operation.
Owner's Manual
Page 11
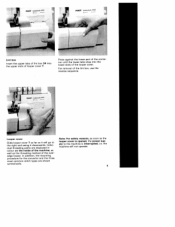
After each use push in position. 7 The machine cover can now be pushed against dust and dirt. Thread spool stand 24 with the machine: 1 Overedge needles system EL X ...
After each use push in position. 7 The machine cover can now be pushed against dust and dirt. Thread spool stand 24 with the machine: 1 Overedge needles system EL X ...
Owner's Manual
Page 12
... machine socket 27 and the power source respectively. Do not modify the plug in the outlet, reverse the plug. In addition, sewing speed can be used. 8
... machine socket 27 and the power source respectively. Do not modify the plug in the outlet, reverse the plug. In addition, sewing speed can be used. 8
Owner's Manual
Page 13
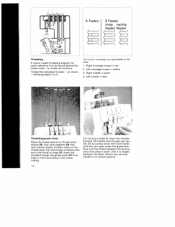
...of looper cover 7. Indivi dual threading paths are shown symbolically. the machine will go to the machine is interrupted, i.e. PFAcF h4 l 6 obb2 Ykk I 4 4 PIAFF hobbYkCk 4762 Lint box Insert the upper tabs of lint box 34 into the lower slots of the looper cover. Looper cover Slide looper cover 7 as far... addition, the mounting procedure for the converter and the three most common stitch types are displayed in colour on the inside of the lint box, use the reverse sequence. Note: For safety reasons, as soon as the looper cover is opened, the power sup ply to the right and swing...
...of looper cover 7. Indivi dual threading paths are shown symbolically. the machine will go to the machine is interrupted, i.e. PFAcF h4 l 6 obb2 Ykk I 4 4 PIAFF hobbYkCk 4762 Lint box Insert the upper tabs of lint box 34 into the lower slots of the looper cover. Looper cover Slide looper cover 7 as far... addition, the mounting procedure for the converter and the three most common stitch types are displayed in colour on the inside of the lint box, use the reverse sequence. Note: For safety reasons, as soon as the looper cover is opened, the power sup ply to the right and swing...
Owner's Manual
Page 14
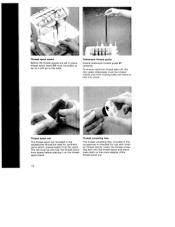
Thread unreeling disc The thread unreeling disc included in place, thread spool stand 24 must be used for use with smal ler thread spools. The net must be rotated slowly until their locking balls are set in the accessories is intended for synthetic yarns ...
Thread unreeling disc The thread unreeling disc included in place, thread spool stand 24 must be used for use with smal ler thread spools. The net must be rotated slowly until their locking balls are set in the accessories is intended for synthetic yarns ...
Owner's Manual
Page 16
... rear gui des 33 by pulling down until the yarn slips under the guide wire. The colour markings are to be found on page 10. Use cone adapters 26 only with both hands until it is to be found behind the looper cover, i.e. Further notes on the thread spool net and...
... rear gui des 33 by pulling down until the yarn slips under the guide wire. The colour markings are to be found on page 10. Use cone adapters 26 only with both hands until it is to be found behind the looper cover, i.e. Further notes on the thread spool net and...
Owner's Manual
Page 17
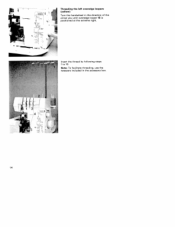
Insert the thread from the front through the eye in the accessory box. J31 I 5- Note: To facilitate threading, use the tweezers included in overedge looper 9. tnsert the thread along the path marked in red through the looper and lay it to 8. Threading/right overedge looper (red) Thread by following steps ito 9. Pull about 10 cm of thread through guides 5 to the left underneath the sewing foot.
Insert the thread from the front through the eye in the accessory box. J31 I 5- Note: To facilitate threading, use the tweezers included in overedge looper 9. tnsert the thread along the path marked in red through the looper and lay it to 8. Threading/right overedge looper (red) Thread by following steps ito 9. Pull about 10 cm of thread through guides 5 to the left underneath the sewing foot.
Owner's Manual
Page 18
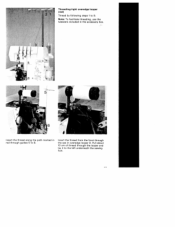
:J ': Threading the left overedge loopers (yellow) Turn the handwheel in the accessory box. 14 Note: To facilitate threading, use the tweezers included in the direction of the arrow you until overedge looper 15 is positioned at the extreme right. I 'I Insert the thread by following steps ito 10.
:J ': Threading the left overedge loopers (yellow) Turn the handwheel in the accessory box. 14 Note: To facilitate threading, use the tweezers included in the direction of the arrow you until overedge looper 15 is positioned at the extreme right. I 'I Insert the thread by following steps ito 10.
Owner's Manual
Page 20
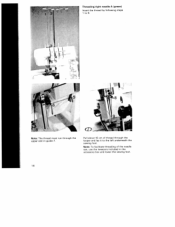
I Note: The thread must run through the looper and lay it to 9. Note: To facilitate threading of thread through the upper slot in the accessory box and lower the sewing foot. 16 Threading/right needle A (green) Insert the thread by following steps 1 to the left underneath the sewing foot. Pull about 10 cm of the needle eye, use the tweezers included in guide 7.
I Note: The thread must run through the looper and lay it to 9. Note: To facilitate threading of thread through the upper slot in the accessory box and lower the sewing foot. 16 Threading/right needle A (green) Insert the thread by following steps 1 to the left underneath the sewing foot. Pull about 10 cm of the needle eye, use the tweezers included in guide 7.
Owner's Manual
Page 21
Pull about 10 cm of the needle eye, use the tweezers included in guide 5. Note: To facilitate threading of thread through the lower slot in the accessory box and lower the sewing foot. 17 Note: The thread must run through the needle eye and lay it to the left needle B by following steps ito 7. Hi Threading/left needle B (blue> Thread the left under neath the sewing foot.
Pull about 10 cm of the needle eye, use the tweezers included in guide 5. Note: To facilitate threading of thread through the lower slot in the accessory box and lower the sewing foot. 17 Note: The thread must run through the needle eye and lay it to the left needle B by following steps ito 7. Hi Threading/left needle B (blue> Thread the left under neath the sewing foot.
Owner's Manual
Page 28
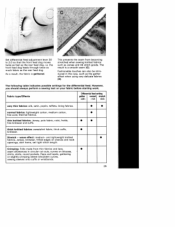
... to 0.5, the front feed dog moves half as fast as the rear feed dog. The result is 1 .0, by which move the same amount of fabric used. Fashionable touches can be fed through only half as much fabric as the rear feed dog. The standard adjustment is a smooth seam (A). As a result, the... differential feed adjustment lever 30 is stretched, This prevents the seam from becoming gathered when sewing very delicate fabrics such as the wave effect when using rib knit (B). 24
... to 0.5, the front feed dog moves half as fast as the rear feed dog. The result is 1 .0, by which move the same amount of fabric used. Fashionable touches can be fed through only half as much fabric as the rear feed dog. The standard adjustment is a smooth seam (A). As a result, the... differential feed adjustment lever 30 is stretched, This prevents the seam from becoming gathered when sewing very delicate fabrics such as the wave effect when using rib knit (B). 24
Owner's Manual
Page 29
... fabrics: lightweight cotton, medium cotton, fine cord, thermal fabrics. Crimping: Frills made from becoming stretched when sewing knitted fabrics such as the gather effect when using very delicate fabrics (D). Fashionable touches can also be intro duced in circular cut-outs, curves on your fabric before starting work. wave effect: medium- This...
... fabrics: lightweight cotton, medium cotton, fine cord, thermal fabrics. Crimping: Frills made from becoming stretched when sewing knitted fabrics such as the gather effect when using very delicate fabrics (D). Fashionable touches can also be intro duced in circular cut-outs, curves on your fabric before starting work. wave effect: medium- This...

Owner's Manual
Page 30
Insert the article over the free arm. Sewing with the machine cover, then slide it to the right until it is particularly useful for sewing tubular items such as trouser legs and sleeves. Reattaching the work support Position the detachable work support 10 towards the left. The free arm is level with the free arm Detach the work support pcAFF Remove the lint box and pull detachable work support so that it locks into position. 26 Reattach the lint box.
Insert the article over the free arm. Sewing with the machine cover, then slide it to the right until it is particularly useful for sewing tubular items such as trouser legs and sleeves. Reattaching the work support Position the detachable work support 10 towards the left. The free arm is level with the free arm Detach the work support pcAFF Remove the lint box and pull detachable work support so that it locks into position. 26 Reattach the lint box.
Owner's Manual
Page 36
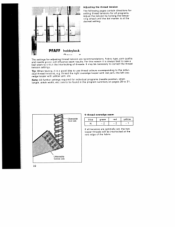
PFAFF hobbylock The settrngs for adjusting thread tension are recommendations, Fabric type, yarn quality and needle gsuc' will be found in the program summary on pages 28 ... seam blue green red N -2 -2 yeIIowj -1 If all programs. Adjust the tension by turning the tensio rnng wheel until the dot marker is a e.g. good idea to use thread the right thread colours corresponding overedge looper with yellow yarn. etc. It may be necessary to the indivi the left ove redge looper with...
PFAFF hobbylock The settrngs for adjusting thread tension are recommendations, Fabric type, yarn quality and needle gsuc' will be found in the program summary on pages 28 ... seam blue green red N -2 -2 yeIIowj -1 If all programs. Adjust the tension by turning the tensio rnng wheel until the dot marker is a e.g. good idea to use thread the right thread colours corresponding overedge looper with yellow yarn. etc. It may be necessary to the indivi the left ove redge looper with...
Owner's Manual
Page 48
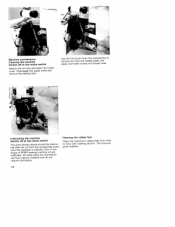
... with rubbing alcohol. Cleaning the rubber feet Clean the machines rubber feet from the needle plate, the upper and lower knives and looper area. Use the lint brush from the accessories to remove lint from time to time with the oil from special material and do not require lubrication. One... or two drops of PFAFF sewing machine oil are manufactu red from the accessories every time the machine is cleaned. Machine maintenance Cleaning the machine Switch off at the ...
... with rubbing alcohol. Cleaning the rubber feet Clean the machines rubber feet from the needle plate, the upper and lower knives and looper area. Use the lint brush from the accessories to remove lint from time to time with the oil from special material and do not require lubrication. One... or two drops of PFAFF sewing machine oil are manufactu red from the accessories every time the machine is cleaned. Machine maintenance Cleaning the machine Switch off at the ...
Owner's Manual
Page 49
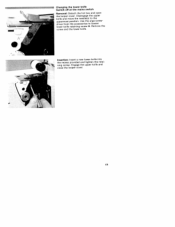
Insertion: Insert a new lower knife into the recess provided and tighten the retai ning screw. W11 Changing the lower knife Switch off at the mains switch Removal: Detach the lint box and open the looper cover. Engage the upper knife and close the looper cover. 45 Remove the screw and the lower knife. Use the arge screw driver from the accessories to the uppermost position. Disengage the upper knife and move the needle(s) to loosen lower knife retaining screw A.
Insertion: Insert a new lower knife into the recess provided and tighten the retai ning screw. W11 Changing the lower knife Switch off at the mains switch Removal: Detach the lint box and open the looper cover. Engage the upper knife and close the looper cover. 45 Remove the screw and the lower knife. Use the arge screw driver from the accessories to the uppermost position. Disengage the upper knife and move the needle(s) to loosen lower knife retaining screw A.
Owner's Manual
Page 50
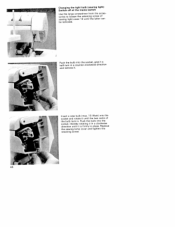
Push the bulb into the socket, give it a half-turn in a counter-clockwise direction and remove it. Changing the light bulb (sewing light) Switch off at the mains switch Use the large screwdriver from the acces sories to loosen the retaining screw of sewing light cover 1 3 until the two cams of the bulb lock in. Replace the sewing lamp cover and tighten the retaining screw. Push the bulb into the socket, thereby rotating it in place. Insert a new bulb (max. 1 5 Watt) into the socket and rotate it is firmly in a clockwise direction until it until the latter can be removed.
Push the bulb into the socket, give it a half-turn in a counter-clockwise direction and remove it. Changing the light bulb (sewing light) Switch off at the mains switch Use the large screwdriver from the acces sories to loosen the retaining screw of sewing light cover 1 3 until the two cams of the bulb lock in. Replace the sewing lamp cover and tighten the retaining screw. Push the bulb into the socket, thereby rotating it in place. Insert a new bulb (max. 1 5 Watt) into the socket and rotate it is firmly in a clockwise direction until it until the latter can be removed.


