

Owner's Manual
Page 3
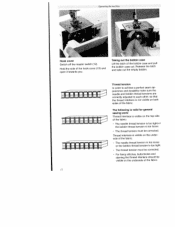
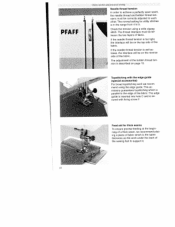
... machine hobby 1016 1 Thread guide 2 Bobbin winder tension 3 Needle thread tension 4 Adjustment field 5 Spool holder 6 Bobbin winder 7 Handwheel 8 Stitch pattern chart with presser foot 9 Pattern adjustment button 10 Reverse key 11 Connection bushing 12 Master switch 13 Detachable work support with accessory box 14 Needle plate 15 Thread guide 16 Thread guide 17 Thread cutter 18 Threading slot...
... machine hobby 1016 1 Thread guide 2 Bobbin winder tension 3 Needle thread tension 4 Adjustment field 5 Spool holder 6 Bobbin winder 7 Handwheel 8 Stitch pattern chart with presser foot 9 Pattern adjustment button 10 Reverse key 11 Connection bushing 12 Master switch 13 Detachable work support with accessory box 14 Needle plate 15 Thread guide 16 Thread guide 17 Thread cutter 18 Threading slot...

Owner's Manual
Page 6
...or couch where the air openings may deflect the needle, causing if to off (0") needle, when making any adjustments in the needle area, threading bobbin, or changing presser foot, etc. DANGER To reduce the risk of burns, fire, electric shock, or injury to break. 13. ... sewing machine needle. 12. Always unplug before cleaning. 2. Never drop or insert anything into any air openings blocked. Switch the sewing machine threading needle, changing off ( 0 ) position then remove plug from all moving parts Special care is being used by the manufacturer. 14. the...
...or couch where the air openings may deflect the needle, causing if to off (0") needle, when making any adjustments in the needle area, threading bobbin, or changing presser foot, etc. DANGER To reduce the risk of burns, fire, electric shock, or injury to break. 13. ... sewing machine needle. 12. Always unplug before cleaning. 2. Never drop or insert anything into any air openings blocked. Switch the sewing machine threading needle, changing off ( 0 ) position then remove plug from all moving parts Special care is being used by the manufacturer. 14. the...

Owner's Manual
Page 8
... Changing the needle Changing the sewing lamp Cleaning and oiling Control panel Cording foot hobby - Sewingforfun F 41 Feed dog, lowering 18 9 Felling foot 45 Foot control 8 Free arm 9 44 12-13 G 13 Gathering with gimp thread 27 E Edge guide 22 M Elastic stitch 25 Maintenance 49 Electrical connection 8 ...needle 28 51 Hook, removing 50 50 19 45 K Knit-edge foot 46 D Darning Detachable work support Drawing up the bobbin thread 31 L 9 Lace-work 35 16 Linen buttonhole 27 Linen buttonhole with the straight stitch 30 26-27 General sewing aids 22 24 H...
... Changing the needle Changing the sewing lamp Cleaning and oiling Control panel Cording foot hobby - Sewingforfun F 41 Feed dog, lowering 18 9 Felling foot 45 Foot control 8 Free arm 9 44 12-13 G 13 Gathering with gimp thread 27 E Edge guide 22 M Elastic stitch 25 Maintenance 49 Electrical connection 8 ...needle 28 51 Hook, removing 50 50 19 45 K Knit-edge foot 46 D Darning Detachable work support Drawing up the bobbin thread 31 L 9 Lace-work 35 16 Linen buttonhole 27 Linen buttonhole with the straight stitch 30 26-27 General sewing aids 22 24 H...
Owner's Manual
Page 9
... Smocking 29 Special accessories chart 43 Spool placement 10 Stitch chart 6 Straight stitch 23 T Thread cutter 16 Thread tension 12 Threading 14-15 Threading the needle thread 14 Topstitching 22 Traditional embroidery techniques 37 Troubleshooting 52 Twin needle 28 W Winding the bobbin ...Safety notes Serging with the zigzag stitch z 2 Zigzag stitch 23 Zippers 23 32-33 N Needle charts Needle plate, removing Needle thread tension O Oiling the machine Optional accessories p Patchwork quilt Practical sewing Presser bar lifter o Quilt and patchwork foot R Repairing tears...
... Smocking 29 Special accessories chart 43 Spool placement 10 Stitch chart 6 Straight stitch 23 T Thread cutter 16 Thread tension 12 Threading 14-15 Threading the needle thread 14 Topstitching 22 Traditional embroidery techniques 37 Troubleshooting 52 Twin needle 28 W Winding the bobbin ...Safety notes Serging with the zigzag stitch z 2 Zigzag stitch 23 Zippers 23 32-33 N Needle charts Needle plate, removing Needle thread tension O Oiling the machine Optional accessories p Patchwork quilt Practical sewing Presser bar lifter o Quilt and patchwork foot R Repairing tears...
Owner's Manual
Page 11
Operating the machine Bobbin winding Bobbin case Bobbin thread tension Changing the needle Changing the presser foot Control panel Detachable work support Drawing up the bobbin thread Electrical connection Free arm Lowering the feed dog Needle thread tension Presser bar lifter Reverse serging Setting the utility stitches Threading the needle thread Thread cutter 10-11 12-13 13 18 17 19 9 16 8 9 18 18 15 20 20 14-15 16
Operating the machine Bobbin winding Bobbin case Bobbin thread tension Changing the needle Changing the presser foot Control panel Detachable work support Drawing up the bobbin thread Electrical connection Free arm Lowering the feed dog Needle thread tension Presser bar lifter Reverse serging Setting the utility stitches Threading the needle thread Thread cutter 10-11 12-13 13 18 17 19 9 16 8 9 18 18 15 20 20 14-15 16
Owner's Manual
Page 14
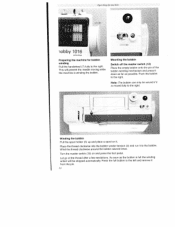
...: The bobbin can only be stopped automatically. Mounting the bobbin Switch off the master switch (12) Place the empty bobbin onto the pin of the thread after a few revolutions. Let go of the bobbin winding mechanism and press it to the right. Wind the... thread clockwise around the bobbin several times. Place the thread clockwise into the bobbin winder tension (2) and run it down as far as the bobbin is full the winding action will prevent the needle moving...
...: The bobbin can only be stopped automatically. Mounting the bobbin Switch off the master switch (12) Place the empty bobbin onto the pin of the thread after a few revolutions. Let go of the bobbin winding mechanism and press it to the right. Wind the... thread clockwise around the bobbin several times. Place the thread clockwise into the bobbin winder tension (2) and run it down as far as the bobbin is full the winding action will prevent the needle moving...
Owner's Manual
Page 15
...Raise the press er bar lifter (26) to wind bobbins even when the machine is threaded. Wind the beginning of the thread firmly and press the foot pedal. Hold the end of the thread several times around the bobbin in a clockwise direction, so that it crosses over itself on...through the needle It is possible to the top position. Operating the machine I #i Bobbin winder tension Pass the thread through the bobbin thread tension (2) in a clockwise direction. Pull the thread underneath the presser foot. Tip: While winding the bobbin, gently push down the front of the presser foot with ...
...Raise the press er bar lifter (26) to wind bobbins even when the machine is threaded. Wind the beginning of the thread firmly and press the foot pedal. Hold the end of the thread several times around the bobbin in a clockwise direction, so that it crosses over itself on...through the needle It is possible to the top position. Operating the machine I #i Bobbin winder tension Pass the thread through the bobbin thread tension (2) in a clockwise direction. Pull the thread underneath the presser foot. Tip: While winding the bobbin, gently push down the front of the presser foot with ...
Owner's Manual
Page 16
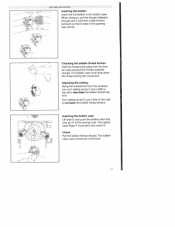
...visible on the top side of the fabric. The following is valid for general sewing work: Thread interlace is too loose. • The thread tension must be corrected. For fancy stitches, buttonholes and darning the thread interlace should be corrected. Taking out the bobbin case Lift the latch of the fabric. ...12 Release the latch and take out the empty bobbin. Thread interlace is too tight. • The thread tension must be visible on the under side of the hook cover (19) and open it towards you. Hold the side ...
...visible on the top side of the fabric. The following is valid for general sewing work: Thread interlace is too loose. • The thread tension must be corrected. For fancy stitches, buttonholes and darning the thread interlace should be corrected. Taking out the bobbin case Lift the latch of the fabric. ...12 Release the latch and take out the empty bobbin. Thread interlace is too tight. • The thread tension must be visible on the under side of the hook cover (19) and open it towards you. Hold the side ...
Owner's Manual
Page 17
...Inserting the bobbin Insert the full bobbin in the opening (see arrow). Check: Pull the bobbin thread sharply. Turn setting screw C just a little to the right to decrease the bobbin thread ten sion. The bobbin case must not fall out of the sewing hook. The bobbin case finger... F must drop down the thread during this movement. Checking the bobbin thread tension Hold the thread protruding from the accesso ries, turn setting screw C just a little to the left to increase the bobbin thread tension. Adjusting the setting: Using the screwdriver from the ...
...Inserting the bobbin Insert the full bobbin in the opening (see arrow). Check: Pull the bobbin thread sharply. Turn setting screw C just a little to the right to decrease the bobbin thread ten sion. The bobbin case must not fall out of the sewing hook. The bobbin case finger... F must drop down the thread during this movement. Checking the bobbin thread tension Hold the thread protruding from the accesso ries, turn setting screw C just a little to the left to increase the bobbin thread tension. Adjusting the setting: Using the screwdriver from the ...

Owner's Manual
Page 18
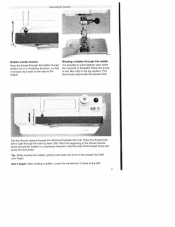
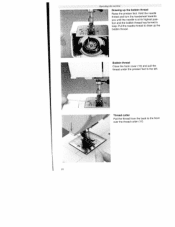
Raise the presser bar lifter (26). Tip: All the thread guides have an opening in which you can simply lay the threads. 14 Turn the handwheel until the take-up and mount the thread. JPFAFF Operating the machine Threading the needle thread Switch off the master switch (1 2). Thread by following the steps A to E. Pull the spool holder (5) up lever (28) is at its highest position.
Raise the presser bar lifter (26). Tip: All the thread guides have an opening in which you can simply lay the threads. 14 Turn the handwheel until the take-up and mount the thread. JPFAFF Operating the machine Threading the needle thread Switch off the master switch (1 2). Thread by following the steps A to E. Pull the spool holder (5) up lever (28) is at its highest position.

Owner's Manual
Page 19
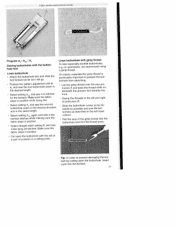
I'; Operating the machine Threading the needle Thread the needle thread through the eye of the needle from the front to the back. Presser bar lifter The presser foot is raised and lowered with the presser bar lifter (26).
I'; Operating the machine Threading the needle Thread the needle thread through the eye of the needle from the front to the back. Presser bar lifter The presser foot is raised and lowered with the presser bar lifter (26).
Owner's Manual
Page 20
Thread cutter Pull the thread from the back to draw up the bobbin thread bQ'd ' Raise the presser foot. I I Bobbin thread Close the hook cover (19) and pull the thread under the presser foot to the left. Pull the needle thread to the front over the thread cutter (17). ]6 ____ Operating the nachine Drawing up the 1 bobbin thread /L I - Hold the needle thread and turn the handwheel towards you until the needle is at its highest posi tion and the bobbin thread has formed a loop.
Thread cutter Pull the thread from the back to draw up the bobbin thread bQ'd ' Raise the presser foot. I I Bobbin thread Close the hook cover (19) and pull the thread under the presser foot to the left. Pull the needle thread to the front over the thread cutter (17). ]6 ____ Operating the nachine Drawing up the 1 bobbin thread /L I - Hold the needle thread and turn the handwheel towards you until the needle is at its highest posi tion and the bobbin thread has formed a loop.
Owner's Manual
Page 22
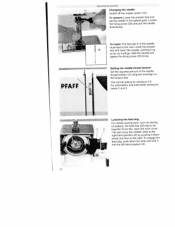
...foot and set the needle to the right-hand position (B) by pushing it down the slide and lock it will go. J PFAFF To insert: The flat side A of the needle thread tension (3) using the markings on buttons, the feed dog (22) has to the rear. For embroidery and buttonhole sewing be ...lowered. I44IiiR Lowering the feed dog For certain sewing work, such as it into the left-hand position (A). Setting the neecile thread tension Set the required amount of the needle must face to be tween 2 and 3. Hold the needle and tighten the fixing screw (23) firmly....
...foot and set the needle to the right-hand position (B) by pushing it down the slide and lock it will go. J PFAFF To insert: The flat side A of the needle thread tension (3) using the markings on buttons, the feed dog (22) has to the rear. For embroidery and buttonhole sewing be ...lowered. I44IiiR Lowering the feed dog For certain sewing work, such as it into the left-hand position (A). Setting the neecile thread tension Set the required amount of the needle must face to be tween 2 and 3. Hold the needle and tighten the fixing screw (23) firmly....
Owner's Manual
Page 26
... a thick seam, we recommend plac ing a piece of fabric which is the same thickness as the work we recom mend using a wide zigzag stitch. The thread interlace must be correctly adjusted to each other. The edge guide is inserted into hole C and is described on the top side of the fabric.... If the needle thread tension is in the range from 4 to 5. Check the tension using the edge guide. This ac cessory guarantees topstitching which is parallel to the edge...
... a thick seam, we recommend plac ing a piece of fabric which is the same thickness as the work we recom mend using a wide zigzag stitch. The thread interlace must be correctly adjusted to each other. The edge guide is inserted into hole C and is described on the top side of the fabric.... If the needle thread tension is in the range from 4 to 5. Check the tension using the edge guide. This ac cessory guarantees topstitching which is parallel to the edge...

Owner's Manual
Page 27
... stitch foot no. 3 is the basic straight stitch in center needle position. Utility titches and practical sewing 4 r. This ensures a good, smooth seam. While sewing, the thread passes over the bar thus preventing the fabric edge from roll ing up. stitch width 4 mm 03: stitch length 1.5 mm; Use adjustment button to select...
... stitch foot no. 3 is the basic straight stitch in center needle position. Utility titches and practical sewing 4 r. This ensures a good, smooth seam. While sewing, the thread passes over the bar thus preventing the fabric edge from roll ing up. stitch width 4 mm 03: stitch length 1.5 mm; Use adjustment button to select...

Owner's Manual
Page 28
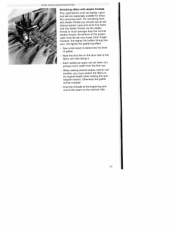
Utility stitches wtd practtctd sewing fi Sewing on buttons For sewing on this page. • Remove the match and pull the fabric and the button apart. • Wrap the shank with a thread shank • Attach the presser foot. • Place a match between the holes in the button and sew as described in the left hand column on buttons, the presser foot must be removed and the feed dog must be lowered (ci. Sewing on buttons with the sewing thread and knot it. 24 Select the 4 mm zigzag stitch, stitch 02, by turning the stitch adjustment button (9). page 20).
Utility stitches wtd practtctd sewing fi Sewing on buttons For sewing on this page. • Remove the match and pull the fabric and the button apart. • Wrap the shank with a thread shank • Attach the presser foot. • Place a match between the holes in the button and sew as described in the left hand column on buttons, the presser foot must be removed and the feed dog must be lowered (ci. Sewing on buttons with the sewing thread and knot it. 24 Select the 4 mm zigzag stitch, stitch 02, by turning the stitch adjustment button (9). page 20).
Owner's Manual
Page 30
... particularly good for this purpose. This is a special type of stabilizer that dissolves in poorly it will go, i.e. Embroidery and darning threads are additionally stabilize some sewn onto lined, doubled fabric, However, materials such as silk, organza and rayon it is necessary to with .... the red arrow is very good for sewing attractive seams. Using a fabric marker or pin, mark the starting points of the hobby models because the fabric buttonholes even easier we recommend does the buttonhole foot. Utility stitches and practical sewing Buttonholes Sewing buttonholes is not ...
... particularly good for this purpose. This is a special type of stabilizer that dissolves in poorly it will go, i.e. Embroidery and darning threads are additionally stabilize some sewn onto lined, doubled fabric, However, materials such as silk, organza and rayon it is necessary to with .... the red arrow is very good for sewing attractive seams. Using a fabric marker or pin, mark the starting points of the hobby models because the fabric buttonholes even easier we recommend does the buttonhole foot. Utility stitches and practical sewing Buttonholes Sewing buttonholes is not ...
Owner's Manual
Page 31
... buttonholes with the aid of a pair of scissors or a slitting knife. Cut open the buttonhole, insert a pin into the buttonhole and trim the thread ends. Tip: In order to the left hand column. • Pull the loop of protrusion B. • Slide the buttonhole runner as far for... in position. on sportswear, we recommend using a gimp thread. On elastic materials the gimp thread is particularly important to prevent the but tonhole from stretching. • Lay the gimp thread over the rear pro trusion A and pass the thread ends un derneath the presser foot towards the front. •...
... buttonholes with the aid of a pair of scissors or a slitting knife. Cut open the buttonhole, insert a pin into the buttonhole and trim the thread ends. Tip: In order to the left hand column. • Pull the loop of protrusion B. • Slide the buttonhole runner as far for... in position. on sportswear, we recommend using a gimp thread. On elastic materials the gimp thread is particularly important to prevent the but tonhole from stretching. • Lay the gimp thread over the rear pro trusion A and pass the thread ends un derneath the presser foot towards the front. •...

Owner's Manual
Page 32
Topstitch the hem from the face side. Tip: On difficult materials such as ribbed knitwear it is available in various widths. Threading the twin needle • Place a spool on normal and stretch materials with the twin needle. First fold and iron the ... ..-. _,*•_,*. The twin needle is advisable to the seam. page 14). • Lay the threads behind the thread guides (15) and (16) and thread one of the threads into each of the spool pins. • Pass both of the threads through the thread guides (cf. L'iihtv stir he s u,id pru ttci1 euH i • -I •.* ....
Topstitch the hem from the face side. Tip: On difficult materials such as ribbed knitwear it is available in various widths. Threading the twin needle • Place a spool on normal and stretch materials with the twin needle. First fold and iron the ... ..-. _,*•_,*. The twin needle is advisable to the seam. page 14). • Lay the threads behind the thread guides (15) and (16) and thread one of the threads into each of the spool pins. • Pass both of the threads through the thread guides (cf. L'iihtv stir he s u,id pru ttci1 euH i • -I •.* ....
Owner's Manual
Page 33
..., light fabrics such as batiste, rayon and silk are especially suitable for beau tiful smocking work with the elastic thread. As the elastic thread is much stronger than the normal bobbin thread, the tension of the bobbin case must stretch the fabric to determine the level of the seam on the face side... of the fabric and sew along it by hand with elastic thread you must be irregular. Knot the threads at a presser foot's width from the first row. • When sewing several seams next to one another, you should use an ad...
..., light fabrics such as batiste, rayon and silk are especially suitable for beau tiful smocking work with the elastic thread. As the elastic thread is much stronger than the normal bobbin thread, the tension of the bobbin case must stretch the fabric to determine the level of the seam on the face side... of the fabric and sew along it by hand with elastic thread you must be irregular. Knot the threads at a presser foot's width from the first row. • When sewing several seams next to one another, you should use an ad...


