Owner's Manual
Page 44
...A • Fold and press the hem allowance inwards. • Fold the hem back on itself so approximately 1/4 inch (6 mm) of topstitching can be determined by the width of C the presser foot. The wrong side of your rows of topstitching by the needle positions. There is finished and sewn at...project should now be facing up. • Place the fabric under the presser foot so that the fold runs along the presser foot for stretchy fabrics. Sewing B Topstitching F The straight stitch can be sewn in cm and inches. The hem is no need to guide the fabric edge along edge guide ...
...A • Fold and press the hem allowance inwards. • Fold the hem back on itself so approximately 1/4 inch (6 mm) of topstitching can be determined by the width of C the presser foot. The wrong side of your rows of topstitching by the needle positions. There is finished and sewn at...project should now be facing up. • Place the fabric under the presser foot so that the fold runs along the presser foot for stretchy fabrics. Sewing B Topstitching F The straight stitch can be sewn in cm and inches. The hem is no need to guide the fabric edge along edge guide ...

Owner's Manual
Page 47
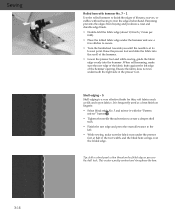
... plate. Cross hem stitch - 17 This highly elastic stitch is often used to the wrong side. • Place the fabric under the presser foot with the edges approximately 1/8 inch (3 mm) apart. • Stitch from the right side of the fabric. Tip: It is available in the small hole at the beginning ...and end of the seam. • Sew 1 or 2 more rows of stitching, using the edge of the presser foot as a guide. • Gather the fabric ...
... plate. Cross hem stitch - 17 This highly elastic stitch is often used to the wrong side. • Place the fabric under the presser foot with the edges approximately 1/8 inch (3 mm) apart. • Stitch from the right side of the fabric. Tip: It is available in the small hole at the beginning ...and end of the seam. • Sew 1 or 2 more rows of stitching, using the edge of the presser foot as a guide. • Gather the fabric ...
Owner's Manual
Page 48
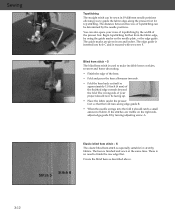
... from fraying and produces a neat and durable edge finish. • Double-fold the fabric edge (about 1/8 inch / 2 mm per fold). • Place the folded fabric edge under the presser foot at its lowest point. It is frequently used as a hem finish on the folded edge as you until... No. 5 and mirror it with hemmer No. 7 - 1 Use the rolled hemmer to finish the edges of the hemmer opening. Raise the presser foot and slide the fabric into the hemmer. Sewing 3:16 Rolled hem with the "Pattern mirror" button . • Tighten the needle thread tension to create a ...
... from fraying and produces a neat and durable edge finish. • Double-fold the fabric edge (about 1/8 inch / 2 mm per fold). • Place the folded fabric edge under the presser foot at its lowest point. It is frequently used as a hem finish on the folded edge as you until... No. 5 and mirror it with hemmer No. 7 - 1 Use the rolled hemmer to finish the edges of the hemmer opening. Raise the presser foot and slide the fabric into the hemmer. Sewing 3:16 Rolled hem with the "Pattern mirror" button . • Tighten the needle thread tension to create a ...

Owner's Manual
Page 54
... small stitches. Tip: Change to create a decorative pattern for your Pfaff expression, e.g. In traditional quilts these three layers of quilts are then sewn together by pin basting your expression with stitch 30 (26/2038) using monofilament thread on top and regular or decorative thread... course, you will also create the pattern on the optional ¼" quilting foot. Sew the pieces together following the seams in the quilt, sew every 3 - 4 inches to follow . Place a safety pin about every 6 - 8 inches (15 - 20 cm). To begin quilting, start sewing from the middle ...
... small stitches. Tip: Change to create a decorative pattern for your Pfaff expression, e.g. In traditional quilts these three layers of quilts are then sewn together by pin basting your expression with stitch 30 (26/2038) using monofilament thread on top and regular or decorative thread... course, you will also create the pattern on the optional ¼" quilting foot. Sew the pieces together following the seams in the quilt, sew every 3 - 4 inches to follow . Place a safety pin about every 6 - 8 inches (15 - 20 cm). To begin quilting, start sewing from the middle ...


