
Owner's Manual
Page 2
... causing it has been dropped or damaged, or dropped into any opening. • Do not use as contained in this sewing machine from all moving parts. To unplug, grasp the plug, not the cord. Special care is required around the Sewing machine needle. • Always use bent needles. • Do not...
... causing it has been dropped or damaged, or dropped into any opening. • Do not use as contained in this sewing machine from all moving parts. To unplug, grasp the plug, not the cord. Special care is required around the Sewing machine needle. • Always use bent needles. • Do not...
Owner's Manual
Page 4
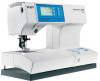
Parts of the sewing machine (model 2048) 1 23 4 14 5 15 16 35 34 6 17 33 18 32 31 30 36 37 38 39 20 21 19 ...
Parts of the sewing machine (model 2048) 1 23 4 14 5 15 16 35 34 6 17 33 18 32 31 30 36 37 38 39 20 21 19 ...

Owner's Manual
Page 5
Parts of the sewing machine (model 2038) 14 123 4 5 16 17 35 18 34 6 33 36 19 32 37 38 39 20 19 7 21 20 31 22 18 8 30 23 17 9 21 ...
Parts of the sewing machine (model 2038) 14 123 4 5 16 17 35 18 34 6 33 36 19 32 37 38 39 20 19 7 21 20 31 22 18 8 30 23 17 9 21 ...

Owner's Manual
Page 19
... flush with numbers. This discoloring may be very difficult or impossible to -wear garment contains a lot of the sewing machine. Arrange the parts in especially red and blue often contain a lot of the hole. If you . Preparations Accessory tray Open the accessory tray by placing your left index...
... flush with numbers. This discoloring may be very difficult or impossible to -wear garment contains a lot of the sewing machine. Arrange the parts in especially red and blue often contain a lot of the hole. If you . Preparations Accessory tray Open the accessory tray by placing your left index...
Owner's Manual
Page 27
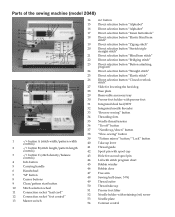
... the presser foot holder. Setting the needle thread tension Set the required amount of the presser foot upwards and at the same time the rear part downwards until it disengages from the presser foot holder (30). Preparations Removing the presser foot Switch off the main switch. Attaching the presser foot Place... presser foot under the presser foot holder (30), so that the presser foot is 4 - 5. For decorative sewing, darning and buttonhole sewing 3. 2:11 Press the front part of the needle thread tension (35) using the markings on the tension dial.
... the presser foot holder. Setting the needle thread tension Set the required amount of the presser foot upwards and at the same time the rear part downwards until it disengages from the presser foot holder (30). Preparations Removing the presser foot Switch off the main switch. Attaching the presser foot Place... presser foot under the presser foot holder (30), so that the presser foot is 4 - 5. For decorative sewing, darning and buttonhole sewing 3. 2:11 Press the front part of the needle thread tension (35) using the markings on the tension dial.

Owner's Manual
Page 49
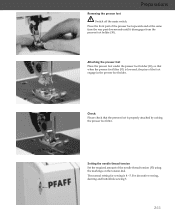
... on the model 2038) give your garments the professional touch. It must spring back slightly so that every buttonhole is a small gap between the two arrows) on buttonhole foot No. 5. 3:17 Snap on the back of fabrics such as it will go. The expression uses sensormatic buttonhole... guide No. 10 and sensors to sew buttonholes on jackets, pants (trousers), blouses or stretch fabrics, 5 different buttonholes (4 on even the most difficult of the needle plate. The white part extends over the needle plate. ...
... on the model 2038) give your garments the professional touch. It must spring back slightly so that every buttonhole is a small gap between the two arrows) on buttonhole foot No. 5. 3:17 Snap on the back of fabrics such as it will go. The expression uses sensormatic buttonhole... guide No. 10 and sensors to sew buttonholes on jackets, pants (trousers), blouses or stretch fabrics, 5 different buttonholes (4 on even the most difficult of the needle plate. The white part extends over the needle plate. ...
Owner's Manual
Page 56
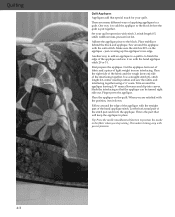
...side of the fabric and the rough (iron-on with the straight part of the stitch just catch into curves. Follow around the applique with stitch 3, stitch length 0.5, stitch width 4-6 mm, presser foot 2A. Set your expression. 4:3 Another way to add an applique to a quilt is put...Trim around the applique leaving 1/8" seam allowance and clip into the applique. When you stop sewing. This makes turning easy with your quilt expression with the satin stitch. Place stabilizer behind the block and applique. Use a straight stitch (1), stitch length 2.0, center needle position and sew ...
...side of the fabric and the rough (iron-on with the straight part of the stitch just catch into curves. Follow around the applique with stitch 3, stitch length 0.5, stitch width 4-6 mm, presser foot 2A. Set your expression. 4:3 Another way to add an applique to a quilt is put...Trim around the applique leaving 1/8" seam allowance and clip into the applique. When you stop sewing. This makes turning easy with your quilt expression with the satin stitch. Place stabilizer behind the block and applique. Use a straight stitch (1), stitch length 2.0, center needle position and sew ...

Owner's Manual
Page 63
...desired stitch again. When leaving the machine, even for only a short time, switch off . Select the desired stitch again. Non-original Parts and Accessories The warranty does not cover any children nearby. The needle plate is running with brush. Display incorrect or no display When static... All segments must be disturbed when the machine is cleaned or is transported (display is being discharged some segments of non-original accessories or parts. 6:3 Push slide A to the right or slide B to sew without fabric under the presser foot. The contrast on again after approx...
...desired stitch again. When leaving the machine, even for only a short time, switch off . Select the desired stitch again. Non-original Parts and Accessories The warranty does not cover any children nearby. The needle plate is running with brush. Display incorrect or no display When static... All segments must be disturbed when the machine is cleaned or is transported (display is being discharged some segments of non-original accessories or parts. 6:3 Push slide A to the right or slide B to sew without fabric under the presser foot. The contrast on again after approx...


