
Owner's Manual
Page 2
... instructions before relamping. If it to break. • Switch the sewing machine off (0") when making any adjustment in the needle area, such as threading needle, changing needle threading bobbin, or changing presser foot etc. • Always unplug the sewing machine from the electric outlet immediately after using and before cleaning. • Always...
... instructions before relamping. If it to break. • Switch the sewing machine off (0") when making any adjustment in the needle area, such as threading needle, changing needle threading bobbin, or changing presser foot etc. • Always unplug the sewing machine from the electric outlet immediately after using and before cleaning. • Always...
Owner's Manual
Page 4
... Bias binder Blind hem Bobbin case Bobbin thread monitor (model 2046) Bobbin thread tension Bobbin thread, drawing up Bobbin winding Bobbin winding through the needle Braiding foot Bridging Buttonhole, fully-automatic Buttonholes Buttonholes with gimp thread Buttonhole tips Buttonholes, types Buttons, sewing ... 2046) 62 Darning, sewing on patches 59, 62-63 Decorative sewing, general notes 84 Decorative stitches, Quilt Expression 2046 10 Decorative stitches, Expression 2034 11 E Elastic utility stitches Electrical connection Eyelet embroidery Eyelets 56-60, 65 19 93 61 F Feed dog,...
... Bias binder Blind hem Bobbin case Bobbin thread monitor (model 2046) Bobbin thread tension Bobbin thread, drawing up Bobbin winding Bobbin winding through the needle Braiding foot Bridging Buttonhole, fully-automatic Buttonholes Buttonholes with gimp thread Buttonhole tips Buttonholes, types Buttons, sewing ... 2046) 62 Darning, sewing on patches 59, 62-63 Decorative sewing, general notes 84 Decorative stitches, Quilt Expression 2046 10 Decorative stitches, Expression 2034 11 E Elastic utility stitches Electrical connection Eyelet embroidery Eyelets 56-60, 65 19 93 61 F Feed dog,...
Owner's Manual
Page 5
..., Integrated Needle, changing Needle, threading Needle/bobbin thread tension Non-elastic/elastic stitches Non-stick fancy stitch foot for leather 0 Overlock stitches P Parts of the sewing machine (2046) Parts of the sewing machine (2034) Patchwork and quilting "Pattern start...Tapering with satin-stitch zigzag Technical data Thread cutter Thread tension, general notes Threading Tie-off Tips for a perfect buttonhole Top feed (integrated dual feed) Twin needle Twin needle, threading U Utility stitches, Quilt Expression 2046 Utility stitches, Expression 2034 V Voltage switch 29 Window, adjusting ...
..., Integrated Needle, changing Needle, threading Needle/bobbin thread tension Non-elastic/elastic stitches Non-stick fancy stitch foot for leather 0 Overlock stitches P Parts of the sewing machine (2046) Parts of the sewing machine (2034) Patchwork and quilting "Pattern start...Tapering with satin-stitch zigzag Technical data Thread cutter Thread tension, general notes Threading Tie-off Tips for a perfect buttonhole Top feed (integrated dual feed) Twin needle Twin needle, threading U Utility stitches, Quilt Expression 2046 Utility stitches, Expression 2034 V Voltage switch 29 Window, adjusting ...
Owner's Manual
Page 7
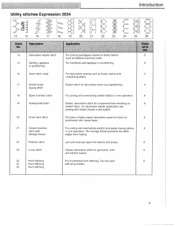
... stitch Join and overcast open knit fabrics and jersey. 6 23 Cross stitch Classic decorative stitch for decorative elastic application and sewing with elastic thread in one operation. I Utility stitches Expression 2034 Il . 4=31 II 14 15 16 17 18 20 21 22 23 24 ách t4o 14 Decorative elastic stitch 15 Quilting...
... stitch Join and overcast open knit fabrics and jersey. 6 23 Cross stitch Classic decorative stitch for decorative elastic application and sewing with elastic thread in one operation. I Utility stitches Expression 2034 Il . 4=31 II 14 15 16 17 18 20 21 22 23 24 ách t4o 14 Decorative elastic stitch 15 Quilting...

Owner's Manual
Page 10
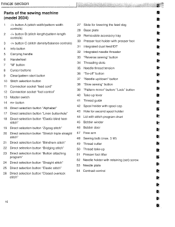
... 12 Connection socket "foot control" 13 Master switch 39 "Pattern mirror" button/ "Lock" button 40 Take-up lever I 14 m+ button 41 Thread guide I 15 Direct selection button "Alphabet" 42 Spool holder with spool cap 16 Direct selection button "Alphabet" 43 Hole for second spool holder 17... attaching program" 24 Direct selection button "Straight stitch" 25 Direct selection button "Elastic stitch" 48 Sewing bulb (max. 5 W) 49 Thread cutter 50 Thread take-up 51 Presser foot lifter 52 Needle holder with retaining (set) screw 53 Needle plate 54 Contrast control 26 Direct selection button ...
... 12 Connection socket "foot control" 13 Master switch 39 "Pattern mirror" button/ "Lock" button 40 Take-up lever I 14 m+ button 41 Thread guide I 15 Direct selection button "Alphabet" 42 Spool holder with spool cap 16 Direct selection button "Alphabet" 43 Hole for second spool holder 17... attaching program" 24 Direct selection button "Straight stitch" 25 Direct selection button "Elastic stitch" 48 Sewing bulb (max. 5 W) 49 Thread cutter 50 Thread take-up 51 Presser foot lifter 52 Needle holder with retaining (set) screw 53 Needle plate 54 Contrast control 26 Direct selection button ...
Owner's Manual
Page 12
...feed!IDT F 5 Carrying handle 32 Integrated needle threader F 6 Handwheel 7 M" button 8 Cursor buttons 33 'Reverse sewing" button 34 Threading slots F 35 Needle thread tension F 9 Clear/pattern start button 36 "Tie-off" button F 10 Stitch selection button 37 "Needle up F 23 Direct selection...Direct selection button "Bridging stitch" 50 Thread take-up /down" button F 11 Connection socket "lead cord" 12 Connection socket "foot control" 38 "Slow sewing" button 39 "Pattern mirror" button! rinicai section Parts of the sewing machine t (model 2034) t 1 -1+ button A (stitch ...
...feed!IDT F 5 Carrying handle 32 Integrated needle threader F 6 Handwheel 7 M" button 8 Cursor buttons 33 'Reverse sewing" button 34 Threading slots F 35 Needle thread tension F 9 Clear/pattern start button 36 "Tie-off" button F 10 Stitch selection button 37 "Needle up F 23 Direct selection...Direct selection button "Bridging stitch" 50 Thread take-up /down" button F 11 Connection socket "lead cord" 12 Connection socket "foot control" 38 "Slow sewing" button 39 "Pattern mirror" button! rinicai section Parts of the sewing machine t (model 2034) t 1 -1+ button A (stitch ...

Owner's Manual
Page 18
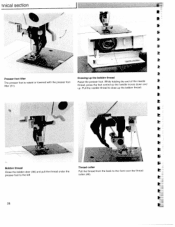
...will be p stopped automatically. I I spool cap of the right size for the thread spool. Push the bobbin to front). Switch on the spool holder. To obtain frut movement of the thread and hold the thread spool firmly, fit I p 22 hnical section ________ I 1!! _ir 1Ih!! 1!!!... the bobbin from the winder. Pull tfi' p thread under the thread guide C (from the front and pull it counterclockwise through the pre-tension device B. Threading Place the thread into guide A from back to the left, cut the 4 thread and remove bobbin from the spool pin Place the sewing...
...will be p stopped automatically. I I spool cap of the right size for the thread spool. Push the bobbin to front). Switch on the spool holder. To obtain frut movement of the thread and hold the thread spool firmly, fit I p 22 hnical section ________ I 1!! _ir 1Ih!! 1!!!... the bobbin from the winder. Pull tfi' p thread under the thread guide C (from the front and pull it counterclockwise through the pre-tension device B. Threading Place the thread into guide A from back to the left, cut the 4 thread and remove bobbin from the spool pin Place the sewing...

Owner's Manual
Page 19
Threading Thread as the bobbin is full, the winding action will be stopped automatically. Cut the thread, push the bobbin to the left and remove bobbin from the second spool holder Insert the second spool holder in the hole provided. _________ i4.qL 1iiriii iii _1 IecFl1kI(u tUUUfl I 204 I '4 22i 23i 24 25 26 1 2 : 2048 27o 2$o Winding from the winder. 23 Switch on page 22. As soon as shown on the master switch Hold the end of the thread firmly and press the foot control.
Threading Thread as the bobbin is full, the winding action will be stopped automatically. Cut the thread, push the bobbin to the left and remove bobbin from the second spool holder Insert the second spool holder in the hole provided. _________ i4.qL 1iiriii iii _1 IecFl1kI(u tUUUfl I 204 I '4 22i 23i 24 25 26 1 2 : 2048 27o 2$o Winding from the winder. 23 Switch on page 22. As soon as shown on the master switch Hold the end of the thread firmly and press the foot control.
Owner's Manual
Page 20
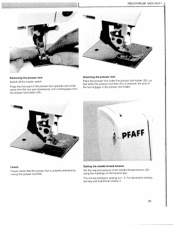
... For the best stitch appearance and durability make sure the needle and bobbin thread tensions are balanced with one another, i.e. The thread tension must be corrected. the threads evenly meet between the two fabrit layers. hnEcal section w Bobbin door Switch off main switch Hold the bobbin door (46)...latch of the bobbin case and pull the bobbin case out of the fabric: The needle thread tension is too tight The thread tension must be corrected. The following is too loose . Top thread is visible on the top side of the machine. S For decorative stitches and buttonholes ...
... For the best stitch appearance and durability make sure the needle and bobbin thread tensions are balanced with one another, i.e. The thread tension must be corrected. the threads evenly meet between the two fabrit layers. hnEcal section w Bobbin door Switch off main switch Hold the bobbin door (46)...latch of the bobbin case and pull the bobbin case out of the fabric: The needle thread tension is too tight The thread tension must be corrected. The following is too loose . Top thread is visible on the top side of the machine. S For decorative stitches and buttonholes ...
Owner's Manual
Page 21
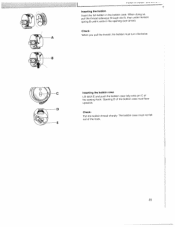
Check: When you pull the thread, the bobbin must turn clockwise. -c Inserting the bobbin case Lift latch E and push the bobbin case fully onto pin C of the hook. The bobbin case must face upwards. E 25 Inserting the bobbin Insert the full bobbin in the opening (see arrow). Check: Pull the bobbin thread sharply. Opening D of the bobbin case must not fall out of the sewing hook. pull the thread sideways through slot A, When doing so, then under tension spring B until it rests in the bobbin case. I I II -
Check: When you pull the thread, the bobbin must turn clockwise. -c Inserting the bobbin case Lift latch E and push the bobbin case fully onto pin C of the hook. The bobbin case must face upwards. E 25 Inserting the bobbin Insert the full bobbin in the opening (see arrow). Check: Pull the bobbin thread sharply. Opening D of the bobbin case must not fall out of the sewing hook. pull the thread sideways through slot A, When doing so, then under tension spring B until it rests in the bobbin case. I I II -

Owner's Manual
Page 22
.... Raise the presser foot lifter (51). Place the thread on the + $. A To thread the needle, please refer to the take -up lever (40). Place the thread from right to right Pass the thread downwards in the right threading slot and upwards to the next page. 1I PFAFF S 26 Threading the needle t I Ia a I I - - nical section I Switch off the...
.... Raise the presser foot lifter (51). Place the thread on the + $. A To thread the needle, please refer to the take -up lever (40). Place the thread from right to right Pass the thread downwards in the right threading slot and upwards to the next page. 1I PFAFF S 26 Threading the needle t I Ia a I I - - nical section I Switch off the...
Owner's Manual
Page 23
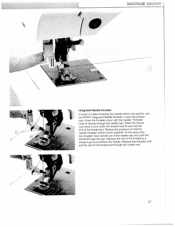
... Place the thread over hook 0 and under the thread hook R and hold the end of the thread so a thread loop forms behind the needle. Threader hook R swivels through the needle eye. 27 Release the threader and pull the rest of the needle eye and pulls the thread through the eye...that the needle threader slowly moves upwards. Release the end of the thread taut. Integrated Needle threader In order to make threading the needle easier and quicker. Lower the presser foot. aecnncaa sectkjri I / - use the PFAFF Integrated Needle threader. At the same time the threader hook swivels ...
... Place the thread over hook 0 and under the thread hook R and hold the end of the thread so a thread loop forms behind the needle. Threader hook R swivels through the needle eye. 27 Release the threader and pull the rest of the needle eye and pulls the thread through the eye...that the needle threader slowly moves upwards. Release the end of the thread taut. Integrated Needle threader In order to make threading the needle easier and quicker. Lower the presser foot. aecnncaa sectkjri I / - use the PFAFF Integrated Needle threader. At the same time the threader hook swivels ...
Owner's Manual
Page 24
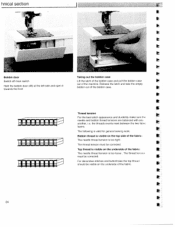
Drawing-up . I I w Presser foot lifter The presser foot is raised or lowered with the presser foot lifter (51). Pull the needle thread to the front over the thread cutter (49), 28 ,nicaI section I 5 V 1 S Bobbin thread Close the bobbin door (46) and pull the thread under the presser foot to the left Thread cutter Pull the thread from the back to draw up the bobbin thread. While holding the end of the needle thread, press the foot control so the needle moves down and up the bobbin thread Raise the presser foot.
Drawing-up . I I w Presser foot lifter The presser foot is raised or lowered with the presser foot lifter (51). Pull the needle thread to the front over the thread cutter (49), 28 ,nicaI section I 5 V 1 S Bobbin thread Close the bobbin door (46) and pull the thread under the presser foot to the left Thread cutter Pull the thread from the back to draw up the bobbin thread. While holding the end of the needle thread, press the foot control so the needle moves down and up the bobbin thread Raise the presser foot.
Owner's Manual
Page 25
...the presser foot holder (30). le(1111K.a1 StUuull / / - -F -F Removing the presser foot Switch off the master switch Press the front part of the needle thread tension (35) using the markings on the tension dial. so that when the presser foot lifter (51)is lowered, the pins of the foot engage... in the presser foot holder. •pFAFF Check: Please check that the presser toot is 4 - 5. The normal setting for sewing is properly attached by raising the presser foot lifter. Setting the ...
...the presser foot holder (30). le(1111K.a1 StUuull / / - -F -F Removing the presser foot Switch off the master switch Press the front part of the needle thread tension (35) using the markings on the tension dial. so that when the presser foot lifter (51)is lowered, the pins of the foot engage... in the presser foot holder. •pFAFF Check: Please check that the presser toot is 4 - 5. The normal setting for sewing is properly attached by raising the presser foot lifter. Setting the ...
Owner's Manual
Page 26
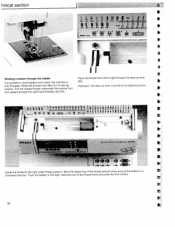
...and upward through the take U-up lever (40). g C 11 1* - Important: The take -up lever must be at its highest position. Wind the beginning of the thread firmly and press the foot control. 30 hnical section i'4 2e 3 4 b • 11 I 31* * a. . 3Q ) I I - - I I Winding... a bobbin through the needle It is possible to wind bobbins even when the machine is fully threaded. Place the thread from left to the top position. Raise the presser toot lifter (51) to right through the right-hand threader slot (34).
...and upward through the take U-up lever (40). g C 11 1* - Important: The take -up lever must be at its highest position. Wind the beginning of the thread firmly and press the foot control. 30 hnical section i'4 2e 3 4 b • 11 I 31* * a. . 3Q ) I I - - I I Winding... a bobbin through the needle It is possible to wind bobbins even when the machine is fully threaded. Place the thread from left to the top position. Raise the presser toot lifter (51) to right through the right-hand threader slot (34).

Owner's Manual
Page 27
...the needle must face to the left into the thread guide and thread the needles (for additional details, see "Decorative stitches with the twin needle" p. 85). Continue threading in the left threading slot (34), make sure that you pass one spool of thread on each to the rear. To insert: The...of the spool holders. Note It is not possible to its highest position. Loosen the needle screw (52) and pull the needle out downwards. Threading the twin needle: Replace the sewing needle with a twin needle. 31 Hold the needle and tighten the needle screw (52) firmly. Technica'...
...the needle must face to the left into the thread guide and thread the needles (for additional details, see "Decorative stitches with the twin needle" p. 85). Continue threading in the left threading slot (34), make sure that you pass one spool of thread on each to the rear. To insert: The...of the spool holders. Note It is not possible to its highest position. Loosen the needle screw (52) and pull the needle out downwards. Threading the twin needle: Replace the sewing needle with a twin needle. 31 Hold the needle and tighten the needle screw (52) firmly. Technica'...
Owner's Manual
Page 31
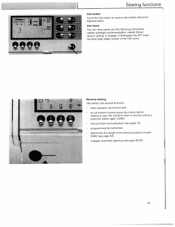
Sewing functions Adjusting the contrast in the Expression window 36 Stitch selection 36 Bobbin thread monitor (model 2046) 37 Altering pattern sizes 37 Altering the stitch width/needle position 38 4ltering the pattern th/stitch length 38, 39 A1ring the pattern tenØVstitch density 39 Sa1ate 40 jnfobutton/reverse sewing button 41 Sewtrgfuction buttons 42 btton 43 :. 44 45
Sewing functions Adjusting the contrast in the Expression window 36 Stitch selection 36 Bobbin thread monitor (model 2046) 37 Altering pattern sizes 37 Altering the stitch width/needle position 38 4ltering the pattern th/stitch length 38, 39 A1ring the pattern tenØVstitch density 39 Sa1ate 40 jnfobutton/reverse sewing button 41 Sewtrgfuction buttons 42 btton 43 :. 44 45

Owner's Manual
Page 33
Altering stitches Adjust the length, width, balance, density or needle position of stitches by touching the appropriate -1+ buttons to sew again. 9 Sewing functions Bobbin thread monitor (model 2046) If the bobbin is nearing its end [2 ¼ yd (2 m)-3 1/4 yd (3 m)], or there is no thread on the bobbin, the bobbin symbol appears in the window. The symbol disappears after a full bobbin is visible in the window. Each change is inserted and you start to the right ol the window. cha Stitch width Pattern width Needle position for straight stitches
Altering stitches Adjust the length, width, balance, density or needle position of stitches by touching the appropriate -1+ buttons to sew again. 9 Sewing functions Bobbin thread monitor (model 2046) If the bobbin is nearing its end [2 ¼ yd (2 m)-3 1/4 yd (3 m)], or there is no thread on the bobbin, the bobbin symbol appears in the window. The symbol disappears after a full bobbin is visible in the window. Each change is inserted and you start to the right ol the window. cha Stitch width Pattern width Needle position for straight stitches
Owner's Manual
Page 37
... gives you press the button again (2046) manual finish of a buttonhole (see page 72) programming the buttonhole determines the length of the info menu. needle thread tension setting, to receive information about the selected stitch. "0, Sewing functions Info button Touch the info button to engage or disengage the IDT, lower the...
... gives you press the button again (2046) manual finish of a buttonhole (see page 72) programming the buttonhole determines the length of the info menu. needle thread tension setting, to receive information about the selected stitch. "0, Sewing functions Info button Touch the info button to engage or disengage the IDT, lower the...
Owner's Manual
Page 49
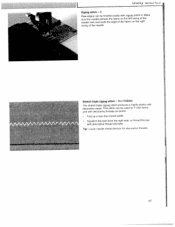
... the right swing of the needle. Zigzag stitch -3 Raw edges can be finished easily with decorative thread and sew. Tip: Lower needle thread tension tor decorative threads. 57 S I Stretch triple zigzag stitch - 15 (17/2034) The stretch triple zigzag stitch produces a highly elastic and decorative seam. Make sure the needle pierces fhe fabric on...
... the right swing of the needle. Zigzag stitch -3 Raw edges can be finished easily with decorative thread and sew. Tip: Lower needle thread tension tor decorative threads. 57 S I Stretch triple zigzag stitch - 15 (17/2034) The stretch triple zigzag stitch produces a highly elastic and decorative seam. Make sure the needle pierces fhe fabric on...


