
Owner's Manual
Page 1
Instruction manual $ PFRFF'\. £4 1• pcM a
Instruction manual $ PFRFF'\. £4 1• pcM a
Owner's Manual
Page 2
... risk of electric shock, this plug is i ii iii polimrized outlet only one blade wider than the other user servicing adjustments mentioned in the instruction manual. • Never drop or insert any opening. : • Do not use as contained in any air openings blocked Keep ventilation openings of the... INSTRUCTIONS F or tlw USA and Canada Ii ii 'ii him mis a polarized plug (one way. Do not modify the plug in this manual. • Never operate this manual. To reduce the risk of lint, dust, and loose cloth. • Keep fingers awoy from outlet. • Do not unplug by ...
... risk of electric shock, this plug is i ii iii polimrized outlet only one blade wider than the other user servicing adjustments mentioned in the instruction manual. • Never drop or insert any opening. : • Do not use as contained in any air openings blocked Keep ventilation openings of the... INSTRUCTIONS F or tlw USA and Canada Ii ii 'ii him mis a polarized plug (one way. Do not modify the plug in this manual. • Never operate this manual. To reduce the risk of lint, dust, and loose cloth. • Keep fingers awoy from outlet. • Do not unplug by ...
Owner's Manual
Page 37
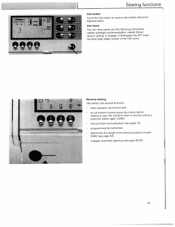
... machine sews in reverse until you the following information: needle size/type recommendation. Info menu The info menu gives you press the button again (2046) manual finish of a buttonhole (see page 89-90) I I 41 Reverse sewing This button has several functions: when pressed, will reverse sew 9 • for permanent reverse press...
... machine sews in reverse until you the following information: needle size/type recommendation. Info menu The info menu gives you press the button again (2046) manual finish of a buttonhole (see page 89-90) I I 41 Reverse sewing This button has several functions: when pressed, will reverse sew 9 • for permanent reverse press...
Owner's Manual
Page 61
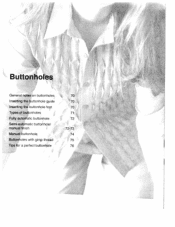
manual finish Manual buttonhole Buttonholes with gimp thread Tips for a perfect buttonhole 70 70 70 71 72 72-73 74 75 76 Buttonholes General notes on buttonholes Inserting the buttonhole guide Inserting the buttonhole foot Types of button holes Fully automatic buttonhole Semi-automatic buttonhole!
manual finish Manual buttonhole Buttonholes with gimp thread Tips for a perfect buttonhole 70 70 70 71 72 72-73 74 75 76 Buttonholes General notes on buttonholes Inserting the buttonhole guide Inserting the buttonhole foot Types of button holes Fully automatic buttonhole Semi-automatic buttonhole!
Owner's Manual
Page 62
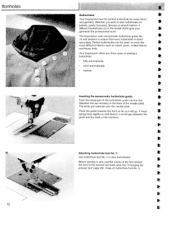
...slightly so that every buttonhole is a small gap between the two arrows) on the model 2034) give your garments the professional touch. p Press the guide towards the front as far as...Whether you three ways of sewing a buttonhole: fully automatically • semi-automatically • manual Inserting the sensormatic buttonhole guide: Push the metal part of the buttonhole guide into the slot...5 to the second red mark (also see "Changing the presser foot" page 29). The Expression uses sensormatic buttonhole guide No. 10 and sensors to ensure that there is sized accurately. Perfect buttonholes...
...slightly so that every buttonhole is a small gap between the two arrows) on the model 2034) give your garments the professional touch. p Press the guide towards the front as far as...Whether you three ways of sewing a buttonhole: fully automatically • semi-automatically • manual Inserting the sensormatic buttonhole guide: Push the metal part of the buttonhole guide into the slot...5 to the second red mark (also see "Changing the presser foot" page 29). The Expression uses sensormatic buttonhole guide No. 10 and sensors to ensure that there is sized accurately. Perfect buttonholes...
Owner's Manual
Page 64
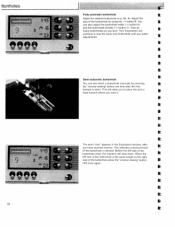
...or back bartack where you wish. This indicates a manual finish of the buttonhole is the same length as you want it. I Select the desired buttonhole (e.g. ttonholes "99 "'9 72 Fully automatic buttonhole I The word "man' appears in the Expression window, after the first bartack is sewn. No.... 9). Sew as many buttonholes as the right side of the buttonhole is desired. Your Expression will I t Semi-automatic buttonhole You can also adjust the buttonhole width (-1÷ button A) and the buttonhole density (-1+ button C). ...
...or back bartack where you wish. This indicates a manual finish of the buttonhole is the same length as you want it. I Select the desired buttonhole (e.g. ttonholes "99 "'9 72 Fully automatic buttonhole I The word "man' appears in the Expression window, after the first bartack is sewn. No.... 9). Sew as many buttonholes as the right side of the buttonhole is desired. Your Expression will I t Semi-automatic buttonhole You can also adjust the buttonhole width (-1÷ button A) and the buttonhole density (-1+ button C). ...
Owner's Manual
Page 66
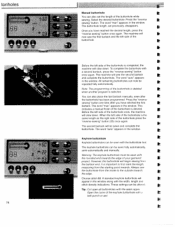
...Tip: Cut open all buttonholes with the width, length and stitch density indications. These settings can be sewn fully automatically, semi-automatically and manually. Press the "reverse sewing" button. The machine will appear in the window. even after the buttonhole has been programmed Press the "... sewing" button once again. The word "auto" appears in wards. Keyhole buttonhole Keyhole buttonholes can also place the last bartack manually. Warning: The keyhole buttonhole must be sewn and complete the buttonhole. project. Choose stitch 88. Open the curve of the buttonhole.
...Tip: Cut open all buttonholes with the width, length and stitch density indications. These settings can be sewn fully automatically, semi-automatically and manually. Press the "reverse sewing" button. The machine will appear in the window. even after the buttonhole has been programmed Press the "... sewing" button once again. The word "auto" appears in wards. Keyhole buttonhole Keyhole buttonholes can also place the last bartack manually. Warning: The keyhole buttonhole must be sewn and complete the buttonhole. project. Choose stitch 88. Open the curve of the buttonhole.

Owner's Manual
Page 80
Manual change the stitch from 0 to 6 mm and reduce it again to 0 mm. Begin sewing. • With -1+ button A increase the width from a right (C) to left needle ... needle thread tension to 3. Select the zigzag stitch needle position (stitch 11/2046, 12/2034). Note: If you also have selected the right or left (A) needle position stitch. Pressing the I Tapering with the satinstitch zigzag With your Expression you have the option of increasing or decreasing the width of a zigzag seam is...
Manual change the stitch from 0 to 6 mm and reduce it again to 0 mm. Begin sewing. • With -1+ button A increase the width from a right (C) to left needle ... needle thread tension to 3. Select the zigzag stitch needle position (stitch 11/2046, 12/2034). Note: If you also have selected the right or left (A) needle position stitch. Pressing the I Tapering with the satinstitch zigzag With your Expression you have the option of increasing or decreasing the width of a zigzag seam is...

Owner's Manual
Page 81
...point. The machine stops at an angle of a border, select z 9 zai g stitch No. 11/2046, 12/2034. I • Using -1+ button A increase and reduce the width while 4) 1' sewing. (1 A B ci ... will be sewn automatically at the taper and the needle remains in one direction. Manual change/Irregular pattern • Place stabilizer under fabric. • Set needle thread tension...the length you would like placemats, cushions and valances. A dense zigzag stitch appears in the Expression window and beside it the word 'tapering' with this technique. Try creating flowers and leaves with...
...point. The machine stops at an angle of a border, select z 9 zai g stitch No. 11/2046, 12/2034. I • Using -1+ button A increase and reduce the width while 4) 1' sewing. (1 A B ci ... will be sewn automatically at the taper and the needle remains in one direction. Manual change/Irregular pattern • Place stabilizer under fabric. • Set needle thread tension...the length you would like placemats, cushions and valances. A dense zigzag stitch appears in the Expression window and beside it the word 'tapering' with this technique. Try creating flowers and leaves with...
Owner's Manual
Page 97
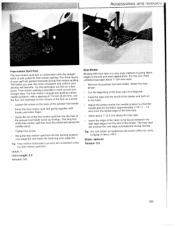
... will go. Accessones ana rieeua,s Free-motion Quilt Foot The tree-motion quilt foot in both curved and straight lines. The three layers are guided manually during sewing. For free-motion, straight-line quilting (center needle position), with a spacing of 1)4 inch (6.35 mm), use the four red markings on a test piece...
... will go. Accessones ana rieeua,s Free-motion Quilt Foot The tree-motion quilt foot in both curved and straight lines. The three layers are guided manually during sewing. For free-motion, straight-line quilting (center needle position), with a spacing of 1)4 inch (6.35 mm), use the four red markings on a test piece...
Owner's Manual
Page 110
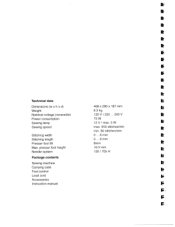
k F F F F F F F F F F F F Technical data Dimensions (w x h x d) Weight Nominal voltage (reversible) Power consumption Sewing lamp Sewing speed Stitching width Stitching length Presser foot lift Max. presser foot height Needle system Package contents Sewing machine Carrying case Foot control Lead cord Accessories Instruction manual 408 x 290 x 187 mm 8.3 kg 120 V / 220 ... 240 V 75 W 12 V/max. 5W max. 950 stitches/mm mm. 80 stitches/mm 0 6 mm ... 0. 6 mm 8mm 10.5mm 130 / 705 H F F
k F F F F F F F F F F F F Technical data Dimensions (w x h x d) Weight Nominal voltage (reversible) Power consumption Sewing lamp Sewing speed Stitching width Stitching length Presser foot lift Max. presser foot height Needle system Package contents Sewing machine Carrying case Foot control Lead cord Accessories Instruction manual 408 x 290 x 187 mm 8.3 kg 120 V / 220 ... 240 V 75 W 12 V/max. 5W max. 950 stitches/mm mm. 80 stitches/mm 0 6 mm ... 0. 6 mm 8mm 10.5mm 130 / 705 H F F


