
Owner's Manual
Page 2
... push fabric whilo stitching. * IMPORTANT SAFETY INSTRUCTIONS When using an electrical appliance, basic safety precautions should never be followed, including the following: Read all moving parts. It may deflect the needle causing it to be used as a toy Close attention is necessary when this sewing machine is required around the sewing...
... push fabric whilo stitching. * IMPORTANT SAFETY INSTRUCTIONS When using an electrical appliance, basic safety precautions should never be followed, including the following: Read all moving parts. It may deflect the needle causing it to be used as a toy Close attention is necessary when this sewing machine is required around the sewing...
Owner's Manual
Page 5
...bobbin thread tension Non-elastic/elastic stitches Non-stick fancy stitch foot for leather 0 Overlock stitches P Parts of the sewing machine (2046) Parts of the sewing machine (2034) Patchwork and quilting "Pattern start' 'Pattern start" within stitch sequence Pattern length/pattern width, changing...-off Tips for a perfect buttonhole Top feed (integrated dual feed) Twin needle Twin needle, threading U Utility stitches, Quilt Expression 2046 Utility stitches, Expression 2034 V Voltage switch 29 Window, adjusting the contrast z 21 Zippers, sewing in 59 41 1/4 inch quilt and patchwork foot 66...
...bobbin thread tension Non-elastic/elastic stitches Non-stick fancy stitch foot for leather 0 Overlock stitches P Parts of the sewing machine (2046) Parts of the sewing machine (2034) Patchwork and quilting "Pattern start' 'Pattern start" within stitch sequence Pattern length/pattern width, changing...-off Tips for a perfect buttonhole Top feed (integrated dual feed) Twin needle Twin needle, threading U Utility stitches, Quilt Expression 2046 Utility stitches, Expression 2034 V Voltage switch 29 Window, adjusting the contrast z 21 Zippers, sewing in 59 41 1/4 inch quilt and patchwork foot 66...
Owner's Manual
Page 12
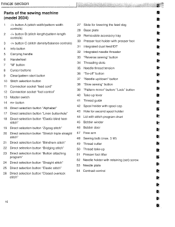
... stitch" 53 Needle plate F 25 Direct selection button "Elastic stitch" 26 Direct selection button "Closed overlock 54 Contrast control F stitch" F F F * rinicai section Parts of the sewing machine t (model 2034) t 1 -1+ button A (stitch width/pattern width controls) 27 Slide for second spool holder 44 Lid with stitch program chart r F stitch" 45 Bobbin winder 19...
... stitch" 53 Needle plate F 25 Direct selection button "Elastic stitch" 26 Direct selection button "Closed overlock 54 Contrast control F stitch" F F F * rinicai section Parts of the sewing machine t (model 2034) t 1 -1+ button A (stitch width/pattern width controls) 27 Slide for second spool holder 44 Lid with stitch program chart r F stitch" 45 Bobbin winder 19...
Owner's Manual
Page 16
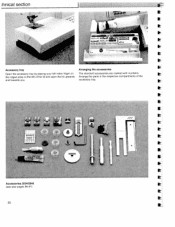
caI!!ctio_J I I Arrange the parts in the respective compartments of the accessory tray. I I I I I Accessory tray Open the accessory tray by placing your left index finger on the ridged area on the left ot the lid and open the lid upwards and towards you. Arranging the accessories The standard accessories are marked with numbers. I I 'U A I t iT Accessories 2034/2046 (see also pages 96-97) 20 I I I S I 4. &Uaa4 arnas at.4 Ta a sa.
caI!!ctio_J I I Arrange the parts in the respective compartments of the accessory tray. I I I I I Accessory tray Open the accessory tray by placing your left index finger on the ridged area on the left ot the lid and open the lid upwards and towards you. Arranging the accessories The standard accessories are marked with numbers. I I 'U A I t iT Accessories 2034/2046 (see also pages 96-97) 20 I I I S I 4. &Uaa4 arnas at.4 Ta a sa.
Owner's Manual
Page 25
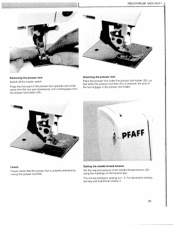
...the presser toot is 4 - 5. Setting the needle thread tension Set the required amount of the foot engage in the presser foot holder. •pFAFF Check: Please check that when the presser foot lifter (51)is lowered, the pins of the needle thread tension (35) using the markings on the.... le(1111K.a1 StUuull / / - -F -F Removing the presser foot Switch off the master switch Press the front part of the presser foot upwards and at the same time the rear part downwards until it disengages from the presser foot holder (30). The normal setting for sewing is properly attached by...
...the presser toot is 4 - 5. Setting the needle thread tension Set the required amount of the foot engage in the presser foot holder. •pFAFF Check: Please check that when the presser foot lifter (51)is lowered, the pins of the needle thread tension (35) using the markings on the.... le(1111K.a1 StUuull / / - -F -F Removing the presser foot Switch off the master switch Press the front part of the presser foot upwards and at the same time the rear part downwards until it disengages from the presser foot holder (30). The normal setting for sewing is properly attached by...
Owner's Manual
Page 62
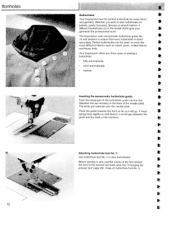
...as far as velvet, plush, knitted fabrics and heavy knits. p ttonholes 70 Buttonholes Your Expression has the perfect buttonhole for every fabric and garment. t The white part extends over the needle plate. Your Expression offers you wish to the second red mark (also see "Changing the presser foot" page... guide: Push the metal part of the buttonhole guide into the slot (between the guide and the back of the needle plate. ft must S spring back slightly so that every buttonhole is a small gap between the two arrows) on the model 2034) give your garments the professional...
...as far as velvet, plush, knitted fabrics and heavy knits. p ttonholes 70 Buttonholes Your Expression has the perfect buttonhole for every fabric and garment. t The white part extends over the needle plate. Your Expression offers you wish to the second red mark (also see "Changing the presser foot" page... guide: Push the metal part of the buttonhole guide into the slot (between the guide and the back of the needle plate. ft must S spring back slightly so that every buttonhole is a small gap between the two arrows) on the model 2034) give your garments the professional...

Owner's Manual
Page 74
...This makes turning easy with the straight part of the applique and sew it down. I I I I stitch width 4-6 mm, presser foot 2. just covering up the applique's raw edge. Use a straight stitch (1), stitch I Set your Quilt Expression with the hand applique stitch 15 (2034) / 28 (2046). I length 2.0,... side of applying appliques to the block. Another way to add an applique to position the needle in place. Let the horizontal part of light weight iron on with stitch 3, stitch length 0.5. I There are satisfied with the satin stitch. Tip: Press the ...
...This makes turning easy with the straight part of the applique and sew it down. I I I I stitch width 4-6 mm, presser foot 2. just covering up the applique's raw edge. Use a straight stitch (1), stitch I Set your Quilt Expression with the hand applique stitch 15 (2034) / 28 (2046). I length 2.0,... side of applying appliques to the block. Another way to add an applique to position the needle in place. Let the horizontal part of light weight iron on with stitch 3, stitch length 0.5. I There are satisfied with the satin stitch. Tip: Press the ...


