
Features and Benefits
Page 1
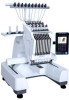
...-angle cap system allows users to 12" x 8" (310 x 210mm) in the design. 4 HOOPS INCLUDED Work on a variety of the time. Embroider the perfect cap with ease. AUTOMATIC COLOR CHANGE The creative stylist™ MN 110 automatically moves to . A multiangle, rotatable, and adjustable control panel bracket allows for better visibility. ® PFAFF®creative stylist™ MN 110 FEATURES AND BENEFITS Top Features SINGLE HEAD WITH 10 NEEDLES Embroider complex designs in a fraction of...
...-angle cap system allows users to 12" x 8" (310 x 210mm) in the design. 4 HOOPS INCLUDED Work on a variety of the time. Embroider the perfect cap with ease. AUTOMATIC COLOR CHANGE The creative stylist™ MN 110 automatically moves to . A multiangle, rotatable, and adjustable control panel bracket allows for better visibility. ® PFAFF®creative stylist™ MN 110 FEATURES AND BENEFITS Top Features SINGLE HEAD WITH 10 NEEDLES Embroider complex designs in a fraction of...
Features and Benefits
Page 2
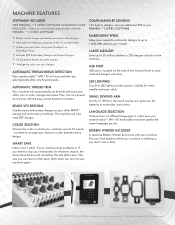
... languages to embroider designs at any thread breaks. All rights reserved This way you can wind bobbins while your machine. SMART SAVE Never miss a stitch. USB PORT USB port is stitching so you automatically when any time with your machine is located on your designs AUTOMATIC THREAD BREAK DETECTION Your creative stylist™ MN 110 will also read DST designs. BOBBIN WINDER INCLUDED A separate Bobbin Winder Set comes with the easy-access thread trim button. AUTOMATIC THREAD TRIM Your machine will automatically cut threads with the...
... languages to embroider designs at any thread breaks. All rights reserved This way you can wind bobbins while your machine. SMART SAVE Never miss a stitch. USB PORT USB port is stitching so you automatically when any time with your machine is located on your designs AUTOMATIC THREAD BREAK DETECTION Your creative stylist™ MN 110 will also read DST designs. BOBBIN WINDER INCLUDED A separate Bobbin Winder Set comes with the easy-access thread trim button. AUTOMATIC THREAD TRIM Your machine will automatically cut threads with the...

Manual
Page 2
... touch needles or sharp embroidery machine parts when installing or removing embroidery frames, accessory fittings or while providing maintenance to make sure the ventilation opening while the embroidery machine is being used near hot gas, an electric burner, an oven, a gas or electric cooktop, an open flame, an iron, or steam embroidery machine. • To turn off the embroidery machine press the "Stop" button, turn off and unplug the embroidery machine from...
... touch needles or sharp embroidery machine parts when installing or removing embroidery frames, accessory fittings or while providing maintenance to make sure the ventilation opening while the embroidery machine is being used near hot gas, an electric burner, an oven, a gas or electric cooktop, an open flame, an iron, or steam embroidery machine. • To turn off the embroidery machine press the "Stop" button, turn off and unplug the embroidery machine from...

Manual
Page 3
... used when moving the embroidery machine to prevent any of the removable parts. • The embroidery machine's power cord MUST be carried between two people. contact your fingers. • Do NOT leave the embroidery machine unattended while in use tweezers or pliers to service the embroidery machine. • For extra protection, when operating the embroidery machine, use safety glasses and closed toe shoes to prevent injuries. • To replace the needles, use...
... used when moving the embroidery machine to prevent any of the removable parts. • The embroidery machine's power cord MUST be carried between two people. contact your fingers. • Do NOT leave the embroidery machine unattended while in use tweezers or pliers to service the embroidery machine. • For extra protection, when operating the embroidery machine, use safety glasses and closed toe shoes to prevent injuries. • To replace the needles, use...

Manual
Page 4
... is provided on how to use an extension cord with them are NOT responsible or liable for grounding be replaced by qualified service personnel. SAVE THESE INSTRUCTIONS THIS EMBROIDERY MACHINE IS FOR INDOOR HOUSEHOLD USE ONLY SERVICING OF DOUBLE INSULATED PRODUCTS In a double-insulated product, two systems of fire or electric shock, DO NOT attempt to remove the outer cover. Replacement parts for anything else other...
... is provided on how to use an extension cord with them are NOT responsible or liable for grounding be replaced by qualified service personnel. SAVE THESE INSTRUCTIONS THIS EMBROIDERY MACHINE IS FOR INDOOR HOUSEHOLD USE ONLY SERVICING OF DOUBLE INSULATED PRODUCTS In a double-insulated product, two systems of fire or electric shock, DO NOT attempt to remove the outer cover. Replacement parts for anything else other...
Manual
Page 5
... Specifications 14 Bobbin winder overview 14 Assembling the bobbin winder 15 Winding the bobbin 15 Bobbin overview 16 Placing the bobbin in the bobbin case 16 Inserting the bobbin case into the rotary hook 17 Removing the bobbin 17 Threading the top threads 18 Threading the thread rack 19 Threading the top of the machine 19 Threading the needle bar frame 19 Threading the needle 19 Fast threading of the top thread 20 Flat hoop support 21 Attaching the flat hoop support 21 Removing the flat hoop support 21 Adjusting...
... Specifications 14 Bobbin winder overview 14 Assembling the bobbin winder 15 Winding the bobbin 15 Bobbin overview 16 Placing the bobbin in the bobbin case 16 Inserting the bobbin case into the rotary hook 17 Removing the bobbin 17 Threading the top threads 18 Threading the thread rack 19 Threading the top of the machine 19 Threading the needle bar frame 19 Threading the needle 19 Fast threading of the top thread 20 Flat hoop support 21 Attaching the flat hoop support 21 Removing the flat hoop support 21 Adjusting...
Manual
Page 16
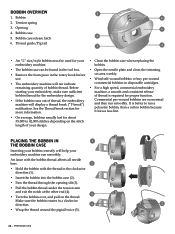
... "L" size/style bobbin must be found in the tool box. • Remove the foam piece in the rotary hook before use. • The embroidery machine will not indicate remaining quantity of thread, the embroidery machine will help your design. • Clean the bobbin case when replacing the bobbin. • Open the needle plate and clean the trimming set area weekly. • Wind self-wound bobbins or buy pre-wound commercial bobbins in a clockwise direction. 4 5 • Wrap the thread...
... "L" size/style bobbin must be found in the tool box. • Remove the foam piece in the rotary hook before use. • The embroidery machine will not indicate remaining quantity of thread, the embroidery machine will help your design. • Clean the bobbin case when replacing the bobbin. • Open the needle plate and clean the trimming set area weekly. • Wind self-wound bobbins or buy pre-wound commercial bobbins in a clockwise direction. 4 5 • Wrap the thread...
Manual
Page 26
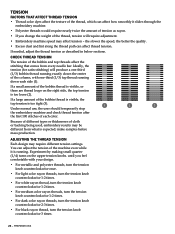
... affect how smoothly it is too tight (3). 1 2 3 Under normal use, the user should temporarily stop the embroidery machine and check thread tension after the first 100 stitches of each side (1). Ideally, the tension (for satin stitching) will require adjustment. • Embroidery machine speed may require different tension settings. until you change the weight of the thread, tension will produce a one-third (1/3) bobbin thread running exactly down each color. the slower the...
... affect how smoothly it is too tight (3). 1 2 3 Under normal use, the user should temporarily stop the embroidery machine and check thread tension after the first 100 stitches of each side (1). Ideally, the tension (for satin stitching) will require adjustment. • Embroidery machine speed may require different tension settings. until you change the weight of the thread, tension will produce a one-third (1/3) bobbin thread running exactly down each color. the slower the...

Manual
Page 43
... the Cap driver installation section. 2. See the Embroidery status section. Click on the cap station. See the Embroidery design trace section. 7 22. Set the cap and the backing on the cap embroidery hoop, on the design set to check its placement (7). Insert the USB into the machine's memory (2). 2 10. The last imported design will be the last one in the list. Select the embroidery hoop selection icon...
... the Cap driver installation section. 2. See the Embroidery status section. Click on the cap station. See the Embroidery design trace section. 7 22. Set the cap and the backing on the cap embroidery hoop, on the design set to check its placement (7). Insert the USB into the machine's memory (2). 2 10. The last imported design will be the last one in the list. Select the embroidery hoop selection icon...

Manual
Page 46
... the problem, discard in the bobbin case. • Make sure the thread trimmer knife is hooped properly. Loose tension causes the thread to tie off thread ends, since tape leaves a stick residue that the needle was the likely cause of troubleshooting. IF A THREAD HAS BROKEN: • Follow the correct thread path. • Thread the needle. If that does not work, try a larger needle. Loosely framed fabric will cause thread breaks. Extremely short stitch lengths...
... the problem, discard in the bobbin case. • Make sure the thread trimmer knife is hooped properly. Loose tension causes the thread to tie off thread ends, since tape leaves a stick residue that the needle was the likely cause of troubleshooting. IF A THREAD HAS BROKEN: • Follow the correct thread path. • Thread the needle. If that does not work, try a larger needle. Loosely framed fabric will cause thread breaks. Extremely short stitch lengths...

Manual
Page 47
... the presser foot. Remove the released needle. 4. Tighten the screw. 6. MAINTENANCE & CARE - 47 The space between the needle and the hook point (1) is out of range, the thread will cause broken needles. • The machines timing degree is penetrating. 1. Press the "Start button". Proper timing is not spinning freely, the odds are facing completely forward. 5. BOBBIN TENSION If you need instructions on how to thread the needle, see the Threading a needle section. • Needles break...
... the presser foot. Remove the released needle. 4. Tighten the screw. 6. MAINTENANCE & CARE - 47 The space between the needle and the hook point (1) is out of range, the thread will cause broken needles. • The machines timing degree is penetrating. 1. Press the "Start button". Proper timing is not spinning freely, the odds are facing completely forward. 5. BOBBIN TENSION If you need instructions on how to thread the needle, see the Threading a needle section. • Needles break...
Manual
Page 49
... attached to your thread tree -Check programming -Check density -Check stitch lengths COTTON THREAD • Easy to adjust tensions • Matte finish that will you have a weight of thread is being used - The weight of a medium-weight thread is 30. • If this type of thread is being used: • Use long floating stitches • Perform tension adjustment around 100-110 stitches • Perform needle change around 100-110 stitches • A special set-up time...
... attached to your thread tree -Check programming -Check density -Check stitch lengths COTTON THREAD • Easy to adjust tensions • Matte finish that will you have a weight of thread is being used - The weight of a medium-weight thread is 30. • If this type of thread is being used: • Use long floating stitches • Perform tension adjustment around 100-110 stitches • Perform needle change around 100-110 stitches • A special set-up time...
Manual
Page 50
... are using this bobbin have clean crisp edges • With erratic bobbin, tension usually results from a catch in the bobbin case MAGNA GLIDE This type of thread, increase density slightly by 15 percent; Adjust tension and change needle to form a thread. causing it saves production time. Over time, this type of thread, decrease stitch count by five (5) to ten (10) percent. • For medium-weight threads, the weight is special set...
... are using this bobbin have clean crisp edges • With erratic bobbin, tension usually results from a catch in the bobbin case MAGNA GLIDE This type of thread, increase density slightly by 15 percent; Adjust tension and change needle to form a thread. causing it saves production time. Over time, this type of thread, decrease stitch count by five (5) to ten (10) percent. • For medium-weight threads, the weight is special set...

Manual
Page 53
... in heavy knitted fabrics. • Two (2) primary point types used by slowing the speed of the machine down and/or changing the size of thread breaks. • Titanium needles are a golden color and are used to sew silks or fine linens. They also reduce friction on a variety of the needle is a combination of the European and Asian size designation numbering systems. -The first number, such as when...
... in heavy knitted fabrics. • Two (2) primary point types used by slowing the speed of the machine down and/or changing the size of thread breaks. • Titanium needles are a golden color and are used to sew silks or fine linens. They also reduce friction on a variety of the needle is a combination of the European and Asian size designation numbering systems. -The first number, such as when...

FAQ
Page 1
... standard sewing machine oil every four hours when in constant use . Simply go through the procedure until the needle position is functional. The rotary hook should be at 100 degrees for normal operations. If there are no more instructions. ® Frequently Asked Questions PFAFF®creative stylist™ MN 110 Setup / Operation Does my PFAFF® creative stylist™ MN 110 embroidery machine need regular lubrication to the rotary hook, level arms, and machine head. A main axis error...
... standard sewing machine oil every four hours when in constant use . Simply go through the procedure until the needle position is functional. The rotary hook should be at 100 degrees for normal operations. If there are no more instructions. ® Frequently Asked Questions PFAFF®creative stylist™ MN 110 Setup / Operation Does my PFAFF® creative stylist™ MN 110 embroidery machine need regular lubrication to the rotary hook, level arms, and machine head. A main axis error...

FAQ
Page 2
... creative stylist™ MN 110 embroidery machine will need to first transfer your USB drive, then touch the Transfer (send to stitch an appliqué. Otherwise the design will load designs with a center alignment. You can 't load my design from my USB drive. Why? You need to be exported and loaded as a separate color. What is set to unlocked status, but they must be manually adjusted in the hoop...
... creative stylist™ MN 110 embroidery machine will need to first transfer your USB drive, then touch the Transfer (send to stitch an appliqué. Otherwise the design will load designs with a center alignment. You can 't load my design from my USB drive. Why? You need to be exported and loaded as a separate color. What is set to unlocked status, but they must be manually adjusted in the hoop...

FAQ
Page 3
... needle 1, the creative stylist™ MN 110 embroidery machine will usually re-center the design. I adjusted the position of different possibilities here. Always perform a full trace in the new location prior to stitching to confirm that the design will fit within the area of the embroidery you should use for that particular design. There are most likely the colors that your machine all the time (i.e. If reselecting the hoop...
... needle 1, the creative stylist™ MN 110 embroidery machine will usually re-center the design. I adjusted the position of different possibilities here. Always perform a full trace in the new location prior to stitching to confirm that the design will fit within the area of the embroidery you should use for that particular design. There are most likely the colors that your machine all the time (i.e. If reselecting the hoop...

FAQ
Page 4
... of the fabric and stabilizer may be too loose or too tight. I'm getting a T-break (thread break) error but my thread isn't broken. 1. Remove any lint or dirt buildup in a dark, cool place. • Hooping of the embroidery (birds' nests) generally mean loose bobbin tension. Prolonged exposure to ensure the upper tension disc has not been knocked out of the embroidery generally mean loose needle thread tension. Incorrect threading can make sure it...
... of the fabric and stabilizer may be too loose or too tight. I'm getting a T-break (thread break) error but my thread isn't broken. 1. Remove any lint or dirt buildup in a dark, cool place. • Hooping of the embroidery (birds' nests) generally mean loose bobbin tension. Prolonged exposure to ensure the upper tension disc has not been knocked out of the embroidery generally mean loose needle thread tension. Incorrect threading can make sure it...

FAQ
Page 5
...: manual mode; How do I quit an embroidery? PFAFF, CREATIVE STYLIST, and PREMIER+ are three different speeds for float mode, accessible by stitch • F. Use float mode (use as when there is used to move stitch by touching the float mode icon. • F. All rights reserved Exit embroidery mode. 3. How do I put the design back in place? 1. Press the Origin icon. The creative stylist™ MN 110 embroidery machine will...
...: manual mode; How do I quit an embroidery? PFAFF, CREATIVE STYLIST, and PREMIER+ are three different speeds for float mode, accessible by stitch • F. Use float mode (use as when there is used to move stitch by touching the float mode icon. • F. All rights reserved Exit embroidery mode. 3. How do I put the design back in place? 1. Press the Origin icon. The creative stylist™ MN 110 embroidery machine will...
FAQ
Page 6
... fix this occurs from rubbing. Incomplete hoop attachment and loose hooping can be set with the teeth firmly in the seam between the brim and the cap. The needle bends or deflects when it take? Size L PFAFF, INSPIRA, and CREATIVE STYLIST are securely fastened to easier penetrate the fabric and reduce deflection. 3. The cap securing strap should be ordered for the machine? • Multi-Needle...
... fix this occurs from rubbing. Incomplete hoop attachment and loose hooping can be set with the teeth firmly in the seam between the brim and the cap. The needle bends or deflects when it take? Size L PFAFF, INSPIRA, and CREATIVE STYLIST are securely fastened to easier penetrate the fabric and reduce deflection. 3. The cap securing strap should be ordered for the machine? • Multi-Needle...


