
Owner's Manual
Page 48
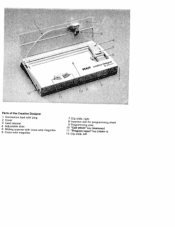
Parts of the Creative Designer 1 Connection lead with plug 2 Cover 3 Lead retainer 4 Adjustable slide 5 Sliding scanner with cross-wire magnifier 6 Cross-wire magnifier 7 Clip slide, right 8 Insertion slot for programming sheet 9 Programming area 1 0 "Call stitch" key (memory) 11 "Program input" key (mem +) 12 Clip slide, left
Parts of the Creative Designer 1 Connection lead with plug 2 Cover 3 Lead retainer 4 Adjustable slide 5 Sliding scanner with cross-wire magnifier 6 Cross-wire magnifier 7 Clip slide, right 8 Insertion slot for programming sheet 9 Programming area 1 0 "Call stitch" key (memory) 11 "Program input" key (mem +) 12 Clip slide, left
Owner's Manual
Page 51
Instruction book Adjusting the programming sheet Appending a stitch Balance Changing the pattern length Changing the pattern width Changing width/length of a pattern Clearing the p-memory Connecting the Creative Designer Creative card Creative designer Deleting a pattern Deleting a p-pattern from the Creative card Deleting a stitch Drawing a motif Drawing and programming a motif Editing Editing a a Creative motif pattern in the p-memory (ROM) Editing...
Instruction book Adjusting the programming sheet Appending a stitch Balance Changing the pattern length Changing the pattern width Changing width/length of a pattern Clearing the p-memory Connecting the Creative Designer Creative card Creative designer Deleting a pattern Deleting a p-pattern from the Creative card Deleting a stitch Drawing a motif Drawing and programming a motif Editing Editing a a Creative motif pattern in the p-memory (ROM) Editing...
Owner's Manual
Page 58
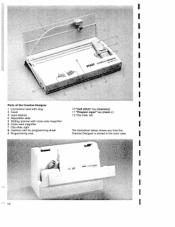
1 I I I I I I I I I Parts of the Creative Designer I Connection lead with plug 10 "Call stitch" key (memory) 2 Cover 3 Lead retainer 11 "Program input" key (mem +) 12 Clip slide, left I 4 Adjustable slide 5 Sliding scanner with cross-wire magnifier 6 Cross-wire magnifier I I I I I PFAF ""'' I I I I 10 I 7 Clip slide, right 8 Insertion slot for programming sheet 9 Programming area The illustration below shows you how the Creative Designer is stored in the carry case.
1 I I I I I I I I I Parts of the Creative Designer I Connection lead with plug 10 "Call stitch" key (memory) 2 Cover 3 Lead retainer 11 "Program input" key (mem +) 12 Clip slide, left I 4 Adjustable slide 5 Sliding scanner with cross-wire magnifier 6 Cross-wire magnifier I I I I I PFAF ""'' I I I I 10 I 7 Clip slide, right 8 Insertion slot for programming sheet 9 Programming area The illustration below shows you how the Creative Designer is stored in the carry case.

Owner's Manual
Page 63
.. E E Contents Programming sheet Page 16 a Drawing a motif Page 17 Placing the stitch points Page 18 Pattern combinations Pages 19/20/28-30 Inserting and adjusting the programming sheet Pages 21-22 Selecting a p-memory Pages 23-24 Programming a motif Page 25 Editing a pattern Page 27 E 15
.. E E Contents Programming sheet Page 16 a Drawing a motif Page 17 Placing the stitch points Page 18 Pattern combinations Pages 19/20/28-30 Inserting and adjusting the programming sheet Pages 21-22 Selecting a p-memory Pages 23-24 Programming a motif Page 25 Editing a pattern Page 27 E 15
Owner's Manual
Page 64
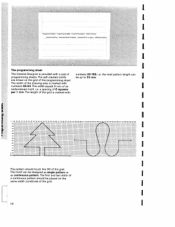
...44 48 52 56 60 64 68 72 76 80 84 89 92 96 100104106112116120124128132136140144148152r5616r218416$172116199164188192196 ± tj1HJj j I The programming sheet The Creative Designer is marked with numbers 00-198, i.e. I I 16 I Programmenngsark Programlama kârr5r Programmeringoark Ohjelmorntralue pelqiaawwciaoid auo,ZnwuerOojd p .... The first and last stitch of J a continuous pattern should touch line 00 of programming sheets. The motif can be placed on the grid of the programming sheet The width of the drawing area is provided with a pad of the grid. _______ I...
...44 48 52 56 60 64 68 72 76 80 84 89 92 96 100104106112116120124128132136140144148152r5616r218416$172116199164188192196 ± tj1HJj j I The programming sheet The Creative Designer is marked with numbers 00-198, i.e. I I 16 I Programmenngsark Programlama kârr5r Programmeringoark Ohjelmorntralue pelqiaawwciaoid auo,ZnwuerOojd p .... The first and last stitch of J a continuous pattern should touch line 00 of programming sheets. The motif can be placed on the grid of the programming sheet The width of the drawing area is provided with a pad of the grid. _______ I...

Owner's Manual
Page 67
... 88 92 96 100104108112116120 48 44 40 32 28 24 20 16 12 OR t4 , o Boo. Draw one half of the pattern on the programming sheet and enter it into the p-memory. 4N\ f\ iI I 19 r Pattern combinations (mirroring) The pattern is 18 mm. 0 I 1\\ '1 /// / / // \/ / \/ Sew the pattern half with the "single pattern...
... 88 92 96 100104108112116120 48 44 40 32 28 24 20 16 12 OR t4 , o Boo. Draw one half of the pattern on the programming sheet and enter it into the p-memory. 4N\ f\ iI I 19 r Pattern combinations (mirroring) The pattern is 18 mm. 0 I 1\\ '1 /// / / // \/ / \/ Sew the pattern half with the "single pattern...
Owner's Manual
Page 69
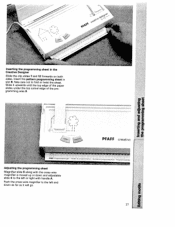
Adjusting the programming sheet Magnifier slide 5 along with handle A. Push the cross-wire magnifier to the left or right with the cross-wire magnifier is moved up or down ... under the top cutout edge of the pro gramming area 9. Slide it will go. Take care not to fold or twist the sheet. I 21 Insert the pattern programming sheet in the Creative Designer Slide the clip slides 7 and 12 forwards on both sides. Ti tI S C b PFAFF creativE PMF Po4mIbogn F d pwqramrnahcn Sh1 d owarnma, PogrrnmebI. Inserting the programming...
Adjusting the programming sheet Magnifier slide 5 along with handle A. Push the cross-wire magnifier to the left or right with the cross-wire magnifier is moved up or down ... under the top cutout edge of the pro gramming area 9. Slide it will go. Take care not to fold or twist the sheet. I 21 Insert the pattern programming sheet in the Creative Designer Slide the clip slides 7 and 12 forwards on both sides. Ti tI S C b PFAFF creativE PMF Po4mIbogn F d pwqramrnahcn Sh1 d owarnma, PogrrnmebI. Inserting the programming...
Owner's Manual
Page 70
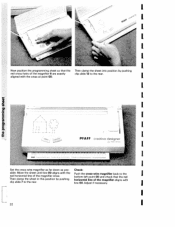
I I I I I I I PFAFF creative designer I r :: I I I Adjust if necessary. Check: Push the cross-wire magnifier back to the bottom left point 00 and check that the Then clamp the sheet into position by pushing clip slide 7 to the rear. clip slide 12 to the rear. horizontal line of... the magnifier aligns with the cross at point 00. I I I I I I I Now position the programming sheet so that the red I Then clamp the sheet in this position by pushing red cross-hairs of the magnifier 6 are exaxtly aligned with line 00. I I 22 I Set the...
I I I I I I I PFAFF creative designer I r :: I I I Adjust if necessary. Check: Push the cross-wire magnifier back to the bottom left point 00 and check that the Then clamp the sheet into position by pushing clip slide 7 to the rear. clip slide 12 to the rear. horizontal line of... the magnifier aligns with the cross at point 00. I I I I I I I Now position the programming sheet so that the red I Then clamp the sheet in this position by pushing red cross-hairs of the magnifier 6 are exaxtly aligned with line 00. I I 22 I Set the...

Owner's Manual
Page 77
... A -4- EEEf Jih --.--" --,- - -4-! £ 41t- __ A LP I [[Li it -Lu- T4-tl1 Separate the programming sheets so that you have 4 pattern sections. Over Enter the second section in the second p-memory beginning here again at point "A" of the sections... in a separate p-memory. m1-H-44-f irl-L44 * 4-444- Start at point "A' Enter the rest of the right programming sheet and enter the pattern stitch by stitch (number the pattern if necessary). I:!4-4-i tffl U C 4-fl i] Il-i [Li_i r i _1 I !; I I I I laps may occur. "E" ...
... A -4- EEEf Jih --.--" --,- - -4-! £ 41t- __ A LP I [[Li it -Lu- T4-tl1 Separate the programming sheets so that you have 4 pattern sections. Over Enter the second section in the second p-memory beginning here again at point "A" of the sections... in a separate p-memory. m1-H-44-f irl-L44 * 4-444- Start at point "A' Enter the rest of the right programming sheet and enter the pattern stitch by stitch (number the pattern if necessary). I:!4-4-i tffl U C 4-fl i] Il-i [Li_i r i _1 I !; I I I I laps may occur. "E" ...
