
Owner's Manual
Page 3
... car rying case. 4 Creative designer The Creative Designer belongs to P 15, each of which holds a maximum of 999 stitches. Altogether you can input 3,260 stit ches, distributed over various P memories. • When the machine is used for entering motifs of your own design in the matrix of a programming card. • There are preserved. • You will find examples for sewing whenever...
... car rying case. 4 Creative designer The Creative Designer belongs to P 15, each of which holds a maximum of 999 stitches. Altogether you can input 3,260 stit ches, distributed over various P memories. • When the machine is used for entering motifs of your own design in the matrix of a programming card. • There are preserved. • You will find examples for sewing whenever...
Owner's Manual
Page 8
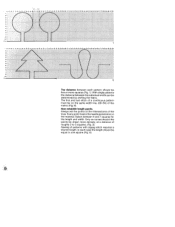
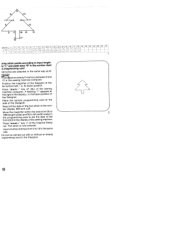
... intersections of the matrix (Fig. 6). With single patterns the distance between 4 and 7 squares for the length and width. The first and last stitch of a continuous pattern must be on curves should the points be drawn more squares (Fig. 1). Always set the points at a distance of patterns with zigzag stitch requires a shorter length. ci0' 4* 06 2 5 40 14 29 13 35...
... intersections of the matrix (Fig. 6). With single patterns the distance between 4 and 7 squares for the length and width. The first and last stitch of a continuous pattern must be on curves should the points be drawn more squares (Fig. 1). Always set the points at a distance of patterns with zigzag stitch requires a shorter length. ci0' 4* 06 2 5 40 14 29 13 35...
Owner's Manual
Page 11
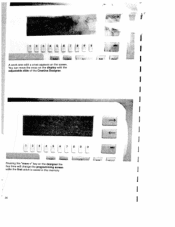
... cover 2, For this reason, whenever you press "mem-" key 47 BL the position of the wire-cross magnifier is automatically register ed by the manufacturer. • After using the Creative Designer • always first insert the connection lead in retainer 3, then push adjust able slide 4 fully to sit at the correct basic position 00, i.e. When you align the control with a stitch...
... cover 2, For this reason, whenever you press "mem-" key 47 BL the position of the wire-cross magnifier is automatically register ed by the manufacturer. • After using the Creative Designer • always first insert the connection lead in retainer 3, then push adjust able slide 4 fully to sit at the correct basic position 00, i.e. When you align the control with a stitch...
Owner's Manual
Page 20
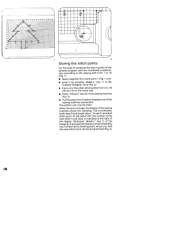
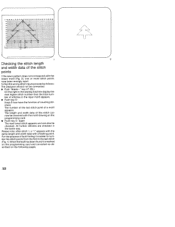
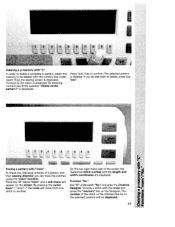
...Storing the stitch points For the sake of simplicity the stitch points of the sample program card are numbered consecuti vely according to the sewing path from 1 to 18 (Fig. 1). • Move magnifier 6 to stitch point 1 (Fig. 1) and • enter it by pressing "mem+" key 11 of the Creative Designer once (...sewing machine connection. At the same time, the number of the next stitch to 18 one by one in the same way. • Press "memory" key 30 of the sewing machine (Fig. 3). • Pull the plug of the Creative Designer out of the display. Whenever "mem+" key 11 of the sewing machine...
...Storing the stitch points For the sake of simplicity the stitch points of the sample program card are numbered consecuti vely according to the sewing path from 1 to 18 (Fig. 1). • Move magnifier 6 to stitch point 1 (Fig. 1) and • enter it by pressing "mem+" key 11 of the Creative Designer once (...sewing machine connection. At the same time, the number of the next stitch to 18 one by one in the same way. • Press "memory" key 30 of the sewing machine (Fig. 3). • Pull the plug of the Creative Designer out of the display. Whenever "mem+" key 11 of the sewing machine...
Owner's Manual
Page 22
... data "B" in the number chart a programming card nemories are selected in the sewing machine computer. its basic position. /\ Press "mem-' key 47 (BL) of the Creative Desig ner. A flashing 1" appears at the right in the Designer. Press "m em +" key 11 of the sewing machine computer. e. e. the basic position of the first stitch in the display of the Designer. his can be carried...
... data "B" in the number chart a programming card nemories are selected in the sewing machine computer. its basic position. /\ Press "mem-' key 47 (BL) of the Creative Desig ner. A flashing 1" appears at the right in the Designer. Press "m em +" key 11 of the sewing machine computer. e. e. the basic position of the first stitch in the display of the Designer. his can be carried...
Owner's Manual
Page 29
...free M-memory • Push "mem+" key48 • Select the P-memory with consistent left edge: • the right outer stitch point must lie on B 54, but • the left edge (Fig. 2) To vary a pattern with the programmed motif • Push "mem+' key • Push pattern start" key 26 and change the stitch... l$0172 178150164 ii 835296 2a Patterns with consistent left outer stitch point must not lie on BOO (FIg. 2 a). For continuous sewing in the sewing machine. Input the stitch points in different pattern widths (Figs. 1 and 2)...
...free M-memory • Push "mem+" key48 • Select the P-memory with consistent left edge: • the right outer stitch point must lie on B 54, but • the left edge (Fig. 2) To vary a pattern with the programmed motif • Push "mem+' key • Push pattern start" key 26 and change the stitch... l$0172 178150164 ii 835296 2a Patterns with consistent left outer stitch point must not lie on BOO (FIg. 2 a). For continuous sewing in the sewing machine. Input the stitch points in different pattern widths (Figs. 1 and 2)...
Owner's Manual
Page 34
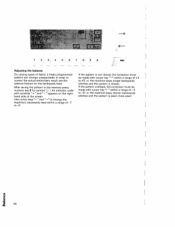
... de scribed on the programming card. • Push key 5- I Push'mem-'key47(BL). For the purpose of counting stit ches). i. On the right in the sewing machine display the next higher stitch number than the total num ber of stitches in the same way. Please note: after stitch 1 a 1" appears with the same length and width data with the...
... de scribed on the programming card. • Push key 5- I Push'mem-'key47(BL). For the purpose of counting stit ches). i. On the right in the sewing machine display the next higher stitch number than the total num ber of stitches in the same way. Please note: after stitch 1 a 1" appears with the same length and width data with the...
Owner's Manual
Page 35
... I Check the corrected motif by sewing it . Press 'memory" key on the sewing machine. Set the magnifier over the correct stitch point (Figs. 3 and 1 a>. 04 04 2 6 20 24 0832 36 40 44 46 52 58 5 04 86 72 Boo 18 a 1O]öj5O4O6pJj4 2 orrection: / Connect the Creative Designer to the sewing machine. Insert the programming card with the wrong data (Fig...
... I Check the corrected motif by sewing it . Press 'memory" key on the sewing machine. Set the magnifier over the correct stitch point (Figs. 3 and 1 a>. 04 04 2 6 20 24 0832 36 40 44 46 52 58 5 04 86 72 Boo 18 a 1O]öj5O4O6pJj4 2 orrection: / Connect the Creative Designer to the sewing machine. Insert the programming card with the wrong data (Fig...
Owner's Manual
Page 36
... Creative Designer. • Push "mem-" key 47 BL on the sewing machine. If you wish to set stitches at the beginning of stitches you insert. Now input the required stitches. The stitch numbers of the motif stored before are all stitches situated on the Designer. The memory is also stored in the display. • Push keys 5- (stitch count) to insert a stitch, e.g. if you wish to insert a stitch between stitch...
... Creative Designer. • Push "mem-" key 47 BL on the sewing machine. If you wish to set stitches at the beginning of stitches you insert. Now input the required stitches. The stitch numbers of the motif stored before are all stitches situated on the Designer. The memory is also stored in the display. • Push keys 5- (stitch count) to insert a stitch, e.g. if you wish to insert a stitch between stitch...
Owner's Manual
Page 43
... the Creative Designer 10 Examples of Creative patterns 35 40 Important notes 0 Multiple stitch, searching 14 P-memories to M-memories, transferring 24 Parts of the Designer Pattern change by spacings 29 Pattern change by stitch width and length 28 Pattern in centre position II Pattern width, changing 26, 27 Patterns, assembled 21 Patterns, assembled, in two P-memories 22, 23 Patterns, drawing on the programming card 4 Patterns, vertical 21 Programming card 2, 3 Programming card, adjusting in Designer 1317 Programming card, inserting in Designer 12...
... the Creative Designer 10 Examples of Creative patterns 35 40 Important notes 0 Multiple stitch, searching 14 P-memories to M-memories, transferring 24 Parts of the Designer Pattern change by spacings 29 Pattern change by stitch width and length 28 Pattern in centre position II Pattern width, changing 26, 27 Patterns, assembled 21 Patterns, assembled, in two P-memories 22, 23 Patterns, drawing on the programming card 4 Patterns, vertical 21 Programming card 2, 3 Programming card, adjusting in Designer 1317 Programming card, inserting in Designer 12...
Owner's Manual
Page 47
... of the Creative Designer. Do not introduce any stubborn dirt use any cleaning and maintenance work. Do not use a soft cloth moistened with PFAFF sewing machine models for any damaged caused. Cleaning To clean housing and display use only. The recommended environment is not subjected to clean the housing. If this is not possible, the sewing machine must be operated in house hold use a dry, clean, soft, lint-free cloth. Keep...
... of the Creative Designer. Do not introduce any stubborn dirt use any cleaning and maintenance work. Do not use a soft cloth moistened with PFAFF sewing machine models for any damaged caused. Cleaning To clean housing and display use only. The recommended environment is not subjected to clean the housing. If this is not possible, the sewing machine must be operated in house hold use a dry, clean, soft, lint-free cloth. Keep...
Owner's Manual
Page 48
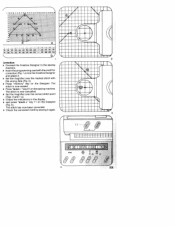
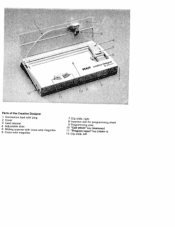
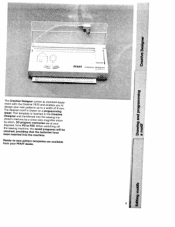
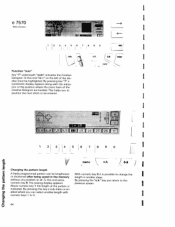
Parts of the Creative Designer 1 Connection lead with plug 2 Cover 3 Lead retainer 4 Adjustable slide 5 Sliding scanner with cross-wire magnifier 6 Cross-wire magnifier 7 Clip slide, right 8 Insertion slot for programming sheet 9 Programming area 1 0 "Call stitch" key (memory) 11 "Program input" key (mem +) 12 Clip slide, left
Parts of the Creative Designer 1 Connection lead with plug 2 Cover 3 Lead retainer 4 Adjustable slide 5 Sliding scanner with cross-wire magnifier 6 Cross-wire magnifier 7 Clip slide, right 8 Insertion slot for programming sheet 9 Programming area 1 0 "Call stitch" key (memory) 11 "Program input" key (mem +) 12 Clip slide, left
Owner's Manual
Page 50
It is impossible to your imagination. We wish you many happy hours while I now on you can develop your own embroidery patterns. i A very "creative" and pleasant sewing experience awaits you . I I I I I I I 2 I with the PFAFF "creative designer": This sophisticated additional appliance will open up the world of anything more individual since from I designing your fashion ideas. I I I I I I I Give free rein to think of embroidery for you I I Congratulations!
It is impossible to your imagination. We wish you many happy hours while I now on you can develop your own embroidery patterns. i A very "creative" and pleasant sewing experience awaits you . I I I I I I I 2 I with the PFAFF "creative designer": This sophisticated additional appliance will open up the world of anything more individual since from I designing your fashion ideas. I I I I I I I Give free rein to think of embroidery for you I I Congratulations!
Owner's Manual
Page 51
Instruction book Adjusting the programming sheet Appending a stitch Balance Changing the pattern length Changing the pattern width Changing width/length of a pattern Clearing the p-memory Connecting the Creative Designer Creative card Creative designer Deleting a pattern Deleting a p-pattern from the Creative card Deleting a stitch Drawing a motif Drawing and programming a motif Editing Editing a a Creative motif pattern in the p-memory (ROM) Editing a motif Fading in/out stitch points Inserting a stitch Inserting straight stitch (continuous pattern) Inserting the programming ...
Instruction book Adjusting the programming sheet Appending a stitch Balance Changing the pattern length Changing the pattern width Changing width/length of a pattern Clearing the p-memory Connecting the Creative Designer Creative card Creative designer Deleting a pattern Deleting a p-pattern from the Creative card Deleting a stitch Drawing a motif Drawing and programming a motif Editing Editing a a Creative motif pattern in the p-memory (ROM) Editing a motif Fading in/out stitch points Inserting a stitch Inserting straight stitch (continuous pattern) Inserting the programming ...
Owner's Manual
Page 57
Ready-to-sew pattern templates from your PFAFF dealer. are available I ;fl I PFAFF creative designer btrdbcTsDTdhmeeyhihheehtseeieaeespesnsnnsiietoeigndieCtgt'tsinwee.cswannrsdhTeliesymii,n.,hartreohgfeite3pruosaidmtr0vtrnrmeothmedemodovepamrwiDoctryPdiCrohnptnae0iigrbilnftnsneaopyrtgisaietaoagsfetat,mteitnhtdvhPtrceieheresr2arrrameeon97tiwmdcnss.e5stosnsaWhami7-umencwve0roptohhteeonierebisratdndioetnnaaeheadptsamiesps.tnrewreaowasstrorngiteghiietagawedncrenrbatsihaiahfdClmtniimenahegyrosrsgraeomfdvm yaswuo9eotiterfiniiuaftlvqmgcleuthmboiep. e4 V '' I ': I I9
Ready-to-sew pattern templates from your PFAFF dealer. are available I ;fl I PFAFF creative designer btrdbcTsDTdhmeeyhihheehtseeieaeespesnsnnsiietoeigndieCtgt'tsinwee.cswannrsdhTeliesymii,n.,hartreohgfeite3pruosaidmtr0vtrnrmeothmedemodovepamrwiDoctryPdiCrohnptnae0iigrbilnftnsneaopyrtgisaietaoagsfetat,mteitnhtdvhPtrceieheresr2arrrameeon97tiwmdcnss.e5stosnsaWhami7-umencwve0roptohhteeonierebisratdndioetnnaaeheadptsamiesps.tnrewreaowasstrorngiteghiietagawedncrenrbatsihaiahfdClmtniimenahegyrosrsgraeomfdvm yaswuo9eotiterfiniiuaftlvqmgcleuthmboiep. e4 V '' I ': I I9
Owner's Manual
Page 70
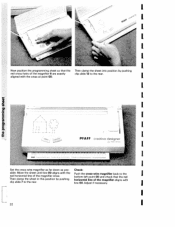
Move the sheet until line 00 aligns with line 00. Adjust if necessary. clip slide 12 to the rear. I I 22 I Set the cross-wire magnifier as far down as possible. horizontal line of the magnifier aligns with the red ...back to the bottom left point 00 and check that the Then clamp the sheet into position by pushing clip slide 7 to the rear. I I I I I I I Now position the programming sheet so that the red I Then clamp the sheet in this position by pushing red cross-hairs of the magnifier cross. I I I I I I I PFAFF creative designer I r :: I I I
Move the sheet until line 00 aligns with line 00. Adjust if necessary. clip slide 12 to the rear. I I 22 I Set the cross-wire magnifier as far down as possible. horizontal line of the magnifier aligns with the red ...back to the bottom left point 00 and check that the Then clamp the sheet into position by pushing clip slide 7 to the rear. I I I I I I I Now position the programming sheet so that the red I Then clamp the sheet in this position by pushing red cross-hairs of the magnifier cross. I I I I I I I PFAFF creative designer I r :: I I I
Owner's Manual
Page 72
I 1 2 3: 4 5 s i g 9 0 II I A work area with the adjustable slide of the Creative Designer. -' r iio I,4 I I I 1 I I I I I 1 234567890 I r I You can move the cross on the display with a cross appears on the designer the firsi time will change the programming screen while the first stitch is saved in the memory. I I 1 24 I Pressing the "mem +" key on the screen.
I 1 2 3: 4 5 s i g 9 0 II I A work area with the adjustable slide of the Creative Designer. -' r iio I,4 I I I 1 I I I I I 1 234567890 I r I You can move the cross on the display with a cross appears on the designer the firsi time will change the programming screen while the first stitch is saved in the memory. I I 1 24 I Pressing the "mem +" key on the screen.
Owner's Manual
Page 91
... their sewing direction you can trace the stitches using the "mem" function. By pressing numeric key 9 the question "Delete entire pattern?" key to be displayed. 43J The selected pattern is displayed. Press "o.k." By pressing the cursor keys "-" and "-b" the cross will appear on the selected position will be deleted with the numeric key under neath. activates the Creative Designer...
... their sewing direction you can trace the stitches using the "mem" function. By pressing numeric key 9 the question "Delete entire pattern?" key to be displayed. 43J The selected pattern is displayed. Press "o.k." By pressing the cursor keys "-" and "-b" the cross will appear on the selected position will be deleted with the numeric key under neath. activates the Creative Designer...
Owner's Manual
Page 92
... 1118 II 23 II 28 II + L I I 1 234 5 6 7 8 9 0 I o.k. key you to position the next stitch to the previous screen. By pressing key "7" a coordinate display appears along with numeric keys 1 to change the length in smaller steps. I 1. To this end "rn +" on the left of the Creative Designer are located. By pressing this end press numeric key 6. To...
... 1118 II 23 II 28 II + L I I 1 234 5 6 7 8 9 0 I o.k. key you to position the next stitch to the previous screen. By pressing key "7" a coordinate display appears along with numeric keys 1 to change the length in smaller steps. I 1. To this end "rn +" on the left of the Creative Designer are located. By pressing this end press numeric key 6. To...
Owner's Manual
Page 94
->
->


