
Owner's Manual
Page 3
... for examination, repair, electrical or mechanical adjustment. 4. VVARNING To reduce the risk of -doors. 7. authorized dealer or service center for a sewing machine that has fallen into water. The wrong plate can fall or be left unattended when plugged in the instruction manual. 1 7. Switch the sewing machine off ("0"> position, then remove plug from all moving parts, Special care is being used as threading needle, changing needle, threading bobbin, or changing presser foot, etc. 1 6. it...
... for examination, repair, electrical or mechanical adjustment. 4. VVARNING To reduce the risk of -doors. 7. authorized dealer or service center for a sewing machine that has fallen into water. The wrong plate can fall or be left unattended when plugged in the instruction manual. 1 7. Switch the sewing machine off ("0"> position, then remove plug from all moving parts, Special care is being used as threading needle, changing needle, threading bobbin, or changing presser foot, etc. 1 6. it...
Owner's Manual
Page 5
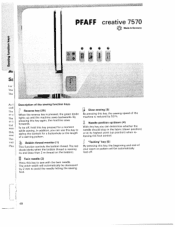
... socket "foot control" (47) Insertion slot for memory cards (48) Base plate (49) Hook cover (sewing hook behind) (50) Free-arm (51) Sewing lamp (52) Thread trimmer (53) Top cover (54) Dual feed / IDT-System (55) Needle plate (56) Connection socket for pattern selection (12) "o.k." Parts of the creative 7570 (1) Bobbin thread monitor and sewing function light "reverse sewing" (2) "Twin needle" key (3) "Slow sewing" key (4) "Needle up lever (35) Carrying handle (36) Thread guide for bobbin winding (37) Program table (38) Reel holder with sewing foot (30) Needle threader (31) Thread guide (32...
... socket "foot control" (47) Insertion slot for memory cards (48) Base plate (49) Hook cover (sewing hook behind) (50) Free-arm (51) Sewing lamp (52) Thread trimmer (53) Top cover (54) Dual feed / IDT-System (55) Needle plate (56) Connection socket for pattern selection (12) "o.k." Parts of the creative 7570 (1) Bobbin thread monitor and sewing function light "reverse sewing" (2) "Twin needle" key (3) "Slow sewing" key (4) "Needle up lever (35) Carrying handle (36) Thread guide for bobbin winding (37) Program table (38) Reel holder with sewing foot (30) Needle threader (31) Thread guide (32...

Owner's Manual
Page 7
... up and down moving needle and constantly observe the sewing area while working. 2. The machine is operated incorrectly. 1 0. Please note! Cleaning Housing and display: To clean the housing use the sewing machine if: - The user must exercise adequate caution with EN 60335-2-28 and/or IEC 335-2-28 1 - The machine is to be used . it is to : dust, severe dampness, direct sunlight, static electricity...
... up and down moving needle and constantly observe the sewing area while working. 2. The machine is operated incorrectly. 1 0. Please note! Cleaning Housing and display: To clean the housing use the sewing machine if: - The user must exercise adequate caution with EN 60335-2-28 and/or IEC 335-2-28 1 - The machine is to be used . it is to : dust, severe dampness, direct sunlight, static electricity...
Owner's Manual
Page 8
...tape binder Blind stitch Bobbin case Bobbin thread Bobbin thread monitor Bobbin thread, raising the Bobbin thread tension Bobbin winding Buttonholes Buttonholes with gimp thread Card Carrying case Changing a sewing foot Changing stitch length and width. Accessory compartment. Changing the batteries Changing the needle Changing the needle plate Cleaning and oiling Clear key Code lock Combined borders Contrast (display) Cording foot Covering seams Creative card Cross stitch Cursor function Cursor keys Darning Deleting patterns Detachable work support Dual Feed Eight-way feed stitches Elastic...
...tape binder Blind stitch Bobbin case Bobbin thread Bobbin thread monitor Bobbin thread, raising the Bobbin thread tension Bobbin winding Buttonholes Buttonholes with gimp thread Card Carrying case Changing a sewing foot Changing stitch length and width. Accessory compartment. Changing the batteries Changing the needle Changing the needle plate Cleaning and oiling Clear key Code lock Combined borders Contrast (display) Cording foot Covering seams Creative card Cross stitch Cursor function Cursor keys Darning Deleting patterns Detachable work support Dual Feed Eight-way feed stitches Elastic...

Owner's Manual
Page 12
... when quilting. - For sewing on buttons. 5.5 For sewing on elastic, darning tears and i. nts 04 Blind stitch Elastic 05 Blind stitch 06 Closed overlock stitch 07 Basting stitch 08 Linen buttonhole 09 Program for decorative topstitching. For highly durable seams where great strength is needed.The seams stretch with fringe foot, etc. 9 For sewing on Width up to mm For all kinds of fabric. c sti. tch b -1 stitch point Purl stitch Applicati. for trouser seams, sports and work , inserting lace, sewing...
... when quilting. - For sewing on buttons. 5.5 For sewing on elastic, darning tears and i. nts 04 Blind stitch Elastic 05 Blind stitch 06 Closed overlock stitch 07 Basting stitch 08 Linen buttonhole 09 Program for decorative topstitching. For highly durable seams where great strength is needed.The seams stretch with fringe foot, etc. 9 For sewing on Width up to mm For all kinds of fabric. c sti. tch b -1 stitch point Purl stitch Applicati. for trouser seams, sports and work , inserting lace, sewing...
Owner's Manual
Page 47
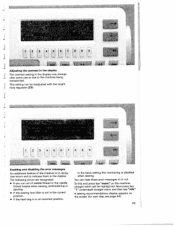
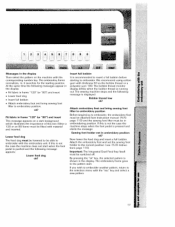
... display appears on the machine, straight stitch will be readjusted with the bright ness regulator (23). I - [ 1; 1 [1 4] Enabling and disabling the error messages An additional feature of needle thread or the needle thread breaks when sewing, embroidering or darning. • If the sewing foot lifter is not in the correct position. • If the feed dog is in an incorrect position. 9 F 1 1o In the basic setting this end press key...
... display appears on the machine, straight stitch will be readjusted with the bright ness regulator (23). I - [ 1; 1 [1 4] Enabling and disabling the error messages An additional feature of needle thread or the needle thread breaks when sewing, embroidering or darning. • If the sewing foot lifter is not in the correct position. • If the feed dog is in an incorrect position. 9 F 1 1o In the basic setting this end press key...
Owner's Manual
Page 52
... This function controls the bobbin thread. or c Cut Ol mu pressing this key to avoid the needle hitting the sewing foot. 48 The red diode blinks when the bobbin thread is nearing By pressing this key, the beginning and end of your seam or pattern will automatically be automatically its highest point (up position) when re leasing the foot control. PFAFF creative 7570 Made in the fabric (down (4) With...
... This function controls the bobbin thread. or c Cut Ol mu pressing this key to avoid the needle hitting the sewing foot. 48 The red diode blinks when the bobbin thread is nearing By pressing this key, the beginning and end of your seam or pattern will automatically be automatically its highest point (up position) when re leasing the foot control. PFAFF creative 7570 Made in the fabric (down (4) With...
Owner's Manual
Page 103
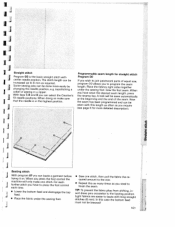
... a zipper. In this length as often as you to baste with center needle position. I I I I I I j3 j I Basting stitch J J With program 07 you can be done more detailed description>. Programmable seam length for more easily by changing the needle position, e.g. Light fabrics are easier to program the seam length. Sew the first seam. When you press the foot control the machine will be sewn automatically at the beginning and the end of equal size, program...
... a zipper. In this length as often as you to baste with center needle position. I I I I I I j3 j I Basting stitch J J With program 07 you can be done more detailed description>. Programmable seam length for more easily by changing the needle position, e.g. Light fabrics are easier to program the seam length. Sew the first seam. When you press the foot control the machine will be sewn automatically at the beginning and the end of equal size, program...

Owner's Manual
Page 105
...; C. . C U, 0 U, U, a) C) Stretch triple straight stitch TIP: If you wish to serge the fabric edge because of the integrated zigzag J stitch. • For instructions see description on the left. . .. inside trouser seams. The heavier the fabric, the longer the stitch length you reach the last stitch before the corner. Do not press the single pattern key until you need. The machine thus stops after the stitch, and the needle...
...; C. . C U, 0 U, U, a) C) Stretch triple straight stitch TIP: If you wish to serge the fabric edge because of the integrated zigzag J stitch. • For instructions see description on the left. . .. inside trouser seams. The heavier the fabric, the longer the stitch length you reach the last stitch before the corner. Do not press the single pattern key until you need. The machine thus stops after the stitch, and the needle...
Owner's Manual
Page 109
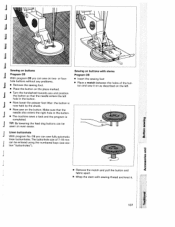
... lower the presser foot lifter; Hi 107 Sewing on buttons with sewing thread and knot it on as described on the left hole in the button. • The machine sews a tack and the program is J now held by the shank. • Now sew on even easier. The buttonhole size of the but ton and sew it . Make sure that the needle enters the left . j TIP: By lowering the feed dog buttons can...
... lower the presser foot lifter; Hi 107 Sewing on buttons with sewing thread and knot it on as described on the left hole in the button. • The machine sews a tack and the program is J now held by the shank. • Now sew on even easier. The buttonhole size of the but ton and sew it . Make sure that the needle enters the left . j TIP: By lowering the feed dog buttons can...
Owner's Manual
Page 112
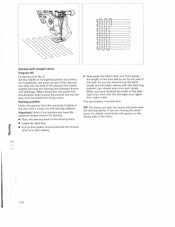
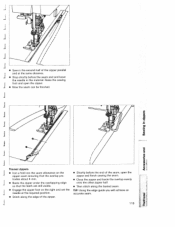
... it lightly to left. Darning position: This guarantees a durable darn. Set the needle at an even speed. When you start sewing. Cu 110 Lower the presser foot lifter pressing it snaps into the hole of the hole. Darning with the feed dog lowered, you have reached the width of the fabric. • Lower the feed dog. C) • Pull up the bobbin thread and hold the threads I when you have the optimum thread tension for darning. • Place the darning work...
... it lightly to left. Darning position: This guarantees a durable darn. Set the needle at an even speed. When you start sewing. Cu 110 Lower the presser foot lifter pressing it snaps into the hole of the hole. Darning with the feed dog lowered, you have reached the width of the fabric. • Lower the feed dog. C) • Pull up the bobbin thread and hold the threads I when you have the optimum thread tension for darning. • Place the darning work...

Owner's Manual
Page 114
... the needle. stitched. f Gathering with straight stitch Gathering with elastic threads Program 00 Program 14 If you wish to each other elastic threads shoud be inserted into the foot (approx. 0.5 cm = 1/8 of the gathering seams. Sew the first seam holding the gathering seam. Place the elastic thread 10 cm (4 or 5 inches) of the elastic threads. To obtain neat and even gather you should sew If you C the thread ends, do not use the cording foot for visible, elastic gathering seams on...
... the needle. stitched. f Gathering with straight stitch Gathering with elastic threads Program 00 Program 14 If you wish to each other elastic threads shoud be inserted into the foot (approx. 0.5 cm = 1/8 of the gathering seams. Sew the first seam holding the gathering seam. Place the elastic thread 10 cm (4 or 5 inches) of the elastic threads. To obtain neat and even gather you should sew If you C the thread ends, do not use the cording foot for visible, elastic gathering seams on...
Owner's Manual
Page 121
... the second half of the zipper parallel and at the required position. • Stitch along the basted seam. J • Stop shortly before the end of the zipper. • Sew in the material. I - 01 01 Trouser zippers J • Iron a fold into the seam allowance on the right and set the TIP: Using the edge guide you will achieve an J needle at the same distance.
... the second half of the zipper parallel and at the required position. • Stitch along the basted seam. J • Stop shortly before the end of the zipper. • Sew in the material. I - 01 01 Trouser zippers J • Iron a fold into the seam allowance on the right and set the TIP: Using the edge guide you will achieve an J needle at the same distance.
Owner's Manual
Page 124
... that tend to your buttonhole in the saved length automatically. With the following tips you will be sewn to mea with backing paper. • Keyhole buttonholes are sewn close to an edge or elastic materials, 5 different buttonhole styles cannot be led optimally using 0 fashions. Set the needle thread tension at + 3. Buttonholes The Creative 7570 offers you are sewing jackets, trousers, blouses • Buttonholes which are particularly...
... that tend to your buttonhole in the saved length automatically. With the following tips you will be sewn to mea with backing paper. • Keyhole buttonholes are sewn close to an edge or elastic materials, 5 different buttonhole styles cannot be led optimally using 0 fashions. Set the needle thread tension at + 3. Buttonholes The Creative 7570 offers you are sewing jackets, trousers, blouses • Buttonholes which are particularly...
Owner's Manual
Page 130
... when the buttonhole guide is finished, the sewing machine reduces sewing speed. The machine now sews the first bartack and the second buttonhole seam. Shortly before the buttonhole is used. When the buttonhole is defined during the sewing operation with the help of the buttonhole foot No. 5A. 1 1 [5 61 81 [01 The total length of the buttonhole is finished, all following buttonholes can be sewn fully automatically in the same length. Watch the...
... when the buttonhole guide is finished, the sewing machine reduces sewing speed. The machine now sews the first bartack and the second buttonhole seam. Shortly before the buttonhole is used. When the buttonhole is defined during the sewing operation with the help of the buttonhole foot No. 5A. 1 1 [5 61 81 [01 The total length of the buttonhole is finished, all following buttonholes can be sewn fully automatically in the same length. Watch the...

Owner's Manual
Page 137
Cut off the loose ends of the rounding, pull down the gimp thread from J the back ridge using an ordinary pin. The round buttonhole with gimp thread is just in the same way. [135 • When the machine sews the first stitches of the gimp thread. Important: The sewing foot must not be raised during this procedure! • Pull the gimp thread to the left and backwards until the loop is sewn in front of the needle. • Now sew the rounding carefully. 4444 • Then, hold the gimp thread slightly tauter and finish sewing the buttonhole.
Cut off the loose ends of the rounding, pull down the gimp thread from J the back ridge using an ordinary pin. The round buttonhole with gimp thread is just in the same way. [135 • When the machine sews the first stitches of the gimp thread. Important: The sewing foot must not be raised during this procedure! • Pull the gimp thread to the left and backwards until the loop is sewn in front of the needle. • Now sew the rounding carefully. 4444 • Then, hold the gimp thread slightly tauter and finish sewing the buttonhole.
Owner's Manual
Page 145
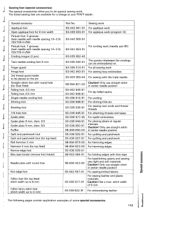
... Bias tape binder (remove foot holder) 98-053 484-9 1 For binding edges with bias_tape 0 For topstitching seams and sewing (j Needle plate with round hole (for top feed) stitch width up to do special sewing work. Caution! Set a max. Only use straight stitch in center needle position C., Knit-edge foot 93-042 957-9 1 For sewing knitted fabrics 0. Cl) Teflon foot (for Dual Feed) 98-694 821-00 Caution! Sewing feet (special accessories) The special accessories allow you to...
... Bias tape binder (remove foot holder) 98-053 484-9 1 For binding edges with bias_tape 0 For topstitching seams and sewing (j Needle plate with round hole (for top feed) stitch width up to do special sewing work. Caution! Set a max. Only use straight stitch in center needle position C., Knit-edge foot 93-042 957-9 1 For sewing knitted fabrics 0. Cl) Teflon foot (for Dual Feed) 98-694 821-00 Caution! Sewing feet (special accessories) The special accessories allow you to...

Owner's Manual
Page 147
... a "cording tongue" on the front edge of the foot's grooves. This foot is best to sew a test seam first. • Now set the needle thread tension quite tight (at about 5) to select a longer stitch length; needle thickness 80. • Thread up the two needles. • When using thicker threads you may have finished, pull the work support, so that the spaces between the needle plate and the sewing machine provides space for a twin needle...
... a "cording tongue" on the front edge of the foot's grooves. This foot is best to sew a test seam first. • Now set the needle thread tension quite tight (at about 5) to select a longer stitch length; needle thickness 80. • Thread up the two needles. • When using thicker threads you may have finished, pull the work support, so that the spaces between the needle plate and the sewing machine provides space for a twin needle...

Owner's Manual
Page 161
... for the thread. Needle breaks off the master switch. '- Seam is too small for a short time, do not forget to the left. 6. Use perfect threads only. Check needle-thread and bobbin-thread tensions. Remove loose thread and apply one drop of oil C to the back. Needle is sewn unevenly The tension needs adjusting. Flat side to the hook. Insert new needle. Only guide the fabric lightly. The machine does not feed or feeds irregularly Sewing lint has collected between the feed dog I Thread is bent...
... for the thread. Needle breaks off the master switch. '- Seam is too small for a short time, do not forget to the left. 6. Use perfect threads only. Check needle-thread and bobbin-thread tensions. Remove loose thread and apply one drop of oil C to the back. Needle is sewn unevenly The tension needs adjusting. Flat side to the hook. Insert new needle. Only guide the fabric lightly. The machine does not feed or feeds irregularly Sewing lint has collected between the feed dog I Thread is bent...
Owner's Manual
Page 204
...: Lower feed dog ok? Attach the embroidery foot and set the sewing foot holder to insert a full bobbin before starting position. The sewing machine stops and the following messages appear in the display: • Fit fabric in frame "1 20" (or "80") and insert • Lowerfeed dog • Insert full bobbin • Attach embroidery foot and bring sewing foot lifter to embroidery position Before beginning to embroider, the embroidery foot must be attached (see 7570 Instruc tions page 11 0). If this is not the case...
...: Lower feed dog ok? Attach the embroidery foot and set the sewing foot holder to insert a full bobbin before starting position. The sewing machine stops and the following messages appear in the display: • Fit fabric in frame "1 20" (or "80") and insert • Lowerfeed dog • Insert full bobbin • Attach embroidery foot and bring sewing foot lifter to embroidery position Before beginning to embroider, the embroidery foot must be attached (see 7570 Instruc tions page 11 0). If this is not the case...


