

Owner's Manual
Page 3
... only. Do not allow plug to break. 1 5. Use needles recommended by the manufacturer as contained in this manual. 3. Always unplug sewing machine from all moving parts, Special care is required around the sewing machine - Always unplug sewing machine before using and before cleaning. 2. by pulling on cord. Please also observe the...
... only. Do not allow plug to break. 1 5. Use needles recommended by the manufacturer as contained in this manual. 3. Always unplug sewing machine from all moving parts, Special care is required around the sewing machine - Always unplug sewing machine before using and before cleaning. 2. by pulling on cord. Please also observe the...

Owner's Manual
Page 5
Parts of the creative 7570 (1) Bobbin thread monitor and sewing function light "reverse sewing" (2) "Twin needle" key (3) "Slow sewing" key (4) "Needle up lever (35) Carrying handle (36) Thread guide for ...
Parts of the creative 7570 (1) Bobbin thread monitor and sewing function light "reverse sewing" (2) "Twin needle" key (3) "Slow sewing" key (4) "Needle up lever (35) Carrying handle (36) Thread guide for ...

Owner's Manual
Page 7
...cord. 9. No liability will be used on a firm and even surface which it is intended or if it being hit or dropped. Only original PFAFF parts may only be used for any dama ge caused if this machine is used . Cleaning Housing and display: To clean the housing use the sewing...(50"F) to 40°C (140 °F) Air humidity 20% to clean the housing. 3 When leaving the machine, during maintenance work or when changing mechanical parts or accessories, always disconnect the machine from the mains by it is disturbed - - Do not use a soft cloth moistened with EN 60335-2-28 and/or...
...cord. 9. No liability will be used on a firm and even surface which it is intended or if it being hit or dropped. Only original PFAFF parts may only be used for any dama ge caused if this machine is used . Cleaning Housing and display: To clean the housing use the sewing...(50"F) to 40°C (140 °F) Air humidity 20% to clean the housing. 3 When leaving the machine, during maintenance work or when changing mechanical parts or accessories, always disconnect the machine from the mains by it is disturbed - - Do not use a soft cloth moistened with EN 60335-2-28 and/or...

Owner's Manual
Page 13
... position A decorative edge serging seam. 7.5 As for program 02 (zigzag from left needle position: press pattern inversion key). 6 9 Description 1 7 Fagoting stitch Application For joining corsetry parts. Provides a decorative hemstitching effect. P Utility stitch programs : 17 18 19 20 21 22 23 24 25 26 27 28 29 30 31 32 Program No.
... position A decorative edge serging seam. 7.5 As for program 02 (zigzag from left needle position: press pattern inversion key). 6 9 Description 1 7 Fagoting stitch Application For joining corsetry parts. Provides a decorative hemstitching effect. P Utility stitch programs : 17 18 19 20 21 22 23 24 25 26 27 28 29 30 31 32 Program No.
Owner's Manual
Page 103
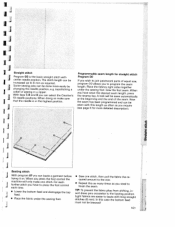
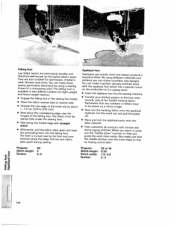
... to the rear. • Repeat this length as often as you require (see page X for straight stitch Program 00 If you wish to join patchwork parts of the seam. Programmable seam length for more easily by changing the needle position, e.g. Place the fabrics right sides together under the sewing foot. A tack... as many times as required. I I I I I I j3 j I Basting stitch J J With program 07 you can baste a garment before trying it on. The stitch length can select the Creative's 19 needle positions.
... to the rear. • Repeat this length as often as you require (see page X for straight stitch Program 00 If you wish to join patchwork parts of the seam. Programmable seam length for more easily by changing the needle position, e.g. Place the fabrics right sides together under the sewing foot. A tack... as many times as required. I I I I I I j3 j I Basting stitch J J With program 07 you can baste a garment before trying it on. The stitch length can select the Creative's 19 needle positions.

Owner's Manual
Page 106
on underwear. • Cut off the old elastic close to the edge. • Gather the fabric with a 6 mm long straight stitch, • Push the part that you have prepared in this way under the elastic or place it underneath, and pin it firmly in place. • Sew it on Tshirts ...
on underwear. • Cut off the old elastic close to the edge. • Gather the fabric with a 6 mm long straight stitch, • Push the part that you have prepared in this way under the elastic or place it underneath, and pin it firmly in place. • Sew it on Tshirts ...

Owner's Manual
Page 114
... without low easily at the around the needle so that two threads are over beginning and end of the elastic threads. stitched. While gather the part by pulling the bottom threads of sewing the gathering seam, make sure that the the seams. You determine the amount of gather elastic thread is...
... without low easily at the around the needle so that two threads are over beginning and end of the elastic threads. stitched. While gather the part by pulling the bottom threads of sewing the gathering seam, make sure that the the seams. You determine the amount of gather elastic thread is...

Owner's Manual
Page 125
I I I I I I I 123 C 0 j I Inserting the buttonhole guide: 1 Push the metal part of the buttonhole will not be sewn. Inserting the buttonhole guide activates the sensor. Without this clearance, the second bartack of the buttonhole guide into the slot below the needle plate from the J rear (between the needle plate and J catch. Push the guide forwards until the catch lies against the rear of the free-arm. The guide must spring back a little to obtain a small distance between the two red arrows).The white plastic part is over the needle plate. d J 2.
I I I I I I I 123 C 0 j I Inserting the buttonhole guide: 1 Push the metal part of the buttonhole will not be sewn. Inserting the buttonhole guide activates the sensor. Without this clearance, the second bartack of the buttonhole guide into the slot below the needle plate from the J rear (between the needle plate and J catch. Push the guide forwards until the catch lies against the rear of the free-arm. The guide must spring back a little to obtain a small distance between the two red arrows).The white plastic part is over the needle plate. d J 2.

Owner's Manual
Page 142
Standard sewing-foot No. 0 A Part No.: 98-694 828-00 Fancy stitch foot for top feed No.1 A Part No.: 98-694 836-00 Fancy stitch foot for sewing without top feed No. 2 A Part No.: 98-694-838-00 -k Blind stitch and overlock foot No. 3 Part No.: 98-694-890-00 140
Standard sewing-foot No. 0 A Part No.: 98-694 828-00 Fancy stitch foot for top feed No.1 A Part No.: 98-694 836-00 Fancy stitch foot for sewing without top feed No. 2 A Part No.: 98-694-838-00 -k Blind stitch and overlock foot No. 3 Part No.: 98-694-890-00 140
Owner's Manual
Page 144
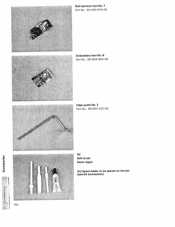
Roll hemmer foot No.7 Part No.: 96-694 818-00 Embroidery foot No. 8 Part No.: 98-694-840-00 Edge guide No. 3 Part No.: 98-8O2--422OO Oil Soft brush Seam ripper 3rd Spool holder to be placed on the pin (special accessories) 142
Roll hemmer foot No.7 Part No.: 96-694 818-00 Embroidery foot No. 8 Part No.: 98-694-840-00 Edge guide No. 3 Part No.: 98-8O2--422OO Oil Soft brush Seam ripper 3rd Spool holder to be placed on the pin (special accessories) 142

Owner's Manual
Page 145
... 93-036 91 5-91 For cording Shirring foot 93-036 998-9 1 For shirring frills etc. Ruffler 98-999 650-00 For placing pleats at your PFAFF dealer: Special accessory Appliqué foot Open appliqué foot for top feed) 98-694 823-00 For hemming edges Narrow edge foot 93-036...-91 Bias tape binder (remove foot holder) 98-053 484-9 1 For binding edges with bias_tape 0 For topstitching seams and sewing (j Needle plate with needle spacing 1.6-2.0) Part No. 93-042 941 -91 93-036 933-91 Sewing work For appliqué work For appliqué work (program 12) 93-042 950-91...
... 93-036 91 5-91 For cording Shirring foot 93-036 998-9 1 For shirring frills etc. Ruffler 98-999 650-00 For placing pleats at your PFAFF dealer: Special accessory Appliqué foot Open appliqué foot for top feed) 98-694 823-00 For hemming edges Narrow edge foot 93-036...-91 Bias tape binder (remove foot holder) 98-053 484-9 1 For binding edges with bias_tape 0 For topstitching seams and sewing (j Needle plate with needle spacing 1.6-2.0) Part No. 93-042 941 -91 93-036 933-91 Sewing work For appliqué work For appliqué work (program 12) 93-042 950-91...
Owner's Manual
Page 146
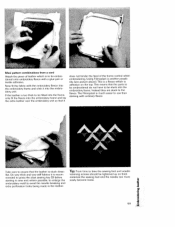
... seams are quickly done and always produce a beautiful effect. Cut the motif out and pull the paper off. • Place and iron the appliqué parts onto the base material. • Then overstitch all contours with narrow and dense zigzag stitches. Appliqué foot Appliqués are particularly durable and therefore...
... seams are quickly done and always produce a beautiful effect. Cut the motif out and pull the paper off. • Place and iron the appliqué parts onto the base material. • Then overstitch all contours with narrow and dense zigzag stitches. Appliqué foot Appliqués are particularly durable and therefore...
Owner's Manual
Page 149
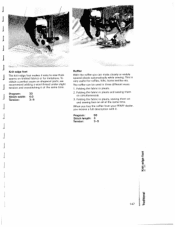
...33 j Stitch width: 6.0 Tension: 3-5 Ruffler With the ruttier you receive a full description with it at the same time. When you buy the ruffler from your PFAFF dealer, you can be used in pleats. 2. Program: 00 Stitch length: 3 Tension: 3-5 Is 0) 0) 0) 147 This is very useful for ruffles, frills, ... in three different ways: 1. Knit-edge foot The knit-edge foot makes it easy to sew thick J seams on shapecut parts, we recommend adding a wool thread under slight j tension and overstitching it . To obtain a perfect seam on knitted fabrics or fur imitations.
...33 j Stitch width: 6.0 Tension: 3-5 Ruffler With the ruttier you receive a full description with it at the same time. When you buy the ruffler from your PFAFF dealer, you can be used in pleats. 2. Program: 00 Stitch length: 3 Tension: 3-5 Is 0) 0) 0) 147 This is very useful for ruffles, frills, ... in three different ways: 1. Knit-edge foot The knit-edge foot makes it easy to sew thick J seams on shapecut parts, we recommend adding a wool thread under slight j tension and overstitching it . To obtain a perfect seam on knitted fabrics or fur imitations.

Owner's Manual
Page 187
Parts of the "creative fantasy" embroidery unit: I I I I I I I I 3 Embroidery unit from front Large and small frame Embroidery unit from rear I 1 Metal track for attaching the frame 2 Release lever for removing the frame I 3 Connection bushing for the machine 4 Fastening spigot for connecting to the machine I 5 Guide strip for engaging the embroidery unit 6 Release lever for removing the embroidery unit 7 Engaging spigot I 8 2 engaging spigots 9 Retaining screw for attaching the fabric L L L L L
Parts of the "creative fantasy" embroidery unit: I I I I I I I I 3 Embroidery unit from front Large and small frame Embroidery unit from rear I 1 Metal track for attaching the frame 2 Release lever for removing the frame I 3 Connection bushing for the machine 4 Fastening spigot for connecting to the machine I 5 Guide strip for engaging the embroidery unit 6 Release lever for removing the embroidery unit 7 Engaging spigot I 8 2 engaging spigots 9 Retaining screw for attaching the fabric L L L L L

Owner's Manual
Page 189
...Connecting / removing the embroidery unit Connection bushing of the Creative 7570 Correcting monograms Creating a word sequence Creative Fantasy cards Cursor keys Deleting from the Creative Card Embroidering Embroidering a word sequence Embroidering a word sequence ...Embroidering borders Embroidering chiffon Embroidering contours Embroidering frotté Embroidering individual segments Embroidering leather Embroidering segments Embroidering small fabric parts...
...Connecting / removing the embroidery unit Connection bushing of the Creative 7570 Correcting monograms Creating a word sequence Creative Fantasy cards Cursor keys Deleting from the Creative Card Embroidering Embroidering a word sequence Embroidering a word sequence ...Embroidering borders Embroidering chiffon Embroidering contours Embroidering frotté Embroidering individual segments Embroidering leather Embroidering segments Embroidering small fabric parts...
Owner's Manual
Page 205
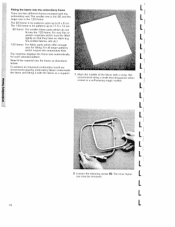
...The smaller one is the 80 and the larger one is the 1 20 frame. I fine knitted fabrics, silk etc.) 1 20 frame: For fabric parts which must be removed. For very fine or stretch materials which offer enough area for patterns up to 11.5 x 1 2 cm. 80 frame: For... smaller fabric parts which require the embroidery field. Loosen the retaining screw (9). L L L 18 L I Now fit the material into the frame as a support. 1. We recommend ...
...The smaller one is the 80 and the larger one is the 1 20 frame. I fine knitted fabrics, silk etc.) 1 20 frame: For fabric parts which must be removed. For very fine or stretch materials which offer enough area for patterns up to 11.5 x 1 2 cm. 80 frame: For... smaller fabric parts which require the embroidery field. Loosen the retaining screw (9). L L L 18 L I Now fit the material into the frame as a support. 1. We recommend ...
Owner's Manual
Page 280
Remove the embroidery fleece when you have finished em broideri ng. Now you can fit the part into the frame, we recommend tacking the piece of a napkin but you cannot fit all the fabric into the frame and embroider it. Embroiclering small pieces of fabric If you want to embroider on a small piece of fabric, for example a pocket or the corner of fabric onto embroidery fleece with large stitches. a. 91
Remove the embroidery fleece when you have finished em broideri ng. Now you can fit the part into the frame, we recommend tacking the piece of a napkin but you cannot fit all the fabric into the frame and embroider it. Embroiclering small pieces of fabric If you want to embroider on a small piece of fabric, for example a pocket or the corner of fabric onto embroidery fleece with large stitches. a. 91
Owner's Manual
Page 288
..., to enlarge the materials the sewing foot and the needle can more easily become loose. Using Filmoplast is stuck down flat. This means that the parts to be embroidered do not have to be fitted into the frame, only fit the fleece into the embroidery frame and lay the extra leather...
..., to enlarge the materials the sewing foot and the needle can more easily become loose. Using Filmoplast is stuck down flat. This means that the parts to be embroidered do not have to be fitted into the frame, only fit the fleece into the embroidery frame and lay the extra leather...


