

Owner's Manual
Page 3
always be used as threading • Always making unplug the sewing machine from outlet. • Do not unplug by or • rUesceomthmis esnedweidngbymtahcehimneanounflayctfuorreirtsaisntceonndteadinuedseinasthdisesmcarinbueadl.in . ... is necessary when this manual. of burns, injury to persons: fire, • Do not allow plug to the off Cc") changing needle, threading bwohbebninm, aokricnhgaanngyinagdpjursetsmseerntfoiont,theetcn. It may deflect the needle causing it to near children. Do not allow to break. • Switch needle, the sewing...
always be used as threading • Always making unplug the sewing machine from outlet. • Do not unplug by or • rUesceomthmis esnedweidngbymtahcehimneanounflayctfuorreirtsaisntceonndteadinuedseinasthdisesmcarinbueadl.in . ... is necessary when this manual. of burns, injury to persons: fire, • Do not allow plug to the off Cc") changing needle, threading bwohbebninm, aokricnhgaanngyinagdpjursetsmseerntfoiont,theetcn. It may deflect the needle causing it to near children. Do not allow to break. • Switch needle, the sewing...
Owner's Manual
Page 5
...Selection by number 3-11 All stitches 3-11 Last stitch 3-11 Creative Data Manager 3-12 The Creative Assistant 3-13 Sewing Assistant 3-13 Embroidery Assistant 3-13 Machine Assistant 3-13 Instructions on using your Pfaff creative 2140 3-2 Selecting a stitch 3-3 Altering the stitch settings 3-4 Single ... needle down 3-1 Reverse sewing button 3-1 The tool bar 3-2 Tool bar after open the Creative Assistant 3-2 Instructions on use of the machine Inction buttons 3-1 Thread cutter 3-1 Stitch re-start 3-1 Sew slow 3-1 Needle up Direct Help 3-14 Instructions on...
...Selection by number 3-11 All stitches 3-11 Last stitch 3-11 Creative Data Manager 3-12 The Creative Assistant 3-13 Sewing Assistant 3-13 Embroidery Assistant 3-13 Machine Assistant 3-13 Instructions on using your Pfaff creative 2140 3-2 Selecting a stitch 3-3 Altering the stitch settings 3-4 Single ... needle down 3-1 Reverse sewing button 3-1 The tool bar 3-2 Tool bar after open the Creative Assistant 3-2 Instructions on use of the machine Inction buttons 3-1 Thread cutter 3-1 Stitch re-start 3-1 Sew slow 3-1 Needle up Direct Help 3-14 Instructions on...

Owner's Manual
Page 6
... right needle position 4-3 Tapering 4-3 Selecting decorative stitches 4-4 Altering stitch settings 4-5 Stitch width 4-5 Stitch length 4-5 Stitch elongation 4-5 Thread tension 4-5 Twin needle function 4-5 Buttonholes 4-6 Enter the length of the buttonhole on the screen 4-6 Set the length of the ... combination Embroider stitches stored in your Pfaff creative 2140 The Creative Data Manager Functions In the Creative Data Manager Working with source and destination fields in the Creative Data Manager Working with a field in the Creative Data Manager Delete Create a directory ...
... right needle position 4-3 Tapering 4-3 Selecting decorative stitches 4-4 Altering stitch settings 4-5 Stitch width 4-5 Stitch length 4-5 Stitch elongation 4-5 Thread tension 4-5 Twin needle function 4-5 Buttonholes 4-6 Enter the length of the buttonhole on the screen 4-6 Set the length of the ... combination Embroider stitches stored in your Pfaff creative 2140 The Creative Data Manager Functions In the Creative Data Manager Working with source and destination fields in the Creative Data Manager Working with a field in the Creative Data Manager Delete Create a directory ...

Owner's Manual
Page 7
...cStraight stitch 5-2 Programmable seam length for straight stitch 5-2 Topstitching 5-2 Gathering with the straight stitch 5-2 Gathering with elastic threads 5-3 Blindhem 5-3 Stretch Blindhem 5-3 Stretch seams Joining Overedge seams Flatlock seams Bridging stitch Cross-hem stitch Twin needle ... the fabric 6-24 Position an additional design 6-25 Combine embroidered word combinations 6-26 Creating a directory in the Creative Data Manager Embroidering the text Positioning an additional section Pattern combinations Combine designs in the hoop Embroider endless borders 6-...
...cStraight stitch 5-2 Programmable seam length for straight stitch 5-2 Topstitching 5-2 Gathering with the straight stitch 5-2 Gathering with elastic threads 5-3 Blindhem 5-3 Stretch Blindhem 5-3 Stretch seams Joining Overedge seams Flatlock seams Bridging stitch Cross-hem stitch Twin needle ... the fabric 6-24 Position an additional design 6-25 Combine embroidered word combinations 6-26 Creating a directory in the Creative Data Manager Embroidering the text Positioning an additional section Pattern combinations Combine designs in the hoop Embroider endless borders 6-...
Owner's Manual
Page 9
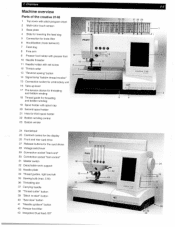
...cord" 30 Connection socket "foot control" 31 Master switch 36 32 Detachable work support 33 Needle plate 34 Thread guides. Overview Machine overview Parts of the creative 2140 1 Top cover with stitch program chart 2 Multi-color touch screen 3 Base plate 4 Slide for lowering the...lamp "bobbin thread monitor" 15 Connection socket for embroidery unit 16 Take-up /down" button 42 Presser toot lifter 43 Integrated Dual feed /IDT ______ 1-1 1920 212223 hrk*y Lt Lti4t1T 4tIItILfhitLoiIrL:3fL 1)3U3tTIfiE fitiltl[iL11 IiR tt 8tI! fl ) tip> 1' )I PFAFF -24 creative 2140 Th dII...
...cord" 30 Connection socket "foot control" 31 Master switch 36 32 Detachable work support 33 Needle plate 34 Thread guides. Overview Machine overview Parts of the creative 2140 1 Top cover with stitch program chart 2 Multi-color touch screen 3 Base plate 4 Slide for lowering the...lamp "bobbin thread monitor" 15 Connection socket for embroidery unit 16 Take-up /down" button 42 Presser toot lifter 43 Integrated Dual feed /IDT ______ 1-1 1920 212223 hrk*y Lt Lti4t1T 4tIItILfhitLoiIrL:3fL 1)3U3tTIfiE fitiltl[iL11 IiR tt 8tI! fl ) tip> 1' )I PFAFF -24 creative 2140 Th dII...
Owner's Manual
Page 11
iii 1. Overview 1-3 Stitch overview creative 2140 -- ------ -I 1' .
iii 1. Overview 1-3 Stitch overview creative 2140 -- ------ -I 1' .

Owner's Manual
Page 12
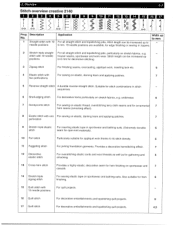
...(May be sewn from position variable from left to right or from right to left ) 7,5 23 Open overedge stitch Elastic serging stitch with selvage thread 6 20 Closed overedge For joining and serging in one operation. Width up to left , using the stitch-mirroring key). easily fraying fabrics. 24...impression of handmade needlework. For stitch cover stitching hem edges. 75 27 Pullover stitch Elastic assembly and serging seam for stretchy. 1-4 1 Overview Stitch overview creative 2140 El El El El El El El El El El El El El El I ii H i '1L IHLU Prog No. 18 Description Quilting. ...
...(May be sewn from position variable from left to right or from right to left ) 7,5 23 Open overedge stitch Elastic serging stitch with selvage thread 6 20 Closed overedge For joining and serging in one operation. Width up to left , using the stitch-mirroring key). easily fraying fabrics. 24...impression of handmade needlework. For stitch cover stitching hem edges. 75 27 Pullover stitch Elastic assembly and serging seam for stretchy. 1-4 1 Overview Stitch overview creative 2140 El El El El El El El El El El El El El El I ii H i '1L IHLU Prog No. 18 Description Quilting. ...
Owner's Manual
Page 17
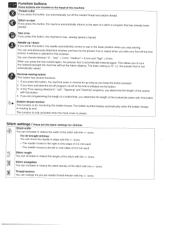
...change the presser procedures, precise instructions on how to use the machine, thread a needle foot, change . Information hIcFm.cr, Use this function to enter the main menu. Creative Assistant provides general information on which you choose whether the information on the...change basic settings of the machine and of all functions appearing in Creative Assistant • There is bar then a Creative Assistant function in the embroidery hoop, information on stabilizers, threads After touching the icon a menu is opened embroidering. This function confirms...
...change the presser procedures, precise instructions on how to use the machine, thread a needle foot, change . Information hIcFm.cr, Use this function to enter the main menu. Creative Assistant provides general information on which you choose whether the information on the...change basic settings of the machine and of all functions appearing in Creative Assistant • There is bar then a Creative Assistant function in the embroidery hoop, information on stabilizers, threads After touching the icon a menu is opened embroidering. This function confirms...
Owner's Manual
Page 18
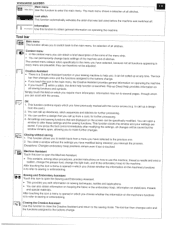
... not Reverse sewing button This button has several functions 1. This "0", i.e. In the "Four sewing with the +I icons. Bobbin thread monitor This function is nearing its is for this button, the machine sews in reverse for stitches Stitch width You can move the...icons Stitch elongation ' You can simultaneously determine whether and control. directions", "pat". The bobbin symbol flashes automatically when the bobbin thread This function is only activated when the hook cover is automatically lowered machine without the fabric slipping. how far the presser foot ...
... not Reverse sewing button This button has several functions 1. This "0", i.e. In the "Four sewing with the +I icons. Bobbin thread monitor This function is nearing its is for this button, the machine sews in reverse for stitches Stitch width You can move the...icons Stitch elongation ' You can simultaneously determine whether and control. directions", "pat". The bobbin symbol flashes automatically when the bobbin thread This function is only activated when the hook cover is automatically lowered machine without the fabric slipping. how far the presser foot ...
Owner's Manual
Page 19
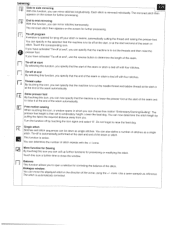
...presser foot. More function for processing or modifying the stitch. the direction of stitches as a single This function is to cut the threads and then raise the If you have activated presser foot. The mirrored stitch then appears on the screen can mirror for correcting the balance...for further stitches longitudinally. Tie-off at end By selecting this function, you specify that the machine is to cut the needle thread and bobbin thread at the start or Raise presser foot By touching to raise it at this icon, you can now specify that the end of...
...presser foot. More function for processing or modifying the stitch. the direction of stitches as a single This function is to cut the threads and then raise the If you have activated presser foot. The mirrored stitch then appears on the screen can mirror for correcting the balance...for further stitches longitudinally. Tie-off at end By selecting this function, you specify that the machine is to cut the needle thread and bobbin thread at the start or Raise presser foot By touching to raise it at this icon, you can now specify that the end of...
Owner's Manual
Page 22
... determining the buttonhole before or during sewing. Dialogue window: You can specify the number of the buttonhole seam with the +7 icons Thread tension: ) You can change the pre set needle thread tension with the +7 icons Stitch number for sewing-on the screen. direction of the buttonhole while sewing. icons. Remove the twin...
... determining the buttonhole before or during sewing. Dialogue window: You can specify the number of the buttonhole seam with the +7 icons Thread tension: ) You can change the pre set needle thread tension with the +7 icons Stitch number for sewing-on the screen. direction of the buttonhole while sewing. icons. Remove the twin...

Owner's Manual
Page 24
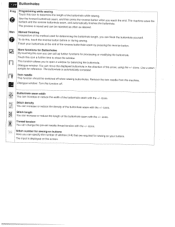
...appears on the screen for further processing. 11 G Tie-off program A window is opened for tying off your word sequences, automatically cutting the thread and raising the presser foot. If you have activated tie-off with four stitches. Raise presser foot I By touching this function, you can ...specify that the machine is to cut the needle thread and bobbin thread at the start of the stitch is tied off at the end, you can mirror each character of a word sequence longitudinally. Twin ...
...appears on the screen for further processing. 11 G Tie-off program A window is opened for tying off your word sequences, automatically cutting the thread and raising the presser foot. If you have activated tie-off with four stitches. Raise presser foot I By touching this function, you can ...specify that the machine is to cut the needle thread and bobbin thread at the start of the stitch is tied off at the end, you can mirror each character of a word sequence longitudinally. Twin ...

Owner's Manual
Page 25
...drive. design has been moved from the center The numbers of the current color. The designs are always adjusted proportionally. thread breakage With this command affects all areas in order to establish an exact position. troubleshooting functions to call up Size ...screen for the hoop. A dot or the Design processing This opens a design within the hoop, the needles current position. icons. thread breakage. The mirrored design then appears on a cross-hair cursor, which you the current needle position. Start of color This positions the...
...drive. design has been moved from the center The numbers of the current color. The designs are always adjusted proportionally. thread breakage With this command affects all areas in order to establish an exact position. troubleshooting functions to call up Size ...screen for the hoop. A dot or the Design processing This opens a design within the hoop, the needles current position. icons. thread breakage. The mirrored design then appears on a cross-hair cursor, which you the current needle position. Start of color This positions the...

Owner's Manual
Page 26
... of the window show you switch back to close the window. If you can rotate your design within the hoop and can adjust the thread tension (tighter or slacker) with this icon you select "Alphabets" in several steps. Dialogue window: Using the arrows you move it must...the representation in the same colors as for the embroidery combination is cancelled again. only appear when "Alphabets' is surrounded by a colored frame. Thread tension )j( You can be marked. A red dash appears for positioning your design in steps of 50 in the same colors as the embroidery ...
... of the window show you switch back to close the window. If you can rotate your design within the hoop and can adjust the thread tension (tighter or slacker) with this icon you select "Alphabets" in several steps. Dialogue window: Using the arrows you move it must...the representation in the same colors as for the embroidery combination is cancelled again. only appear when "Alphabets' is surrounded by a colored frame. Thread tension )j( You can be marked. A red dash appears for positioning your design in steps of 50 in the same colors as the embroidery ...

Owner's Manual
Page 28
... presser foot By touching this icon, you specify that a twin needle can be switched off for tying off your stitch sequences, automatically cutting the thread and raising the presser foot. Balance 1 14 This function allows you to lower the presser foot at start By selecting this function you have activated... length of the stitch. You can move the displayed stitch sequence in the selection that the machine is to tie off is to cut the threads and then raise the presser foot. Use a sewn sample for correcting the stitch sequence. Tie-off at the start and end of the seam...
... presser foot By touching this icon, you specify that a twin needle can be switched off for tying off your stitch sequences, automatically cutting the thread and raising the presser foot. Balance 1 14 This function allows you to lower the presser foot at start By selecting this function you have activated... length of the stitch. You can move the displayed stitch sequence in the selection that the machine is to tie off is to cut the threads and then raise the presser foot. Use a sewn sample for correcting the stitch sequence. Tie-off at the start and end of the seam...

Owner's Manual
Page 30
...your design within a combination. To do this purpose. Orbiting the design With this field you can select a color segment in case of thread breakage. If several designs in order to change . If you can advance stitch by stitch, also across a color change it is ...changes. Start of color This positions the needle at the start of the marked design. Enlarged representation With this function you can adjust the thread tension (tighter or slacker) with the +1- Advancing stitch by stitch With this function, you open a window to be activated. Bottom field...
...your design within a combination. To do this purpose. Orbiting the design With this field you can select a color segment in case of thread breakage. If several designs in order to change . If you can advance stitch by stitch, also across a color change it is ...changes. Start of color This positions the needle at the start of the marked design. Enlarged representation With this function you can adjust the thread tension (tighter or slacker) with the +1- Advancing stitch by stitch With this function, you open a window to be activated. Bottom field...
Owner's Manual
Page 33
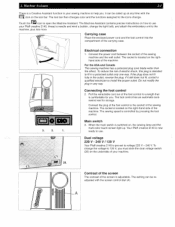
...the compartment of the machine. Do not modify the plug in your machine. Main switch 3. Dual voltage 220 V - 240 V I 120 V Your Pfaff creative 2140 is comfortable for storage. Connect the power cord between the socket of the foot control to 120 V, you must slide the dual voltage switch (28...The tool bar then changes color and the functions assigned to voltage 220 V - 240 V. Connect the plug of the foot control to use your Pfaff creative 2140, thread a needle and wind a bobbin, change . When the main switch is now ready to the socket of the sewing machine. it still does not...
...the compartment of the machine. Do not modify the plug in your machine. Main switch 3. Dual voltage 220 V - 240 V I 120 V Your Pfaff creative 2140 is comfortable for storage. Connect the power cord between the socket of the foot control to 120 V, you must slide the dual voltage switch (28...The tool bar then changes color and the functions assigned to voltage 220 V - 240 V. Connect the plug of the foot control to use your Pfaff creative 2140, thread a needle and wind a bobbin, change . When the main switch is now ready to the socket of the sewing machine. it still does not...

Owner's Manual
Page 35
... Assistant 2-3 / Winding the bobbin from the spool pin Choose a spool cap slightly larger in a clockwise direction. Threading Place the thread into guide (A) from the winder. Place the sewing thread on the main switch. 2. Wind the start of thread, and the smallest cap with cone-type spools. Start bobbin winding by pushing the bobbin winding...
... Assistant 2-3 / Winding the bobbin from the spool pin Choose a spool cap slightly larger in a clockwise direction. Threading Place the thread into guide (A) from the winder. Place the sewing thread on the main switch. 2. Wind the start of thread, and the smallest cap with cone-type spools. Start bobbin winding by pushing the bobbin winding...

Owner's Manual
Page 36
...pin. Winding from the winder As soon as the bobbin is full, the winding action will be stopped automatically. Place a spool of the thread around the bobbin several times in the hole (21) provided. Start bobbin winding by pushing the bobbin lever to back and pull it counter... clockwise through the pre-tension device (B). Cut the thread and remove the bobbin from the third spool pin Insert the third spool pin in a clockwise direction. 2-4 2 Machine Assistant 1. Winding from front ...
...pin. Winding from the winder As soon as the bobbin is full, the winding action will be stopped automatically. Place a spool of the thread around the bobbin several times in the hole (21) provided. Start bobbin winding by pushing the bobbin lever to back and pull it counter... clockwise through the pre-tension device (B). Cut the thread and remove the bobbin from the third spool pin Insert the third spool pin in a clockwise direction. 2-4 2 Machine Assistant 1. Winding from front ...

Owner's Manual
Page 37
...even when the machine is full, the winding action will be at its highest position. Guide the thread to the right. Raise the presser foot. Wind the start of the thread around the bobbin several times in a clockwise direction, Start bobbin winding by pushing the bobbin lever ...to the right. Place the thread from the winder. Note: The take -up lever must be stopped automatically. As soon as the bobbin is fully threaded (see page 2-8 for instructions for threading your machine). Machine Assistant 2-5 Winding a bobbin through the needle It...
...even when the machine is full, the winding action will be at its highest position. Guide the thread to the right. Raise the presser foot. Wind the start of the thread around the bobbin several times in a clockwise direction, Start bobbin winding by pushing the bobbin lever ...to the right. Place the thread from the winder. Note: The take -up lever must be stopped automatically. As soon as the bobbin is fully threaded (see page 2-8 for instructions for threading your machine). Machine Assistant 2-5 Winding a bobbin through the needle It...


