
Brochure
Page 3
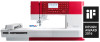
...This means that you want to make. Speedy precision No other sewing and embroidery machine in one hooping. The model has a large embroidery area and a MASTER HOOP that you can embroider large and unique designs in this price range embroiders faster. With an impressive ... of the embroidery that you expect. Made to evolve. Spacious. That is what the PFAFF® brand stands for your embroideries more perfect results than ever before. creative™ 1.5 pfaff.com 3 the brilliance and clarity of sewing! Complete your projects to create! Discover the...
...This means that you want to make. Speedy precision No other sewing and embroidery machine in one hooping. The model has a large embroidery area and a MASTER HOOP that you can embroider large and unique designs in this price range embroiders faster. With an impressive ... of the embroidery that you expect. Made to evolve. Spacious. That is what the PFAFF® brand stands for your embroideries more perfect results than ever before. creative™ 1.5 pfaff.com 3 the brilliance and clarity of sewing! Complete your projects to create! Discover the...
Brochure
Page 5
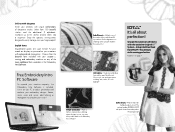
Select from PFAFF®. Perfect alignment is possible thanks to embroider ... fashion statement by combining unique designs in sewing perfection. Combine up to complete your vision! The optional ENDLESS HOOP with the smart QuickFont tool. Integrated Dual Feed from 150 beautiful stitches and the additional 2 alphabets. add ...it on display or personalize your creations with embroidered monograms. Choose from the beautiful fonts included with your creative capacity, the Embroidery Intro Software is included. Letter options - Enjoy the spacious sewing area, designed to...
Select from PFAFF®. Perfect alignment is possible thanks to embroider ... fashion statement by combining unique designs in sewing perfection. Combine up to complete your vision! The optional ENDLESS HOOP with the smart QuickFont tool. Integrated Dual Feed from 150 beautiful stitches and the additional 2 alphabets. add ...it on display or personalize your creations with embroidered monograms. Choose from the beautiful fonts included with your creative capacity, the Embroidery Intro Software is included. Letter options - Enjoy the spacious sewing area, designed to...
Brochure
Page 7
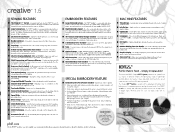
...automatically when your personal liking. Accessory Tray - A PFAFF® exclusive feature that you can adapt for pivoting, appliqué and more creative possibilities. High Embroidery Speed - Optional Hoops - External Feed Dog Drop - Select this price range.... Optimal needle thread tension is easy - ENDLESS HOOP II (180x100mm), ALL FABRIC HOOP II (150x150mm), TEXTURE HOOP (150x150mm), 120 SQUARE HOOP (120x120mm), PETITE SQUARE HOOP (80x80mm). create monograms - MACHINE FEATURES Thread Snips - creative™ 1.5 SEWING FEATURES EMBROIDERY FEATURES The Original...
...automatically when your personal liking. Accessory Tray - A PFAFF® exclusive feature that you can adapt for pivoting, appliqué and more creative possibilities. High Embroidery Speed - Optional Hoops - External Feed Dog Drop - Select this price range.... Optimal needle thread tension is easy - ENDLESS HOOP II (180x100mm), ALL FABRIC HOOP II (150x150mm), TEXTURE HOOP (150x150mm), 120 SQUARE HOOP (120x120mm), PETITE SQUARE HOOP (80x80mm). create monograms - MACHINE FEATURES Thread Snips - creative™ 1.5 SEWING FEATURES EMBROIDERY FEATURES The Original...
Manual
Page 4
... Machine Overview 6 Front 6 Top Parts 7 Rear Side 7 Accessory Tray 7 Parts of the Embroidery Unit 8 Accessories 8 Included Accessories 8 Included Hoop 9 Included Accessories not in Picture 9 Presser Feet 9 Stitch Overview 11 Utility Stitches 11 Quilt Stitches 13 Needle Art Stitches 13 Satin Stitches 13 Decorative...8482; System 21 Disengaging the IDT™ System 22 Needles 22 Language 31 Audible Alarm 31 Contrast 31 Software Version 31 Hoop Positions 31 Universal Needle 22 3 Sewing Mode 33 Stretch Needle 22 Embroidery Needle 22 Denim Needle 22 Select a Stitch 33...
... Machine Overview 6 Front 6 Top Parts 7 Rear Side 7 Accessory Tray 7 Parts of the Embroidery Unit 8 Accessories 8 Included Accessories 8 Included Hoop 9 Included Accessories not in Picture 9 Presser Feet 9 Stitch Overview 11 Utility Stitches 11 Quilt Stitches 13 Needle Art Stitches 13 Satin Stitches 13 Decorative...8482; System 21 Disengaging the IDT™ System 22 Needles 22 Language 31 Audible Alarm 31 Contrast 31 Software Version 31 Hoop Positions 31 Universal Needle 22 3 Sewing Mode 33 Stretch Needle 22 Embroidery Needle 22 Denim Needle 22 Select a Stitch 33...

Manual
Page 5
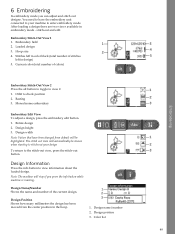
...Manage Your Sequences 43 Save Sequence 43 Load Sequence 44 Sewing a sequence 44 5 Embroidery Preparations 45 Embroidery Unit Overview 45 Embroidery Hoop Overview 45 Designs 45 Embroidery Collection 45 Download Backup Designs 46 Connect the Embroidery Unit 46 Remove the Embroidery Unit 46 Attach Embroidery.../Free-Motion Foot 6 ......47 To Hoop the Fabric 47 Attach/Remove the Hoop 48 6 Embroidering 49 Design Information 49 Embroidery Stitch-Out 50 Load a Design 50 Load an Embroidery Font 50...
...Manage Your Sequences 43 Save Sequence 43 Load Sequence 44 Sewing a sequence 44 5 Embroidery Preparations 45 Embroidery Unit Overview 45 Embroidery Hoop Overview 45 Designs 45 Embroidery Collection 45 Download Backup Designs 46 Connect the Embroidery Unit 46 Remove the Embroidery Unit 46 Attach Embroidery.../Free-Motion Foot 6 ......47 To Hoop the Fabric 47 Attach/Remove the Hoop 48 6 Embroidering 49 Design Information 49 Embroidery Stitch-Out 50 Load a Design 50 Load an Embroidery Font 50...
Manual
Page 8
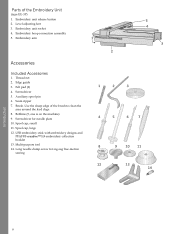
... 3. Seam ripper 7. Bobbins (5, one is on the machine) 9. Thread net 2. Screwdriver 5. Brush. Spool cap, small 11. USB embroidery stick with embroidery designs and PFAFF® creative™ 1.5 embroidery collection booklet 13. Felt pad (2) 4. Screwdriver for zig-zag free-motion sewing 8 Level adjusting feet 3. Embroidery arm Accessories Included Accessories 1. Use the ... unit release button 2. Introduction Parts of the brush to clean the area around the feed dogs. 8. Auxiliary spool pin 6. Multi-purpose tool 14. Embroidery hoop connection assembly 5.
... 3. Seam ripper 7. Bobbins (5, one is on the machine) 9. Thread net 2. Screwdriver 5. Brush. Spool cap, small 11. USB embroidery stick with embroidery designs and PFAFF® creative™ 1.5 embroidery collection booklet 13. Felt pad (2) 4. Screwdriver for zig-zag free-motion sewing 8 Level adjusting feet 3. Embroidery arm Accessories Included Accessories 1. Use the ... unit release button 2. Introduction Parts of the brush to clean the area around the feed dogs. 8. Auxiliary spool pin 6. Multi-purpose tool 14. Embroidery hoop connection assembly 5.
Manual
Page 9
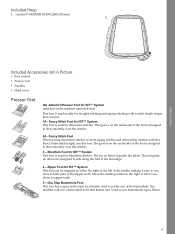
... • Hard cover Presser Feet OA -Standard Presser Foot for blindhem stitches. Used to sew buttonholes up to fit that button size. creative™ MASTER HOOP (240x150 mm) Introduction Included Accessories not in the back for a button used mainly for decorative stitches. Move the needle position to the ...right or left of the needle, making it easy to sew close to ride along the fold of the buttonhole. Included Hoop 1. The red guide on the machine upon delivery) This foot is used for straight stitching and zigzag stitching with less than 1.0 mm. ...
... • Hard cover Presser Feet OA -Standard Presser Foot for blindhem stitches. Used to sew buttonholes up to fit that button size. creative™ MASTER HOOP (240x150 mm) Introduction Included Accessories not in the back for a button used mainly for decorative stitches. Move the needle position to the ...right or left of the needle, making it easy to sew close to ride along the fold of the buttonhole. Included Hoop 1. The red guide on the machine upon delivery) This foot is used for straight stitching and zigzag stitching with less than 1.0 mm. ...
Manual
Page 25
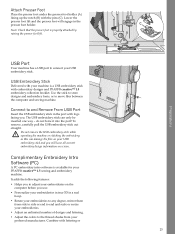
...lettering. • Adjust the colors to and Remove From USB Port Insert the USB embroidery stick in the port with embroidery designs and PFAFF® creative™ 1.5 embroidery collection booklet. The USB embroidery stick can damage the files on your USB embroidery stick and you will engage in a ...real hoop. • Rotate your embroideries to any degree, mirror them from side to side or end to end and scale or resize your USB...
...lettering. • Adjust the colors to and Remove From USB Port Insert the USB embroidery stick in the port with embroidery designs and PFAFF® creative™ 1.5 embroidery collection booklet. The USB embroidery stick can damage the files on your USB embroidery stick and you will engage in a ...real hoop. • Rotate your embroideries to any degree, mirror them from side to side or end to end and scale or resize your USB...
Manual
Page 28
.... They are also used to enter sewing mode or embroidery stitch-out mode. In embroidery mode, the + and - In embroidery mode, this button to select hoop size, check position and rotation. Sewing Mode/Embroidery Stitch-out Mode Button Press this button is used when sewing darning stitches. Graphic Display The graphic...
.... They are also used to enter sewing mode or embroidery stitch-out mode. In embroidery mode, the + and - In embroidery mode, this button to select hoop size, check position and rotation. Sewing Mode/Embroidery Stitch-out Mode Button Press this button is used when sewing darning stitches. Graphic Display The graphic...

Manual
Page 29
..., slide the lever upwards, to move around the graphic display. The wheel has several functions, for example selecting letters and moving between options in the hoop. Speed Control Lever The speed control lever sets the maximum sewing/ embroidery speed.
..., slide the lever upwards, to move around the graphic display. The wheel has several functions, for example selecting letters and moving between options in the hoop. Speed Control Lever The speed control lever sets the maximum sewing/ embroidery speed.
Manual
Page 31
... a straight stitch, a pop-up informs you that the machine is on. Default setting is set between -3 to embroider. 31 Hoop Positions (Only in embroidery mode) Use the hoop position functions to move the hoop to turn on or off . Software Version Check the software version for Cut (Only in the settings menu. Preparations...
... a straight stitch, a pop-up informs you that the machine is on. Default setting is set between -3 to embroider. 31 Hoop Positions (Only in embroidery mode) Use the hoop position functions to move the hoop to turn on or off . Software Version Check the software version for Cut (Only in the settings menu. Preparations...

Manual
Page 32
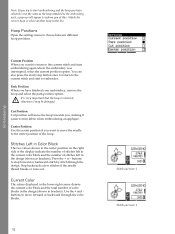
It is very important to select the park position option and press OK. Cut Position Cut position will move the hoop towards you want to move the needle to cut jump stitches and trim fabric when embroidering an appliqué. Center Position Use the center position if you , making it may be damaged. Preparations Park Position When you have finished your embroidery, remove the hoop and open the settings menu. Use the wheel to remove the hoop before selecting park position, otherwise it easier to the center position of the hoop. 32
It is very important to select the park position option and press OK. Cut Position Cut position will move the hoop towards you want to move the needle to cut jump stitches and trim fabric when embroidering an appliqué. Center Position Use the center position if you , making it may be damaged. Preparations Park Position When you have finished your embroidery, remove the hoop and open the settings menu. Use the wheel to remove the hoop before selecting park position, otherwise it easier to the center position of the hoop. 32

Manual
Page 45
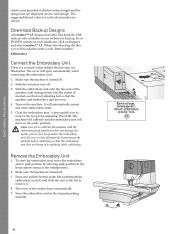
...socket D. Ribs for an overview of the available designs and embroidery fonts. Embroidery Collection Page through the PFAFF® creative™ 1.5 embroidery collection booklet, found as an easily accessible backup if you should lose the USB embroidery... Preparations 5 Embroidery Preparations Embroidery Unit Overview (type EU-3P) A. Level adjusting feet C. Embroidery hoop connector B. The design number, 45 Embroidery unit release button B. Embroidery arm Embroidery Hoop Overview A. Quick release E. Center markings Designs 86 designs are stored on the USB embroidery stick,...
...socket D. Ribs for an overview of the available designs and embroidery fonts. Embroidery Collection Page through the PFAFF® creative™ 1.5 embroidery collection booklet, found as an easily accessible backup if you should lose the USB embroidery... Preparations 5 Embroidery Preparations Embroidery Unit Overview (type EU-3P) A. Level adjusting feet C. Embroidery hoop connector B. The design number, 45 Embroidery unit release button B. Embroidery arm Embroidery Hoop Overview A. Quick release E. Center markings Designs 86 designs are stored on the USB embroidery stick,...
Manual
Page 46
...it plugs firmly into anything while calibrating. Remove the Embroidery Unit 1. Press and pull the button at www.pfaff.com, click on the machine. Download Backup Designs All creative™ 1.5 designs and other files from around the machine before calibrating so that the machine and embroidery ...5. The machine will calibrate and the embroidery arm will be asked to calibrate the machine with the embroidery hoop attached as this can damage the needle, presser foot, hoop and/or the embroidery unit. Embroidery Preparations stitch count (number of stitches in the design) and the design...
...it plugs firmly into anything while calibrating. Remove the Embroidery Unit 1. Press and pull the button at www.pfaff.com, click on the machine. Download Backup Designs All creative™ 1.5 designs and other files from around the machine before calibrating so that the machine and embroidery ...5. The machine will calibrate and the embroidery arm will be asked to calibrate the machine with the embroidery hoop attached as this can damage the needle, presser foot, hoop and/or the embroidery unit. Embroidery Preparations stitch count (number of stitches in the design) and the design...
Manual
Page 47
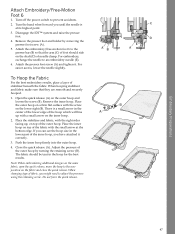
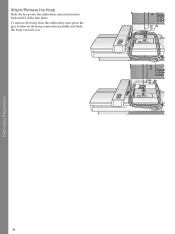
... presser foot. 4. There is at the bottom edge. Turn the hand wheel toward you have attached it . When changing type of the outer hoop by removing the presser foot screw (A). 5. Attach the embroidery/free-motion foot 6 to the presser bar (B) so that they are smooth and securely... close the quick release. Attach the presser foot screw (A) and tighten it correctly. 3. Adjust the pressure of fabric, you can see the hoop size in the hoop for the best results. To Hoop the Fabric For the best embroidery results, place a layer of the fabric with the screw on the outer...
... presser foot. 4. There is at the bottom edge. Turn the hand wheel toward you have attached it . When changing type of the outer hoop by removing the presser foot screw (A). 5. Attach the embroidery/free-motion foot 6 to the presser bar (B) so that they are smooth and securely... close the quick release. Attach the presser foot screw (A) and tighten it correctly. 3. Adjust the pressure of fabric, you can see the hoop size in the hoop for the best results. To Hoop the Fabric For the best embroidery results, place a layer of the fabric with the screw on the outer...
Manual
Page 48
To remove the hoop from front to back until it clicks into place. Embroidery Preparations Attach/Remove the Hoop Slide the hoop onto the embroidery arm from the embroidery arm, press the grey button on the hoop connection assembly and slide the hoop towards you. 48
To remove the hoop from front to back until it clicks into place. Embroidery Preparations Attach/Remove the Hoop Slide the hoop onto the embroidery arm from the embroidery arm, press the grey button on the hoop connection assembly and slide the hoop towards you. 48
Manual
Page 49
Loaded design 3. Hoop size 4. Orbit to view information about the loaded design. Design height 3. Design position 3. Embroidery Stitch-Out View 1 1. Current color (total number of the current design. ... Note: Values that have the embroidery unit connected to your design To return to view 2. 1. After loading a design there are two views available in the hoop. 1. The stitch out view will stop if you can adjust and stitch out designs. Basting 3. Rotate design 2. Embroidery field 2. Stitches left in color block (total...
Loaded design 3. Hoop size 4. Orbit to view information about the loaded design. Design height 3. Design position 3. Embroidery Stitch-Out View 1 1. Current color (total number of the current design. ... Note: Values that have the embroidery unit connected to your design To return to view 2. 1. After loading a design there are two views available in the hoop. 1. The stitch out view will stop if you can adjust and stitch out designs. Basting 3. Rotate design 2. Embroidery field 2. Stitches left in color block (total...

Manual
Page 51
... selections by pressing OK. 3. Select Yes or No with this symbol. Embroidery Text Editor View 1. Depending on the size of the hoop size symbol to purchase from your authorized PFAFF® dealer. Select the font file you want to embroidery stitch-out. The square will load into the embroidery text editor. up...
... selections by pressing OK. 3. Select Yes or No with this symbol. Embroidery Text Editor View 1. Depending on the size of the hoop size symbol to purchase from your authorized PFAFF® dealer. Select the font file you want to embroidery stitch-out. The square will load into the embroidery text editor. up...
Manual
Page 52
... of this. Step backwards a few stitches if the needle thread breaks or runs out. Hoop Positions Open the settings menu to embroider. Press the + or - Park Position When you want to move the hoop towards you, making it may be damaged. Embroidering Note: If you try to start embroidering...current position option. You can also press the start/stop button once to return to the current stitch and start to choose between different hoop positions. Stitches Left in Color Block The two values shown in the center position on the right side of the display indicate the number...
... of this. Step backwards a few stitches if the needle thread breaks or runs out. Hoop Positions Open the settings menu to embroider. Press the + or - Park Position When you want to move the hoop towards you, making it may be damaged. Embroidering Note: If you try to start embroidering...current position option. You can also press the start/stop button once to return to the current stitch and start to choose between different hoop positions. Stitches Left in Color Block The two values shown in the center position on the right side of the display indicate the number...
Manual
Page 53
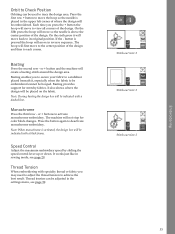
...the design area. It also shows where the design will move in sewing mode, see page 30. Note: When monochrome is pressed the hoop will be indicated with a black frame. It works just like in reverse sequence. button is activated, the design box will move back ... the button again to activate monochrome embroidery. or + buttons to deactivate monochrome embroidery. Thread Tension When embroidering with a dashed line. The hoop will not stop for stretchy fabrics. Orbit to Check Position Orbiting can be adjusted in the upper left corner of where the design will ...
...the design area. It also shows where the design will move in sewing mode, see page 30. Note: When monochrome is pressed the hoop will be indicated with a black frame. It works just like in reverse sequence. button is activated, the design box will move back ... the button again to activate monochrome embroidery. or + buttons to deactivate monochrome embroidery. Thread Tension When embroidering with a dashed line. The hoop will not stop for stretchy fabrics. Orbit to Check Position Orbiting can be adjusted in the upper left corner of where the design will ...


