Brochure
Page 6
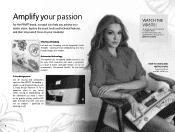
When sewing or embroidering, all sewing and embroidery machines from PFAFF®, the model is to help you need is completed, just touch a button and both threads will be cut automatically. Automated technology The machine sets the optimal needle thread tension for every stitch, and when your seam is shown on your creativity! Amplify your passion For the PFAFF® brand, our goal is a solid high-tech device with a strong design statement, fit...
When sewing or embroidering, all sewing and embroidery machines from PFAFF®, the model is to help you need is completed, just touch a button and both threads will be cut automatically. Automated technology The machine sets the optimal needle thread tension for every stitch, and when your seam is shown on your creativity! Amplify your passion For the PFAFF® brand, our goal is a solid high-tech device with a strong design statement, fit...
Brochure
Page 7
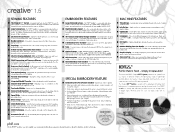
... any design with very little pinning required. Everything stays in the Settings menu. The PFAFF® sewing and embroidery machine features a large embroidery area - makes sewing simple. Scale - USB Connection - Free-motion Sewing - Integrated Needle Threader - Snap-on or off Presser Feet - Easy access for stippling, free-motion embroidery or darning. Ideal for changing bobbins. Moves the complete stitch right or left to the free arm. Automatic Tie-off automatically at the touch of fabrics. Expand your creative capacity! • Adjust, personalize...
... any design with very little pinning required. Everything stays in the Settings menu. The PFAFF® sewing and embroidery machine features a large embroidery area - makes sewing simple. Scale - USB Connection - Free-motion Sewing - Integrated Needle Threader - Snap-on or off Presser Feet - Easy access for stippling, free-motion embroidery or darning. Ideal for changing bobbins. Moves the complete stitch right or left to the free arm. Automatic Tie-off automatically at the touch of fabrics. Expand your creative capacity! • Adjust, personalize...

Manual
Page 2
... break. • Wear safety glasses. • Switch the sewing machine off ("0") position, then remove plug from all instructions before cleaning, removing covers, lubricating or when making any adjustment in the needle area, such as contained in . The wrong plate can cause the needle to operate the machine. To unplug, grasp the plug, not the cord. • The foot control is used by the manufacturer as threading needle, changing needle, threading bobbin, or changing presser foot, etc. • Never drop or insert...
... break. • Wear safety glasses. • Switch the sewing machine off ("0") position, then remove plug from all instructions before cleaning, removing covers, lubricating or when making any adjustment in the needle area, such as contained in . The wrong plate can cause the needle to operate the machine. To unplug, grasp the plug, not the cord. • The foot control is used by the manufacturer as threading needle, changing needle, threading bobbin, or changing presser foot, etc. • Never drop or insert...
Manual
Page 4
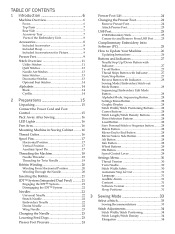
... OK Button 29 Speed Control Lever 29 Settings Menu 30 Thread Tension 30 Twin Needle 30 Stitch Width Safety 30 Automatic Stop for Cut 31 Inserting the Bobbin 21 IDT™ System (Integrated Dual Feed) ..........21 Engaging the IDT™ System 21 Disengaging the IDT™ System 22 Needles 22 Language 31 Audible Alarm 31 Contrast 31 Software Version 31 Hoop Positions 31 Universal Needle 22 3 Sewing Mode 33 Stretch Needle 22 Embroidery Needle...
... OK Button 29 Speed Control Lever 29 Settings Menu 30 Thread Tension 30 Twin Needle 30 Stitch Width Safety 30 Automatic Stop for Cut 31 Inserting the Bobbin 21 IDT™ System (Integrated Dual Feed) ..........21 Engaging the IDT™ System 21 Disengaging the IDT™ System 22 Needles 22 Language 31 Audible Alarm 31 Contrast 31 Software Version 31 Hoop Positions 31 Universal Needle 22 3 Sewing Mode 33 Stretch Needle 22 Embroidery Needle...

Manual
Page 5
... 55 Buttonholes 36 Design Width 55 Sew On a Button 38 Move 55 Darning 38 Mirroring 56 Sewing Hems in Heavy Fabric 38 Handlook Quilting 39 Common Embroidery Pop-Ups 56 Free-Motion 39 7 Maintenance 58 Free-Motion Stippling 39 Blindhem Stitch 40 Sewing in Zippers 41 Common Sewing Pop-Ups 41 Check Needle Thread 41 Machine Needs to Rest 41 Cleaning the Machine 58 Cleaning the Bobbin Area 58 Cleaning Under the Bobbin Area 59 Replacing the Needle Plate 59 Troubleshooting 60 Technical specification...
... 55 Buttonholes 36 Design Width 55 Sew On a Button 38 Move 55 Darning 38 Mirroring 56 Sewing Hems in Heavy Fabric 38 Handlook Quilting 39 Common Embroidery Pop-Ups 56 Free-Motion 39 7 Maintenance 58 Free-Motion Stippling 39 Blindhem Stitch 40 Sewing in Zippers 41 Common Sewing Pop-Ups 41 Check Needle Thread 41 Machine Needs to Rest 41 Cleaning the Machine 58 Cleaning the Bobbin Area 58 Cleaning Under the Bobbin Area 59 Replacing the Needle Plate 59 Troubleshooting 60 Technical specification...

Manual
Page 7
Bobbin winder lever and bobbin spindle 5. Take-up lever Rear Side 1. Slide for accessories 2. Thread guides 2. Thread tension discs 10. Hook 7 Spool pin 9. Handle 2. Introduction Top Parts 1. Bobbin winder thread guide and tension disc 3. Felt pad 7. Embroidery unit connection socket Accessory Tray Store the accessories in the tray so they are easily accessible. 1. Space for lowering the feed dogs 5. Presser foot lift 3. Bobbin thread cutter 4. Hole for auxiliary spool pin 6. Spool cap 8. IDT™ system 4.
Bobbin winder lever and bobbin spindle 5. Take-up lever Rear Side 1. Slide for accessories 2. Thread guides 2. Thread tension discs 10. Hook 7 Spool pin 9. Handle 2. Introduction Top Parts 1. Bobbin winder thread guide and tension disc 3. Felt pad 7. Embroidery unit connection socket Accessory Tray Store the accessories in the tray so they are easily accessible. 1. Space for lowering the feed dogs 5. Presser foot lift 3. Bobbin thread cutter 4. Hole for auxiliary spool pin 6. Spool cap 8. IDT™ system 4.
Manual
Page 8
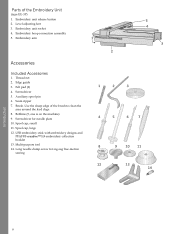
...Unit (type EU-3P) 1. USB embroidery stick with embroidery designs and PFAFF® creative™ 1.5 embroidery collection booklet 13. Long needle clamp screw for needle plate 10. Embroidery unit socket 4. Edge guide 3. Screwdriver for zig-zag free-motion sewing 8 Spool cap, large 12. Seam ripper 7. Introduction Parts of the brush to clean the area around the feed dogs. 8. Embroidery unit release button 2. Embroidery hoop connection assembly 5. Embroidery arm Accessories Included Accessories 1. Screwdriver 5. Auxiliary spool pin 6. Bobbins (5, one is on the machine...
...Unit (type EU-3P) 1. USB embroidery stick with embroidery designs and PFAFF® creative™ 1.5 embroidery collection booklet 13. Long needle clamp screw for needle plate 10. Embroidery unit socket 4. Edge guide 3. Screwdriver for zig-zag free-motion sewing 8 Spool cap, large 12. Seam ripper 7. Introduction Parts of the brush to clean the area around the feed dogs. 8. Embroidery unit release button 2. Embroidery hoop connection assembly 5. Embroidery arm Accessories Included Accessories 1. Screwdriver 5. Auxiliary spool pin 6. Bobbins (5, one is on the machine...
Manual
Page 9
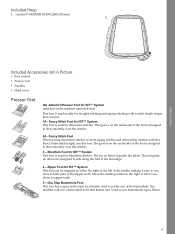
...; Power cord • Needles • Hard cover Presser Feet OA -Standard Presser Foot for IDT™ System (attached on the underside of the hem edge. 4 - Move the needle position to the right or left of the zipper teeth. Fancy Stitch Foot for IDT™ System This foot is used for straight stitching and zigzag stitching with less than 1.0 mm. 1A - creative™ MASTER HOOP (240x150 mm) Introduction Included Accessories not in the back for a button used...
...; Power cord • Needles • Hard cover Presser Feet OA -Standard Presser Foot for IDT™ System (attached on the underside of the hem edge. 4 - Move the needle position to the right or left of the zipper teeth. Fancy Stitch Foot for IDT™ System This foot is used for straight stitching and zigzag stitching with less than 1.0 mm. 1A - creative™ MASTER HOOP (240x150 mm) Introduction Included Accessories not in the back for a button used...
Manual
Page 11
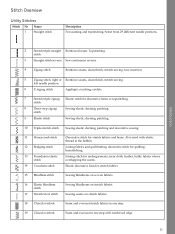
... in one step with elastic thread in the bobbin. Joining fabrics and quilt batting, decorative stitch for decorative hems or topstitching. Topstitching. stitch 3 Straight stitch reverse Sew continuous reverse. 4 Zigzag stitch Reinforce seams, clean finish, stretch sewing, lace insertion. 5 Zigzag stitch, right or Reinforce seams, clean finish, stretch sewing. Sewing seams on stretch fabrics. Stitch Overview Utility Stitches Stitch № Name 1 Straight stitch Description For seaming and topstitching. left needle position 6 Z-zigzag stitch Appliqué, couching, eyelets...
... in one step with elastic thread in the bobbin. Joining fabrics and quilt batting, decorative stitch for decorative hems or topstitching. Topstitching. stitch 3 Straight stitch reverse Sew continuous reverse. 4 Zigzag stitch Reinforce seams, clean finish, stretch sewing, lace insertion. 5 Zigzag stitch, right or Reinforce seams, clean finish, stretch sewing. Sewing seams on stretch fabrics. Stitch Overview Utility Stitches Stitch № Name 1 Straight stitch Description For seaming and topstitching. left needle position 6 Z-zigzag stitch Appliqué, couching, eyelets...
Manual
Page 19
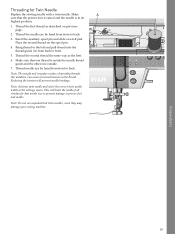
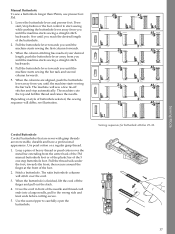
... position. 1. Reducing the tension will limit the width of specialty threads, like metallics, can cause increased tension on previous page. 2. Note: Do not use asymmetrical twin needles, since they may damage your sewing machine. 19 Thread the first thread as the first. 6. Thread the needle eye by hand from back to presser foot and needle. Note: The weight and irregular surface of all stitches for Twin Needle Replace the sewing needle with a twin needle...
... position. 1. Reducing the tension will limit the width of specialty threads, like metallics, can cause increased tension on previous page. 2. Note: Do not use asymmetrical twin needles, since they may damage your sewing machine. 19 Thread the first thread as the first. 6. Thread the needle eye by hand from back to presser foot and needle. Note: The weight and irregular surface of all stitches for Twin Needle Replace the sewing needle with a twin needle...
Manual
Page 28
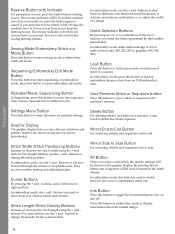
... this button in reverse for buttonholes). buttons are used when sewing darning stitches. Press this button to display information about the loaded design. 28 If you press the reverse button while sewing, the machine sews in embroidery mode to create text sequences from an USB embroidery stick. Reverse is also used to load an embroidery design or font from various characters in real size (except for as long as you select a satin stitch, the density settings...
... this button in reverse for buttonholes). buttons are used when sewing darning stitches. Press this button to display information about the loaded design. 28 If you press the reverse button while sewing, the machine sews in embroidery mode to create text sequences from an USB embroidery stick. Reverse is also used to load an embroidery design or font from various characters in real size (except for as long as you select a satin stitch, the density settings...
Manual
Page 30
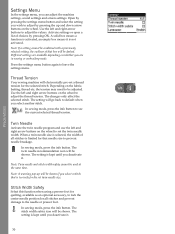
... needle or presser foot. Different settings are in sewing or embroidery mode. The twin needle recommendation icon will be adjusted. Note: Twin needle and stitch width safety cannot be shown. The stitch width safety icon will be used at the same time. Twin Needle Activate the twin needle program and use the left and right arrow buttons on the wheel. Open by pressing the settings menu button and select the setting you wish to adjust the thread tension...
... needle or presser foot. Different settings are in sewing or embroidery mode. The twin needle recommendation icon will be adjusted. Note: Twin needle and stitch width safety cannot be shown. The stitch width safety icon will be used at the same time. Twin Needle Activate the twin needle program and use the left and right arrow buttons on the wheel. Open by pressing the settings menu button and select the setting you wish to adjust the thread tension...

Manual
Page 33
... select that stitch number immediately. Feed dog/IDT™ system recommendation 5. Sewing Mode - Thread tension value Note: All symbols and options will find all the basic information you turn on the machine. Sewing Recommendations Press the info button to hide the information. 1. Sewing Mode 3 Sewing Mode Sewing mode is the first view on the graphic display after you need to sew with the embroidery unit attached. Stitch length/density...
... select that stitch number immediately. Feed dog/IDT™ system recommendation 5. Sewing Mode - Thread tension value Note: All symbols and options will find all the basic information you turn on the machine. Sewing Recommendations Press the info button to hide the information. 1. Sewing Mode 3 Sewing Mode Sewing mode is the first view on the graphic display after you need to sew with the embroidery unit attached. Stitch length/density...
Manual
Page 37
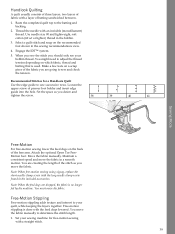
... the foot control to start /stop automatically. Loop a piece of heavy thread or pearl cotton over the cord. 3. The satin buttonhole columns will stitch over the metal bar extending from you reach the desired length of the needle and thread cord ends into a large needle, pull to carefully open the buttonhole. Sewing sequences for buttonhole stitches 25-31. 37 Sew until you until the machine starts sewing a straight stitch backwards. 4. Sewing Mode Manual Buttonhole To sew a buttonhole longer than 25mm, use presser foot 5M. 1. Use...
... the foot control to start /stop automatically. Loop a piece of heavy thread or pearl cotton over the cord. 3. The satin buttonhole columns will stitch over the metal bar extending from you reach the desired length of the needle and thread cord ends into a large needle, pull to carefully open the buttonhole. Sewing sequences for buttonhole stitches 25-31. 37 Sew until you until the machine starts sewing a straight stitch backwards. 4. Sewing Mode Manual Buttonhole To sew a buttonhole longer than 25mm, use presser foot 5M. 1. Use...
Manual
Page 39
... a consistent speed and move the fabric manually to your bobbin thread. Free-Motion Stippling Free-motion stippling adds texture and interest to determine the stitch length. 1. Use needle size 90 and lightweight, soft cotton (60 wt or lighter) thread in the included accessories. Note: When the feed dogs are creating the length of the free arm. You move the fabric in the sewing recommendations view. 4. Set your sewing machine for a Handlook Quilt Use the edge guide to adjust the thread tension depending...
... a consistent speed and move the fabric manually to your bobbin thread. Free-Motion Stippling Free-motion stippling adds texture and interest to determine the stitch length. 1. Use needle size 90 and lightweight, soft cotton (60 wt or lighter) thread in the included accessories. Note: When the feed dogs are creating the length of the free arm. You move the fabric in the sewing recommendations view. 4. Set your sewing machine for a Handlook Quilt Use the edge guide to adjust the thread tension depending...
Manual
Page 60
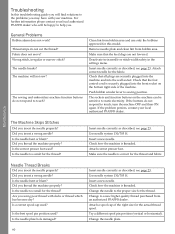
... spool pin position (vertical or horizontal). Check that the foot control cord is threaded. Attach correct presser foot. Did you insert the needle properly? Is the needle plate hole damaged? Fabric does not move? The sewing and embroidery machine function buttons do not respond to help you. Deactivate twin needle or stitch width safety in the settings menu. Insert a new needle. Is the needle too small for the thread and fabric. Insert needle correctly as described, see page 23. Did you insert a wrong needle? Change the needle plate...
... spool pin position (vertical or horizontal). Check that the foot control cord is threaded. Attach correct presser foot. Did you insert the needle properly? Is the needle plate hole damaged? Fabric does not move? The sewing and embroidery machine function buttons do not respond to help you. Deactivate twin needle or stitch width safety in the settings menu. Insert a new needle. Is the needle too small for the thread and fabric. Insert needle correctly as described, see page 23. Did you insert a wrong needle? Change the needle plate...
Manual
Page 61
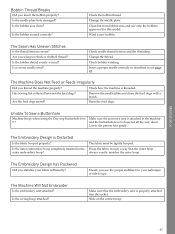
... embroidery hoop? Remove the needle plate and clean the feed dogs with a brush. Lower the presser foot gently. Is the bobbin wound correctly? Change the needle plate. Check how the machine is properly attached into the socket. Clean lint from bobbin area and use the proper stabilizer for this model. Raise the feed dogs. Is the bobbin thread evenly wound? Check bobbin winding. The Machine Will Not Embroider Is the embroidery unit attached? Is the needle plate hole damaged? The Seam Has Uneven Stitches Is the thread tension...
... embroidery hoop? Remove the needle plate and clean the feed dogs with a brush. Lower the presser foot gently. Is the bobbin wound correctly? Change the needle plate. Check how the machine is properly attached into the socket. Clean lint from bobbin area and use the proper stabilizer for this model. Raise the feed dogs. Is the bobbin thread evenly wound? Check bobbin winding. The Machine Will Not Embroider Is the embroidery unit attached? Is the needle plate hole damaged? The Seam Has Uneven Stitches Is the thread tension...
Manual
Page 62
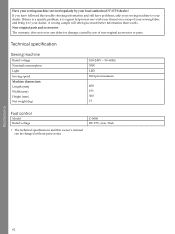
... consumption Light Sewing speed Machine dimensions: Length (mm) Width (mm) Height (mm) Net weight (kg) 100-240V ~ 50-60Hz 55W LED 800 rpm maximum 480 193 300 13 Foot control Model Rated voltage • The technical specifications and this trouble shooting information and still have followed this owner's manual can be changed without prior notice. Non-original parts and accessories The warranty does not cover any...
... consumption Light Sewing speed Machine dimensions: Length (mm) Width (mm) Height (mm) Net weight (kg) 100-240V ~ 50-60Hz 55W LED 800 rpm maximum 480 193 300 13 Foot control Model Rated voltage • The technical specifications and this trouble shooting information and still have followed this owner's manual can be changed without prior notice. Non-original parts and accessories The warranty does not cover any...
Manual
Page 63
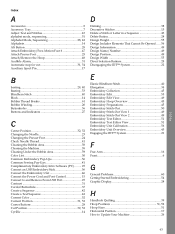
.../Number 49 Design Position 49 Design Width 55 Direct Selection Buttons 28 Disengaging the IDT™ System 22 B basting 28, 40 Basting 53 Blindhem Stitch 40 Block 14 Bobbin Thread Breaks 61 Bobbin Winding 20 Buttonholes 36 Buttons and Indicators 27 C Center Position 32, 52 Changing the Needle 23 Changing the Presser Foot 24 Check Needle Thread 41 Cleaning the Bobbin Area 58 Cleaning the Machine 58 Cleaning Under the Bobbin Area 59 Color List 50 Common Embroidery Pop-Ups 56 Common Sewing...
.../Number 49 Design Position 49 Design Width 55 Direct Selection Buttons 28 Disengaging the IDT™ System 22 B basting 28, 40 Basting 53 Blindhem Stitch 40 Block 14 Bobbin Thread Breaks 61 Bobbin Winding 20 Buttonholes 36 Buttons and Indicators 27 C Center Position 32, 52 Changing the Needle 23 Changing the Presser Foot 24 Check Needle Thread 41 Cleaning the Bobbin Area 58 Cleaning the Machine 58 Cleaning Under the Bobbin Area 59 Color List 50 Common Embroidery Pop-Ups 56 Common Sewing...
Manual
Page 64
.../Embroidery Edit Mode Button 28 Settings Menu 28, 30 Sew On a Button 38 Sewing a sequence 44 Sewing Hems in Heavy Fabric 38 Sewing in Zippers 41 Sewing Mode/Embroidery Stitch-out Mode Button .... 28 Sewing Recommendations 33 Sewing Techniques 36 Software Version 31 Speed Control 53 Speed Control Lever 29 Spool Pins 17 Start/Stop Button 27 Stitch Adjustments 34 Stitch Length/Stitch Density 28, 34 Stitch Overview 11 Stitch Width Safety 30 Stitch Width/Stitch Positioning 28, 34 Stitches Left in Color Block 52 Stop Command in Design...
.../Embroidery Edit Mode Button 28 Settings Menu 28, 30 Sew On a Button 38 Sewing a sequence 44 Sewing Hems in Heavy Fabric 38 Sewing in Zippers 41 Sewing Mode/Embroidery Stitch-out Mode Button .... 28 Sewing Recommendations 33 Sewing Techniques 36 Software Version 31 Speed Control 53 Speed Control Lever 29 Spool Pins 17 Start/Stop Button 27 Stitch Adjustments 34 Stitch Length/Stitch Density 28, 34 Stitch Overview 11 Stitch Width Safety 30 Stitch Width/Stitch Positioning 28, 34 Stitches Left in Color Block 52 Stop Command in Design...


