Brochure
Page 7
... creative combinations. • Add-on all times. Resize easily, maintaining perfect stitch density. • Great selection of a seam for all your Embroidery Software to the free arm. Bobbin Winding From the Needle - Makes your unique, personal creations in order. The time-tested PFAFF&#...end for a multitude of thread changes when you can expand your possibilities even more creative possibilities. Created by learning more about this price range embroiders faster. Ideal for changing bobbins. Flip the stitch or embroidery design side-to-side and/or end-to the ...
... creative combinations. • Add-on all times. Resize easily, maintaining perfect stitch density. • Great selection of a seam for all your Embroidery Software to the free arm. Bobbin Winding From the Needle - Makes your unique, personal creations in order. The time-tested PFAFF&#...end for a multitude of thread changes when you can expand your possibilities even more creative possibilities. Created by learning more about this price range embroiders faster. Ideal for changing bobbins. Flip the stitch or embroidery design side-to-side and/or end-to the ...

Manual
Page 2
... is necessary when this manual. To unplug, grasp the plug, not the cord. • The foot control is used as threading needle, changing needle, threading bobbin, or changing presser foot, etc. • Never drop or insert any object into water. Always unplug this sewing machine from all instructions before cleaning, removing...
... is necessary when this manual. To unplug, grasp the plug, not the cord. • The foot control is used as threading needle, changing needle, threading bobbin, or changing presser foot, etc. • Never drop or insert any object into water. Always unplug this sewing machine from all instructions before cleaning, removing...
Manual
Page 4
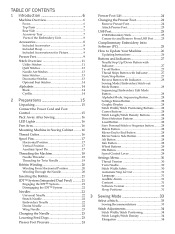
...17 Horizontal Position 17 Vertical Position 17 Auxiliary Spool Pin 17 Threading the Machine 18 Needle Threader 18 Threading for Twin Needle 19 Bobbin Winding 20 Winding From Horizontal Position 20 Winding Through the Needle 20 Save Personal Stitch or Sequence button........ 28 Delete Button 28 ... Speed Control Lever 29 Settings Menu 30 Thread Tension 30 Twin Needle 30 Stitch Width Safety 30 Automatic Stop for Cut 31 Inserting the Bobbin 21 IDT™ System (Integrated Dual Feed) ..........21 Engaging the IDT™ System 21 Disengaging the IDT™ System 22 Needles...
...17 Horizontal Position 17 Vertical Position 17 Auxiliary Spool Pin 17 Threading the Machine 18 Needle Threader 18 Threading for Twin Needle 19 Bobbin Winding 20 Winding From Horizontal Position 20 Winding Through the Needle 20 Save Personal Stitch or Sequence button........ 28 Delete Button 28 ... Speed Control Lever 29 Settings Menu 30 Thread Tension 30 Twin Needle 30 Stitch Width Safety 30 Automatic Stop for Cut 31 Inserting the Bobbin 21 IDT™ System (Integrated Dual Feed) ..........21 Engaging the IDT™ System 21 Disengaging the IDT™ System 22 Needles...

Manual
Page 5
... in Zippers 41 Common Sewing Pop-Ups 41 Check Needle Thread 41 Machine Needs to Rest 41 Cleaning the Machine 58 Cleaning the Bobbin Area 58 Cleaning Under the Bobbin Area 59 Replacing the Needle Plate 59 Troubleshooting 60 Technical specification 62 4 Sequencing 42 Create a Sequence 42 Index 63 Using the Alphabet...
... in Zippers 41 Common Sewing Pop-Ups 41 Check Needle Thread 41 Machine Needs to Rest 41 Cleaning the Machine 58 Cleaning the Bobbin Area 58 Cleaning Under the Bobbin Area 59 Replacing the Needle Plate 59 Troubleshooting 60 Technical specification 62 4 Sequencing 42 Create a Sequence 42 Index 63 Using the Alphabet...
Manual
Page 6
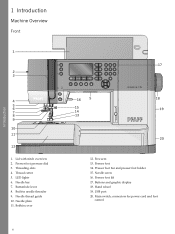
Presser foot pressure dial 3. Needle bar 7. Bobbin cover 6 12. Hand wheel 19. Buttons and graphic display 18. USB port 20. Needle thread guide 10. Free arm 13. Presser foot lift 17. Presser foot 14. Needle screw 16. Needle plate 11. LED lights 6. 1 Introduction Machine Overview Front Introduction 1. Threading slots 4. Main switch, connectors for power cord and foot control Buttonhole lever 8. Lid with stitch overview 2. Built-in needle threader 9. Presser foot bar and presser foot holder 15. Thread cutter 5.
Presser foot pressure dial 3. Needle bar 7. Bobbin cover 6 12. Hand wheel 19. Buttons and graphic display 18. USB port 20. Needle thread guide 10. Free arm 13. Presser foot lift 17. Presser foot 14. Needle screw 16. Needle plate 11. LED lights 6. 1 Introduction Machine Overview Front Introduction 1. Threading slots 4. Main switch, connectors for power cord and foot control Buttonhole lever 8. Lid with stitch overview 2. Built-in needle threader 9. Presser foot bar and presser foot holder 15. Thread cutter 5.

Manual
Page 7
Bobbin winder lever and bobbin spindle 5. Thread tension discs 10. Take-up lever Rear Side 1. Embroidery unit connection socket Accessory Tray Store the accessories in the tray so they are easily accessible. 1. Spool cap 8. Spool pin 9. Thread guides 2. Bobbin winder thread guide and tension disc 3. Hole for accessories 2. IDT™ system 4. Space for auxiliary spool pin 6. Handle 2. Slide for lowering the feed dogs 5. Hook 7 Bobbin thread cutter 4. Felt pad 7. Presser foot lift 3. Introduction Top Parts 1.
Bobbin winder lever and bobbin spindle 5. Thread tension discs 10. Take-up lever Rear Side 1. Embroidery unit connection socket Accessory Tray Store the accessories in the tray so they are easily accessible. 1. Spool cap 8. Spool pin 9. Thread guides 2. Bobbin winder thread guide and tension disc 3. Hole for accessories 2. IDT™ system 4. Space for auxiliary spool pin 6. Handle 2. Slide for lowering the feed dogs 5. Hook 7 Bobbin thread cutter 4. Felt pad 7. Presser foot lift 3. Introduction Top Parts 1.
Manual
Page 8
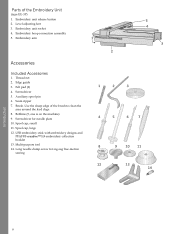
... sewing 8 Embroidery unit release button 2. Edge guide 3. Use the sharp edge of the Embroidery Unit (type EU-3P) 1. USB embroidery stick with embroidery designs and PFAFF® creative™ 1.5 embroidery collection booklet 13. Embroidery unit socket 4. Spool cap, large 12. Long needle clamp screw for needle plate 10. Felt pad...
... sewing 8 Embroidery unit release button 2. Edge guide 3. Use the sharp edge of the Embroidery Unit (type EU-3P) 1. USB embroidery stick with embroidery designs and PFAFF® creative™ 1.5 embroidery collection booklet 13. Embroidery unit socket 4. Spool cap, large 12. Long needle clamp screw for needle plate 10. Felt pad...
Manual
Page 11
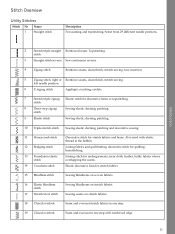
.... 18 Closed overlock Seam and overcast stretch fabrics in one step. 19 Closed overlock Seam and overcast in one step with elastic thread in the bobbin. Stitch Overview Utility Stitches Stitch № Name 1 Straight stitch Description For seaming and topstitching. Introduction 2 Stretch triple straight Reinforced seam.
.... 18 Closed overlock Seam and overcast stretch fabrics in one step. 19 Closed overlock Seam and overcast in one step with elastic thread in the bobbin. Stitch Overview Utility Stitches Stitch № Name 1 Straight stitch Description For seaming and topstitching. Introduction 2 Stretch triple straight Reinforced seam.

Manual
Page 17
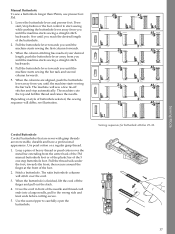
... direction of the machine (A). This is to the vertical position. Auxiliary Spool Pin The auxiliary spool pin is adjustable and can be used when winding a bobbin thread from rotating. The main spool pin is used both in vertical position. 17 Make sure that would prevent the spool from a second spool of...
... direction of the machine (A). This is to the vertical position. Auxiliary Spool Pin The auxiliary spool pin is adjustable and can be used when winding a bobbin thread from rotating. The main spool pin is used both in vertical position. 17 Make sure that would prevent the spool from a second spool of...
Manual
Page 20
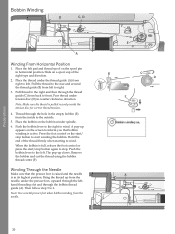
...foot is raised and the needle is pulled securely inside to right. 3. A pop-up appears on the spool pin in its highest position. When the bobbin is active. The pop-up from the needle, under the thread guide (A) from back to start / stop . Bring the thread up closes. Note... Make sure the thread is in horizontal position. Press the foot control or the start winding the bobbin. Note: Use a metal presser foot when bobbin winding from left to the outside. 5. Place the bobbin on a spool cap of the thread firmly when starting to the left . Winding Through the Needle ...
...foot is raised and the needle is pulled securely inside to right. 3. A pop-up appears on the spool pin in its highest position. When the bobbin is active. The pop-up from the needle, under the thread guide (A) from back to start / stop . Bring the thread up closes. Note... Make sure the thread is in horizontal position. Press the foot control or the start winding the bobbin. Note: Use a metal presser foot when bobbin winding from left to the outside. 5. Place the bobbin on a spool cap of the thread firmly when starting to the left . Winding Through the Needle ...
Manual
Page 21
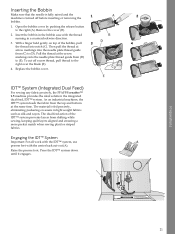
...fabrics. Raise the presser foot. Open the bobbin cover by pushing the release button to (D). Pull the thread at arrow markings into notch (C). IDT™ System (Integrated Dual Feed) For sewing any fabric precisely, the PFAFF® creative™ 1.5 machine provides the ideal solution:... the integrated dual feed, IDT™ system. Preparations Inserting the Bobbin Make sure that the needle is fully raised and the machine is fed ...
...fabrics. Raise the presser foot. Open the bobbin cover by pushing the release button to (D). Pull the thread at arrow markings into notch (C). IDT™ System (Integrated Dual Feed) For sewing any fabric precisely, the PFAFF® creative™ 1.5 machine provides the ideal solution:... the integrated dual feed, IDT™ system. Preparations Inserting the Bobbin Make sure that the needle is fully raised and the machine is fed ...
Manual
Page 24
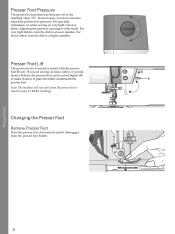
... on heavy fabric or several layers of fabric, the presser foot can improve the result. Presser Foot Lift The presser foot is raised (except for bobbin winding). Note: The machine will not start when the presser foot is lowered or raised with the presser foot lift (A). In most cases, you are...
... on heavy fabric or several layers of fabric, the presser foot can improve the result. Presser Foot Lift The presser foot is raised (except for bobbin winding). Note: The machine will not start when the presser foot is lowered or raised with the presser foot lift (A). In most cases, you are...
Manual
Page 27
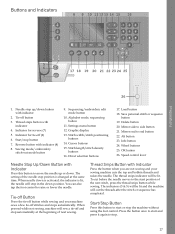
... end to raise or lower the needle. Tie-off Button Press the tie-off button while sewing and your sewing machine cuts the top and bobbin threads and raises the needle. When pressed while not sewing, machine will stop . 27 Start/Stop Button Press this button to move the needle up...
... end to raise or lower the needle. Tie-off Button Press the tie-off button while sewing and your sewing machine cuts the top and bobbin threads and raises the needle. When pressed while not sewing, machine will stop . 27 Start/Stop Button Press this button to move the needle up...

Manual
Page 35
... with the new one. Depending on how to overwrite the previously saved stitch or sequence with the arrow buttons and press the OK. If the bobbin thread is visible on the underside of this when you wish to change the setting manually. For decorative stitches and buttonholes, the top thread should...
... with the new one. Depending on how to overwrite the previously saved stitch or sequence with the arrow buttons and press the OK. If the bobbin thread is visible on the underside of this when you wish to change the setting manually. For decorative stitches and buttonholes, the top thread should...
Manual
Page 37
... reached your desired length, push the buttonhole lever away from you until the machine starts sewing the bar tack. The machine cuts the top and bobbin thread and raises the needle. Depending on style of the buttonhole. 2. Loop a piece of the 5 one step buttonhole foot. Use the seam ripper to the...
... reached your desired length, push the buttonhole lever away from you until the machine starts sewing the bar tack. The machine cuts the top and bobbin thread and raises the needle. Depending on style of the buttonhole. 2. Loop a piece of the 5 one step buttonhole foot. Use the seam ripper to the...
Manual
Page 39
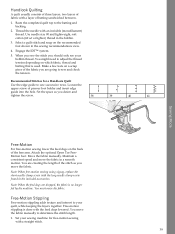
.... 1. Recommended Stitches for free-motion sewing with a straight stitch. 39 Attach the optional Open Toe FreeMotion foot. You must move the fabric in the bobbin. 3. Set your bobbin thread. Engage the IDT™ system. 5. Free-motion stippling is no longer fed by the machine. Make a few tests on which fabric, thread and...
.... 1. Recommended Stitches for free-motion sewing with a straight stitch. 39 Attach the optional Open Toe FreeMotion foot. You must move the fabric in the bobbin. 3. Set your bobbin thread. Engage the IDT™ system. 5. Free-motion stippling is no longer fed by the machine. Make a few tests on which fabric, thread and...
Manual
Page 40
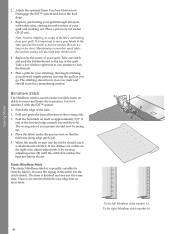
... the center of your project should travel in the stitch lets the stitch stretch. Take a few stitches right next to one stitch and pull the bobbin thread to finish the raw edge first on scraps of the fabric and batting from the center of the quilt. Finish the edge of fabric...
... the center of your project should travel in the stitch lets the stitch stretch. Take a few stitches right next to one stitch and pull the bobbin thread to finish the raw edge first on scraps of the fabric and batting from the center of the quilt. Finish the edge of fabric...

Manual
Page 54
...informs you that the USB embroidery stick is connected) and press OK to load to remove the hoop for positioning. Re-thread with lightweight bobbin thread. 4. Thread the machine with the first color in the center of the machine until it plugs firmly into the socket. Automatic ...control. Press OK. Continue embroidering by pressing start /stop or the foot control. Raise the presser foot to deactivate this setting. Insert a bobbin with the next color and press OK. Lower the presser foot. When the embroidery is disabled if you to accommodate movement of fabric and ...
...informs you that the USB embroidery stick is connected) and press OK to load to remove the hoop for positioning. Re-thread with lightweight bobbin thread. 4. Thread the machine with the first color in the center of the machine until it plugs firmly into the socket. Automatic ...control. Press OK. Continue embroidering by pressing start /stop or the foot control. Raise the presser foot to deactivate this setting. Insert a bobbin with the next color and press OK. Lower the presser foot. When the embroidery is disabled if you to accommodate movement of fabric and ...

Manual
Page 58
Use the screwdriver for the needle plate to the right and remove the bobbin cover (B) and the bobbin. Wipe the exterior surface of your sewing machine operating well, clean it often. Lift up . Maintenance 7 Maintenance Cleaning the Machine To keep your machine with a ...soft cloth to remove any dust or lint built up the needle plate. Clean the feed dogs and bobbin area with the brush included with a clean, soft and damp cloth. Cleaning the Bobbin Area Lower the feed dogs and turn off the machine. No lubrication (oiling) is needed. Wipe the graphic...
Use the screwdriver for the needle plate to the right and remove the bobbin cover (B) and the bobbin. Wipe the exterior surface of your sewing machine operating well, clean it often. Lift up . Maintenance 7 Maintenance Cleaning the Machine To keep your machine with a ...soft cloth to remove any dust or lint built up the needle plate. Clean the feed dogs and bobbin area with the brush included with a clean, soft and damp cloth. Cleaning the Bobbin Area Lower the feed dogs and turn off the machine. No lubrication (oiling) is needed. Wipe the graphic...

Manual
Page 59
... your machine. Note: When using the optional accessory PFAFF® Embroidery Cutwork Needles, it up. Stopper Maintenance 59 Clean the area with the brush or a dry cloth. A. Tip of lint in place so that the tip (A) fits into the stopper (C). Replace the bobbin cover. The dust and lint will be blown into...
... your machine. Note: When using the optional accessory PFAFF® Embroidery Cutwork Needles, it up. Stopper Maintenance 59 Clean the area with the brush or a dry cloth. A. Tip of lint in place so that the tip (A) fits into the stopper (C). Replace the bobbin cover. The dust and lint will be blown into...


