
Owner's Manual
Page 6
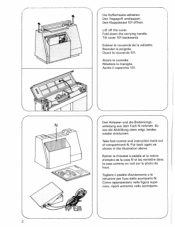
... maniglia. Come rappresentato nella figura supe riore, riporli entrambi nello scomparto. Take foot control and instruction book out of compartment N. Die Kofferhaube abheben. Retirer le rheostat a pédale et Ia notice d'emploi de Ia case N et les remettre dans Ia case comme on voit sur Ia photo du haut. Fold down the carrying handle. Lift off the cover.
... maniglia. Come rappresentato nella figura supe riore, riporli entrambi nello scomparto. Take foot control and instruction book out of compartment N. Die Kofferhaube abheben. Retirer le rheostat a pédale et Ia notice d'emploi de Ia case N et les remettre dans Ia case comme on voit sur Ia photo du haut. Fold down the carrying handle. Lift off the cover.

Owner's Manual
Page 14
...(Il capo del fib va rivolto verso dietro). Checking the bobbin thread tension: With a brief, sharp upward movement of your hand, the bobbin must gradually slip downwards. (Turn screw Q counter-clock wise for a weaker tension, or clockwise for a tighter tension) Tension du fil de canette: Laisser pendre Ia canette garnie au... abbassarsi gradatamente (girando Ia vite di regolaggio Q a sinistra si allenta, verso destra si rinforza). 10 Draw the thread into slot 0 and into eye P. Inserting the bobbin (N), with the thread unreeling toward the back. Spule einlegen N (Faden nach hinten).
...(Il capo del fib va rivolto verso dietro). Checking the bobbin thread tension: With a brief, sharp upward movement of your hand, the bobbin must gradually slip downwards. (Turn screw Q counter-clock wise for a weaker tension, or clockwise for a tighter tension) Tension du fil de canette: Laisser pendre Ia canette garnie au... abbassarsi gradatamente (girando Ia vite di regolaggio Q a sinistra si allenta, verso destra si rinforza). 10 Draw the thread into slot 0 and into eye P. Inserting the bobbin (N), with the thread unreeling toward the back. Spule einlegen N (Faden nach hinten).
Owner's Manual
Page 17
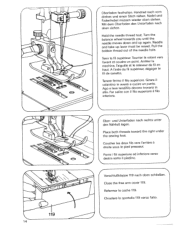
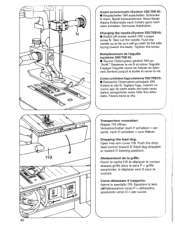
.... Place both threads toward the right under the sewing foot. A l'aide du fil supérieur dégager le fil de canette. Porre i fili superiore ed inferiore verso destra sotto il piedino. Close the free arm cover 119. 4 Oberfaden festhalten. Pull the bobbin thread out of the needle hole. Ago e ...hfuB legen. Nadel und Fadenhebel müssen wieder oben stehen. Hold the needle thread taut. Refermer be pied presseur. Verschlul$klappe 119 nach oben schlie1.en. Handrad nach vorn drehen und einen Stich nähen. Chiudere bo sportello 119 verso l'alto. 14 Tourner le ...
.... Place both threads toward the right under the sewing foot. A l'aide du fil supérieur dégager le fil de canette. Porre i fili superiore ed inferiore verso destra sotto il piedino. Close the free arm cover 119. 4 Oberfaden festhalten. Pull the bobbin thread out of the needle hole. Ago e ...hfuB legen. Nadel und Fadenhebel müssen wieder oben stehen. Hold the needle thread taut. Refermer be pied presseur. Verschlul$klappe 119 nach oben schlie1.en. Handrad nach vorn drehen und einen Stich nähen. Chiudere bo sportello 119 verso l'alto. 14 Tourner le ...
Owner's Manual
Page 22
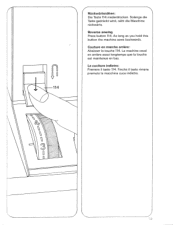
Couture en marche arrière: Abaisser Ia touche 114. Solange die Taste gedrückt wird, nâht die Maschine rückwärts. La machine coud en arrière aussi longtemps que Ia touche est maintenue en bas. La cucitura indietro: Premere il tasto 114. 4 Rückwärtsnähen: Die Taste 114 niederdrücken. As long as you hold this button the machine sews backwards. Finchè il tasto rimane premuto Ia macchina cuce indietro. \\ Reverse sewing Press button 114.
Couture en marche arrière: Abaisser Ia touche 114. Solange die Taste gedrückt wird, nâht die Maschine rückwärts. La machine coud en arrière aussi longtemps que Ia touche est maintenue en bas. La cucitura indietro: Premere il tasto 114. 4 Rückwärtsnähen: Die Taste 114 niederdrücken. As long as you hold this button the machine sews backwards. Finchè il tasto rimane premuto Ia macchina cuce indietro. \\ Reverse sewing Press button 114.
Owner's Manual
Page 27
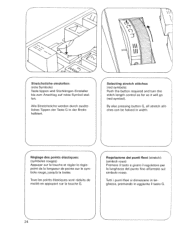
By also pressing button G, all 'arresto sul simbolo rosso. Tutti i punti flexi 51 dimezzano in lar ghezza, premendo in width. ) J 4 Réglage des points élastiques: (symboles rouges) Appuyer ... aggiunta il tasto G. Tous les points élastiques sont réduits de moitié en appuyant sur Ia touche G. U -I 24 Selecting stretch stitches (red symbols> Push the button required and turn the stitch length control as far as it will go (red symbol). Alle Stretchstiche werden durch zusätz liches Tippen der Taste G in der...
By also pressing button G, all 'arresto sul simbolo rosso. Tutti i punti flexi 51 dimezzano in lar ghezza, premendo in width. ) J 4 Réglage des points élastiques: (symboles rouges) Appuyer ... aggiunta il tasto G. Tous les points élastiques sont réduits de moitié en appuyant sur Ia touche G. U -I 24 Selecting stretch stitches (red symbols> Push the button required and turn the stitch length control as far as it will go (red symbol). Alle Stretchstiche werden durch zusätz liches Tippen der Taste G in der...
Owner's Manual
Page 28
...de point entre 1 et 4. Ad esempio il punto invisibile elastico: tasto M e F premuti insieme. select a stitch length between 1 and 4. For example, if you want to sew an elastic blindstitch, push buttons M and F. Points utilitaires et élastiques combines: Les combinaisons de points possibles sont indiquées, avec ... e al termine di questo libretto, con con sigh per ii cucito. and stretch-stitch combinations The various stitch combinations are shown in the chart on the inside of the hinged top cover and at the end of this booklet, together with sewing instruc tions. 4 N utz-
...de point entre 1 et 4. Ad esempio il punto invisibile elastico: tasto M e F premuti insieme. select a stitch length between 1 and 4. For example, if you want to sew an elastic blindstitch, push buttons M and F. Points utilitaires et élastiques combines: Les combinaisons de points possibles sont indiquées, avec ... e al termine di questo libretto, con con sigh per ii cucito. and stretch-stitch combinations The various stitch combinations are shown in the chart on the inside of the hinged top cover and at the end of this booklet, together with sewing instruc tions. 4 N utz-
Owner's Manual
Page 30
...: the wire which is coloured blue must be connected to the terminal which is used a 3-ampere fuse has to be connected to use only a 15-watt light bulb in your fin gers by the needle during sewing. c Be sure to the terminal which is coloured brown must be fitted. Norme...for United Kingdom only The wires in this mains lead are coloured according to clean it, oil it or change mechanical and accessory parts. b) Be sure to unplug the power cord whenever you leave the machine or wish to following code: Blue: Neutral Brown: Live As the colours of the wires in the ...
...: the wire which is coloured blue must be connected to the terminal which is used a 3-ampere fuse has to be connected to use only a 15-watt light bulb in your fin gers by the needle during sewing. c Be sure to the terminal which is coloured brown must be fitted. Norme...for United Kingdom only The wires in this mains lead are coloured according to clean it, oil it or change mechanical and accessory parts. b) Be sure to unplug the power cord whenever you leave the machine or wish to following code: Blue: Neutral Brown: Live As the colours of the wires in the ...
Owner's Manual
Page 41
.... Raise the needle 2 Push button B in until 4 to 6 bartack ing stitches are sewn, holding the material firmly, then release the but - ton. 3 Push button A. Remove the fabric, pull the filler cord taut and trim. 6 Cut the buttonhole open. Den Stoff dabei festha[ten. Den Stoff dabei festhalten. Sew the second but tonhole seam the same length as a test. 38 Before sewing buttonholes in der...
.... Raise the needle 2 Push button B in until 4 to 6 bartack ing stitches are sewn, holding the material firmly, then release the but - ton. 3 Push button A. Remove the fabric, pull the filler cord taut and trim. 6 Cut the buttonhole open. Den Stoff dabei festha[ten. Den Stoff dabei festhalten. Sew the second but tonhole seam the same length as a test. 38 Before sewing buttonholes in der...
Owner's Manual
Page 43
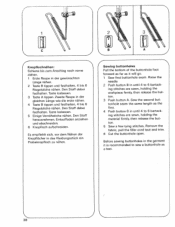
...Disinserire /'interruttore principale 104, Svitare Ia vite N. lnserire un nuovo ago (Ia parte piatta del fusto verso dietro) spingendolo verso l'alto fino all'ar resto. Changing the needle (System 130/705 H): • Switch off master switch 104. Fissare bene...0 (sewing position). Dropping the feed dog: Open free arm cover 119. Schraube festdrehen. Take out the needle. Abaissement de Ia griffe: Ouvrir le cache 119 et déplacer le curseur abaisse-griffe dans le sens P = griffe escamotée; Come cambiare I 'aiguille. Schraube N lösen. Loosen screw N. Nadel...
...Disinserire /'interruttore principale 104, Svitare Ia vite N. lnserire un nuovo ago (Ia parte piatta del fusto verso dietro) spingendolo verso l'alto fino all'ar resto. Changing the needle (System 130/705 H): • Switch off master switch 104. Fissare bene...0 (sewing position). Dropping the feed dog: Open free arm cover 119. Schraube festdrehen. Take out the needle. Abaissement de Ia griffe: Ouvrir le cache 119 et déplacer le curseur abaisse-griffe dans le sens P = griffe escamotée; Come cambiare I 'aiguille. Schraube N lösen. Loosen screw N. Nadel...
Owner's Manual
Page 45
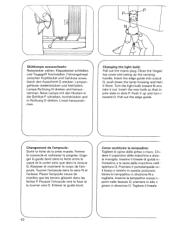
Changing the light bulb: Pull out the mains plug. Close the hinged top cover and swing up and turn ii toward N and take it there. Placer l'ampoule neuve de manière que les tenons glissent dans les fentes R ... maniglia. Lampen gehäuse sowie durch den Ausschnitt Q stecken. Neue Lampe mit den Nocken in die Schlitze P schieben, hochdrücken und in slots P. Enlever le guide-bord. Lineal herausneh men. Insert the new bulb so that its pins slide in Richtung 0 drehen. Abaisser et maintenir le corps de l'am poule. Come sostituire Ia lampadina: Togliere...
Changing the light bulb: Pull out the mains plug. Close the hinged top cover and swing up and turn ii toward N and take it there. Placer l'ampoule neuve de manière que les tenons glissent dans les fentes R ... maniglia. Lampen gehäuse sowie durch den Ausschnitt Q stecken. Neue Lampe mit den Nocken in die Schlitze P schieben, hochdrücken und in slots P. Enlever le guide-bord. Lineal herausneh men. Insert the new bulb so that its pins slide in Richtung 0 drehen. Abaisser et maintenir le corps de l'am poule. Come sostituire Ia lampadina: Togliere...
Owner's Manual
Page 48
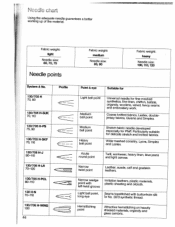
... suitable for Pfaff. linen, blue jeans Narrow twist point Leather, suede, calf and goatskin leathers. Coarse knitted fabrics, Lastex, double jersey fabrics, Quiana and Simplex. terials, Light ball point, long eye Seams topstitched with left-twist groove pImlaistatitciosnheleeattihnegrsa,npdlaositlicclomtha. Medium ball point Heavy ball point Stretch-fabric needle developed especially for delicate stretch and knitted fabrics. Nccd?e chut Using the adequate needle working up...
... suitable for Pfaff. linen, blue jeans Narrow twist point Leather, suede, calf and goatskin leathers. Coarse knitted fabrics, Lastex, double jersey fabrics, Quiana and Simplex. terials, Light ball point, long eye Seams topstitched with left-twist groove pImlaistatitciosnheleeattihnegrsa,npdlaositlicclomtha. Medium ball point Heavy ball point Stretch-fabric needle developed especially for delicate stretch and knitted fabrics. Nccd?e chut Using the adequate needle working up...
Owner's Manual
Page 49
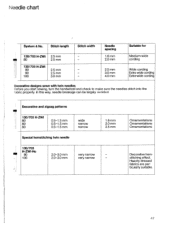
... be largely avoided. Stitch length 130/705 H-ZW1 80 130/705 H-ZWI 80 90 100 2.5 mm 2.5 mm 25mm 2.5 mm 3.0mm Stitch width - - Needle spacing 1.6mm 2.0 mm 2.5 mm 3.0 mm 4.0 mm Suitable for Medium-wide cording Wide cording Extra wide cording Extra-wide cording Decorative designs sewn with twin needles Before you start sewing, turn the handwheel and check to make sure the needles stitch into the fabric properly.
... be largely avoided. Stitch length 130/705 H-ZW1 80 130/705 H-ZWI 80 90 100 2.5 mm 2.5 mm 25mm 2.5 mm 3.0mm Stitch width - - Needle spacing 1.6mm 2.0 mm 2.5 mm 3.0 mm 4.0 mm Suitable for Medium-wide cording Wide cording Extra wide cording Extra-wide cording Decorative designs sewn with twin needles Before you start sewing, turn the handwheel and check to make sure the needles stitch into the fabric properly.
Owner's Manual
Page 56
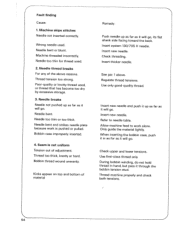
... it through the bobbin tension stud. Allow machine feed to needle table. During bobbin winding, do not hold thread in as it will go . Insert new needle and push it up as far as it will go . Needle bent or blunt. Needle thread breaks For any of adjustment. Insert thicker needle. Use only good-quality thread. Refer to work is not uniform Tension out of the above . Only guide the material lightly. Thread machine properly and check...
... it through the bobbin tension stud. Allow machine feed to needle table. During bobbin winding, do not hold thread in as it will go . Insert new needle and push it up as far as it will go . Needle bent or blunt. Needle thread breaks For any of adjustment. Insert thicker needle. Use only good-quality thread. Refer to work is not uniform Tension out of the above . Only guide the material lightly. Thread machine properly and check...
Owner's Manual
Page 57
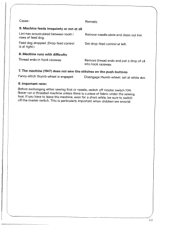
Machine runs with difficulty Thread ends in hook raceway Remove thread ends and put a drop of fabric under the sewing foot. Never run a threaded machine unless there is at right.) Set drop-feed control at all Lint has accumulated between tooths' rows of feed dog. Feed dog dropped. (Drop-feed control is a piece of oil into hook raceway. 7. Remove needle plate and clean out lint. Important note: Before exchanging either sewing foot or needle, switch off the master switch. Machine feeds irregularly or not at...
Machine runs with difficulty Thread ends in hook raceway Remove thread ends and put a drop of fabric under the sewing foot. Never run a threaded machine unless there is at right.) Set drop-feed control at all Lint has accumulated between tooths' rows of feed dog. Feed dog dropped. (Drop-feed control is a piece of oil into hook raceway. 7. Remove needle plate and clean out lint. Important note: Before exchanging either sewing foot or needle, switch off the master switch. Machine feeds irregularly or not at...
Owner's Manual
Page 64
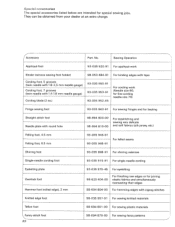
No. Sewing Operation Appliqué foot 93-035 920-9 1 For appliqué work Binder (remove sewing foot holder> 98-053 484-9 1 For binding edges with tape Cording foot, 5 grooves (twin needle with 1.8-2,5 mm needle gauge) Cording foot, 7 grooves (twin needle with 1.4-1.8 mm needle gauge) Cording blade (2 ea.) 93-035 950-91 93-035 953-9 1 93-035 952-45 For cording work (Needle size 80, for fine cording needle size 70) Fringe sewing foot 93-035 943-9 1 For sewing fringes and for basting Straight-stitch foot Needle plate with...
No. Sewing Operation Appliqué foot 93-035 920-9 1 For appliqué work Binder (remove sewing foot holder> 98-053 484-9 1 For binding edges with tape Cording foot, 5 grooves (twin needle with 1.8-2,5 mm needle gauge) Cording foot, 7 grooves (twin needle with 1.4-1.8 mm needle gauge) Cording blade (2 ea.) 93-035 950-91 93-035 953-9 1 93-035 952-45 For cording work (Needle size 80, for fine cording needle size 70) Fringe sewing foot 93-035 943-9 1 For sewing fringes and for basting Straight-stitch foot Needle plate with...
Owner's Manual
Page 65
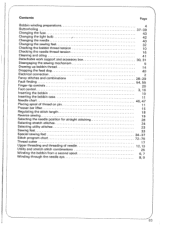
... Detachable work support and accessory box 30, 31 Disengaging the sewing mechanism 5 Drawing up bobbin thread 14 Dropping the feed dog 40 Electrical connection 2 Fancy stitches and combinations 28-29 Fault finding 54, 55 Finger-tip controls 20 Foot control 3, 16 Inserting the bobbin 10 Inserting the bobbin case 11 Needle chart 46, 47 Placing spool of thread on pin 11 Presser bar lifter 15 Regulating the stitch length 18 Reverse sewing 19 Selecting the needle position for straight stitching 26 Selecting stretch stitches...
... Detachable work support and accessory box 30, 31 Disengaging the sewing mechanism 5 Drawing up bobbin thread 14 Dropping the feed dog 40 Electrical connection 2 Fancy stitches and combinations 28-29 Fault finding 54, 55 Finger-tip controls 20 Foot control 3, 16 Inserting the bobbin 10 Inserting the bobbin case 11 Needle chart 46, 47 Placing spool of thread on pin 11 Presser bar lifter 15 Regulating the stitch length 18 Reverse sewing 19 Selecting the needle position for straight stitching 26 Selecting stretch stitches...
Owner's Manual
Page 72
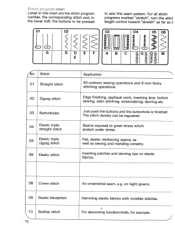
a c 1 r Listed in this chart are the stitch program number, the corresponding stitch and, in the lower half, the buttons to be regulated. Edge finishing, appliqué work, inserting lace, button sewing, satin stitching, embroidering, darning etc. Seams exposed to sew this seam pattern. For all stitch programs marked "stretch", turn the stitcl length control toward "stretch" as far as sewing and mending corsetry. on elastic . Flat, elastic reinforcing seams, as well as ii 04 05 06 Ill Ill %% II...
a c 1 r Listed in this chart are the stitch program number, the corresponding stitch and, in the lower half, the buttons to be regulated. Edge finishing, appliqué work, inserting lace, button sewing, satin stitching, embroidering, darning etc. Seams exposed to sew this seam pattern. For all stitch programs marked "stretch", turn the stitcl length control toward "stretch" as far as sewing and mending corsetry. on elastic . Flat, elastic reinforcing seams, as well as ii 04 05 06 Ill Ill %% II...
Owner's Manual
Page 73
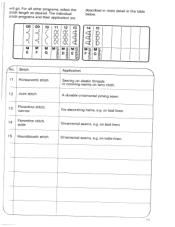
... are described in more detail in the table below. 08 , -' 1 \ , -' \ 09 - -' \ , \ 10 11 12 I3 , /\/ /1/ -I/ \/\ \I\ '%$\ ' /\/ /1/ \/\ \I / 72 on terry cloth. I \ '•%.\ '- /\/ \/\ /1/ \l\ %44/\ M M M MMM E FG .-' -' .-' C) U C) 1.. For all other programs, select the stitch length as desired. will go. F DC) MCI) lvi ,-4- G. :C) Stitch 11 Honeycomb stitch 1 2 Joint stitch 13 Florentine stitch, narrow 14 Florentine stitch, wide Application Sewing on elastic threads or covering seams on bed linen.
... are described in more detail in the table below. 08 , -' 1 \ , -' \ 09 - -' \ , \ 10 11 12 I3 , /\/ /1/ -I/ \/\ \I\ '%$\ ' /\/ /1/ \/\ \I / 72 on terry cloth. I \ '•%.\ '- /\/ \/\ /1/ \l\ %44/\ M M M MMM E FG .-' -' .-' C) U C) 1.. For all other programs, select the stitch length as desired. will go. F DC) MCI) lvi ,-4- G. :C) Stitch 11 Honeycomb stitch 1 2 Joint stitch 13 Florentine stitch, narrow 14 Florentine stitch, wide Application Sewing on elastic threads or covering seams on bed linen.


