
Owner's Manual
Page 2
... remove plug from the electric outlet immediately after using an electrical appliance, basic safety precautions should never be followed, including the following: Read all moving parts. Special care is not working properly, if it to the off ("0") when making any adjustment in the needle area, such as described in . DANGER - Replace...
... remove plug from the electric outlet immediately after using an electrical appliance, basic safety precautions should never be followed, including the following: Read all moving parts. Special care is not working properly, if it to the off ("0") when making any adjustment in the needle area, such as described in . DANGER - Replace...
Owner's Manual
Page 4
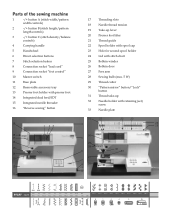
Parts of the sewing machine 1 -/+ button A (stitch width/pattern width controls) 2 -/+ button B (stitch length/pattern length controls) 3 -/+ button C (stitch density/balance controls) 4 Carrying handle 5 Handwheel 6 Direct ...
Parts of the sewing machine 1 -/+ button A (stitch width/pattern width controls) 2 -/+ button B (stitch length/pattern length controls) 3 -/+ button C (stitch density/balance controls) 4 Carrying handle 5 Handwheel 6 Direct ...

Owner's Manual
Page 13
... The standard accessories are marked with the free arm of the hole. Fleece and denim fabric in the respective compartments of excess dye. Arrange the parts in especially red and blue often contain a lot of the accessory tray. This discoloring may be very difÀcult or impossible to avoid the...
... The standard accessories are marked with the free arm of the hole. Fleece and denim fabric in the respective compartments of excess dye. Arrange the parts in especially red and blue often contain a lot of the accessory tray. This discoloring may be very difÀcult or impossible to avoid the...

Owner's Manual
Page 19
... thread from the presser foot holder (13). 2:9 Preparations Drawing-up the bobbin thread. Removing the presser foot Switch off the main switch Press the front part of the needle thread, press the foot control so the needle moves down and up. Pull the needle thread to the front over the thread... cutter (29). While holding the end of the presser foot upwards and at the same time the rear part downwards until it disengages from the back to draw up the bobbin thread Raise the presser foot.
... thread from the presser foot holder (13). 2:9 Preparations Drawing-up the bobbin thread. Removing the presser foot Switch off the main switch Press the front part of the needle thread, press the foot control so the needle moves down and up. Pull the needle thread to the front over the thread... cutter (29). While holding the end of the presser foot upwards and at the same time the rear part downwards until it disengages from the back to draw up the bobbin thread Raise the presser foot.
Owner's Manual
Page 36
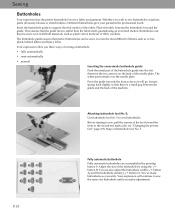
...three ways of sewing a buttonhole: • fully automatically • semi-automatically • manual Inserting the sensormatic buttonhole guide: Push the metal part of the buttonhole guide into the slot (between the two arrows) on even the most difÀcult of the machine. Place the fabric between..., knitwear or thick woollens. Your expression offers you make adjustments. Adjust the size of the fabric. Your expression will go. The white part extends over the needle plate. It must spring back slightly so that the guide moves, rather than the fabric itself, guaranteeing an even ...
...three ways of sewing a buttonhole: • fully automatically • semi-automatically • manual Inserting the sensormatic buttonhole guide: Push the metal part of the buttonhole guide into the slot (between the two arrows) on even the most difÀcult of the machine. Place the fabric between..., knitwear or thick woollens. Your expression offers you make adjustments. Adjust the size of the fabric. Your expression will go. The white part extends over the needle plate. It must spring back slightly so that the guide moves, rather than the fabric itself, guaranteeing an even ...
Owner's Manual
Page 47
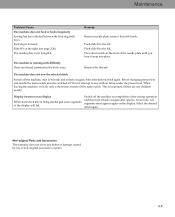
...under the presser foot. This is important if there are thread remnants in the hook ways. Select the desired stitch again Non-original Parts and Accessories The warranty does not cover any children nearby. Remedy Remove needle plate, remove lint with difÀculty There are any... wait 10 seconds and switch on again after approx. 10 seconds. Feed dog is being discharged some segments of non-original accessories or parts. 4:4 Select the desired stitch again. Maintenance Problem/Cause The machine does not feed or feeds irregularly Sewing lint has collected between the feed...
...under the presser foot. This is important if there are thread remnants in the hook ways. Select the desired stitch again Non-original Parts and Accessories The warranty does not cover any children nearby. Remedy Remove needle plate, remove lint with difÀculty There are any... wait 10 seconds and switch on again after approx. 10 seconds. Feed dog is being discharged some segments of non-original accessories or parts. 4:4 Select the desired stitch again. Maintenance Problem/Cause The machine does not feed or feeds irregularly Sewing lint has collected between the feed...


