
Owner's Manual
Page 2
... supervision or instruction concerning use by persons (including children) with 200mW, 300mW and 200mW LED lamp, which is required around the sewing machine needle. 6. This appliance is 75dB(A). 17.Please turn all controls to persons: 1. SAFETY INSTRUCTIONS When using an electrical appliance, basic... intended for household use as a wrong needle plate can cause the needle to avoid a hazard. 20. SAVE THESE INSTRUCTIONS This sewing machine is not working properly, if it is intended for use of lint, dust, and loose cloth. 5. Use only the attachments recommended ...
... supervision or instruction concerning use by persons (including children) with 200mW, 300mW and 200mW LED lamp, which is required around the sewing machine needle. 6. This appliance is 75dB(A). 17.Please turn all controls to persons: 1. SAFETY INSTRUCTIONS When using an electrical appliance, basic... intended for household use as a wrong needle plate can cause the needle to avoid a hazard. 20. SAVE THESE INSTRUCTIONS This sewing machine is not working properly, if it is intended for use of lint, dust, and loose cloth. 5. Use only the attachments recommended ...

Owner's Manual
Page 3
...heater, iron, halogen lamp, or other parts. For repair or adjustment In the event a malfunction occurs or adjustment is completed. Leaving the machine unattended. 3. up lever, needle or other parts to turn OFF the power switch and unplug the cord when: Operation is required, first ...follow the troubleshooting guide in the back of this operation manual to clean the machine. Remember to assure correct installation. If the problem persists, please consult your eye on the foot control. 4. For a longer service life ...
...heater, iron, halogen lamp, or other parts. For repair or adjustment In the event a malfunction occurs or adjustment is completed. Leaving the machine unattended. 3. up lever, needle or other parts to turn OFF the power switch and unplug the cord when: Operation is required, first ...follow the troubleshooting guide in the back of this operation manual to clean the machine. Remember to assure correct installation. If the problem persists, please consult your eye on the foot control. 4. For a longer service life ...
Owner's Manual
Page 4
CONTENTS INSTRUCTIONS SAFETY INSTRUCTIONS ...1-2 CONTENTS...3-5 ACCESSORIES ...6 PRINCIPAL PARTS OF THE MACHINE 7 FOOT CONTROL ...8 OPERATION BUTTONS...9-11 START/STOP button...9 Thread Snips ...9 Reverse button ...10 Auto-lock button ...10 Needle position button ...11 FUNCTION ...Direct stitch selection and number buttons 16 Memory button ...17 Edit button ...17 Clear button...17 GETTING READY CONNECTING THE MACHINE TO THE POWER SOURCE 18 Connecting the machine...18 TURN MACHINE ON / OFF ...19 UNDERSTANDING THE LCD SCREEN 20-21 LCD SCREEN BRIGHTNESS CONTROL 21 WINDING THE BOBBIN ...22 ...
CONTENTS INSTRUCTIONS SAFETY INSTRUCTIONS ...1-2 CONTENTS...3-5 ACCESSORIES ...6 PRINCIPAL PARTS OF THE MACHINE 7 FOOT CONTROL ...8 OPERATION BUTTONS...9-11 START/STOP button...9 Thread Snips ...9 Reverse button ...10 Auto-lock button ...10 Needle position button ...11 FUNCTION ...Direct stitch selection and number buttons 16 Memory button ...17 Edit button ...17 Clear button...17 GETTING READY CONNECTING THE MACHINE TO THE POWER SOURCE 18 Connecting the machine...18 TURN MACHINE ON / OFF ...19 UNDERSTANDING THE LCD SCREEN 20-21 LCD SCREEN BRIGHTNESS CONTROL 21 WINDING THE BOBBIN ...22 ...
Owner's Manual
Page 6
... 84-85 Instruction animation message display 86 Warning beeping sound ...87 Beeping sound ...87 MAINTENANCE ...88-89 Cleaning the LCD screen ...88 Cleaning the sewing machine surface 88 Cleaning the hook ...88-89 TROUBLESHOOTING ...90-91 STITCH REFERENCE CHART...92-103 5 INSTRUCTIONS
... 84-85 Instruction animation message display 86 Warning beeping sound ...87 Beeping sound ...87 MAINTENANCE ...88-89 Cleaning the LCD screen ...88 Cleaning the sewing machine surface 88 Cleaning the hook ...88-89 TROUBLESHOOTING ...90-91 STITCH REFERENCE CHART...92-103 5 INSTRUCTIONS
Owner's Manual
Page 8
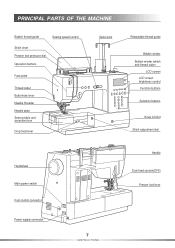
PRINCIPAL PARTS OF THE MACHINE Bobbin thread guide Sewing speed control Stitch chart Presser foot pressure dial Operation buttons Face plate Thread cutter Buttonhole lever Needle threader Needle plate Sewing table and accessory box Drop feed lever Spool pins Retractable thread guide Bobbin winder Bobbin winder switch and thread cutter LCD screen LCD screen brightness control Function buttons Selection buttons Knee Lift slot Stitch adjustment dial Handwheel Main power switch Foot control connector Power supply connector 7 INSTRUCTIONS Handle Dual feed system(DFS) Presser foot lever
PRINCIPAL PARTS OF THE MACHINE Bobbin thread guide Sewing speed control Stitch chart Presser foot pressure dial Operation buttons Face plate Thread cutter Buttonhole lever Needle threader Needle plate Sewing table and accessory box Drop feed lever Spool pins Retractable thread guide Bobbin winder Bobbin winder switch and thread cutter LCD screen LCD screen brightness control Function buttons Selection buttons Knee Lift slot Stitch adjustment dial Handwheel Main power switch Foot control connector Power supply connector 7 INSTRUCTIONS Handle Dual feed system(DFS) Presser foot lever
Owner's Manual
Page 9
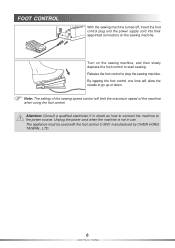
... then slowly depress the foot control to start sewing. By tapping the foot control one time will limit the maximum speed of the machine when using the foot control. Note: The setting of the sewing speed control will allow the needle to go up or down. The ... foot control C-9001 manufactured by CHIEN HUNG TAIWAN., LTD. 8 INSTRUCTIONS Attention: Consult a qualified electrician if in use. Turn on the sewing machine. Unplug the power cord when the machine is not in doubt as how to connect the machine to stop the sewing machine. Release the foot control to the power source.
... then slowly depress the foot control to start sewing. By tapping the foot control one time will limit the maximum speed of the machine when using the foot control. Note: The setting of the sewing speed control will allow the needle to go up or down. The ... foot control C-9001 manufactured by CHIEN HUNG TAIWAN., LTD. 8 INSTRUCTIONS Attention: Consult a qualified electrician if in use. Turn on the sewing machine. Unplug the power cord when the machine is not in doubt as how to connect the machine to stop the sewing machine. Release the foot control to the power source.
Owner's Manual
Page 10
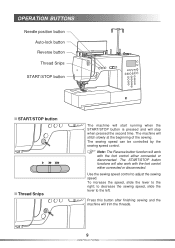
... the right; To increase the speed, slide the lever to adjust the sewing speed. Press this button after finishing sewing and the machine will stop when pressed the second time. OPERATION BUTTONS Needle position button Auto-lock button Reverse button Thread Snips START/STOP button START/...STOP button Thread Snips The machine will start running when the START/STOP button is pressed and will trim the threads. 9 INSTRUCTIONS to decrease the sewing speed, slide ...
... the right; To increase the speed, slide the lever to adjust the sewing speed. Press this button after finishing sewing and the machine will stop when pressed the second time. OPERATION BUTTONS Needle position button Auto-lock button Reverse button Thread Snips START/STOP button START/...STOP button Thread Snips The machine will start running when the START/STOP button is pressed and will trim the threads. 9 INSTRUCTIONS to decrease the sewing speed, slide ...
Owner's Manual
Page 11
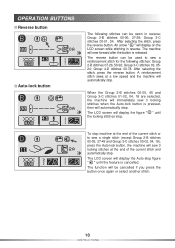
...2-B stitches 00-05, 27-49 and Group 3-C stitches 00-02, 04, 18), press the Auto-lock button, the machine will sew 3 locking stitches at a low speed and the machine will automatically stop . The function will display on the LCD screen while stitching in reverse: Group 2-B stitches 00-06,... stitch, press the reverse button. When the Group 2-B stitches 00-05, 45 and Group 3-C stitches 01-02, 04, 18 are selected, the machine will automatically stop . The LCD screen will display the figure " " until the feature is cancelled. OPERATION BUTTONS Reverse button Auto-lock button The following...
...2-B stitches 00-05, 27-49 and Group 3-C stitches 00-02, 04, 18), press the Auto-lock button, the machine will sew 3 locking stitches at a low speed and the machine will automatically stop . The function will display on the LCD screen while stitching in reverse: Group 2-B stitches 00-06,... stitch, press the reverse button. When the Group 2-B stitches 00-05, 45 and Group 3-C stitches 01-02, 04, 18 are selected, the machine will automatically stop . The LCD screen will display the figure " " until the feature is cancelled. OPERATION BUTTONS Reverse button Auto-lock button The following...
Owner's Manual
Page 12
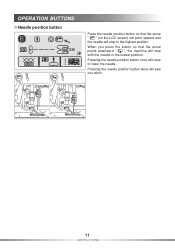
Pressing the needle position button once will sew one stitch. 11 INSTRUCTIONS Pressing the needle position button twice will raise or lower the needle. OPERATION BUTTONS Needle position button Press the needle position button so that the arrow points downward " ", the machine will stop in the lowest position. When you press the button so that the arrow " " (on the LCD screen) will point upward and the needle will stop with the needle in the highest position.
Pressing the needle position button once will sew one stitch. 11 INSTRUCTIONS Pressing the needle position button twice will raise or lower the needle. OPERATION BUTTONS Needle position button Press the needle position button so that the arrow points downward " ", the machine will stop in the lowest position. When you press the button so that the arrow " " (on the LCD screen) will point upward and the needle will stop with the needle in the highest position.

Owner's Manual
Page 13
... needle button Mirror image button Elongation button Bobbin winding button Key lock button FUNC selection button Stitch width adjustment buttons When you select a stitch, the machine will automatically set center needle position will move the needle to the left and pressing the "+" button (right), will be indicated as "4.5". 12 INSTRUCTIONS Certain...
... needle button Mirror image button Elongation button Bobbin winding button Key lock button FUNC selection button Stitch width adjustment buttons When you select a stitch, the machine will automatically set center needle position will move the needle to the left and pressing the "+" button (right), will be indicated as "4.5". 12 INSTRUCTIONS Certain...
Owner's Manual
Page 14
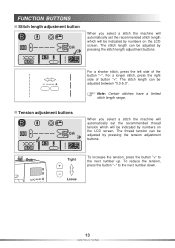
...by pressing the stitch length adjustment buttons. Note: Certain stitches have a limited stitch length range. When you select a stitch the machine will automatically set the recommended thread tension which will be adjusted between "0.0-5.0". Loose 13 INSTRUCTIONS The stitch length can be adjusted by ... press the button "" to the next number up. FUNCTION BUTTONS Stitch length adjustment button When you select a stitch the machine will automatically set the recommended stitch length which will be adjusted by numbers on the LCD screen. The thread tension can be ...
...by pressing the stitch length adjustment buttons. Note: Certain stitches have a limited stitch length range. When you select a stitch the machine will automatically set the recommended thread tension which will be adjusted between "0.0-5.0". Loose 13 INSTRUCTIONS The stitch length can be adjusted by ... press the button "" to the next number up. FUNCTION BUTTONS Stitch length adjustment button When you select a stitch the machine will automatically set the recommended stitch length which will be adjusted by numbers on the LCD screen. The thread tension can be ...

Owner's Manual
Page 15
... by using the numbered buttons. The LED light will turn on while the bobbin is locked the Function and Selection buttons cannot be on the machine. For example : Press FUNC, then 2 for group B. Press " ", then 3, and then stitch number by using the numbered buttons. Press " ", then 4, and then stitch number by...
... by using the numbered buttons. The LED light will turn on while the bobbin is locked the Function and Selection buttons cannot be on the machine. For example : Press FUNC, then 2 for group B. Press " ", then 3, and then stitch number by using the numbered buttons. Press " ", then 4, and then stitch number by...
Owner's Manual
Page 16
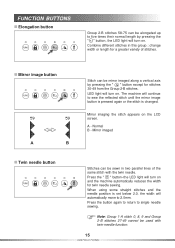
... sewn in this group : change width or length for a greater variety of the same stitch with twin needle function. 15 INSTRUCTIONS The machine will automatically move to sew the reflected stitch until the mirror image button is pressed again or the stitch is set below 2.0, the width..." buttonthe LED light will turn on. Combine different stitches in two parallel lines of stitches. LED light will turn on and the machine automatically reduces the width for stitches 30-49 from the Group 2-B stitches. FUNCTION BUTTONS Elongation button Group 2-B stitches 58-75 can be mirror ...
... sewn in this group : change width or length for a greater variety of the same stitch with twin needle function. 15 INSTRUCTIONS The machine will automatically move to sew the reflected stitch until the mirror image button is pressed again or the stitch is set below 2.0, the width..." buttonthe LED light will turn on. Combine different stitches in two parallel lines of stitches. LED light will turn on and the machine automatically reduces the width for stitches 30-49 from the Group 2-B stitches. FUNCTION BUTTONS Elongation button Group 2-B stitches 58-75 can be mirror ...

Owner's Manual
Page 19
... the power cord plug to your electrical power. Always unplug this machine from the electrical outlet immediately after using and before maintenance. 18 GETTING READY CONNECTING THE MACHINE TO THE POWER SOURCE Connecting the machine Before connecting the power supply, make sure that the voltage and ... shown on a stable table. 1. Connect the power cord to the machine by inserting the plug into the foot control connector on machine. * The appliance must be used with foot control C-9001. Place the machine on the machine is conforming to the electrical outlet. 3. Caution: Never leave...
... the power cord plug to your electrical power. Always unplug this machine from the electrical outlet immediately after using and before maintenance. 18 GETTING READY CONNECTING THE MACHINE TO THE POWER SOURCE Connecting the machine Before connecting the power supply, make sure that the voltage and ... shown on a stable table. 1. Connect the power cord to the machine by inserting the plug into the foot control connector on machine. * The appliance must be used with foot control C-9001. Place the machine on the machine is conforming to the electrical outlet. 3. Caution: Never leave...

Owner's Manual
Page 20
...the main power switch on the right of the machine, the power switch is turned on. The lamp comes on when the machine is ON (" I "). Turn off the machine When you are finished using the machine, turn it off. TURN MACHINE ON/ OFF Turn on the machine Press the right side of the main power ...switch on the right side of the machine, the power switch is being operated, turn...
...the main power switch on the right of the machine, the power switch is turned on. The lamp comes on when the machine is ON (" I "). Turn off the machine When you are finished using the machine, turn it off. TURN MACHINE ON/ OFF Turn on the machine Press the right side of the main power ...switch on the right side of the machine, the power switch is being operated, turn...
Owner's Manual
Page 25
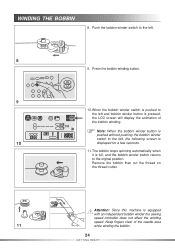
Remove the bobbin then cut the thread on the thread cutter. Attention: Since this machine is full, and the bobbin winder switch returns to the left and bobbin winder button is pressed, the LCD screen will display the animation of ...
Remove the bobbin then cut the thread on the thread cutter. Attention: Since this machine is full, and the bobbin winder switch returns to the left and bobbin winder button is pressed, the LCD screen will display the animation of ...
Owner's Manual
Page 28
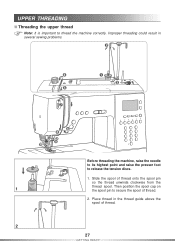
Slide the spool of thread onto the spool pin so the thread unwinds clockwise from the 1 thread spool. Place thread in several sewing problems. 2 4 1 3 5 7 6 8 9 10 Before threading the machine, raise the needle to its highest point and raise the presser foot to release the tension discs. 1. Improper threading could result in the thread guide above the spool of thread. 2 27 GETTING READY Then position the spool cap on the spool pin to thread the machine correctly. UPPER THREADING Threading the upper thread Note: It is important to secure the spool of thread. 2.
Slide the spool of thread onto the spool pin so the thread unwinds clockwise from the 1 thread spool. Place thread in several sewing problems. 2 4 1 3 5 7 6 8 9 10 Before threading the machine, raise the needle to its highest point and raise the presser foot to release the tension discs. 1. Improper threading could result in the thread guide above the spool of thread. 2 27 GETTING READY Then position the spool cap on the spool pin to thread the machine correctly. UPPER THREADING Threading the upper thread Note: It is important to secure the spool of thread. 2.
Owner's Manual
Page 30
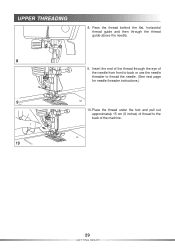
UPPER THREADING 8. Pass the thread behind the flat, horizontal thread guide and then through the eye of the needle from front to back or use the needle threader to thread the needle. (See next page for needle threader instructions.) 9 10.Place the thread under the foot and pull out approximately 15 cm (6 inches) of thread to the back of the machine. 10 29 GETTING READY Insert the end of the thread through the thread guide above the needle. 8 9.
UPPER THREADING 8. Pass the thread behind the flat, horizontal thread guide and then through the eye of the needle from front to back or use the needle threader to thread the needle. (See next page for needle threader instructions.) 9 10.Place the thread under the foot and pull out approximately 15 cm (6 inches) of thread to the back of the machine. 10 29 GETTING READY Insert the end of the thread through the thread guide above the needle. 8 9.
Owner's Manual
Page 34
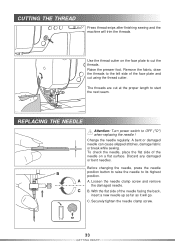
... the threads. With the flat side of the face plate and cut the threads. CUTTING THE THREAD Press thread snips after finishing sewing and the machine will go. C. A bent or damaged needle can cause skipped stitches, damage fabric or break while sewing. Change the needle regularly. Before changing the needle, press...
... the threads. With the flat side of the face plate and cut the threads. CUTTING THE THREAD Press thread snips after finishing sewing and the machine will go. C. A bent or damaged needle can cause skipped stitches, damage fabric or break while sewing. Change the needle regularly. Before changing the needle, press...

Owner's Manual
Page 46
... adjusted between "1" and "2". 45 SEWING BASICS The presser foot pressure dial is on the fabric by the presser foot. The presser foot pressure of the machine has been preset and usually requires no particular adjustment. When working with lightweight/fine fabrics or applique, the pressure can be set near "1".
... adjusted between "1" and "2". 45 SEWING BASICS The presser foot pressure dial is on the fabric by the presser foot. The presser foot pressure of the machine has been preset and usually requires no particular adjustment. When working with lightweight/fine fabrics or applique, the pressure can be set near "1".


