
Owner's Manual
Page 2
... that may come true. Follow these simple instructions and familiarize yourself with the exclusive features of a Pfaff 72, the sewing machine which will find this book a valuable guide to -operate Pfaff 72. If you at any sewing problems, please contact your machine. He will help you have any time. You will enable you . You are an experienced seamstress...
... that may come true. Follow these simple instructions and familiarize yourself with the exclusive features of a Pfaff 72, the sewing machine which will find this book a valuable guide to -operate Pfaff 72. If you at any sewing problems, please contact your machine. He will help you have any time. You will enable you . You are an experienced seamstress...
Owner's Manual
Page 4
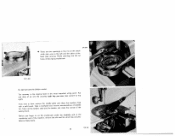
...it toward you (coun ter- DR 050 Fundamentals of the needle eye. DRO51 3 All you have to do is tightened before you begin sewing. • Never run a threaded machine unless you have completed a seam. Also, it is easier to remove the work . • Always bring take -up lever up ...lever to its highest position before you put fabric into the machine. • The machine will feed the material under the sewing foot before you begin and after you have to slip out of Machine Operation • Whenever you have fabric under the sewing foot. • Place both threads back under the...
...it toward you (coun ter- DR 050 Fundamentals of the needle eye. DRO51 3 All you have to do is tightened before you begin sewing. • Never run a threaded machine unless you have completed a seam. Also, it is easier to remove the work . • Always bring take -up lever up ...lever to its highest position before you put fabric into the machine. • The machine will feed the material under the sewing foot before you begin and after you have to slip out of Machine Operation • Whenever you have fabric under the sewing foot. • Place both threads back under the...
Owner's Manual
Page 5
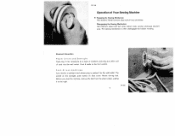
... The switch on the sewlight, push botton on back of machine, and plug 3 at other end of Your Sewing Machine I Engaging the Sewing Mechanism Hold balance wheel and turn stop motion knob clockwise. DR 561 4 Foot-driven machines have merely a sewlight cord whose plug is then disengaged for... bobbin winding. The sewing mechanism is pushed into the wall outlet...
... The switch on the sewlight, push botton on back of machine, and plug 3 at other end of Your Sewing Machine I Engaging the Sewing Mechanism Hold balance wheel and turn stop motion knob clockwise. DR 561 4 Foot-driven machines have merely a sewlight cord whose plug is then disengaged for... bobbin winding. The sewing mechanism is pushed into the wall outlet...
Owner's Manual
Page 6
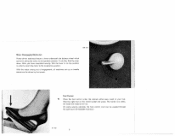
...stands can be driven by foot power. On some sewing cabinets, the foot control cord can be passed through the opening in order to return the motor to the inoperative position. DR 558 Motor Disengaging Mechanism Powerdriven machines feature a lever underneath the balance wheel which serves to... flick the lever down. R 7132 5 Foot Control 4 Place the foot control under the cabinet within easy reach of engagement, all machines set up on the control pedal and press. The harder you have completed sewing, flick the lever to its operative position. After you press, the faster the...
...stands can be driven by foot power. On some sewing cabinets, the foot control cord can be passed through the opening in order to return the motor to the inoperative position. DR 558 Motor Disengaging Mechanism Powerdriven machines feature a lever underneath the balance wheel which serves to... flick the lever down. R 7132 5 Foot Control 4 Place the foot control under the cabinet within easy reach of engagement, all machines set up on the control pedal and press. The harder you have completed sewing, flick the lever to its operative position. After you press, the faster the...
Owner's Manual
Page 10
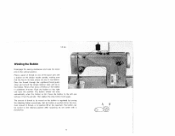
... up to the left and remove it from the spindle. The bobbin winder will stop motion knob again. DR 859 Winding the Bobbin Disengage the sewing mechanism and raise the spool pins to be turned to the right and start the...
... up to the left and remove it from the spindle. The bobbin winder will stop motion knob again. DR 859 Winding the Bobbin Disengage the sewing mechanism and raise the spool pins to be turned to the right and start the...

Owner's Manual
Page 12
... back and long groove toward you the needle size required for all ordinary sewing and embroidery work. Loosen needle set screw a. 13 Insert new needle into opening of needle clamp. The last column in hand Genuine Pfaff needles, System 130 Fl, are used . Changing the Needle Bring needle ...should not be used for the material in the chart on page 12 gives you . Important Facts about Needles On Pfaff 72 sewing machines, System 130 R, flat-shank needles are available from every Pfaff dealer. Tighten needle set screw a half a turn and pull old needle out of needle clamp and push it...
... back and long groove toward you the needle size required for all ordinary sewing and embroidery work. Loosen needle set screw a. 13 Insert new needle into opening of needle clamp. The last column in hand Genuine Pfaff needles, System 130 Fl, are used . Changing the Needle Bring needle ...should not be used for the material in the chart on page 12 gives you . Important Facts about Needles On Pfaff 72 sewing machines, System 130 R, flat-shank needles are available from every Pfaff dealer. Tighten needle set screw a half a turn and pull old needle out of needle clamp and push it...
Owner's Manual
Page 17
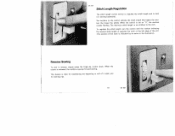
... the slot. (The position of a seam and for backtacking the beginning or end of the mark is six stitches to limit it in sewing backwards. The maximum stitch length is indicated by an arrow in reverse, simply press the finger-tip control down. The numbers on the control...stitch length (the higher the num ber, the longer the stitch). I Reverse Sewing To sew in the illustration). When the control is ideal for darning rips. 18 DR 009 This feature is released, the machine resumes forward sewing. DR 008 Stitch Length Regulation The stitch length control serves to regulate the ...
... the slot. (The position of a seam and for backtacking the beginning or end of the mark is six stitches to limit it in sewing backwards. The maximum stitch length is indicated by an arrow in reverse, simply press the finger-tip control down. The numbers on the control...stitch length (the higher the num ber, the longer the stitch). I Reverse Sewing To sew in the illustration). When the control is ideal for darning rips. 18 DR 009 This feature is released, the machine resumes forward sewing. DR 008 Stitch Length Regulation The stitch length control serves to regulate the ...
Owner's Manual
Page 19
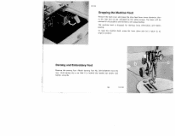
... foot No. 93-102 826-91 from the rear. Darning and Embroidery Foot Remove the sewing foot. The lever will be retained in this position and the fabric will cease feeding. DR 855 Dropping the Machine Feed Remove the bed cover and press the drop feed lever down and let it is... dropped for darning, hoop embroidery and button sewing. The machine feed is behind the needle set screw, and tighten screw b. 20 DR854
... foot No. 93-102 826-91 from the rear. Darning and Embroidery Foot Remove the sewing foot. The lever will be retained in this position and the fabric will cease feeding. DR 855 Dropping the Machine Feed Remove the bed cover and press the drop feed lever down and let it is... dropped for darning, hoop embroidery and button sewing. The machine feed is behind the needle set screw, and tighten screw b. 20 DR854
Owner's Manual
Page 21
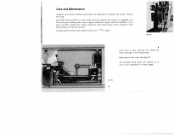
If you have a portable machine, tilt it back, loosen the large thumb screw on regular and proper cleaning and oiling. DR 053 A From time to time, lubricate the needle bar ... oiling points are dependent on the underside cf the machine base, and remove the base. All moving and rotating parts require regular lubrication. Care and Maintenance Longevity and smooth machine performance are marked by ar rows in the sewing head. Use Pfaff sewing machine oil only, Never lubricate machine with animal or vegetable oils. In replacing the...
If you have a portable machine, tilt it back, loosen the large thumb screw on regular and proper cleaning and oiling. DR 053 A From time to time, lubricate the needle bar ... oiling points are dependent on the underside cf the machine base, and remove the base. All moving and rotating parts require regular lubrication. Care and Maintenance Longevity and smooth machine performance are marked by ar rows in the sewing head. Use Pfaff sewing machine oil only, Never lubricate machine with animal or vegetable oils. In replacing the...
Owner's Manual
Page 22
... arrows). wFlirniotth.mTaatikmseoefot tuobtrtuthismeh.eb, Tobraebkmienoavceatosteohtehapnnidcekethdaelendbopblraebtmienoavanenddaccclcleeuaamnnuttlhhaeteiovmniscaicnohiftiynpeoafcfketehedde sewing hook. The one raceway in the rim of the stitch width dial, one on these parts. into the raceway each day you begin needle-bar end of to the oil the mechanism under the bedplate and at the machine, remove the dirt and lint which...
... arrows). wFlirniotth.mTaatikmseoefot tuobtrtuthismeh.eb, Tobraebkmienoavceatosteohtehapnnidcekethdaelendbopblraebtmienoavanenddaccclcleeuaamnnuttlhhaeteiovmniscaicnohiftiynpeoafcfketehedde sewing hook. The one raceway in the rim of the stitch width dial, one on these parts. into the raceway each day you begin needle-bar end of to the oil the mechanism under the bedplate and at the machine, remove the dirt and lint which...
Owner's Manual
Page 24
... Cause: Needle incorrectly inserted. Needle bent, Machine threaded improperly. Choose the correct needle from you , and flat side of shank away from chart on page 12. (For ordinary sewing, use System 130 R needles.) Insert new needle. above mentioned may cause thread breakage. Clean and oil hook raceway. Remedy: Push needle up as...
... Cause: Needle incorrectly inserted. Needle bent, Machine threaded improperly. Choose the correct needle from you , and flat side of shank away from chart on page 12. (For ordinary sewing, use System 130 R needles.) Insert new needle. above mentioned may cause thread breakage. Clean and oil hook raceway. Remedy: Push needle up as...
Owner's Manual
Page 25
... Guide the material lightly. the correct size for the needle and fabric. Don't run thread over finger when winding the bobbin (see page 20). Machine Feeds Improperly Cause: Feed dog dropped. Remedy: Replace needle at once to prevent further damage. Take off needle plate and remove lint with a stiff... as desired. Needle too thin or thread too heavy. Accumulations of thread between feed teeth. Needle Breaks Cause Bent needle strikes point of sewing hook. Bobbin case inserted incorrectly. 4. Machine does not feed because stitch length control set on "0". Use only first-rate thread -
... Guide the material lightly. the correct size for the needle and fabric. Don't run thread over finger when winding the bobbin (see page 20). Machine Feeds Improperly Cause: Feed dog dropped. Remedy: Replace needle at once to prevent further damage. Take off needle plate and remove lint with a stiff... as desired. Needle too thin or thread too heavy. Accumulations of thread between feed teeth. Needle Breaks Cause Bent needle strikes point of sewing hook. Bobbin case inserted incorrectly. 4. Machine does not feed because stitch length control set on "0". Use only first-rate thread -
Owner's Manual
Page 26
...raceway. If thread should happen to overcome hard working while sewing. 7. If this action should be sufficient to jam in the hook raceway, the power of the motor in most instances will not normally jam, even if the machine should not free the jammed thread put a drop of... jerk the balance wheel back, then rock it back and forth. 27 Thread Jamming The Pfaff rotary hook will be handled improperly. Mechanism clogged by pieces of the mechanism. Use only Pfaff sewing machine oil - Machine Works Heavily Cause: Hook raceway lacks oil or is obstructed by inferior oil. Motor idles ...
...raceway. If thread should happen to overcome hard working while sewing. 7. If this action should be sufficient to jam in the hook raceway, the power of the motor in most instances will not normally jam, even if the machine should not free the jammed thread put a drop of... jerk the balance wheel back, then rock it back and forth. 27 Thread Jamming The Pfaff rotary hook will be handled improperly. Mechanism clogged by pieces of the mechanism. Use only Pfaff sewing machine oil - Machine Works Heavily Cause: Hook raceway lacks oil or is obstructed by inferior oil. Motor idles ...
Owner's Manual
Page 27
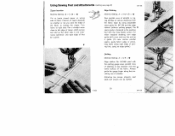
...the fabric to overlap the zipper. The seam guide is fastened to the machine bed with the quilting gauge sews parallel rows of stitching at various distances from the fabric edge by using no edge guide.) Quilting Machine Setting: A 0, B = i Edge stitcher No. 847 600 used ...with the long thumb screw. Using Sewing Feet and Attachments (setting see page 6) DR 868 I Zipper Insertion 8 Edge Stitching Machine Setting: A = 0, B Machine Setting: A 0 to 4, B = Pin or baste ...
...the fabric to overlap the zipper. The seam guide is fastened to the machine bed with the quilting gauge sews parallel rows of stitching at various distances from the fabric edge by using no edge guide.) Quilting Machine Setting: A 0, B = i Edge stitcher No. 847 600 used ...with the long thumb screw. Using Sewing Feet and Attachments (setting see page 6) DR 868 I Zipper Insertion 8 Edge Stitching Machine Setting: A = 0, B Machine Setting: A 0 to 4, B = Pin or baste ...
Owner's Manual
Page 29
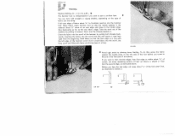
... as far as instructed above. To do this will ensure a neat hem right from the beginning. Take the work out of fabric you come to sew a uniform hem. Inserting the fabric into the scroll of the hem (see ill, at bottom). Don't trim the threads (sketch 1). Before you want to ..., as the rear fabric edge. Draw the fabric into the scroll like this , press the fabric against the needle plate on the type of the machine by slowing down feeding. Feed fabric so that the needle stitches in line with the left side of corner, cut away about 1 /a" to 3; B 4The ...
... as far as instructed above. To do this will ensure a neat hem right from the beginning. Take the work out of fabric you come to sew a uniform hem. Inserting the fabric into the scroll of the hem (see ill, at bottom). Don't trim the threads (sketch 1). Before you want to ..., as the rear fabric edge. Draw the fabric into the scroll like this , press the fabric against the needle plate on the type of the machine by slowing down feeding. Feed fabric so that the needle stitches in line with the left side of corner, cut away about 1 /a" to 3; B 4The ...
Owner's Manual
Page 30
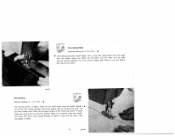
... 4 4 Overcasting prevents frayed edges. DR 872 Butt Seaming Machine Setting: A = 3 or 4, B = u838 954 Two similar pieces of fabric which do not ravel easily may overcas edges after fabric is cut and before the pieces are centered under the sewing foot so that the abutted edges are joined. You may ...the remaining pieces of sheet. 31 DR 046 Cut out worn center strip. Use a long wide zigzag stitch and sew edge with close, wide zigzag stitches to 4; u838 954 Overcasting Edges Machine Setting: A = 2 to obtain a neat and flat seam. Worn bed sheets may be butted together and ...
... 4 4 Overcasting prevents frayed edges. DR 872 Butt Seaming Machine Setting: A = 3 or 4, B = u838 954 Two similar pieces of fabric which do not ravel easily may overcas edges after fabric is cut and before the pieces are centered under the sewing foot so that the abutted edges are joined. You may ...the remaining pieces of sheet. 31 DR 046 Cut out worn center strip. Use a long wide zigzag stitch and sew edge with close, wide zigzag stitches to 4; u838 954 Overcasting Edges Machine Setting: A = 2 to obtain a neat and flat seam. Worn bed sheets may be butted together and ...

Owner's Manual
Page 31
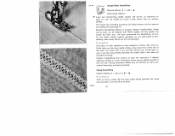
... Place the straight edge of the lace on the wrong side of the fabric. Cut off excessive cloth on the fold of the fabric and sew it down with narrow zigzag stitches, taking one simple operation. Cut patch square or rectangular so that the grain will match the rest of the... close to the wrong side, following method may particularly be patched quickly. DR 871 32 Place the patch over to seams. u838 954 Attaching Lace Machine Setting: A = 2 B I You can be used for jersey fabrics. The following the texture, and pre ferably iron it down with a wide zigzag stitch of the ...
... Place the straight edge of the lace on the wrong side of the fabric. Cut off excessive cloth on the fold of the fabric and sew it down with narrow zigzag stitches, taking one simple operation. Cut patch square or rectangular so that the grain will match the rest of the... close to the wrong side, following method may particularly be patched quickly. DR 871 32 Place the patch over to seams. u838 954 Attaching Lace Machine Setting: A = 2 B I You can be used for jersey fabrics. The following the texture, and pre ferably iron it down with a wide zigzag stitch of the ...

Owner's Manual
Page 32
... right side. If you want to give the design a plastic effect, use buttonhole foot Nr. 847 616 or all-purpose sewing foot, flick lever B to the seam and sew over a filler thread (see also page 36). R 7220 Applique is very effective on right side. DF 033 338 954... Applique Work - Machine Setting: A = 2, B Applique is desired. Trace design on wrong side with granito stitches. Fill out small, but essential sections of ...
... right side. If you want to give the design a plastic effect, use buttonhole foot Nr. 847 616 or all-purpose sewing foot, flick lever B to the seam and sew over a filler thread (see also page 36). R 7220 Applique is very effective on right side. DF 033 338 954... Applique Work - Machine Setting: A = 2, B Applique is desired. Trace design on wrong side with granito stitches. Fill out small, but essential sections of ...
Owner's Manual
Page 33
... on the left of the seam, turn fabric half a turn and sew second row. Sew first row. At the end of its throw. Exciting decorative effects may... Fold fabric to 11/2; For this reason, batiste, organdy, georgette, etc. DR 001 838 954 Straight-Stitch Hemstitching Machine Seing: A = 0; Turn out needle set screw a little further than for cording work (see page 41). If... desired, additional straight or curved ornamental seams may be obtained with Pfaffs System 130 twin needle. Guide fabric so that the wing needle should penetrate the traced line only ...
... on the left of the seam, turn fabric half a turn and sew second row. Sew first row. At the end of its throw. Exciting decorative effects may... Fold fabric to 11/2; For this reason, batiste, organdy, georgette, etc. DR 001 838 954 Straight-Stitch Hemstitching Machine Seing: A = 0; Turn out needle set screw a little further than for cording work (see page 41). If... desired, additional straight or curved ornamental seams may be obtained with Pfaffs System 130 twin needle. Guide fabric so that the wing needle should penetrate the traced line only ...
Owner's Manual
Page 45
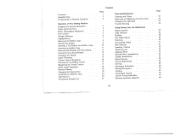
... and Maintenance Cleaning and Oiling Removing and Replacing the Face Cover Changing the Ligth Bulb Trouble Shooting Using Sewing Feet and Attachments Zipper Insertion Edge Stitching Quilting . Foreword Essential Parts Fundamentals of Machine Operation Operation of Your Sewing Machine Engaging the Sewing Mechanism Power and Foot Drive Motor Disengaging Mechanism Foot Control Straight Stitching Zigzag...
... and Maintenance Cleaning and Oiling Removing and Replacing the Face Cover Changing the Ligth Bulb Trouble Shooting Using Sewing Feet and Attachments Zipper Insertion Edge Stitching Quilting . Foreword Essential Parts Fundamentals of Machine Operation Operation of Your Sewing Machine Engaging the Sewing Mechanism Power and Foot Drive Motor Disengaging Mechanism Foot Control Straight Stitching Zigzag...


