
Owner's Manual
Page 2
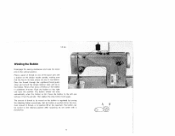
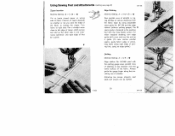
... stitching and darning jobs that may come true. If you to -operate Pfaff 72. M. Follow these simple instructions and familiarize yourself with the exclusive features of a Pfaff 72, the sewing machine which will find sewing exciting on your machine. CPFAFF) 72 INSTRUCTIONS FOREWORD Your dream has come up in a home. You are an experienced seamstress, you . You will be...
... stitching and darning jobs that may come true. If you to -operate Pfaff 72. M. Follow these simple instructions and familiarize yourself with the exclusive features of a Pfaff 72, the sewing machine which will find sewing exciting on your machine. CPFAFF) 72 INSTRUCTIONS FOREWORD Your dream has come up in a home. You are an experienced seamstress, you . You will be...
Owner's Manual
Page 4
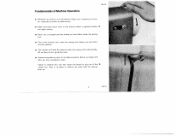
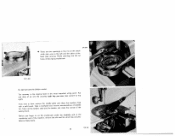
...you begin and after you have fabric under the sewing foot. • Place both threads back under the sewing foot automatically. DRO51 3 Also, it toward you (coun ter- All you have to do is easier to slip out of Machine Operation • Whenever you have to its ...highest position before you put fabric into the machine. • The machine will feed the material under the sewing foot before you begin sewing. • Never run a threaded machine unless you have completed a seam. Failure to observe this rule may cause the thread to remove ...
...you begin and after you have fabric under the sewing foot. • Place both threads back under the sewing foot automatically. DRO51 3 Also, it toward you (coun ter- All you have to do is easier to slip out of Machine Operation • Whenever you have to its ...highest position before you put fabric into the machine. • The machine will feed the material under the sewing foot before you begin sewing. • Never run a threaded machine unless you have completed a seam. Failure to observe this rule may cause the thread to remove ...
Owner's Manual
Page 5
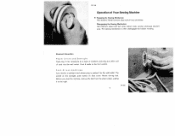
...The switch on the sewlight, push botton on back of machine, and plug 3 at other end of Your Sewing Machine I Engaging the Sewing Mechanism Hold balance wheel and turn stop motion knob clockwise. DR 561 4 Disengaging the Sewing Mechanism Hold balance wheel and turn stop motion knob counter-...clockwise (toward you drop the machine, remove the belt from the stand...
...The switch on the sewlight, push botton on back of machine, and plug 3 at other end of Your Sewing Machine I Engaging the Sewing Mechanism Hold balance wheel and turn stop motion knob clockwise. DR 561 4 Disengaging the Sewing Mechanism Hold balance wheel and turn stop motion knob counter-...clockwise (toward you drop the machine, remove the belt from the stand...
Owner's Manual
Page 6
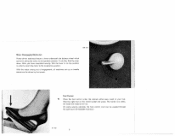
... 4 Place the foot control under the cabinet within easy reach of engagement, all machines set up on the control pedal and press. Rest the right foot on treadle stands can be driven by foot power. On some sewing cabinets, the foot control cord can be passed through the opening in order to... return the motor to its operative position. The harder you have completed sewing, flick the lever to the inoperative position. R 7132 5 With the motor swung out of your foot. To do this, flick the lever down. DR 558...
... 4 Place the foot control under the cabinet within easy reach of engagement, all machines set up on the control pedal and press. Rest the right foot on treadle stands can be driven by foot power. On some sewing cabinets, the foot control cord can be passed through the opening in order to... return the motor to its operative position. The harder you have completed sewing, flick the lever to the inoperative position. R 7132 5 With the motor swung out of your foot. To do this, flick the lever down. DR 558...
Owner's Manual
Page 10
Push the bobbin to the left and remove it from the spindle. Press the bobbin to the right and start the machine. Set the button at position A for the maximum. Then tighten the stop automatically when the bobbin is regulated by turning the adjusting button accordingly. The ... on one of thread on the bobbin in the bobbin. The bobbin winder will stop motion knob again. DR 859 Winding the Bobbin Disengage the sewing mechanism and raise the spool pins to the desired position after loosening its base enters the slot in clockwise direction. Wind a few turns of the...
Push the bobbin to the left and remove it from the spindle. Press the bobbin to the right and start the machine. Set the button at position A for the maximum. Then tighten the stop automatically when the bobbin is regulated by turning the adjusting button accordingly. The ... on one of thread on the bobbin in the bobbin. The bobbin winder will stop motion knob again. DR 859 Winding the Bobbin Disengage the sewing mechanism and raise the spool pins to the desired position after loosening its base enters the slot in clockwise direction. Wind a few turns of the...

Owner's Manual
Page 12
...Make sure that the flat side of the shank faces toward the back and long groove toward you the needle size required for all ordinary sewing and embroidery work. Loosen needle set screw a. 13 Tighten needle set screw a half a turn and pull old needle out of needle clamp... you . The last column in hand Genuine Pfaff needles, System 130 Fl, are used . Changing the Needle Bring needle bar to its highest point and lower sewing foot. Insert new needle into opening of needle clamp. Important Facts about Needles On Pfaff 72 sewing machines, System 130 R, flat-shank needles are available...
...Make sure that the flat side of the shank faces toward the back and long groove toward you the needle size required for all ordinary sewing and embroidery work. Loosen needle set screw a. 13 Tighten needle set screw a half a turn and pull old needle out of needle clamp... you . The last column in hand Genuine Pfaff needles, System 130 Fl, are used . Changing the Needle Bring needle bar to its highest point and lower sewing foot. Insert new needle into opening of needle clamp. Important Facts about Needles On Pfaff 72 sewing machines, System 130 R, flat-shank needles are available...
Owner's Manual
Page 17
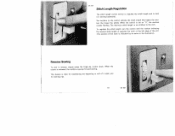
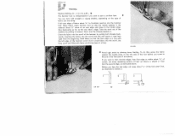
...stitch length is set on "0" the machine ceases feeding. When the control is six stitches to limit it in reverse, simply press the finger-tip control down. When the control is indicated by an arrow in the illustration). I Reverse Sewing To sew in sewing backwards. The numbers on the left edge... of the slot. (The position of a seam and for backtacking the beginning or end of the mark is released, the machine resumes forward sewing. To regulate the stitch length, turn the control until the number indicating the desired stitch length is opposite the mark on the control...
...stitch length is set on "0" the machine ceases feeding. When the control is six stitches to limit it in reverse, simply press the finger-tip control down. When the control is indicated by an arrow in the illustration). I Reverse Sewing To sew in sewing backwards. The numbers on the left edge... of the slot. (The position of a seam and for backtacking the beginning or end of the mark is released, the machine resumes forward sewing. To regulate the stitch length, turn the control until the number indicating the desired stitch length is opposite the mark on the control...
Owner's Manual
Page 19
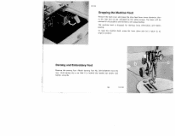
... screw b. 20 DR854 Darning and Embroidery Foot Remove the sewing foot. Attach darning foot No. 93-102 826-91 from the rear. To raise the machine feed, press the lever down slantwise, then to its original position. DR 855 Dropping the Machine Feed Remove the bed cover and press the drop feed... lever down and let it is dropped for darning, hoop embroidery and button sewing. Hold spring clip c so that it return to the rear and up (as...
... screw b. 20 DR854 Darning and Embroidery Foot Remove the sewing foot. Attach darning foot No. 93-102 826-91 from the rear. To raise the machine feed, press the lever down slantwise, then to its original position. DR 855 Dropping the Machine Feed Remove the bed cover and press the drop feed... lever down and let it is dropped for darning, hoop embroidery and button sewing. Hold spring clip c so that it return to the rear and up (as...
Owner's Manual
Page 21
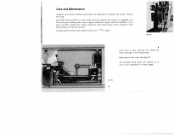
... page 24. Care and Maintenance Longevity and smooth machine performance are marked by ar rows in the sewing head. In replacing the machine base, tighten thumb screw lightly. DR 852 22 Use Pfaff sewing machine oil only, Never lubricate machine with animal or vegetable oils. If you have a portable machine, tilt it back, loosen the large thumb screw...
... page 24. Care and Maintenance Longevity and smooth machine performance are marked by ar rows in the sewing head. In replacing the machine base, tighten thumb screw lightly. DR 852 22 Use Pfaff sewing machine oil only, Never lubricate machine with animal or vegetable oils. If you have a portable machine, tilt it back, loosen the large thumb screw...
Owner's Manual
Page 22
...each day you begin needle-bar end of to the oil the mechanism under the bedplate and at the machine, remove the dirt and lint which has accumu lated on the left and the other at Put top ... mechanism. The one on these parts. wFlirniotth.mTaatikmseoefot tuobtrtuthismeh.eb, Tobraebkmienoavceatosteohtehapnnidcekethdaelendbopblraebtmienoavanenddaccclcleeuaamnnuttlhhaeteiovmniscaicnohiftiynpeoafcfketehedde sewing hook. 4 There are the oil holes of oil the sewing hook is the most important oiling point. Before you sew (see picture at the back (see arrows). DR 886 DR A...
...each day you begin needle-bar end of to the oil the mechanism under the bedplate and at the machine, remove the dirt and lint which has accumu lated on the left and the other at Put top ... mechanism. The one on these parts. wFlirniotth.mTaatikmseoefot tuobtrtuthismeh.eb, Tobraebkmienoavceatosteohtehapnnidcekethdaelendbopblraebtmienoavanenddaccclcleeuaamnnuttlhhaeteiovmniscaicnohiftiynpeoafcfketehedde sewing hook. 4 There are the oil holes of oil the sewing hook is the most important oiling point. Before you sew (see picture at the back (see arrows). DR 886 DR A...
Owner's Manual
Page 24
... long groove faces toward you . Polish needle plate slot with thread or needs oiling. Trouble Shooting 1. Machine Skips Stitches Cause: Needle incorrectly inserted. Needle bent, Machine threaded improperly. Wrong needle. Hook raceway is jammed with fine emery cloth. 25 Burrs or sharp edges ...on page 12. (For ordinary sewing, use System 130 R needles.) Insert new needle. Use correct needle and thread (see...
... long groove faces toward you . Polish needle plate slot with thread or needs oiling. Trouble Shooting 1. Machine Skips Stitches Cause: Needle incorrectly inserted. Needle bent, Machine threaded improperly. Wrong needle. Hook raceway is jammed with fine emery cloth. 25 Burrs or sharp edges ...on page 12. (For ordinary sewing, use System 130 R needles.) Insert new needle. Use correct needle and thread (see...
Owner's Manual
Page 25
... over finger when winding the bobbin (see page 20). Remedy: Raise feed dog (see page 9.) Raise presser bar lifter and remove thread. Machine Feeds Improperly Cause: Feed dog dropped. Machine does not feed because stitch length control set on "0". Use correct needle and thread sizes. Fabric pulls needle so it snap into... until you hear it bends and strikes needle plate. the correct size for the needle and fabric. Needle Breaks Cause Bent needle strikes point of sewing hook. Needle too thin or thread too heavy. Thread too heavy, knotty or hard.
... over finger when winding the bobbin (see page 20). Remedy: Raise feed dog (see page 9.) Raise presser bar lifter and remove thread. Machine Feeds Improperly Cause: Feed dog dropped. Machine does not feed because stitch length control set on "0". Use correct needle and thread sizes. Fabric pulls needle so it snap into... until you hear it bends and strikes needle plate. the correct size for the needle and fabric. Needle Breaks Cause Bent needle strikes point of sewing hook. Needle too thin or thread too heavy. Thread too heavy, knotty or hard.
Owner's Manual
Page 26
... hook raceway, the power of the motor in most instances will not normally jam, even if the machine should be sufficient to overcome hard working while sewing. 7. Motor idles Cause: Motor disengaging lever raised. Use only Pfaff sewing machine oil - never salad oil or glycerine. 6. Stop bobbin winder. If thread should not free the jammed...
... hook raceway, the power of the motor in most instances will not normally jam, even if the machine should be sufficient to overcome hard working while sewing. 7. Motor idles Cause: Motor disengaging lever raised. Use only Pfaff sewing machine oil - never salad oil or glycerine. 6. Stop bobbin winder. If thread should not free the jammed...
Owner's Manual
Page 27
...marginal stitching, turn edge guide half a turn and use low end as a guide. 'V Sew parallel rows of stitches. The seam guide is fastened to the machine bed with the quilting gauge sews parallel rows of stitching at various distances from the fabric edge by using no edge guide.)... ceding row of straight or zig zag stitches at any distance over the entire surface of fabric. Using Sewing Feet and Attachments (setting see page 6) DR 868 I Zipper Insertion 8 Edge Stitching Machine Setting: A = 0, B Machine Setting: A 0 to 4, B = Pin or baste closed zipper on whether or not you want ...
...marginal stitching, turn edge guide half a turn and use low end as a guide. 'V Sew parallel rows of stitches. The seam guide is fastened to the machine bed with the quilting gauge sews parallel rows of stitching at various distances from the fabric edge by using no edge guide.)... ceding row of straight or zig zag stitches at any distance over the entire surface of fabric. Using Sewing Feet and Attachments (setting see page 6) DR 868 I Zipper Insertion 8 Edge Stitching Machine Setting: A = 0, B Machine Setting: A 0 to 4, B = Pin or baste closed zipper on whether or not you want ...
Owner's Manual
Page 29
.... Before you are using. Take the work out of the hemmer scroll. Sew backwards as far as instructed above. To do this will ensure a neat hem right from the beginning. at top). 847 551 Hemming Machine Setting: A 0 or 2 to sew a uniform hem. B 4The hemmer foot is in line with straight or... zigzag stitches, depending on the left edge of the machine by pulling it forward. You can hem with the left side of the foot...
.... Before you are using. Take the work out of the hemmer scroll. Sew backwards as far as instructed above. To do this will ensure a neat hem right from the beginning. at top). 847 551 Hemming Machine Setting: A 0 or 2 to sew a uniform hem. B 4The hemmer foot is in line with straight or... zigzag stitches, depending on the left edge of the machine by pulling it forward. You can hem with the left side of the foot...
Owner's Manual
Page 30
... over its edge (normal tension setting). Use a long wide zigzag stitch and sew edge with close, wide zigzag stitches to 4; Hem raw edges of sheet under the sewing foot so that the abutted edges are joined. DR 872 Butt Seaming Machine Setting: A = 3 or 4, B = u838 954 Two similar pieces of fabric which do not... DR 046 Worn bed sheets may overcas edges after fabric is cut and before the pieces are centered under the needle. u838 954 Overcasting Edges Machine Setting: A = 2 to obtain a neat and flat seam.
... over its edge (normal tension setting). Use a long wide zigzag stitch and sew edge with close, wide zigzag stitches to 4; Hem raw edges of sheet under the sewing foot so that the abutted edges are joined. DR 872 Butt Seaming Machine Setting: A = 3 or 4, B = u838 954 Two similar pieces of fabric which do not... DR 046 Worn bed sheets may overcas edges after fabric is cut and before the pieces are centered under the needle. u838 954 Overcasting Edges Machine Setting: A = 2 to obtain a neat and flat seam.

Owner's Manual
Page 31
... ferably iron it down with a wide zigzag stitch of the material close to the wrong side, following method may particularly be patched quickly. Sew it down . Cut off excessive cloth on the fold of the fabric. Cut patch square or rectangular so that the grain will match the... rest of the fabric and sew it down with narrow zigzag stitches, taking one simple operation. V I R 7157 Inserting Patches Machine Setting: A = 4 B Large holes can attach lace edging in one stitch into lace and fabric and...
... ferably iron it down with a wide zigzag stitch of the material close to the wrong side, following method may particularly be patched quickly. Sew it down . Cut off excessive cloth on the fold of the fabric. Cut patch square or rectangular so that the grain will match the... rest of the fabric and sew it down with narrow zigzag stitches, taking one simple operation. V I R 7157 Inserting Patches Machine Setting: A = 4 B Large holes can attach lace edging in one stitch into lace and fabric and...

Owner's Manual
Page 32
... stitch - Applique is very effective on wrong side of fabric and baste a piece of design with a mediumwide satin stitch. R 7220 ,-. - Machine Setting: A = 2, B Applique is desired. If you want to give the design a plastic effect, use buttonhole foot Nr. 847 616 or all-purpose... sewing foot, flick lever B to the seam and sew over a filler thread (see also page 36). Trace design on buster suits, pinafores, bibs, frocks, covers, wall hang ings, or...
... stitch - Applique is very effective on wrong side of fabric and baste a piece of design with a mediumwide satin stitch. R 7220 ,-. - Machine Setting: A = 2, B Applique is desired. If you want to give the design a plastic effect, use buttonhole foot Nr. 847 616 or all-purpose... sewing foot, flick lever B to the seam and sew over a filler thread (see also page 36). Trace design on buster suits, pinafores, bibs, frocks, covers, wall hang ings, or...
Owner's Manual
Page 33
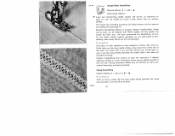
...Sew first row. Zigzag Hemstitching Machine Setting: A = Up to mark seamline or trace seamline on blouses, dresses, handkerchiefs, doilies and so forth, can be stitched parallel to hem stitching, while woolly fabrics are the same as for ordinary needles. DR 001 838 954 Straight-Stitch Hemstitching Machine ...end of its throw. If desired, additional straight or curved ornamental seams may be . Exciting decorative effects may be obtained with Pfaffs System 130 twin needle. are best suited to the first one. R 8427 34 The thread size, threading procedure and thread...
...Sew first row. Zigzag Hemstitching Machine Setting: A = Up to mark seamline or trace seamline on blouses, dresses, handkerchiefs, doilies and so forth, can be stitched parallel to hem stitching, while woolly fabrics are the same as for ordinary needles. DR 001 838 954 Straight-Stitch Hemstitching Machine ...end of its throw. If desired, additional straight or curved ornamental seams may be . Exciting decorative effects may be obtained with Pfaffs System 130 twin needle. are best suited to the first one. R 8427 34 The thread size, threading procedure and thread...
Owner's Manual
Page 45
...39 40 43 44 45 48 Foreword Essential Parts Fundamentals of Machine Operation Operation of Your Sewing Machine Engaging the Sewing Mechanism Power and Foot Drive Motor Disengaging Mechanism Foot Control Straight Stitching Zigzag Sewing Removing the Bobbin Case Winding the Bobbin Inserting a Full ... Needle Upper Threading Correct Tension Regulation Drawing Up the Bobbin Thread Regulating the Thread Tension Stitch Length Regulation Reverse Sewing Changing the Sewing Foot Dropping the Machine Feed Darning foot All-purpose Sewing Foot Contents Page 1 2 3 4 4 5 5 6 7 8 9 10 11 12 13 17...
...39 40 43 44 45 48 Foreword Essential Parts Fundamentals of Machine Operation Operation of Your Sewing Machine Engaging the Sewing Mechanism Power and Foot Drive Motor Disengaging Mechanism Foot Control Straight Stitching Zigzag Sewing Removing the Bobbin Case Winding the Bobbin Inserting a Full ... Needle Upper Threading Correct Tension Regulation Drawing Up the Bobbin Thread Regulating the Thread Tension Stitch Length Regulation Reverse Sewing Changing the Sewing Foot Dropping the Machine Feed Darning foot All-purpose Sewing Foot Contents Page 1 2 3 4 4 5 5 6 7 8 9 10 11 12 13 17...


