Pfaff 77 Support and Manuals
Get Help and Manuals for this Pfaff item

Popular Pfaff 77 Manual Pages
Owner's Manual - Page 3
.... M. who
We hope you will become well acquainted with your machine.
This instruction book has been compiled in
order to help you at
Pfaff dealer any sewing problems, please do
not will
hesitate to contact your Pfaff. We suggest that you try out the various sew ing techniques discussed in this book so that you your be...
Owner's Manual - Page 4

Essential Parts of Your Pfaff 76
LHL1fl
17 18
16 15
2
1 Face cover
2 Take-up lever
3 Thread guide
4 Top cover
5 Thread retainer stud
6 Spool pins
7 Bobbin winder
8 Balance ...Needle plate
16 Sewing foot thumb screw 17 Light switch
18 Stitch width control
19 Needle position lever 20 Needle thread tension
21 Presser bar lifter
(on back of machine arm) 22 Needle set screw
23 Sewing foot
Owner's Manual - Page 5

Essential Parts of Your Pfaff 77
1 7-
3 4 5 I-6_
U
16 15 14
1 Face cover 2 Take-up lever 3 Thread guide 4 Top cover 5 Thread retainer stud 6 Spool pins 7 Bobbin winder 8 Balance ... 15 Needle plate 16 Sewing foot thumb screw 17 Light switch 18 Stitch width control 19 Needle position lever 20 Needle thread tension 21 Presser bar lifter
(on back of machine arm) 22 Needle set screw 23 Sewing foot
3
Owner's Manual - Page 8

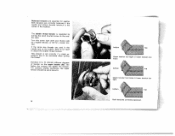
... bin.
On the Piaft 76, remove bed cover (13), as you release the latch, the empty bobbin drops out. Lift latch k on the Pfaff 76. On the Pfaff 77, the bobbin case is at the bobbin case, however, you must first open free arm cover (14) by its stroke. The bobbin cannot fall...
Owner's Manual - Page 12

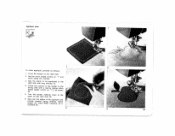
Press the workplate support against the baseplate of the machine.
10
3
4 The sewing area of the Pfaff 76 Portable is enlarged with the aid of the Pfaff 77 for ordinary sewing operations, push the workplate onto the free arm as far as it in place by pulling out and swing ing up its sup port and ...
Owner's Manual - Page 16

... sewing operations, set the stitch length control on the left-hand side of your foot and press down the pedal.
foot
.1
Place the foot control within easy reach of the
slot. The number indi
cating the stitch length chosen should be
I
opposite the dot on "2".
The harder you press, the faster the machine...
Owner's Manual - Page 18
... the center of tension on the bob bin case. bottom
top
Upper tension too loose or lower tension too tight. For ordinary sewing operations, the upper tension should be set correctly if a slight re sistance has to be overcome when pulling the thread. Numbers 0 to adjust the bobbin thread tension.
The bobbin...
Owner's Manual - Page 25

... is used
No. for
93-847 heavy
671-00, with materials,
3
cording grooves
foot No. 93-847 for medium-heavy
675-00 fabrics,
with
7
Ptaff 77
Pfaff 76 23
Owner's Manual - Page 26

...same size. The threading procedure is the same as for cording work. Turn the fabric by guiding the material so that the wing needle enters the needle holes it has made in crease ...can produce a nice hemstitching effect along the hemmed edge of the fabric by half a turn and sew the second seam, guiding the material so that the right needle stitches into the fabric close to 2.5
-lOOI79
IV"
I. ...
Owner's Manual - Page 27

The larger the number, the longer the stitch.
25 Never change the stitch width setting unless the needle is outside the fabric.
18
The stitch length is regulated by turning stitch length control (11) (see ill.). The Zigzag Seam The stitch width is regulated by pushing stitch width control (18) toward the left, as may be desired.
Owner's Manual - Page 32

... put the stitch width control in line with the right edge of the sewing foot. To obtain more prominent buttonholes, place a filler cord of the slide indicator (see ill.).
Sewing Buttonholes
I
1
2
Attach buttonhole foot No. 847616 to the
machine and set the stitch length control so that both dots are opposite each other (see...
Owner's Manual - Page 37
... close to the seam on "1' and
stitch along the outlines.
3. Set the stitch length control on the right side (3).
6.
Sew over the edges of the design on the wrong side with a narrow zigzag stitch (stitch length control on the right side. 2. Sew the fabric to
the
4.
Follow the outlines of the appliqué...
Owner's Manual - Page 39

... dependent on p. 36).
37 Since your Pfaff sewing machine has been made from high-grade materials, there are only a few oiling points left and center).
Machine Care Longevity and smooth machine performance are
illustrated below. (Remove the face cover as instructed on regular cleaning and prop er oiling. Do not oil the bobbin winder. From time...
Owner's Manual - Page 41

... guide the material lightly.
• Clean and oil the machine as instructed.
• Make sure there are no pieces of oil into the raceway, jerk the balance wheel back and then rock it back and forth, without applying force.
39
If thread should be balanced correctly.
•.
Trouble Shooting
When operated properly, your sewing job...
Owner's Manual - Page 42

... Foot
18
Drawing Up the Bobbin Thread . .
12
Dropping the Machine Feed
.
.
.
18
Electrical Equipment
4
Engaging and Disengaging the Sewing
Mechanism
7
Essential Parts of Pfaff 76
2
Essential Parts of Pfaff 77
3
Flat Felled Seams
21
Foot Control
4
Foreword
1
Fundamentals of Machine Operation
13
Hemming
22
Hemstitching
24
Inserting a Full Bobbin
8
Page
Inserting...
Pfaff 77 Reviews
We have not received any reviews for Pfaff yet.