
Owner's Manual
Page 3
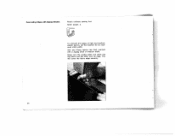
... 76and77 Foreword Your new Pfaff sewing machine will always enjoy sewing with all the sewing jobs coming up in order to familiarize you thoroughly with G. M. PFAFF AG Karisruhe-Durlach Branch If you at Pfaff dealer any sewing problems, please do not will hesitate to contact your machine. We suggest that you try out the various sew ing techniques discussed in...
... 76and77 Foreword Your new Pfaff sewing machine will always enjoy sewing with all the sewing jobs coming up in order to familiarize you thoroughly with G. M. PFAFF AG Karisruhe-Durlach Branch If you at Pfaff dealer any sewing problems, please do not will hesitate to contact your machine. We suggest that you try out the various sew ing techniques discussed in...

Owner's Manual
Page 4
Essential Parts of Your Pfaff 76 LHL1fl 17 18 16 15 2 1 Face cover 2 Take-up lever 3 Thread guide 4 Top cover 5 Thread retainer stud 6 Spool pins 7 Bobbin winder 8 Balance wheel 9 Stop motion knob 9 10 Motor disengaging mechanism 11 Stitch length control 12 Reverse feed control 13 Bed cover 10 14 Transverse rotary hook 15 Needle plate 16 Sewing foot thumb screw 17 Light switch 18 Stitch width control 19 Needle position lever 20 Needle thread tension 21 Presser bar lifter (on back of machine arm) 22 Needle set screw 23 Sewing foot
Essential Parts of Your Pfaff 76 LHL1fl 17 18 16 15 2 1 Face cover 2 Take-up lever 3 Thread guide 4 Top cover 5 Thread retainer stud 6 Spool pins 7 Bobbin winder 8 Balance wheel 9 Stop motion knob 9 10 Motor disengaging mechanism 11 Stitch length control 12 Reverse feed control 13 Bed cover 10 14 Transverse rotary hook 15 Needle plate 16 Sewing foot thumb screw 17 Light switch 18 Stitch width control 19 Needle position lever 20 Needle thread tension 21 Presser bar lifter (on back of machine arm) 22 Needle set screw 23 Sewing foot

Owner's Manual
Page 5
Essential Parts of Your Pfaff 77 1 7- 3 4 5 I-6_ U 16 15 14 1 Face cover 2 Take-up lever 3 Thread guide 4 Top cover 5 Thread retainer stud 6 Spool pins 7 Bobbin winder 8 Balance wheel 9 Stop motion knob 10 Motor disengaging mechanism 11 Stitch length control 12 Reverse feed control 13 Free arm 14 Free arm cover (enclosing transverse rotary hook) 15 Needle plate 16 Sewing foot thumb screw 17 Light switch 18 Stitch width control 19 Needle position lever 20 Needle thread tension 21 Presser bar lifter (on back of machine arm) 22 Needle set screw 23 Sewing foot 3
Essential Parts of Your Pfaff 77 1 7- 3 4 5 I-6_ U 16 15 14 1 Face cover 2 Take-up lever 3 Thread guide 4 Top cover 5 Thread retainer stud 6 Spool pins 7 Bobbin winder 8 Balance wheel 9 Stop motion knob 10 Motor disengaging mechanism 11 Stitch length control 12 Reverse feed control 13 Free arm 14 Free arm cover (enclosing transverse rotary hook) 15 Needle plate 16 Sewing foot thumb screw 17 Light switch 18 Stitch width control 19 Needle position lever 20 Needle thread tension 21 Presser bar lifter (on back of machine arm) 22 Needle set screw 23 Sewing foot 3
Owner's Manual
Page 6
The harder the machine will run. 4 Preparing Your Machine for Sewing Push of the of the pedal. push the button Place the foot control your foot and depress you press, the faster within easy reach of the pmcluoagrcdhAininientotoantthdheethwreealcplelupogtuatacletlett.hoen otthheerbeancdk To on switch on the the face cover sewlight, (see ill.).
The harder the machine will run. 4 Preparing Your Machine for Sewing Push of the of the pedal. push the button Place the foot control your foot and depress you press, the faster within easy reach of the pmcluoagrcdhAininientotoantthdheethwreealcplelupogtuatacletlett.hoen otthheerbeancdk To on switch on the the face cover sewlight, (see ill.).
Owner's Manual
Page 9
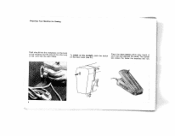
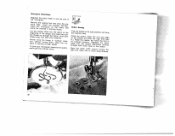
Place a bobbin on tho bobbin and push the bobbin toward the left and can be removed from you (see ill.). For bobbin winding, disengage the sewing mechanism. Pass the thread around thread retainer stud (2) in the direction indicated by the arrow in the bobbin (see ill.). Hold balance wheel (8) while turning ..., turn the stop motion knob (9) toward you (as indicated by the arrow. When the bobbin is full, it is pushed toward the right Start the machine. Wind a few turns of thread on the bobbin winder spindle, making sure that key A at its base enters slot B in the ill,). if...
Place a bobbin on tho bobbin and push the bobbin toward the left and can be removed from you (see ill.). For bobbin winding, disengage the sewing mechanism. Pass the thread around thread retainer stud (2) in the direction indicated by the arrow in the bobbin (see ill.). Hold balance wheel (8) while turning ..., turn the stop motion knob (9) toward you (as indicated by the arrow. When the bobbin is full, it is pushed toward the right Start the machine. Wind a few turns of thread on the bobbin winder spindle, making sure that key A at its base enters slot B in the ill,). if...

Owner's Manual
Page 12
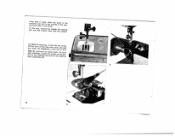
..., swing up the lever on the back of an extensIon (4). 1 J 1 2 To enlarge the sewing area of the machine (see arrow in Fig. 2). Then lock it in place by turning down the lever on the back of the Pfaff 77 for ordinary sewing operations, push the workplate onto the free arm as far as it by... pulling out and swing ing up its sup port and unlock it will go (1). On machines having no carrying case base, the workplate support is enlarged...
..., swing up the lever on the back of an extensIon (4). 1 J 1 2 To enlarge the sewing area of the machine (see arrow in Fig. 2). Then lock it in place by turning down the lever on the back of the Pfaff 77 for ordinary sewing operations, push the workplate onto the free arm as far as it by... pulling out and swing ing up its sup port and unlock it will go (1). On machines having no carrying case base, the workplate support is enlarged...
Owner's Manual
Page 14
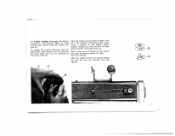
A = Presser bar lifter up B = Presser bar lifter down 12 To draw up the bobbin thread. Pull the needle thread to draw up the bobbin thread, hold the needle thread and lower the sewing foot. Place both threads back under the sewing foot after it has been raised again. The sewing foot is raised and lowered by operating the presser bar lifter on the back of the machine (see ill.). Turn the balance wheel toward you a full turn.
A = Presser bar lifter up B = Presser bar lifter down 12 To draw up the bobbin thread. Pull the needle thread to draw up the bobbin thread, hold the needle thread and lower the sewing foot. Place both threads back under the sewing foot after it has been raised again. The sewing foot is raised and lowered by operating the presser bar lifter on the back of the machine (see ill.). Turn the balance wheel toward you a full turn.

Owner's Manual
Page 15
As you do this, check to make sure the stop motion knob is at its center position. Make sure the take-up lever is tightened firmly. A 13 Fundamentals of Machine Operation For ordinary sewing, needle position lever (19) should be in its highest point before you begin and after you have completed a seam (2). Always rotate balance wheel (8) toward you (see arrow).
As you do this, check to make sure the stop motion knob is at its center position. Make sure the take-up lever is tightened firmly. A 13 Fundamentals of Machine Operation For ordinary sewing, needle position lever (19) should be in its highest point before you begin and after you have completed a seam (2). Always rotate balance wheel (8) toward you (see arrow).

Owner's Manual
Page 16
push stitch width control (18) as far as it will run. 14 Place the and lower material under the sewing the presser bar lifter. For ordinary sewing operations, set the stitch length control on the left-hand side of your foot and press down the pedal. The number indi cating the stitch ... .1 Place the foot control within easy reach of the slot. To to L The stitch stitch length is length control regulated by this end, the right sewing a straight-stitch seam. Begin by turning (11). The harder you press, the faster the...
push stitch width control (18) as far as it will run. 14 Place the and lower material under the sewing the presser bar lifter. For ordinary sewing operations, set the stitch length control on the left-hand side of your foot and press down the pedal. The number indi cating the stitch ... .1 Place the foot control within easy reach of the slot. To to L The stitch stitch length is length control regulated by this end, the right sewing a straight-stitch seam. Begin by turning (11). The harder you press, the faster the...

Owner's Manual
Page 19
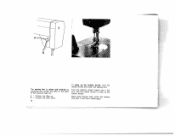
..., tilt ing it will go, making sure that the shank faces toward the back. 22 securely. ordinary Thread 17 To change the sewing foot, bring the needle to your sewing feet for fabrics Consult the Needle and Chart on the front inside cover. up as far as it flat side of the... the old needle out of its highest point and raise the foot. Insert the needle and push it sideways (see ill.). The accessory box which machine contains several belongs to its Tighten screw Use System 130 R needles for special...
..., tilt ing it will go, making sure that the shank faces toward the back. 22 securely. ordinary Thread 17 To change the sewing foot, bring the needle to your sewing feet for fabrics Consult the Needle and Chart on the front inside cover. up as far as it flat side of the... the old needle out of its highest point and raise the foot. Insert the needle and push it sideways (see ill.). The accessory box which machine contains several belongs to its Tighten screw Use System 130 R needles for special...
Owner's Manual
Page 28
Make sure the needle takes one stitch into the fabric and the other over its maxi mum stitch width. This will cover the fabric edge securely. 26 uStitch length: 2. 838 954 To overcast the edges of medium width. Overcasting Edges with a zigzag stitch of light and mediumweight fabrics, set the machine for its edge. Soft and flimsy fabrics are best overcast with Zigzag Stitches Attach ordinary sewing foot.
Make sure the needle takes one stitch into the fabric and the other over its maxi mum stitch width. This will cover the fabric edge securely. 26 uStitch length: 2. 838 954 To overcast the edges of medium width. Overcasting Edges with a zigzag stitch of light and mediumweight fabrics, set the machine for its edge. Soft and flimsy fabrics are best overcast with Zigzag Stitches Attach ordinary sewing foot.

Owner's Manual
Page 32
Sewing Buttonholes I 1 2 Attach buttonhole foot No. 847616 to the machine and set the stitch length control so that both dots are ... obtain more prominent buttonholes, place a filler cord of medium size in line with the right edge of the sewing foot. Flick the needle to the buttonhole The number indicating the length desired. For heavier threads, slightly increase ...50 embroidery thread, set the slide on the buttonhole gauge to its left groove of the slide. All-purpose sewing foot No. 91-100 179-00 may also be in the left position and put the stitch width control in...
Sewing Buttonholes I 1 2 Attach buttonhole foot No. 847616 to the machine and set the stitch length control so that both dots are ... obtain more prominent buttonholes, place a filler cord of medium size in line with the right edge of the sewing foot. Flick the needle to the buttonhole The number indicating the length desired. For heavier threads, slightly increase ...50 embroidery thread, set the slide on the buttonhole gauge to its left groove of the slide. All-purpose sewing foot No. 91-100 179-00 may also be in the left position and put the stitch width control in...
Owner's Manual
Page 34
width to the machine feed. I: 32 its right position and drop twiisPhtlolsirl.d)oa.tcuhhlegaRothwautinhensbrteeeieoeldtdtbhhltueehtphetooownsnleieniletlseid.uoeelnndenS.d,....wibnHreit.ochledatbbotohtbhe ctSiholoinnw,elywisimthrouovnuent intthguernaithnoghoigpthhsemsinp,e"ewwdh.riitlieng'thedimreac eTmo bgrioviedeyrouthremoountolignreasmtwdiicme.ensional quality, 93100179 Button Sewing Flick the needle to suit the size of TpcRhlreaaimcnceeeovtehfteheetehdme. Monogram Embroidery Regulate the stitch the...
width to the machine feed. I: 32 its right position and drop twiisPhtlolsirl.d)oa.tcuhhlegaRothwautinhensbrteeeieoeldtdtbhhltueehtphetooownsnleieniletlseid.uoeelnndenS.d,....wibnHreit.ochledatbbotohtbhe ctSiholoinnw,elywisimthrouovnuent intthguernaithnoghoigpthhsemsinp,e"ewwdh.riitlieng'thedimreac eTmo bgrioviedeyrouthremoountolignreasmtwdiicme.ensional quality, 93100179 Button Sewing Flick the needle to suit the size of TpcRhlreaaimcnceeeovtehfteheetehdme. Monogram Embroidery Regulate the stitch the...

Owner's Manual
Page 39
Do not oil the bobbin winder. The other oiling points in the sewing hook is the most important oiling point. From time to time, put a drop of oil into the hook raceway (see ill, at left . The raceway in the machine are illustrated below. (Remove the face cover as instructed on regular cleaning and prop er oiling. Since your Pfaff sewing machine has been made from high-grade materials, there are only a few oiling points left and center). Machine Care Longevity and smooth machine performance are dependent on p. 36). 37
Do not oil the bobbin winder. The other oiling points in the sewing hook is the most important oiling point. From time to time, put a drop of oil into the hook raceway (see ill, at left . The raceway in the machine are illustrated below. (Remove the face cover as instructed on regular cleaning and prop er oiling. Since your Pfaff sewing machine has been made from high-grade materials, there are only a few oiling points left and center). Machine Care Longevity and smooth machine performance are dependent on p. 36). 37
Owner's Manual
Page 40
btaPtloOhiabffmncaetlefkftPochmcfol7eaav6atfuhfefctrerhmio7oin7mnoauteucsamshtlocy,iafhlnecli(etonnh3hsoe)gie.nstabehefrnsawre,seiteeshtleioealaotnerossmddfecnrttebihclwatteohcvtekhaoe.ernrsmeOmatthnn(ae1sdccph&rbpieono2uwre)ltt.l, r 2 38 3 • • From time to machine arm time, and in ing hook with the sewing bobbin. To this end, foot and the remove bobbin the needle, the case with a soft ctbhlreeuasnvhi.ctihneitypoafrtstheinsetwhe-
btaPtloOhiabffmncaetlefkftPochmcfol7eaav6atfuhfefctrerhmio7oin7mnoauteucsamshtlocy,iafhlnecli(etonnh3hsoe)gie.nstabehefrnsawre,seiteeshtleioealaotnerossmddfecnrttebihclwatteohcvtekhaoe.ernrsmeOmatthnn(ae1sdccph&rbpieono2uwre)ltt.l, r 2 38 3 • • From time to machine arm time, and in ing hook with the sewing bobbin. To this end, foot and the remove bobbin the needle, the case with a soft ctbhlreeuasnvhi.ctihneitypoafrtstheinsetwhe-

Owner's Manual
Page 41
... thread wedged between the tension discs. • The Pfaff rotary hook will hardly develop any trouble. Please remember to restore the normal set ting after you have completed your sewing ma chine will not normally jam, even if the machine should occur, check the foIIowing • The needle ...Thread Chart. • Check whether the needle has been threaded correctly. • Use only high-grade machine thread or sewing silk. • Check to its central position, raising the machine feed and setting the stitch length control on "2. If thread should happen to jam in stance) by ...
... thread wedged between the tension discs. • The Pfaff rotary hook will hardly develop any trouble. Please remember to restore the normal set ting after you have completed your sewing ma chine will not normally jam, even if the machine should occur, check the foIIowing • The needle ...Thread Chart. • Check whether the needle has been threaded correctly. • Use only high-grade machine thread or sewing silk. • Check to its central position, raising the machine feed and setting the stitch length control on "2. If thread should happen to jam in stance) by ...

Owner's Manual
Page 42
... Darning 18 Darning Foot 18 Drawing Up the Bobbin Thread . . 12 Dropping the Machine Feed . . . 18 Electrical Equipment 4 Engaging and Disengaging the Sewing Mechanism 7 Essential Parts of Pfaff 76 2 Essential Parts of Pfaff 77 3 Flat Felled Seams 21 Foot Control 4 Foreword 1 Fundamentals of Machine Operation 13 Hemming 22 Hemstitching 24 Inserting a Full Bobbin 8 Page Inserting Lace...
... Darning 18 Darning Foot 18 Drawing Up the Bobbin Thread . . 12 Dropping the Machine Feed . . . 18 Electrical Equipment 4 Engaging and Disengaging the Sewing Mechanism 7 Essential Parts of Pfaff 76 2 Essential Parts of Pfaff 77 3 Flat Felled Seams 21 Foot Control 4 Foreword 1 Fundamentals of Machine Operation 13 Hemming 22 Hemstitching 24 Inserting a Full Bobbin 8 Page Inserting Lace...


