
Owner's Manual
Page 3
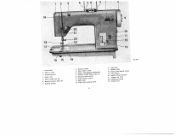
1 Face cover 2 Take-UP lever 3 Thread retainer 4 Spool pins 5 Stitch width dial (A) 6 Needle position lever (B) 7 Bobbin winder 8 Balance wheel 9 Stop motion knob 10 ii Motor disengaging mechanism Bobbin winder thread retainer 12 Reverse feed control 13 Stitch length control 14 Bed slide 15 Pt aft rotary sewing hook 2 DR 849 16 Feed dog 17 Needle plate 18 Sewing foot thumb screw 19 Light switch 20 Needle thread tension 21 Presser bar lifter 22 Needle set screw 23 Sewing foot
1 Face cover 2 Take-UP lever 3 Thread retainer 4 Spool pins 5 Stitch width dial (A) 6 Needle position lever (B) 7 Bobbin winder 8 Balance wheel 9 Stop motion knob 10 ii Motor disengaging mechanism Bobbin winder thread retainer 12 Reverse feed control 13 Stitch length control 14 Bed slide 15 Pt aft rotary sewing hook 2 DR 849 16 Feed dog 17 Needle plate 18 Sewing foot thumb screw 19 Light switch 20 Needle thread tension 21 Presser bar lifter 22 Needle set screw 23 Sewing foot
Owner's Manual
Page 10
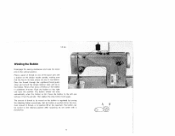
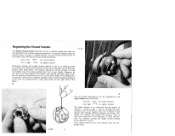
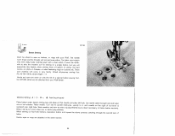
... of thread, or at its set screw with a screwdriver. 9 1 AB Then tighten the stop automatically when the bobbin is regulated by turning the adjusting button accordingly. Set the button at position A for the mim mum amount of the spooi pins and a bobbin on the bobbin is full. DR 859 Winding the Bobbin Disengage the sewing mechanism and raise the spool pins to the right and start the machine. Push the bobbin...
... of thread, or at its set screw with a screwdriver. 9 1 AB Then tighten the stop automatically when the bobbin is regulated by turning the adjusting button accordingly. Set the button at position A for the mim mum amount of the spooi pins and a bobbin on the bobbin is full. DR 859 Winding the Bobbin Disengage the sewing mechanism and raise the spool pins to the right and start the machine. Push the bobbin...
Owner's Manual
Page 11
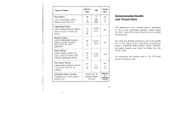
... E to 40 twist 110 Determined by weight of fabric 40 to 50 Determined threal size 60 to 80 Recommended Needle and Thread Sizes The appearance of Fabri. Select the proper thread sizes and needles from this chart. For embroidery and darning work, a No. 50 thread should be used in the needle and on the correct relationship between needle, thread and fabric. Some experienced seamstresses prefer a somewhat thinner bobbin thread.
... E to 40 twist 110 Determined by weight of fabric 40 to 50 Determined threal size 60 to 80 Recommended Needle and Thread Sizes The appearance of Fabri. Select the proper thread sizes and needles from this chart. For embroidery and darning work, a No. 50 thread should be used in the needle and on the correct relationship between needle, thread and fabric. Some experienced seamstresses prefer a somewhat thinner bobbin thread.

Owner's Manual
Page 12
... needle set screw a. 13 Insert new needle into opening of needle clamp. Make sure that the flat side of the shank faces toward the back and long groove toward you the needle size required for all ordinary sewing and embroidery work. Important Facts about Needles On Pfaff 72 sewing machines, System 130 R, flat-shank needles are available from every Pfaff dealer. Changing the Needle Bring needle bar to its highest point and lower sewing foot. The last column in hand Genuine Pfaff needles...
... needle set screw a. 13 Insert new needle into opening of needle clamp. Make sure that the flat side of the shank faces toward the back and long groove toward you the needle size required for all ordinary sewing and embroidery work. Important Facts about Needles On Pfaff 72 sewing machines, System 130 R, flat-shank needles are available from every Pfaff dealer. Changing the Needle Bring needle bar to its highest point and lower sewing foot. The last column in hand Genuine Pfaff needles...
Owner's Manual
Page 15
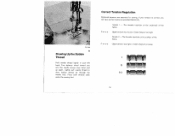
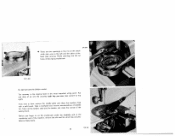
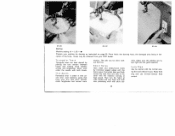
... perfect seams as sketched below (Ill). Lightly pull needle thread to draw bobbin thread up again. C a u s e : Upper tension too loose or lower tension too tight. Sketch II -The threads interlock on the underside of the fabric. Correct Tension Regu'ation Balanced tensions are essential far sewing. Cause Upper tension too tight or lower tension too loose. Sketch I II III 16 I - Place both threads back under the sewing foot. DR 046 A Drawing Up the Bobbin Thread Hold needle thread lightly...
... perfect seams as sketched below (Ill). Lightly pull needle thread to draw bobbin thread up again. C a u s e : Upper tension too loose or lower tension too tight. Sketch II -The threads interlock on the underside of the fabric. Correct Tension Regu'ation Balanced tensions are essential far sewing. Cause Upper tension too tight or lower tension too loose. Sketch I II III 16 I - Place both threads back under the sewing foot. DR 046 A Drawing Up the Bobbin Thread Hold needle thread lightly...
Owner's Manual
Page 16
... the tension dial. Choose the lower tension slightly stronger when doing ornamental stitching to keep the bobbin case from falling out. The numbers on the right side of the fabric. I R8029 17 The upper tension is set for a medium grade by its own weight. loose to reset the ten sion. The higher the number, the greater the tension. Determine whether the bobbin thread tension is so designed that all ordinary sewing operations...
... the tension dial. Choose the lower tension slightly stronger when doing ornamental stitching to keep the bobbin case from falling out. The numbers on the right side of the fabric. I R8029 17 The upper tension is set for a medium grade by its own weight. loose to reset the ten sion. The higher the number, the greater the tension. Determine whether the bobbin thread tension is so designed that all ordinary sewing operations...
Owner's Manual
Page 19
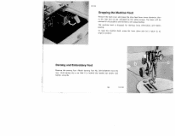
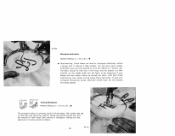
... retained in this position and the fabric will cease feeding. Hold spring clip c so that it return to the rear and up (as indicated by the white arrow). DR 855 Dropping the Machine Feed Remove the bed cover and press the drop feed lever down and let it is dropped for darning, hoop embroidery and button sewing. The machine feed is behind the needle set screw, and tighten screw b. 20 DR854 Attach darning foot No. 93-102...
... retained in this position and the fabric will cease feeding. Hold spring clip c so that it return to the rear and up (as indicated by the white arrow). DR 855 Dropping the Machine Feed Remove the bed cover and press the drop feed lever down and let it is dropped for darning, hoop embroidery and button sewing. The machine feed is behind the needle set screw, and tighten screw b. 20 DR854 Attach darning foot No. 93-102...
Owner's Manual
Page 22
... lubricate the bobbin winder. Before you sew (see picture at the back (see arrows). wFlirniotth.mTaatikmseoefot tuobtrtuthismeh.eb, Tobraebkmienoavceatosteohtehapnnidcekethdaelendbopblraebtmienoavanenddaccclcleeuaamnnuttlhhaeteiovmniscaicnohiftiynpeoafcfketehedde sewing hook. DR 887 23 4 There are the oil holes of the zigzag mechanism. These openings are two openings in the rim of the stitch width dial, one raceway in drop of to the oil the mechanism under the bedplate and at the machine, remove the dirt...
... lubricate the bobbin winder. Before you sew (see picture at the back (see arrows). wFlirniotth.mTaatikmseoefot tuobtrtuthismeh.eb, Tobraebkmienoavceatosteohtehapnnidcekethdaelendbopblraebtmienoavanenddaccclcleeuaamnnuttlhhaeteiovmniscaicnohiftiynpeoafcfketehedde sewing hook. DR 887 23 4 There are the oil holes of the zigzag mechanism. These openings are two openings in the rim of the stitch width dial, one raceway in drop of to the oil the mechanism under the bedplate and at the machine, remove the dirt...
Owner's Manual
Page 24
... 12. (For ordinary sewing, use System 130 R needles.) Insert new needle. above mentioned may cause thread breakage. Use correct needle and thread (see chart an page 12.) Remedy: See remedies listed under 1. Wrong needle. Choose the correct needle from you. Needle bent, Machine threaded improperly. Burrs or sharp edges on pages 14 and 15. Thread tension too tight. Remedy: Push needle up as far as instructed on needle plate slot. Adjust tensions as instructed. Trouble Shooting 1.
... 12. (For ordinary sewing, use System 130 R needles.) Insert new needle. above mentioned may cause thread breakage. Use correct needle and thread (see chart an page 12.) Remedy: See remedies listed under 1. Wrong needle. Choose the correct needle from you. Needle bent, Machine threaded improperly. Burrs or sharp edges on pages 14 and 15. Thread tension too tight. Remedy: Push needle up as far as instructed on needle plate slot. Adjust tensions as instructed. Trouble Shooting 1.
Owner's Manual
Page 25
... presser bar lifter and remove thread. Machine Feeds Improperly Cause: Feed dog dropped. the correct size for the needle and fabric. Accumulations of thread between feed teeth. Guide the material lightly. Don't force the feeding motion. Regulate stitch length, as instructed. Take off needle plate and remove lint with a stiff brush. 26 Use correct needle and thread sizes. Thread too heavy, knotty or hard. Machine does not feed because stitch length control set on "0". 3. Remedy: Adjust tensions as desired. Needle Breaks Cause Bent needle strikes point of sewing hook...
... presser bar lifter and remove thread. Machine Feeds Improperly Cause: Feed dog dropped. the correct size for the needle and fabric. Accumulations of thread between feed teeth. Guide the material lightly. Don't force the feeding motion. Regulate stitch length, as instructed. Take off needle plate and remove lint with a stiff brush. 26 Use correct needle and thread sizes. Thread too heavy, knotty or hard. Machine does not feed because stitch length control set on "0". 3. Remedy: Adjust tensions as desired. Needle Breaks Cause Bent needle strikes point of sewing hook...
Owner's Manual
Page 27
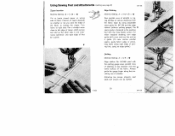
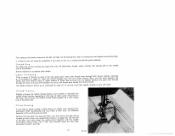
... sew ing foot, using adjustable seam guide No. 847 300 and the edge stitcher (without quilting gauge). Always guide the gauge finger along right edge of stitches. Using Sewing Feet and Attachments (setting see page 6) DR 868 I Zipper Insertion 8 Edge Stitching Machine Setting: A = 0, B Machine Setting: A 0 to 4, B = Pin or baste closed zipper on whether or not you want the edge of the fabric. Run a straight seam close to left edge of fabric. Attractive tea cosies, slippers, seat pads and covers...
... sew ing foot, using adjustable seam guide No. 847 300 and the edge stitcher (without quilting gauge). Always guide the gauge finger along right edge of stitches. Using Sewing Feet and Attachments (setting see page 6) DR 868 I Zipper Insertion 8 Edge Stitching Machine Setting: A = 0, B Machine Setting: A 0 to 4, B = Pin or baste closed zipper on whether or not you want the edge of the fabric. Run a straight seam close to left edge of fabric. Attractive tea cosies, slippers, seat pads and covers...
Owner's Manual
Page 29
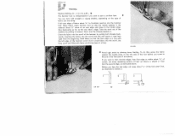
... to sew a uniform hem. 847 551 Hemming Machine Setting: A 0 or 2 to facilitate insertion into the scroll like this , press the fabric against the needle plate on the type of fabric you hem the last edge, cut away remaining portion of the foot before you want to the folded edge. You can hem with fabric at all times (see ill. Before you are using. Sew backwards as far as instructed...
... to sew a uniform hem. 847 551 Hemming Machine Setting: A 0 or 2 to facilitate insertion into the scroll like this , press the fabric against the needle plate on the type of fabric you hem the last edge, cut away remaining portion of the foot before you want to the folded edge. You can hem with fabric at all times (see ill. Before you are using. Sew backwards as far as instructed...
Owner's Manual
Page 33
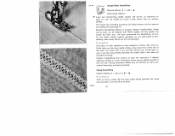
... . Zigzag Hemstitching Machine Setting: A = Up to the first one. The thread size, threading procedure and thread tension are not recommended. :: Procedure Fold fabric to mark seamline or trace seamline on page 13. At the end of its throw. Imitation hemstitching thus requires at least two operations. DR 001 838 954 Straight-Stitch Hemstitching Machine Seing: A = 0; B = + Stitch length: Medium 4 Insert twin hemstitching needle, System 130 ZwiHo, as for ordinary needles. Sew...
... . Zigzag Hemstitching Machine Setting: A = Up to the first one. The thread size, threading procedure and thread tension are not recommended. :: Procedure Fold fabric to mark seamline or trace seamline on page 13. At the end of its throw. Imitation hemstitching thus requires at least two operations. DR 001 838 954 Straight-Stitch Hemstitching Machine Seing: A = 0; B = + Stitch length: Medium 4 Insert twin hemstitching needle, System 130 ZwiHo, as for ordinary needles. Sew...
Owner's Manual
Page 34
... to 3, until centered over right hole. It won 't break and the threads will enter left hole. Stitch length = 0. Raise needle. Start machine and sew as many zig zag stitches as you deem Return dial A to take the machine out for sewing on a single button, but you will come in the same manner. 35 Place button under button sewing foot and align so that needle will not get loose either. needle stitch through the second pair of...
... to 3, until centered over right hole. It won 't break and the threads will enter left hole. Stitch length = 0. Raise needle. Start machine and sew as many zig zag stitches as you deem Return dial A to take the machine out for sewing on a single button, but you will come in the same manner. 35 Place button under button sewing foot and align so that needle will not get loose either. needle stitch through the second pair of...

Owner's Manual
Page 36
... bar. Instruction for Buttonholing 1 Sew first side over a filler cord. Pull filler cord around clockwise, using needle as instructed above (under 3). 6 Turn dial A to the left and lay it parallel to injure the bartacks. 37 Sew second row and stop about 4 to 6 stitches (h/io") from end of first row. 5 Turn dial A to reduce length of stitching. Make 4 to 6 bartack stitches, slightly holding the material to second notch position. Make...
... bar. Instruction for Buttonholing 1 Sew first side over a filler cord. Pull filler cord around clockwise, using needle as instructed above (under 3). 6 Turn dial A to the left and lay it parallel to injure the bartacks. 37 Sew second row and stop about 4 to 6 stitches (h/io") from end of first row. 5 Turn dial A to reduce length of stitching. Make 4 to 6 bartack stitches, slightly holding the material to second notch position. Make...
Owner's Manual
Page 37
... stitch back and forth across the hole from your machine for darning as instructed on page 20. Hoops may be done with short stit ches. Thin Spots Remember that have worn thin with the machine running at right angles and sew back and forth over preceding work under the needle with both hands. Move work with out foot too. Raise feed dog and use forward-reverse feed control...
... stitch back and forth across the hole from your machine for darning as instructed on page 20. Hoops may be done with short stit ches. Thin Spots Remember that have worn thin with the machine running at right angles and sew back and forth over preceding work under the needle with both hands. Move work with out foot too. Raise feed dog and use forward-reverse feed control...
Owner's Manual
Page 38
... is primarily used for satin stitch. The fabric should be held taut in the hoops and the presser bar lifter lowered. Hold both thread ends and sew over outline, moving hoops slowly and evenly. Be sure stitches are best for monogram embroidery without a sewing foot. Set needle plate so that seams do not overlap at joints of letters. OR 038 Monogram Embroidery Machine Setting; It requires a little practice. Sew outlines of your monogram dimensional quality, embroider outline...
... is primarily used for satin stitch. The fabric should be held taut in the hoops and the presser bar lifter lowered. Hold both thread ends and sew over outline, moving hoops slowly and evenly. Be sure stitches are best for monogram embroidery without a sewing foot. Set needle plate so that seams do not overlap at joints of letters. OR 038 Monogram Embroidery Machine Setting; It requires a little practice. Sew outlines of your monogram dimensional quality, embroider outline...
Owner's Manual
Page 40
... zigzag line on the bobbin. Set the machine for a medium stitch length. Thread Tension Slightly increase the bobbin thread tension, and increase or decrease the needle thread tension depending on the type of the oval needle hole f (see ill, on page 16. Thread Size Pin tucks and narrow cording are made with a No. 50 embroidery thread, wider cording with the needle and bobbin thread ends). If the tension has been set correctly, the bobbin thread should appear as instructed on page 40). Remove...
... zigzag line on the bobbin. Set the machine for a medium stitch length. Thread Tension Slightly increase the bobbin thread tension, and increase or decrease the needle thread tension depending on the type of the oval needle hole f (see ill, on page 16. Thread Size Pin tucks and narrow cording are made with a No. 50 embroidery thread, wider cording with the needle and bobbin thread ends). If the tension has been set correctly, the bobbin thread should appear as instructed on page 40). Remove...

Owner's Manual
Page 44
... curtains, proceed as Diolen, use a matching synthetic thread. H 838954 Stitching Synthetic Materials Curtains Machine Setting: Stitch width lever A = 1 to 2; To prevent plastic sheets from sticking to avoid shrinking of tissue paper used in order to the sewing foot, wipe its sole with synthetic thread or cotton and a fine needle. needle position lever B = '0 stitch length: medium. needle position lever B = stitch length control 1. To butt seam the various sections of synthetic curtain fabrics, such as instructed on material;
... curtains, proceed as Diolen, use a matching synthetic thread. H 838954 Stitching Synthetic Materials Curtains Machine Setting: Stitch width lever A = 1 to 2; To prevent plastic sheets from sticking to avoid shrinking of tissue paper used in order to the sewing foot, wipe its sole with synthetic thread or cotton and a fine needle. needle position lever B = '0 stitch length: medium. needle position lever B = stitch length control 1. To butt seam the various sections of synthetic curtain fabrics, such as instructed on material;
Owner's Manual
Page 45
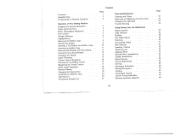
... Felled Seams Hemming . Inserting the Bobbin Case Recommended Needle and Thread Sizes Important Facts about Needles Changing the Needle Upper Threading Correct Tension Regulation Drawing Up the Bobbin Thread Regulating the Thread Tension Stitch Length Regulation Reverse Sewing Changing the Sewing Foot Dropping the Machine Feed Darning foot All-purpose Sewing Foot Contents Page 1 2 3 4 4 5 5 6 7 8 9 10 11 12 13 17 18 18 19 20 20 21 Care and Maintenance Cleaning and Oiling Removing and Replacing the Face Cover Changing the Ligth Bulb Trouble Shooting Using Sewing Feet and Attachments Zipper...
... Felled Seams Hemming . Inserting the Bobbin Case Recommended Needle and Thread Sizes Important Facts about Needles Changing the Needle Upper Threading Correct Tension Regulation Drawing Up the Bobbin Thread Regulating the Thread Tension Stitch Length Regulation Reverse Sewing Changing the Sewing Foot Dropping the Machine Feed Darning foot All-purpose Sewing Foot Contents Page 1 2 3 4 4 5 5 6 7 8 9 10 11 12 13 17 18 18 19 20 20 21 Care and Maintenance Cleaning and Oiling Removing and Replacing the Face Cover Changing the Ligth Bulb Trouble Shooting Using Sewing Feet and Attachments Zipper...


