
Owner's Manual
Page 2
...a in whichever way he can. This little booklet has been prepared to give you many years of your dealer will surely enjoy sewing on its smooth function and is essential for you and packed it . Pages 4 and be glad to you good make you ...Kayser engineers have any questions regarding this ma a marvellous machine and you will be unknown Always take 5 will to help you have latest progressive features. ending variety. Backed by many useful sewing hints beyond the mere operating instructions. - - FOREI1ORD ...
...a in whichever way he can. This little booklet has been prepared to give you many years of your dealer will surely enjoy sewing on its smooth function and is essential for you and packed it . Pages 4 and be glad to you good make you ...Kayser engineers have any questions regarding this ma a marvellous machine and you will be unknown Always take 5 will to help you have latest progressive features. ending variety. Backed by many useful sewing hints beyond the mere operating instructions. - - FOREI1ORD ...
Owner's Manual
Page 3
... of Contents This is Your Accessories Sewing Machine . 1. ards 3. Presser Tips for Piping Zigzag Stitching and Fashion Stitches *) 6. Tips for bar regulator (patch-o-matic) Straight Stitching *) 4. 5. Upper threading, picking up bobbin Sewing - Preparing to separate indexes on pages 27 and 39. 68-73 Table of Faults *) Refer to Sew WNERMExeneiomcnegthddoaoaigrlvneniigngndgigarnitnvhgadaeenntddthabhenordrdbeeisbaspefedilwnoanlcigdniaingnggginfobgtooatbbthlbeeinseawndingbombebcinhanciassme 2. Maintenance 7. Setting Fundamentals the...
... of Contents This is Your Accessories Sewing Machine . 1. ards 3. Presser Tips for Piping Zigzag Stitching and Fashion Stitches *) 6. Tips for bar regulator (patch-o-matic) Straight Stitching *) 4. 5. Upper threading, picking up bobbin Sewing - Preparing to separate indexes on pages 27 and 39. 68-73 Table of Faults *) Refer to Sew WNERMExeneiomcnegthddoaoaigrlvneniigngndgigarnitnvhgadaeenntddthabhenordrdbeeisbaspefedilwnoanlcigdniaingnggginfobgtooatbbthlbeeinseawndingbombebcinhanciassme 2. Maintenance 7. Setting Fundamentals the...
Owner's Manual
Page 5
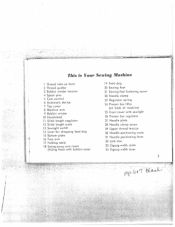
This is Your Sewing Machine 1 Thread take-up lever 2 Thread guides 3 Bobbin winder tension 4 Spool pins 5 Cam control 6 Automatic device 7 Top cover 8 Machine arm 9 Bobbin winder 10 Handwheel 11 Stitch length regulator 12 Stitch length scale 13 Sewlight switch 14 Lever for dropping feed dog 15 Bottom ... table 18 Swing-away arm cover (hiding hook with bobbin case) 19 Feed dog 20 Sewing foot 21 Sewing foot fastening screw 22 Needle clamp 23 Regulator spring 24 Presser bar lifter (on back of machine) 25 Front cover with sewlight 26 Presser bar regulator 27 Needle plate 28 Needle clamp screw...
This is Your Sewing Machine 1 Thread take-up lever 2 Thread guides 3 Bobbin winder tension 4 Spool pins 5 Cam control 6 Automatic device 7 Top cover 8 Machine arm 9 Bobbin winder 10 Handwheel 11 Stitch length regulator 12 Stitch length scale 13 Sewlight switch 14 Lever for dropping feed dog 15 Bottom ... table 18 Swing-away arm cover (hiding hook with bobbin case) 19 Feed dog 20 Sewing foot 21 Sewing foot fastening screw 22 Needle clamp 23 Regulator spring 24 Presser bar lifter (on back of machine) 25 Front cover with sewlight 26 Presser bar regulator 27 Needle plate 28 Needle clamp screw...
Owner's Manual
Page 6
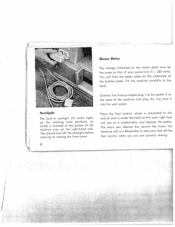
... run. You will rest on it comfortably and depress the pedal. Tne more you are not actually sewing. Tilt the machine carefully to the socket 2 on the back of the machine and plug the line cord 3 into the wall socket. Iotor Drire The voltage indicated on the motor plate must be the same...
... run. You will rest on it comfortably and depress the pedal. Tne more you are not actually sewing. Tilt the machine carefully to the socket 2 on the back of the machine and plug the line cord 3 into the wall socket. Iotor Drire The voltage indicated on the motor plate must be the same...
Owner's Manual
Page 8
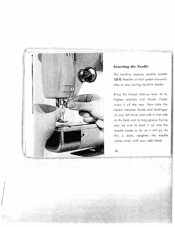
Need/es of your sewing machine dealer. Bring the thread takeup /ever to its /ong groove facing you, be sure to the back and its highest position and /oosen c/amp screw 5 all the Way. Now take the needle between thumb and forefinger of that system are avail able at your /eft hand, and with its flat side to push it will go. p /1I' I I I I Inserti. As this is done, retighten the needle clamp screw With Your right hand. 10 $ the Needle The machine r5 equir need /e c/amp as far as it up into the need /es system 130 R.
Need/es of your sewing machine dealer. Bring the thread takeup /ever to its /ong groove facing you, be sure to the back and its highest position and /oosen c/amp screw 5 all the Way. Now take the needle between thumb and forefinger of that system are avail able at your /eft hand, and with its flat side to push it will go. p /1I' I I I I Inserti. As this is done, retighten the needle clamp screw With Your right hand. 10 $ the Needle The machine r5 equir need /e c/amp as far as it up into the need /es system 130 R.
Owner's Manual
Page 9
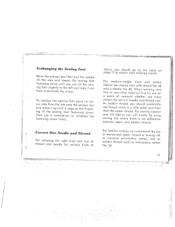
...and Thread For selecting the right kind and size of thread and needle for various kinds of mercerized upper thread or sewing silk or machine embroidery cotton, and as bobbin thread machine embroidery cotton No. 50. When working very fine or very thick material first try out on ing results. Exchanging ...the Sewing Foot Raise the presser bar lifter and the needle all the way and loosen the sewing foot fastening screw until you can tilt the sew ing foot ...
...and Thread For selecting the right kind and size of thread and needle for various kinds of mercerized upper thread or sewing silk or machine embroidery cotton, and as bobbin thread machine embroidery cotton No. 50. When working very fine or very thick material first try out on ing results. Exchanging ...the Sewing Foot Raise the presser bar lifter and the needle all the way and loosen the sewing foot fastening screw until you can tilt the sew ing foot ...
Owner's Manual
Page 12
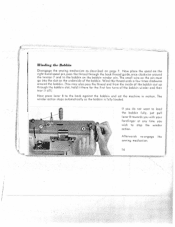
..., just pull lever 8 towards you with your forefinger at any time you wish to the back against the bobbin and set the machine in motion. Afterwards re engage the sewing mechanism. 14 Now place the spool on the right-hand spool pin, pass the thread through the bobbin slot, hold it there... on the underside of the bobbin winder and then tear it off.) Now press lever 8 to stop the winder action. Winding the llobbin Disengage the sewing mechanism as the bobbin is fully loaded.
..., just pull lever 8 towards you with your forefinger at any time you wish to the back against the bobbin and set the machine in motion. Afterwards re engage the sewing mechanism. 14 Now place the spool on the right-hand spool pin, pass the thread through the bobbin slot, hold it there... on the underside of the bobbin winder and then tear it off.) Now press lever 8 to stop the winder action. Winding the llobbin Disengage the sewing mechanism as the bobbin is fully loaded.
Owner's Manual
Page 18
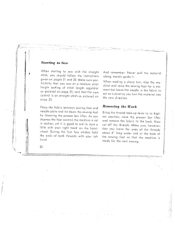
...the foot control, the machine is set in the fabric to the back. L 20 t Place the fabric between sewing foot and Re,novin the Work needle plate and let down the sewing foot by lowering the presser...the fabric to act as a pivot as pictured on the handwheel. Make sure par ticularly that you sew at the back of stitch length regulator as you leave the ends of the threads about 3" long under...and at a medium stitch length (setting of the sewing foot so that the cam control is good to sew with your right hand on page 21) and that the machine is ready for a mo ment but leave the ...
...the foot control, the machine is set in the fabric to the back. L 20 t Place the fabric between sewing foot and Re,novin the Work needle plate and let down the sewing foot by lowering the presser...the fabric to act as a pivot as pictured on the handwheel. Make sure par ticularly that you sew at the back of stitch length regulator as you leave the ends of the threads about 3" long under...and at a medium stitch length (setting of the sewing foot so that the cam control is good to sew with your right hand on page 21) and that the machine is ready for a mo ment but leave the ...
Owner's Manual
Page 20
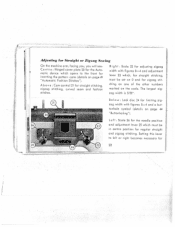
... the needle position and adjustment lever 25 which , for straight stitching, must be set on 0 and for zigzag stit I Adjusting for Straight or Zigzag Sewing On the machine arm, facing you, you will see: Centre: Hinged cover plate 20 for the Auto matic device which opens to leit or right becomes necessary...
... the needle position and adjustment lever 25 which , for straight stitching, must be set on 0 and for zigzag stit I Adjusting for Straight or Zigzag Sewing On the machine arm, facing you, you will see: Centre: Hinged cover plate 20 for the Auto matic device which opens to leit or right becomes necessary...
Owner's Manual
Page 25
...supply free dealing with ovale the machine may also be straight stitch work , and the necessary em broidery carrying tions hoop against extra charge, for all All sewing feet and the following opera ... - hole fitted to used for out any of charge a darning and embroidery work . Setting the Machine ao(LpZosfstnraeoirgngraZzrgeiedigactsghqegehz"utnt2a)ailt.2girersleevst,diSaetcnreshewdfcoeoonirn(n2fpgt30oart",rhog)ne"l,efAeusetk2drdid1ttijichnlusehdesc"rtSiplneoeoppgtfnstarigienrtftfitfgahooiebcrnrutrraihienlSbceaggtlrurysSasllteaeiigswvttocoehenhnerrt 27 Ii II 3. broidery broidery - ...
...supply free dealing with ovale the machine may also be straight stitch work , and the necessary em broidery carrying tions hoop against extra charge, for all All sewing feet and the following opera ... - hole fitted to used for out any of charge a darning and embroidery work . Setting the Machine ao(LpZosfstnraeoirgngraZzrgeiedigactsghqegehz"utnt2a)ailt.2girersleevst,diSaetcnreshewdfcoeoonirn(n2fpgt30oart",rhog)ne"l,efAeusetk2drdid1ttijichnlusehdesc"rtSiplneoeoppgtfnstarigienrtftfitfgahooiebcrnrutrraihienlSbceaggtlrurysSasllteaeiigswvttocoehenhnerrt 27 Ii II 3. broidery broidery - ...
Owner's Manual
Page 33
...you are not stretched in a darning hoop.) Lower presser bar lifter, pick up bobbin thread and sew around the damaged area once with a - - - - - - if so, ask your dealer... and for darning linen as the cover has only a round needle hole in centre position as described under the sew ing foot. (Wool socks are used for a Jura hopper foot II (847615) which you may use of... you prefer darning linen and fine stock ings with a special sewing foot; The presser bar regulator (see page 26). Drop feed dog. Upper and bobbin thread: Machine em broidery and darning cotton No. 50, suit ing the...
...you are not stretched in a darning hoop.) Lower presser bar lifter, pick up bobbin thread and sew around the damaged area once with a - - - - - - if so, ask your dealer... and for darning linen as the cover has only a round needle hole in centre position as described under the sew ing foot. (Wool socks are used for a Jura hopper foot II (847615) which you may use of... you prefer darning linen and fine stock ings with a special sewing foot; The presser bar regulator (see page 26). Drop feed dog. Upper and bobbin thread: Machine em broidery and darning cotton No. 50, suit ing the...

Owner's Manual
Page 34
... darning wool, cut the latter off at the foot, set the zigzag lever between 1 and 2 and sew across the darning wool, cover ing it with zigzag stitches which should be closely laid together. 36 Set the... zigzag lever on the front end of the hole, start darning at a moderate machine speed and lay the darning wool in close parallel lines over the hole, alternately from back to front... through the guide slot on the left , sewing it down to left back edge of the darning foot and place it right into the oval mouth ...
... darning wool, cut the latter off at the foot, set the zigzag lever between 1 and 2 and sew across the darning wool, cover ing it with zigzag stitches which should be closely laid together. 36 Set the... zigzag lever on the front end of the hole, start darning at a moderate machine speed and lay the darning wool in close parallel lines over the hole, alternately from back to front... through the guide slot on the left , sewing it down to left back edge of the darning foot and place it right into the oval mouth ...
Owner's Manual
Page 38
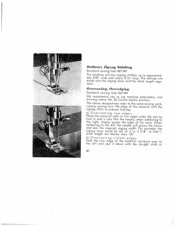
Centre needle position. The above designations namely sewing over straight stitch to at 40 For example, the zigzag lever could be set on 3 or 4 (1/8" to use machine embroidery and darning cotton No. 50. a) Overcasting raw edges Place the material with the narrowly... . The approxima settings are made with the fraying. Ordinary Zigzag Stiteliing Standard sewing foot 847495 The tely machine will pierce the fabric and sew the required zigzag width. Overcasting, Overedging Standard sewing foot 847495 We recommend you to 5/64"), stitch length not shorter than 1/8 "....
Centre needle position. The above designations namely sewing over straight stitch to at 40 For example, the zigzag lever could be set on 3 or 4 (1/8" to use machine embroidery and darning cotton No. 50. a) Overcasting raw edges Place the material with the narrowly... . The approxima settings are made with the fraying. Ordinary Zigzag Stiteliing Standard sewing foot 847495 The tely machine will pierce the fabric and sew the required zigzag width. Overcasting, Overedging Standard sewing foot 847495 We recommend you to 5/64"), stitch length not shorter than 1/8 "....
Owner's Manual
Page 42
...Make sure up to and fro. How to the left and set the zigzag lever on 2. D: Now sew the the first one stitch to proceed (See also on page 45 "The easy way of the first purl... lies accu rsgthaorteoetolhylvaeefttintohanetnhdtesheescrlioligednhfedtt.-htLphaueenraldvzewiggitzlrhloaegofovnleelleeovdwoelfer pthiaanegraatlhsilneeewl foiainnnbgtroi4cf. Stand Place edge cves( '.1 Butlonlaoles Universal sewing foot 847580 a) Buttonholes with gimp thread Upper and bobbin thread: machine embroidery and darfling cotcn No. 50. Stitch length: almost 0 (see pages 24 and...
...Make sure up to and fro. How to the left and set the zigzag lever on 2. D: Now sew the the first one stitch to proceed (See also on page 45 "The easy way of the first purl... lies accu rsgthaorteoetolhylvaeefttintohanetnhdtesheescrlioligednhfedtt.-htLphaueenraldvzewiggitzlrhloaegofovnleelleeovdwoelfer pthiaanegraatlhsilneeewl foiainnnbgtroi4cf. Stand Place edge cves( '.1 Butlonlaoles Universal sewing foot 847580 a) Buttonholes with gimp thread Upper and bobbin thread: machine embroidery and darfling cotcn No. 50. Stitch length: almost 0 (see pages 24 and...

Owner's Manual
Page 43
...machine embroidery and darn ing cotton No. 50. Without gimp thread All other . bar in the manner leaving the needle Set the zigzag lever already again in on the left. However, you should take only 4 stit ches when making a buttonhole A B c 0 E F G (irie airtererit (Buttonholes in linen) Upper thread: Sewing... in tentionally are not laid closely together. de the F: Now make a few fastening stitches ing the work from the machine and cut after remov off the ends b) Buttonholes without gimp thread. The easy way of the finished buttonhole. tacking operations...
...machine embroidery and darn ing cotton No. 50. Without gimp thread All other . bar in the manner leaving the needle Set the zigzag lever already again in on the left. However, you should take only 4 stit ches when making a buttonhole A B c 0 E F G (irie airtererit (Buttonholes in linen) Upper thread: Sewing... in tentionally are not laid closely together. de the F: Now make a few fastening stitches ing the work from the machine and cut after remov off the ends b) Buttonholes without gimp thread. The easy way of the finished buttonhole. tacking operations...
Owner's Manual
Page 44
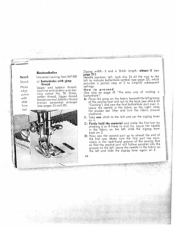
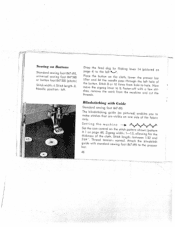
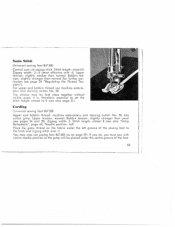
... 14 (pictured on one side of 8 or 10 times from fasten-off with a few the machine and cut stit the Blindstitelzing .t'ith Guide Standard sewing foot 847495 The blindstitching make stitches that only. Stitch move the zigzag ches, remove the threads....you to the dog by flicking left . Needle position: left .._J. Sewing on the cloth, lower the presser bar needle pass through the left hole of the fabric Setting the machine - Stitch length: 0. bg5tAShau/e6iritc1.4dkt"eonh.neewsTspcihtaahrmogefesatcdta4hon8en)dtt.eracnoZrlslodiigtoohzsnn.ae:gwSthtiniwnetocgirhsdmttfihtloace...
... 14 (pictured on one side of 8 or 10 times from fasten-off with a few the machine and cut stit the Blindstitelzing .t'ith Guide Standard sewing foot 847495 The blindstitching make stitches that only. Stitch move the zigzag ches, remove the threads....you to the dog by flicking left . Needle position: left .._J. Sewing on the cloth, lower the presser bar needle pass through the left hole of the fabric Setting the machine - Stitch length: 0. bg5tAShau/e6iritc1.4dkt"eonh.neewsTspcihtaahrmogefesatcdta4hon8en)dtt.eracnoZrlslodiigtoohzsnn.ae:gwSthtiniwnetocgirhsdmttfihtloace...
Owner's Manual
Page 46
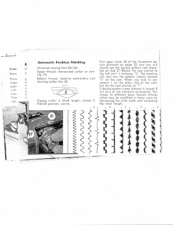
...sew pattern 1 on the other side of the standard accessories; this makes 10 different basic fashion stitches which may be modified in many ways by decreasing the stitch width and increasing the stitch length. Rotate the cam control to the left until it indicates "2", The machine... of the cam, just set the cam control on stud 27. B2 1 1 D 2 E 1; Zigzag width: 4. I I I I Stitch length: almost 0. Bobbin thread: machine embroidery and darning cotton No. 50. 13 U Stanc a Plac€ U edge rr over wrh n c tE abie Trim ( n1 .o Automatic Fashion Stitching Universal...
...sew pattern 1 on the other side of the standard accessories; this makes 10 different basic fashion stitches which may be modified in many ways by decreasing the stitch width and increasing the stitch length. Rotate the cam control to the left until it indicates "2", The machine... of the cam, just set the cam control on stud 27. B2 1 1 D 2 E 1; Zigzag width: 4. I I I I Stitch length: almost 0. Bobbin thread: machine embroidery and darning cotton No. 50. 13 U Stanc a Plac€ U edge rr over wrh n c tE abie Trim ( n1 .o Automatic Fashion Stitching Universal...
Owner's Manual
Page 49
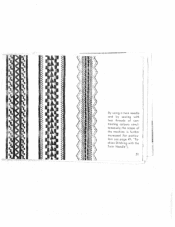
By using a twin needle and by sewing with two threads of confrosting colours simul taneously, the scope of the machine is further increased for particu lars see page 49 Fo shion Stitching with the Twin Needle 51
By using a twin needle and by sewing with two threads of confrosting colours simul taneously, the scope of the machine is further increased for particu lars see page 49 Fo shion Stitching with the Twin Needle 51
Owner's Manual
Page 51
Needle position: left groove of the foot. 53 You may also use machine embroi dery and darning cotton No. 50. The stitches must sew with 4). Upper tension: normal. If you do, you must be placed under the left . Zigzag width: 2-4 (most effective with centre needle position...as the gimp will be laid close together without visible gaps; Place the gimp thread on zigzag stitch. Universal sewing foot 847580 Control cam: on the fabric under the centre groove of the sewing foot to 0 (see pages 24 and 25). Stitch length: almost 0. Bobbin tension: slightly stronger than ...
Needle position: left groove of the foot. 53 You may also use machine embroi dery and darning cotton No. 50. The stitches must sew with 4). Upper tension: normal. If you do, you must be placed under the left . Zigzag width: 2-4 (most effective with centre needle position...as the gimp will be laid close together without visible gaps; Place the gimp thread on zigzag stitch. Universal sewing foot 847580 Control cam: on the fabric under the centre groove of the sewing foot to 0 (see pages 24 and 25). Stitch length: almost 0. Bobbin tension: slightly stronger than ...
Owner's Manual
Page 52
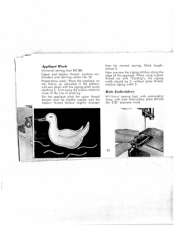
...diameter hole) 54 . Stitch length: almost 0. When using a gimp thread (as indicated in the pattern, and sew down with hole embroidery plate 847645 (for normal sewing. Trim away the surplus material close to the line of the appliqué. without gimp thread, employ zigzag width ...3. Hole Embroidery Without sewing foot, with embroidery hoop, with the zigzag stitch (scale marking 1). Appliqué Work Universal sewing foot 847580 Upper and bobbin thread: machine em broidery and darning cotton No. 50. For the appliqué...
...diameter hole) 54 . Stitch length: almost 0. When using a gimp thread (as indicated in the pattern, and sew down with hole embroidery plate 847645 (for normal sewing. Trim away the surplus material close to the line of the appliqué. without gimp thread, employ zigzag width ...3. Hole Embroidery Without sewing foot, with embroidery hoop, with the zigzag stitch (scale marking 1). Appliqué Work Universal sewing foot 847580 Upper and bobbin thread: machine em broidery and darning cotton No. 50. For the appliqué...


