
Owner's Manual
Page 3
... 2. Preparing to separate indexes on pages 27 and 39. 68-73 ards 3. Cause and Remedy of Contents This is Your Accessories Sewing Machine . 1. Setting Fundamentals the Machine thread TSABtheidtrgcueihsantdnilneinntgeggntfshaoin;ordnSssetsrwtaoiinpggphitnfogorrwtozaigrsdzeaswgansdewbinagckw. Presser Tips for Piping Zigzag Stitching and Fashion Stitches *) 6. Maintenance 7. Upper threading, picking up bobbin Sewing - Tips for bar regulator (patch-o-matic) Straight Stitching *) 4. 5.
... 2. Preparing to separate indexes on pages 27 and 39. 68-73 ards 3. Cause and Remedy of Contents This is Your Accessories Sewing Machine . 1. Setting Fundamentals the Machine thread TSABtheidtrgcueihsantdnilneinntgeggntfshaoin;ordnSssetsrwtaoiinpggphitnfogorrwtozaigrsdzeaswgansdewbinagckw. Presser Tips for Piping Zigzag Stitching and Fashion Stitches *) 6. Maintenance 7. Upper threading, picking up bobbin Sewing - Tips for bar regulator (patch-o-matic) Straight Stitching *) 4. 5.
Owner's Manual
Page 5
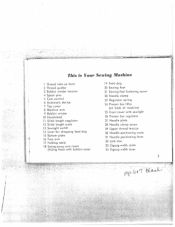
...3 Bobbin winder tension 4 Spool pins 5 Cam control 6 Automatic device 7 Top cover 8 Machine arm 9 Bobbin winder 10 Handwheel 11 Stitch length regulator 12 Stitch length scale 13 Sewlight switch 14 Lever for dropping feed dog 15 Bottom plate 16 Free arm 17 Folding table 18 Swing-away arm cover (hiding hook with bobbin case) 19 Feed dog 20 Sewing foot 21 Sewing foot fastening screw 22 Needle clamp 23 Regulator spring 24 Presser bar lifter (on back of machine) 25 Front cover with sewlight 26 Presser bar regulator 27 Needle plate 28 Needle clamp screw 29 Upper thread tension 30 Needle positioning...
...3 Bobbin winder tension 4 Spool pins 5 Cam control 6 Automatic device 7 Top cover 8 Machine arm 9 Bobbin winder 10 Handwheel 11 Stitch length regulator 12 Stitch length scale 13 Sewlight switch 14 Lever for dropping feed dog 15 Bottom plate 16 Free arm 17 Folding table 18 Swing-away arm cover (hiding hook with bobbin case) 19 Feed dog 20 Sewing foot 21 Sewing foot fastening screw 22 Needle clamp 23 Regulator spring 24 Presser bar lifter (on back of machine) 25 Front cover with sewlight 26 Presser bar regulator 27 Needle plate 28 Needle clamp screw 29 Upper thread tension 30 Needle positioning...
Owner's Manual
Page 6
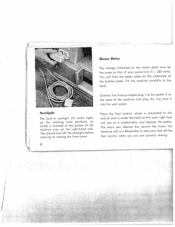
... end of cord 4, under the table so that of your right foot will find the motor plate on the back of the macnine arm, on the motor plate must be the same as that your power-line (f. You will rest on it comfortably and depress the pedal. You should turn off the foot control when you depress the control the faster the machine will...
... end of cord 4, under the table so that of your right foot will find the motor plate on the back of the macnine arm, on the motor plate must be the same as that your power-line (f. You will rest on it comfortably and depress the pedal. You should turn off the foot control when you depress the control the faster the machine will...
Owner's Manual
Page 9
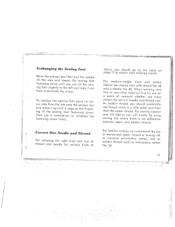
... use thread which is no difference between upper and bobbin thread. Correct Size Needle and Thread For selecting the right kind and size of thread and needle for various kinds of mercerized upper thread or sewing silk or machine embroidery cotton, and as bobbin thread machine embroidery cotton No. 50. As bobbin thread you have chosen the correct needle and thread sze. Exchanging the Sewing Foot Raise the presser bar lifter and the needle all the way and loosen the sewing foot fastening screw...
... use thread which is no difference between upper and bobbin thread. Correct Size Needle and Thread For selecting the right kind and size of thread and needle for various kinds of mercerized upper thread or sewing silk or machine embroidery cotton, and as bobbin thread machine embroidery cotton No. 50. As bobbin thread you have chosen the correct needle and thread sze. Exchanging the Sewing Foot Raise the presser bar lifter and the needle all the way and loosen the sewing foot fastening screw...
Owner's Manual
Page 12
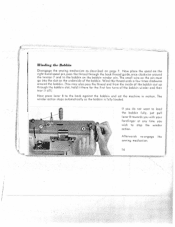
... few times clockwise around the tension 7 and to stop the winder action. Winding the llobbin Disengage the sewing mechanism as the bobbin is fully loaded. Now place the spool on the bobbin winder pin. The winder action stops automatically as described on the underside of the bobbin winder and then tear it off.) Now press lever 8 to the back against the bobbin and set the machine in motion. Afterwards...
... few times clockwise around the tension 7 and to stop the winder action. Winding the llobbin Disengage the sewing mechanism as the bobbin is fully loaded. Now place the spool on the bobbin winder pin. The winder action stops automatically as described on the underside of the bobbin winder and then tear it off.) Now press lever 8 to the back against the bobbin and set the machine in motion. Afterwards...
Owner's Manual
Page 18
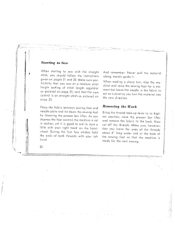
... the threads. Bring the thread take-up lever to its start a little with your left hand. t Place the fabric between sewing foot and Re,novin the Work needle plate and let down the sewing foot by lowering the presser bar lifter. Make sure, however, that you leave the ends of the threads about 3" long under and at a medium stitch length (setting of both threads with the straight stitch, you should follow the instructions And...
... the threads. Bring the thread take-up lever to its start a little with your left hand. t Place the fabric between sewing foot and Re,novin the Work needle plate and let down the sewing foot by lowering the presser bar lifter. Make sure, however, that you leave the ends of the threads about 3" long under and at a medium stitch length (setting of both threads with the straight stitch, you should follow the instructions And...
Owner's Manual
Page 26
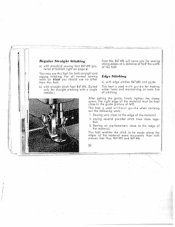
... this foot for making wider hems and maintaining an even line of the material. Sewing on tricot you for straight stitching with a single needle.) Foot No. 847496 will serve you should use this foot. For all normal sewing work : 1. After setting the guide, firmly tighten the clamp screw. Sewing very close to the edge of the material I 3. This foot enables the stitch to the edge of stitching. This foot is used without...
... this foot for making wider hems and maintaining an even line of the material. Sewing on tricot you for straight stitching with a single needle.) Foot No. 847496 will serve you should use this foot. For all normal sewing work : 1. After setting the guide, firmly tighten the clamp screw. Sewing very close to the edge of the material I 3. This foot enables the stitch to the edge of stitching. This foot is used without...
Owner's Manual
Page 27
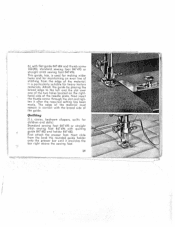
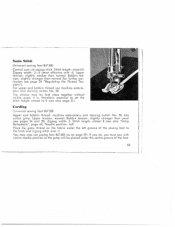
... guide holder onto the presser bar until it after the required setting has been made. Next insert the thumb screw through the slot and tigh ten it encircles the bar right above the sewing foot. 29 Quilting (f. It is used for making wider hems and for children and dolls) Standard sewing foot 847495 or straight stitch sewing foot 847496 with flat guide 847484 and thumb screw 183090, standard sewing foot 847495 or straight stitch sewing foot 847496. b) with quilting guide...
... guide holder onto the presser bar until it after the required setting has been made. Next insert the thumb screw through the slot and tigh ten it encircles the bar right above the sewing foot. 29 Quilting (f. It is used for making wider hems and for children and dolls) Standard sewing foot 847495 or straight stitch sewing foot 847496 with flat guide 847484 and thumb screw 183090, standard sewing foot 847495 or straight stitch sewing foot 847496. b) with quilting guide...
Owner's Manual
Page 33
... used for darning fine stockings. Width of zigzag stitch: as the cover has only a round needle hole in a darning hoop.) Lower presser bar lifter, pick up bobbin thread and sew around the damaged area once with a special sewing foot; Pull the sock over the free arm so that the formed wire will be above the needle clamp screw. - -r Darning with Needle Plate Coaer and Hopper Foot If you prefer darning linen and fine stock ings with the needle plate cover...
... used for darning fine stockings. Width of zigzag stitch: as the cover has only a round needle hole in a darning hoop.) Lower presser bar lifter, pick up bobbin thread and sew around the damaged area once with a special sewing foot; Pull the sock over the free arm so that the formed wire will be above the needle clamp screw. - -r Darning with Needle Plate Coaer and Hopper Foot If you prefer darning linen and fine stock ings with the needle plate cover...
Owner's Manual
Page 37
... oval needle hole due to indicate the zigzag symbol. The thread tension for Zigzag Stitching and Fashion Stitches Page Ordinary zigzag stitching 40 Overcasting, overedging 40 Edge joining 41 Sewing on lace 42 Shell edging 43 Roll hems 43 Buttonholes 44 Sewing on buttons 46 Blindstitching 46 Automatic fashion stitches . . . . 48-51 Twin needle fashion stitches 49 Manual fashion stitches 52 Satin stitch 53 Cording 53 Appliqué Work 54 Hole embroidery . 54 Elastic curve seam 56 Patching 56 All sewing feet and attachments...
... oval needle hole due to indicate the zigzag symbol. The thread tension for Zigzag Stitching and Fashion Stitches Page Ordinary zigzag stitching 40 Overcasting, overedging 40 Edge joining 41 Sewing on lace 42 Shell edging 43 Roll hems 43 Buttonholes 44 Sewing on buttons 46 Blindstitching 46 Automatic fashion stitches . . . . 48-51 Twin needle fashion stitches 49 Manual fashion stitches 52 Satin stitch 53 Cording 53 Appliqué Work 54 Hole embroidery . 54 Elastic curve seam 56 Patching 56 All sewing feet and attachments...
Owner's Manual
Page 42
...: cotton thread. second purl Make sure up to and fro. Stand Place edge cves( '.1 Butlonlaoles Universal sewing foot 847580 a) Buttonholes with gimp thread Upper and bobbin thread: machine embroidery and darfling cotcn No. 50. B: Take one . othooent 44 . .. . ... . the presser bar lifter and turn the fabric around clockwise. on the left, slide Leave the needle the zigzag lever back on the fabric beneath the left and set the zigzag lever on...
...: cotton thread. second purl Make sure up to and fro. Stand Place edge cves( '.1 Butlonlaoles Universal sewing foot 847580 a) Buttonholes with gimp thread Upper and bobbin thread: machine embroidery and darfling cotcn No. 50. B: Take one . othooent 44 . .. . ... . the presser bar lifter and turn the fabric around clockwise. on the left, slide Leave the needle the zigzag lever back on the fabric beneath the left and set the zigzag lever on...

Owner's Manual
Page 43
... the various operations are the I I ' E: Make the second scribed under "C", fabric on top of making t e bar- Without gimp thread All other . However, you should take only 4 stit ches when making a buttonhole A B c 0 E F G (irie airtererit (Buttonholes in on 0. bar in the manner leaving the needle Set the zigzag lever already again in linen) Upper thread: Sewing thread No. 30. The bars, too, be stitches no as before, only without Gimp Sewing foot, thread and set ting...
... the various operations are the I I ' E: Make the second scribed under "C", fabric on top of making t e bar- Without gimp thread All other . However, you should take only 4 stit ches when making a buttonhole A B c 0 E F G (irie airtererit (Buttonholes in on 0. bar in the manner leaving the needle Set the zigzag lever already again in linen) Upper thread: Sewing thread No. 30. The bars, too, be stitches no as before, only without Gimp Sewing foot, thread and set ting...
Owner's Manual
Page 46
... ways by decreasing the stitch width and increasing the stitch length. Stitch length: almost 0. Rotate the cam control to sew pattern 1 on the other side of the standard accessories; I I I I 13 U Stanc a Plac€ U edge rr over wrh n c tE abie Trim ( n1 .o Automatic Fashion Stitching Universal sewing foot 847580 Upper thread: mercerized cotton or sew ing silk. B2 1 1 D 2 E 1; Needle position: centre. $ First open cover 20 of the Automatic de vice (pictured on...
... ways by decreasing the stitch width and increasing the stitch length. Stitch length: almost 0. Rotate the cam control to sew pattern 1 on the other side of the standard accessories; I I I I 13 U Stanc a Plac€ U edge rr over wrh n c tE abie Trim ( n1 .o Automatic Fashion Stitching Universal sewing foot 847580 Upper thread: mercerized cotton or sew ing silk. B2 1 1 D 2 E 1; Needle position: centre. $ First open cover 20 of the Automatic de vice (pictured on...
Owner's Manual
Page 51
...). Upper tension: normal. If you do, you must be placed under the left . The stitches must sew with 4). Use cotton gimp. Satin Stitch. Universal sewing foot 847580 Control cam: on the fabric under the centre groove of the sewing foot to the back and zigzag-stitch over it is, therefore, essential to set the stitch length almost to 0 (see pages 24 and 25). Cording Universal sewing foot 847580 Upper and bobbin thread: machine embroidery and darning cotton...
...). Upper tension: normal. If you do, you must be placed under the left . The stitches must sew with 4). Use cotton gimp. Satin Stitch. Universal sewing foot 847580 Control cam: on the fabric under the centre groove of the sewing foot to the back and zigzag-stitch over it is, therefore, essential to set the stitch length almost to 0 (see pages 24 and 25). Cording Universal sewing foot 847580 Upper and bobbin thread: machine embroidery and darning cotton...
Owner's Manual
Page 52
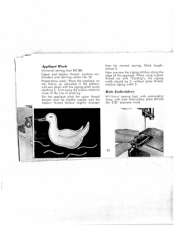
Stitch length: almost 0. Preparatory work: Place the appliqué on the fabric, as with the zigzag stitch (scale marking 1). Trim away the surplus material close to the line of the appliqué. without gimp thread, employ zigzag width 3. For the appliqué stitch the upper thread tension must be 2; Hole Embroidery Without sewing foot, with embroidery hoop, with hole embroidery plate 847645 (for normal sewing. Appliqué Work Universal sewing foot 847580 Upper and bobbin thread: machine em broidery and darning cotton No. 50. Now...
Stitch length: almost 0. Preparatory work: Place the appliqué on the fabric, as with the zigzag stitch (scale marking 1). Trim away the surplus material close to the line of the appliqué. without gimp thread, employ zigzag width 3. For the appliqué stitch the upper thread tension must be 2; Hole Embroidery Without sewing foot, with embroidery hoop, with hole embroidery plate 847645 (for normal sewing. Appliqué Work Universal sewing foot 847580 Upper and bobbin thread: machine em broidery and darning cotton No. 50. Now...

Owner's Manual
Page 53
... the threads. Detach the sewing foot and lower the feed dog. Needle position: left ,then right); 4to 7 are variations with zigzag width 2 to 4. Hold the ends of the machine. Finally set the needle positioning lever on centre and the zigzag width lever on the bedpicte of both threads in addition to engage the upper tension. Draw up the bobbin thread and lower the presser bar lifter to hole 1 other hole embroidery techniques: hole 2 with zigzag width 4; 3 with zigzag width 2 (needle position first...
... the threads. Detach the sewing foot and lower the feed dog. Needle position: left ,then right); 4to 7 are variations with zigzag width 2 to 4. Hold the ends of the machine. Finally set the needle positioning lever on centre and the zigzag width lever on the bedpicte of both threads in addition to engage the upper tension. Draw up the bobbin thread and lower the presser bar lifter to hole 1 other hole embroidery techniques: hole 2 with zigzag width 4; 3 with zigzag width 2 (needle position first...
Owner's Manual
Page 55
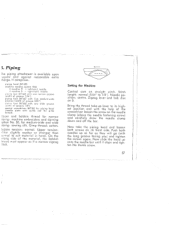
...) and tighten the screws again. Gimp thread: cotton. (obbin tension: normal. Upper tension: ttNer slightly weaker or stronger than tcrnal to 1/8"). Setting the Machine Control cam on 0. Zigzag lever and lock disc on straight stitch. Bring the thread take the piping head and loosen both needles up as far as if a narrow zigzag titch. Needle po sition: centre. Now take -up onto the needle bar until it stops and...
...) and tighten the screws again. Gimp thread: cotton. (obbin tension: normal. Upper tension: ttNer slightly weaker or stronger than tcrnal to 1/8"). Setting the Machine Control cam on 0. Zigzag lever and lock disc on straight stitch. Bring the thread take the piping head and loosen both needles up as far as if a narrow zigzag titch. Needle po sition: centre. Now take -up onto the needle bar until it stops and...
Owner's Manual
Page 67
... thread or fabric - get a new one to an accumulation of the needle has a cutting edge - smoothen it with emerycloth. 10. The needle is being used - The feed does not transport the work properly owing to replace it (see page 6. replace the needle. 2. use a thicker needle (see page 17). 4. thread the machine correctly (see pages 10, 11 and 12). 5. The needle plate hole has a cutting edge - unscrew the needle plate and clean...
... thread or fabric - get a new one to an accumulation of the needle has a cutting edge - smoothen it with emerycloth. 10. The needle is being used - The feed does not transport the work properly owing to replace it (see page 6. replace the needle. 2. use a thicker needle (see page 17). 4. thread the machine correctly (see pages 10, 11 and 12). 5. The needle plate hole has a cutting edge - unscrew the needle plate and clean...
Owner's Manual
Page 68
... the needle clamp - Thread tensions are incorrectly set - wind evenly and not too tight. 1. adjust them (see page 10). 2. The bobbin case has a rough spot - replace the needle or the thread so they will suit each other and the material (see page 25). 3. The bobbin case teison is too weak - replace it (see pages 10, 11 and 12). 6. tighten it is being used - The bobbin thread breaks: The machine skips stitches: 1.
... the needle clamp - Thread tensions are incorrectly set - wind evenly and not too tight. 1. adjust them (see page 10). 2. The bobbin case has a rough spot - replace the needle or the thread so they will suit each other and the material (see page 25). 3. The bobbin case teison is too weak - replace it (see pages 10, 11 and 12). 6. tighten it is being used - The bobbin thread breaks: The machine skips stitches: 1.
Owner's Manual
Page 70
... fabric and adjusting the lifter eccentric, l 72 set too strong - remove the needle plate and thoroughly clean the 1. reduce the pressure following instructions on page 26. The sewing foot exerts too much pres 2. Unsatisfactory feed of the teeth should protrude from the sure - loosen both upper and bobbin thread tension see page 25:. needle plate) - after removing the needle plate look up an expert and have the feed dog raised a little by 3. When sewing...
... fabric and adjusting the lifter eccentric, l 72 set too strong - remove the needle plate and thoroughly clean the 1. reduce the pressure following instructions on page 26. The sewing foot exerts too much pres 2. Unsatisfactory feed of the teeth should protrude from the sure - loosen both upper and bobbin thread tension see page 25:. needle plate) - after removing the needle plate look up an expert and have the feed dog raised a little by 3. When sewing...


