

Owner's Manual
Page 4
30 2 - 9j R 7383 19 Balance wheel 20 Collapsible 5pOol pins 21 Top cover 22 Face cover 23 Presser bar lever 24 Needle threader lever 25 Automatic needle threader 26 Sewing foot 27 Snap-out workplate 28 Free arm 3 29 Receptacle for foot control plug 30 Receptacle for power cord plug 31 Sewlight 32 Needle set screw 33 Free arm fop cover
30 2 - 9j R 7383 19 Balance wheel 20 Collapsible 5pOol pins 21 Top cover 22 Face cover 23 Presser bar lever 24 Needle threader lever 25 Automatic needle threader 26 Sewing foot 27 Snap-out workplate 28 Free arm 3 29 Receptacle for foot control plug 30 Receptacle for power cord plug 31 Sewlight 32 Needle set screw 33 Free arm fop cover
Owner's Manual
Page 8
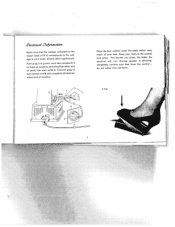
...the volt age in stitching, completely remove your home. (Check other end of cord) into wall outlet 4. Conned plug of foot control cord 5 with receptacle at other appliances). Place your foot on the motor label (110 V) corresponds to rest there. R 7132 jr 7 The harder you press, the faster the ...machine will run. During pauses in your foot from the control - cL2c&iat Dn&Hssthn Make sure that the voltage indicated on the control and press. Push plug I of power cord into receptacle 2 on bock of machine, and plug 3 (...
...the volt age in stitching, completely remove your home. (Check other end of cord) into wall outlet 4. Conned plug of foot control cord 5 with receptacle at other appliances). Place your foot on the motor label (110 V) corresponds to rest there. R 7132 jr 7 The harder you press, the faster the ...machine will run. During pauses in your foot from the control - cL2c&iat Dn&Hssthn Make sure that the voltage indicated on the control and press. Push plug I of power cord into receptacle 2 on bock of machine, and plug 3 (...


