
Owner's Manual
Page 3
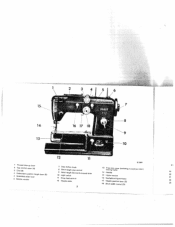
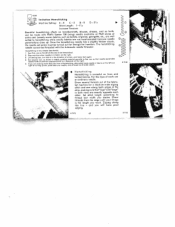
45 6 / I 5- 14- R 7379 1 Thread take-up lever 2 Top control cover (A) 3 Dial (B) 4 Embroidery pattern length lever (E) 5 Buttonhole slide lever 6 Bobbin winder 7 Slop motion knob 8 Stitch length stop control 9 Stitch length (forward-reverse) lever 10 Light switch 11 Drop feed control 12 Needle plate 13 free arm cover sewing hook) (enclosing transverse rotary 14 Needle 15 Upper tension 16 SewlighI swing-out fever 17 Needle position lever (C) 19 20 21 22 18 Stitch width control (D) 23 2
45 6 / I 5- 14- R 7379 1 Thread take-up lever 2 Top control cover (A) 3 Dial (B) 4 Embroidery pattern length lever (E) 5 Buttonhole slide lever 6 Bobbin winder 7 Slop motion knob 8 Stitch length stop control 9 Stitch length (forward-reverse) lever 10 Light switch 11 Drop feed control 12 Needle plate 13 free arm cover sewing hook) (enclosing transverse rotary 14 Needle 15 Upper tension 16 SewlighI swing-out fever 17 Needle position lever (C) 19 20 21 22 18 Stitch width control (D) 23 2
Owner's Manual
Page 6
... is guide the work. Never try to hasten feeding by pushing or pulling the fabric while stitching because the needle may cause the thread to do is done automatically by take -up lever d. On a sewing ma chine, this rule may bend or break. --4 Therefore, always turn the balance wheel toward you until the take -up lever is at its highest position before making another...
... is guide the work. Never try to hasten feeding by pushing or pulling the fabric while stitching because the needle may cause the thread to do is done automatically by take -up lever d. On a sewing ma chine, this rule may bend or break. --4 Therefore, always turn the balance wheel toward you until the take -up lever is at its highest position before making another...
Owner's Manual
Page 10
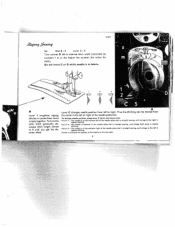
... in zigzag stitching. To form the satin stitch graduolly de crease stitch length almost to right. Notch 3-The needle is at the extreme right of the needle plate slot in straight sewing and swings to the right in zigzag stitching. Pointer z indicates the position of the needle plate slot. To change needle position, press ever C down and mov, into: Notch I to 4; The needle is centered is in zigzag stitching. Notch 2- Al Lever C changes needle position from...
... in zigzag stitching. To form the satin stitch graduolly de crease stitch length almost to right. Notch 3-The needle is at the extreme right of the needle plate slot in straight sewing and swings to the right in zigzag stitching. Pointer z indicates the position of the needle plate slot. To change needle position, press ever C down and mov, into: Notch I to 4; The needle is centered is in zigzag stitching. Notch 2- Al Lever C changes needle position from...
Owner's Manual
Page 18
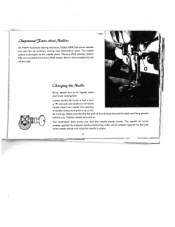
Insert new needle into opening of needle clomp. Bent or blunt needles should not be used for all ordinary sewing and embroidery work. C 6 aqinq the /Vete Bring needle bar to its highest point and lower sewing foot. Make sure that the flat side of the needle shank and holds the needle in place. 17 Loosen needle set screw presses against the tapered needle positioning roller which presses against the flat side of shank faces toward the...
Insert new needle into opening of needle clomp. Bent or blunt needles should not be used for all ordinary sewing and embroidery work. C 6 aqinq the /Vete Bring needle bar to its highest point and lower sewing foot. Make sure that the flat side of the needle shank and holds the needle in place. 17 Loosen needle set screw presses against the tapered needle positioning roller which presses against the flat side of shank faces toward the...
Owner's Manual
Page 22
... and up again and take -up lever d is about four inches of the prong. Slowly lower lever p. V R $390 9kJ 7 awinj 14 the '4 13cn6t '7hea' A Hold needle thread lightly in your left hand. Place both threads back under sewing foot before you put fabric into machine. 21 through needle eye. Place thread ,behind hook of prong w so that its end is not at its highest position.
... and up again and take -up lever d is about four inches of the prong. Slowly lower lever p. V R $390 9kJ 7 awinj 14 the '4 13cn6t '7hea' A Hold needle thread lightly in your left hand. Place both threads back under sewing foot before you put fabric into machine. 21 through needle eye. Place thread ,behind hook of prong w so that its end is not at its highest position.
Owner's Manual
Page 25
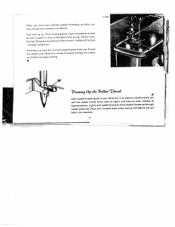
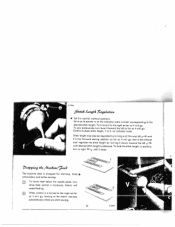
... Wii go . To hold the stitch length in position, turn drop feed control v clockwise. Fabric will go , ieedng of the fabric resumes automatically when you start sewing. 24 R 6029 To sew backwards, turn lever f toward the left until it stops. 7 zc2inf7 tli? , 4 1ac4ine The machine feed is turned to the right as far as it will When control v is dropped for darning, hoop embroidery and button sewing. Stitch length may also be regulated by...
... Wii go . To hold the stitch length in position, turn drop feed control v clockwise. Fabric will go , ieedng of the fabric resumes automatically when you start sewing. 24 R 6029 To sew backwards, turn lever f toward the left until it stops. 7 zc2inf7 tli? , 4 1ac4ine The machine feed is turned to the right as far as it will When control v is dropped for darning, hoop embroidery and button sewing. Stitch length may also be regulated by...

Owner's Manual
Page 30
.... I Ait.sttiii ,4ctc 3 e1i '7n.%ion d Your PFAFF 332 Automatic is housed in the machine base and drives the main shaft by means of service. When you tighten screw s, make sure the washer is obtained. Loosen screws s and adjust idler r until correct tension is in U cover t and remove. I - - 1- --- -*1! - - 4•- Ii If the driving belt tension needs adjustment, take out the four screws in the correct position. 29 ;: - -
.... I Ait.sttiii ,4ctc 3 e1i '7n.%ion d Your PFAFF 332 Automatic is housed in the machine base and drives the main shaft by means of service. When you tighten screw s, make sure the washer is obtained. Loosen screws s and adjust idler r until correct tension is in U cover t and remove. I - - 1- --- -*1! - - 4•- Ii If the driving belt tension needs adjustment, take out the four screws in the correct position. 29 ;: - -
Owner's Manual
Page 31
... thread. Clean and oil hook raceway. Check and correct threading as it wilt go and be sure that the long groove faces you, and flat part of needle away from you. Hook race is stamped on needle plate slot. Adjust tensions as instructed. above mentioned may cause thread breakage. Polish needle plate slot with thread or needs oiling. Remedy: See remedies listed under 1. Insert new needle. Needle Thread Breaks Cause: The above . Wrong needle. Poor or knotty thread used. Use...
... thread. Clean and oil hook raceway. Check and correct threading as it wilt go and be sure that the long groove faces you, and flat part of needle away from you. Hook race is stamped on needle plate slot. Adjust tensions as instructed. above mentioned may cause thread breakage. Polish needle plate slot with thread or needs oiling. Remedy: See remedies listed under 1. Insert new needle. Needle Thread Breaks Cause: The above . Wrong needle. Poor or knotty thread used. Use...

Owner's Manual
Page 32
... of sewing hook. Bobbin unevenly wound. Push bobbin case until you hear it bends and strikes needle plate. Remedy: Adjust tensions as instructed. 3. Bobbin case inserted incorrectly. 4. Don't force the feeding motion. Use only first-rote thread - - Don't run it around thread tension over stud finger on "0" and remove thread. 3. Guide the material lightly. the correct size for the needle and fabric. Remedy: Have your Pfaff dealer make the necessary adjustment. 31 1 I Needle Breaks Cause: Bent needle strikes point of thread between tension discs. Needle...
... of sewing hook. Bobbin unevenly wound. Push bobbin case until you hear it bends and strikes needle plate. Remedy: Adjust tensions as instructed. 3. Bobbin case inserted incorrectly. 4. Don't force the feeding motion. Use only first-rote thread - - Don't run it around thread tension over stud finger on "0" and remove thread. 3. Guide the material lightly. the correct size for the needle and fabric. Remedy: Have your Pfaff dealer make the necessary adjustment. 31 1 I Needle Breaks Cause: Bent needle strikes point of thread between tension discs. Needle...

Owner's Manual
Page 33
Clean and oil hook raceway. Tighten the stop motion knob. Take the end of oil or cleaning fluid into the hook raceway. Use only Piaff sewing machine oil - Stop bobbin winder. Thread iamming can be avoided by inferior oil. Take off needle plate and remove lint with a stiff brush. 6. Mechanism clogged by following the instructions on pages 4 and 5. 32 Thread Jamming If thread jams in the sewing hook mechanism and blocks it out while...
Clean and oil hook raceway. Tighten the stop motion knob. Take the end of oil or cleaning fluid into the hook raceway. Use only Piaff sewing machine oil - Stop bobbin winder. Thread iamming can be avoided by inferior oil. Take off needle plate and remove lint with a stiff brush. 6. Mechanism clogged by following the instructions on pages 4 and 5. 32 Thread Jamming If thread jams in the sewing hook mechanism and blocks it out while...
Owner's Manual
Page 34
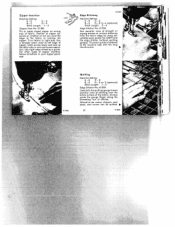
Edge Stitching Machine Setting: E-0 C-2 B-C D -0 to overlap the zipper. Sew parallel rows of the fabric. Used with the long thumb screw. R7104 Quilting Machine Setting: E-0 C-2 8-0 D -0 or 2 (optional) Stitch Length: I - 2 Edge Stitcher No. 41350. Position of zipper de pends on wrong side of zipper insertion, follow directions in one continuous opera tion. Use right edge of stitches. The seam guide is fastened to right side. Attractive tea cosies, slippers, seat pads, and covers can be quilted. 33...
Edge Stitching Machine Setting: E-0 C-2 B-C D -0 to overlap the zipper. Sew parallel rows of the fabric. Used with the long thumb screw. R7104 Quilting Machine Setting: E-0 C-2 8-0 D -0 or 2 (optional) Stitch Length: I - 2 Edge Stitcher No. 41350. Position of zipper de pends on wrong side of zipper insertion, follow directions in one continuous opera tion. Use right edge of stitches. The seam guide is fastened to right side. Attractive tea cosies, slippers, seat pads, and covers can be quilted. 33...

Owner's Manual
Page 36
... sew a uniform hem. You can hem with the left side of the foot before you come to 3. If you are used to facilitate insertion into the hemmer foot. Avoid ugly ends by slowing down feeding. To hem tricot fabrics increase the tension, and use the widest zigzag stitch so the hem has a rolled shell effect. 11246 R 6083 Hemming Machine Setting: E-O C-2 B-O D-O or 2 to 4 (optional) Stitch Length: 2 -4 The hemmer foot is in line with straight...
... sew a uniform hem. You can hem with the left side of the foot before you come to 3. If you are used to facilitate insertion into the hemmer foot. Avoid ugly ends by slowing down feeding. To hem tricot fabrics increase the tension, and use the widest zigzag stitch so the hem has a rolled shell effect. 11246 R 6083 Hemming Machine Setting: E-O C-2 B-O D-O or 2 to 4 (optional) Stitch Length: 2 -4 The hemmer foot is in line with straight...

Owner's Manual
Page 43
... the scallops by using variegated thread. 'V and guide needle along scalloped edge. I I •1I 87168 42 R7150 • -i-'. - You may be used effectively as trimming on fabric. Clamp work into embroidery hoop. The scallops ore produced automati cally. First, trace collar pattern on a doubled piece of lever F (see sketch). Here's how to a child's collar. Set machine (shown above), place fabric under sewing foot Machine Setting: E -0 C-2 B-0 D-2to4 Stitch Length: Minimum Draw designs on numerous...
... the scallops by using variegated thread. 'V and guide needle along scalloped edge. I I •1I 87168 42 R7150 • -i-'. - You may be used effectively as trimming on fabric. Clamp work into embroidery hoop. The scallops ore produced automati cally. First, trace collar pattern on a doubled piece of lever F (see sketch). Here's how to a child's collar. Set machine (shown above), place fabric under sewing foot Machine Setting: E -0 C-2 B-0 D-2to4 Stitch Length: Minimum Draw designs on numerous...
Owner's Manual
Page 44
... is succesful on ordinary needle. first row so that "zigs" and "zags" in both rows ore exactly opposite each other, Set stitch length according to thread bar width you want. For this line - Set machine for a medium-wide zigzag stitch and sew along this type of work use on linen and twilled fabrics. Imitation Hemstitching Machine Setting: E -0 C -2 B -0 Stitch Length: 1 -1/s Increase Tensions D - 2/s 1 csetBphuaxeeeintnatreuenadtbteircefeatuodotlsimlote.hnhaeLssedmeometcossltssowtiecitsltcriyecethhhwiwinunpgPomg.fvauwefSesfnhi'ftnsfifelcbaeceSebtsywrttsihuctooeersonmn...
... is succesful on ordinary needle. first row so that "zigs" and "zags" in both rows ore exactly opposite each other, Set stitch length according to thread bar width you want. For this line - Set machine for a medium-wide zigzag stitch and sew along this type of work use on linen and twilled fabrics. Imitation Hemstitching Machine Setting: E -0 C -2 B -0 Stitch Length: 1 -1/s Increase Tensions D - 2/s 1 csetBphuaxeeeintnatreuenadtbteircefeatuodotlsimlote.hnhaeLssedmeometcossltssowtiecitsltcriyecethhhwiwinunpgPomg.fvauwefSesfnhi'ftnsfifelcbaeceSebtsywrttsihuctooeersonmn...

Owner's Manual
Page 45
... or if bias seam binding is used for draperies or curtains Machine Setting: E -1 B-i A -6 C -1 Stitch Length 1 _V/s Blindstitching is placed in the folded edge and the right stitch up . Therefore these fabrics should be visible on the right side of foot so that its vertical flange goes through the sewing foot slot, Use a No.70 needle, a loose upper tension and thin thread. Bulky work evenly, holding top hem edge against...
... or if bias seam binding is used for draperies or curtains Machine Setting: E -1 B-i A -6 C -1 Stitch Length 1 _V/s Blindstitching is placed in the folded edge and the right stitch up . Therefore these fabrics should be visible on the right side of foot so that its vertical flange goes through the sewing foot slot, Use a No.70 needle, a loose upper tension and thin thread. Bulky work evenly, holding top hem edge against...
Owner's Manual
Page 47
... without a filler cord. 46 Trim the sewing threads Open the buttonhole with your seam ripper Be careful not to "3". Make 4-6 bartack stitches. fi ff J c 0 -a CD ® ® 0 ® ® ® Change D to completed line of first row, leaving needle up. Sew second row and stop about 4-6 stitches from end of stitching. Raise needle. ® three fastening stitches. Buttonholes CD Set D at "1'/2", C at end of filler cord at "1", stitch length lever fan satin stitch.
... without a filler cord. 46 Trim the sewing threads Open the buttonhole with your seam ripper Be careful not to "3". Make 4-6 bartack stitches. fi ff J c 0 -a CD ® ® 0 ® ® ® Change D to completed line of first row, leaving needle up. Sew second row and stop about 4-6 stitches from end of stitching. Raise needle. ® three fastening stitches. Buttonholes CD Set D at "1'/2", C at end of filler cord at "1", stitch length lever fan satin stitch.

Owner's Manual
Page 49
... the upper tension will really appreciate the free arm of your PFAFF 332 when you darn sleeves and socks. Sew across damaged spot (top picture) and anchor it in the machine. Even though the presser bar is suspended, the presser bar lever must be lowered to the machine, slip its spring into the slot in the foot. Machine Setting: E - 0 B -0 C -2 D -.3 Drop feed. Lace filler thread through the hole in the front edge of the needle plate, as instructed...
... the upper tension will really appreciate the free arm of your PFAFF 332 when you darn sleeves and socks. Sew across damaged spot (top picture) and anchor it in the machine. Even though the presser bar is suspended, the presser bar lever must be lowered to the machine, slip its spring into the slot in the foot. Machine Setting: E - 0 B -0 C -2 D -.3 Drop feed. Lace filler thread through the hole in the front edge of the needle plate, as instructed...
Owner's Manual
Page 51
... Drop Machine Feed 4 Script letters are best for monogram embroidery without a sewing foot. Watch that seams do not overlap at the beginning of your Automatic. 50 Attach cord stitcher and sew outlines of letters. You will soon enoy creative embroidery once you the Ornamentograph, the in the hoop, the presser bar suspended and the presser bar lever lowered. You will marvel at a uniform rate. Lower needle into fabric at oints of monogram. according to 3 Stitch Length...
... Drop Machine Feed 4 Script letters are best for monogram embroidery without a sewing foot. Watch that seams do not overlap at the beginning of your Automatic. 50 Attach cord stitcher and sew outlines of letters. You will soon enoy creative embroidery once you the Ornamentograph, the in the hoop, the presser bar suspended and the presser bar lever lowered. You will marvel at a uniform rate. Lower needle into fabric at oints of monogram. according to 3 Stitch Length...
Owner's Manual
Page 52
...-inch needle holders. The interchangeable doubleneedle holder is eosy to instructions on page 48 for heavier cording are available at extra cost. The large needle holder screw must always point toward the right. Additional parts for mounting feed cover plate. 51 R 7373 This set consists of: 4double-needle holdersfor needle distances of System 130 B needles. To attach cording plate refer to attach. Cording Stitch Length: I package of '/io, /o4, 3/ and 1/64 inch, 3 cording feet, 3 cording plates (2 with cord...
...-inch needle holders. The interchangeable doubleneedle holder is eosy to instructions on page 48 for heavier cording are available at extra cost. The large needle holder screw must always point toward the right. Additional parts for mounting feed cover plate. 51 R 7373 This set consists of: 4double-needle holdersfor needle distances of System 130 B needles. To attach cording plate refer to attach. Cording Stitch Length: I package of '/io, /o4, 3/ and 1/64 inch, 3 cording feet, 3 cording plates (2 with cord...

Owner's Manual
Page 57
... into Bobbin Case Inserting the Bobbin Case Recommended Needle and Thread Sizes Important Facts about Needles . Three-Needle Decorative Sewing Automatic Embroidery . Button Sewing Darning Monogram Embroidery . Cording Two-Needle Decorative Sewing. Stitch Length Regulation Dropping the Machine Feed Changing the Sewing Foot The Darning Foot Care and Maintenance Sewlight Facts Adjusting the Motor Belt Tension Trouble Shooting Page .1 .2 .4 .5 .6 .7 .8 .9 10 12 14 14 15 16 17 17 18 20 21 22 23 24 24 25 25 26 28 29 30 Zipper Insertion Edge Stitching Quilting Flat Felled Seams Rolled Hems...
... into Bobbin Case Inserting the Bobbin Case Recommended Needle and Thread Sizes Important Facts about Needles . Three-Needle Decorative Sewing Automatic Embroidery . Button Sewing Darning Monogram Embroidery . Cording Two-Needle Decorative Sewing. Stitch Length Regulation Dropping the Machine Feed Changing the Sewing Foot The Darning Foot Care and Maintenance Sewlight Facts Adjusting the Motor Belt Tension Trouble Shooting Page .1 .2 .4 .5 .6 .7 .8 .9 10 12 14 14 15 16 17 17 18 20 21 22 23 24 24 25 25 26 28 29 30 Zipper Insertion Edge Stitching Quilting Flat Felled Seams Rolled Hems...


