
Owner's Manual
Page 3
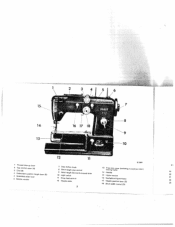
45 6 / I 5- 14- R 7379 1 Thread take-up lever 2 Top control cover (A) 3 Dial (B) 4 Embroidery pattern length lever (E) 5 Buttonhole slide lever 6 Bobbin winder 7 Slop motion knob 8 Stitch length stop control 9 Stitch length (forward-reverse) lever 10 Light switch 11 Drop feed control 12 Needle plate 13 free arm cover sewing hook) (enclosing transverse rotary 14 Needle 15 Upper tension 16 SewlighI swing-out fever 17 Needle position lever (C) 19 20 21 22 18 Stitch width control (D) 23 2
45 6 / I 5- 14- R 7379 1 Thread take-up lever 2 Top control cover (A) 3 Dial (B) 4 Embroidery pattern length lever (E) 5 Buttonhole slide lever 6 Bobbin winder 7 Slop motion knob 8 Stitch length stop control 9 Stitch length (forward-reverse) lever 10 Light switch 11 Drop feed control 12 Needle plate 13 free arm cover sewing hook) (enclosing transverse rotary 14 Needle 15 Upper tension 16 SewlighI swing-out fever 17 Needle position lever (C) 19 20 21 22 18 Stitch width control (D) 23 2
Owner's Manual
Page 13
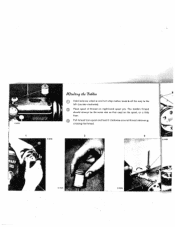
The bobbin thread should always be the same size as that used on right-hand spool pin. Pull thread from spool and lead it clockwise around thread retainer g, crossing the thread. 2 3 7100 h. /9 Oin?in th 2o6in Hold balance wheel a and turn stop motion knob b all the way to the left (counter-clockwise). Place spool of thread on the spool, or a little finer.
The bobbin thread should always be the same size as that used on right-hand spool pin. Pull thread from spool and lead it clockwise around thread retainer g, crossing the thread. 2 3 7100 h. /9 Oin?in th 2o6in Hold balance wheel a and turn stop motion knob b all the way to the left (counter-clockwise). Place spool of thread on the spool, or a little finer.
Owner's Manual
Page 14
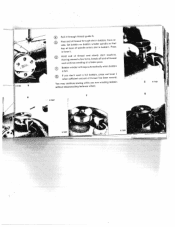
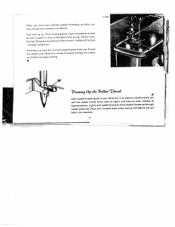
... R 7097 R 7099 You may continue sewing while you don't wont a full bobbin, press out lever i when sufficient amount of thread has been wound. R71O0 6 Pull it through slot in bobbin, from in side. Set bobbin on bobbin winder spindle so that key ot base of thread and continue winding at a faster... pace. 0 Bobbin winder will stop automatically when bobbin is full. Having wound a few turns, break off end of...
... R 7097 R 7099 You may continue sewing while you don't wont a full bobbin, press out lever i when sufficient amount of thread has been wound. R71O0 6 Pull it through slot in bobbin, from in side. Set bobbin on bobbin winder spindle so that key ot base of thread and continue winding at a faster... pace. 0 Bobbin winder will stop automatically when bobbin is full. Having wound a few turns, break off end of...
Owner's Manual
Page 15
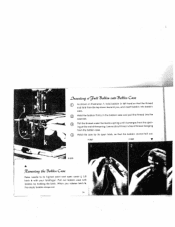
...holding the latch. Hold the bobbin firmly in left hand so that the bobbin cannot fall out. 6030 eu.ovin the 7 o 6 6in Ca5e Raise needle to its open latch, so that the thread end falls from the bobbin case. When you , and insert bobbin into bobbin case. _________ .9 Dnwrtin i9idt... 73c66in into 3 o 6 m6 n Case 0 As shown in illustration 1, hold bobbin in the bobbin case and pull the thread into the case slot. Lift latch k ...
...holding the latch. Hold the bobbin firmly in left hand so that the bobbin cannot fall out. 6030 eu.ovin the 7 o 6 6in Ca5e Raise needle to its open latch, so that the thread end falls from the bobbin case. When you , and insert bobbin into bobbin case. _________ .9 Dnwrtin i9idt... 73c66in into 3 o 6 m6 n Case 0 As shown in illustration 1, hold bobbin in the bobbin case and pull the thread into the case slot. Lift latch k ...
Owner's Manual
Page 16
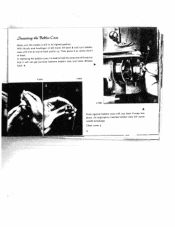
D9 n.stin th 7 c 6 in its highest position. In replacing the bobbin case, it is still in 3 6 Casz Make sure the needle is best that it will cquse needle breakage. I I of hook. R 7380 A Press against bobbin case until slot at end of thread so bobbin case and hook. With thumb arid forefinger of left hand, lift latch k and turn bobbin case until you hear it on center stud I . Then place it snap into place. Release I latch k. Close cover 15 An improperly inserted bobbin case will not get jammed between to hold the loose end of latch points up.
D9 n.stin th 7 c 6 in its highest position. In replacing the bobbin case, it is still in 3 6 Casz Make sure the needle is best that it will cquse needle breakage. I I of hook. R 7380 A Press against bobbin case until slot at end of thread so bobbin case and hook. With thumb arid forefinger of left hand, lift latch k and turn bobbin case until you hear it on center stud I . Then place it snap into place. Release I latch k. Close cover 15 An improperly inserted bobbin case will not get jammed between to hold the loose end of latch points up.
Owner's Manual
Page 17
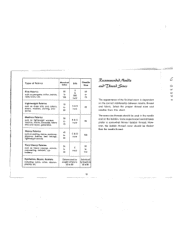
...The same size threads should be used in the needle and on the correct relationship between needle, thread and fabric. How ever, the bobbin thread never should be thicker than the needle thread. Very Heavy Fabrics 24 90 such as heavy TIcKrngz, canvas, overcodting, sailcloth, up..., etc. Select the proper thread sizes and needles from this chart. Some experienced seamstresses prefer a somewhat thinner bobbin thread. ioo 0 to A& B twist 80 peries. 80 on the bobbin. to 000 twist 60 or 70 ar sy 13 The appearance of the finished seam is dependent n< Lightweight ...
...The same size threads should be used in the needle and on the correct relationship between needle, thread and fabric. How ever, the bobbin thread never should be thicker than the needle thread. Very Heavy Fabrics 24 90 such as heavy TIcKrngz, canvas, overcodting, sailcloth, up..., etc. Select the proper thread sizes and needles from this chart. Some experienced seamstresses prefer a somewhat thinner bobbin thread. ioo 0 to A& B twist 80 peries. 80 on the bobbin. to 000 twist 60 or 70 ar sy 13 The appearance of the finished seam is dependent n< Lightweight ...
Owner's Manual
Page 22
... lever d is about four inches of the loop - Place both threads back under sewing foot before you thread the needle, pull about 1/2 inch to draw bobbin thread up . When you hove had sufficient needle threading practice, you put fabric into machine. 21 instead of thread through the needle eye before you...
... lever d is about four inches of the loop - Place both threads back under sewing foot before you thread the needle, pull about 1/2 inch to draw bobbin thread up . When you hove had sufficient needle threading practice, you put fabric into machine. 21 instead of thread through the needle eye before you...
Owner's Manual
Page 24
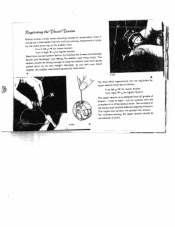
... ordinary sewing, the upper tension should tension rarely needs be set between 3 and 5. I: 23 __ 7 9 utaan ch '/ea 7n.on the bobbin case: Turn ii left gE( for tighter tension. embroidery Adtustment when it is mode by upper tension knob (y) as follows: Turn left c-< for...,il.nidbtahesocebadybtsohoeiwnurehnacja.daensrgkeenffydrrooemebuleryt.bwheTeaiennhngde V kt R 6946 A The final stitch appearance can be regulated by the small screw (x) on Bobbin should be a little tighter than adjusting, except for for looser tension. Turn right )*-
... ordinary sewing, the upper tension should tension rarely needs be set between 3 and 5. I: 23 __ 7 9 utaan ch '/ea 7n.on the bobbin case: Turn ii left gE( for tighter tension. embroidery Adtustment when it is mode by upper tension knob (y) as follows: Turn left c-< for...,il.nidbtahesocebadybtsohoeiwnurehnacja.daensrgkeenffydrrooemebuleryt.bwheTeaiennhngde V kt R 6946 A The final stitch appearance can be regulated by the small screw (x) on Bobbin should be a little tighter than adjusting, except for for looser tension. Turn right )*-

Owner's Manual
Page 32
...rise up enough above needle plate level. Remedy: Have your Pfaff dealer make the necessary adjustment. 31 1 I Needle too thin or thread too heavy. Bobbin case inserted incorrectly. 4. Remedy: Replace needle at once to prevent further damage. Bobbin unevenly wound. Use only first-rote thread - - Don... Improper tension. Guide the material lightly. Don't force the feeding motion. Release upper tension by setting ii on top when winding the bobbin, cover and through thread but lead guide h. 3. Fabric pulls needle so it bends and strikes needle plate. Thread too heavy, knotty...
...rise up enough above needle plate level. Remedy: Have your Pfaff dealer make the necessary adjustment. 31 1 I Needle too thin or thread too heavy. Bobbin case inserted incorrectly. 4. Remedy: Replace needle at once to prevent further damage. Bobbin unevenly wound. Use only first-rote thread - - Don... Improper tension. Guide the material lightly. Don't force the feeding motion. Release upper tension by setting ii on top when winding the bobbin, cover and through thread but lead guide h. 3. Fabric pulls needle so it bends and strikes needle plate. Thread too heavy, knotty...

Owner's Manual
Page 33
Take off needle plate and remove lint with a stiff brush. 6. Bobbin winder working while sewing. (When a bobbin is still jammed, call your Pfaff dealer for help. never salad oil or glycerine. Move the balance wheel away from you put a few drops of oil or cleaning ...fluid into the hook raceway. Clean and oil hook raceway. Stop bobbin winder. Mechanism clogged by adjusting idler...
Take off needle plate and remove lint with a stiff brush. 6. Bobbin winder working while sewing. (When a bobbin is still jammed, call your Pfaff dealer for help. never salad oil or glycerine. Move the balance wheel away from you put a few drops of oil or cleaning ...fluid into the hook raceway. Clean and oil hook raceway. Stop bobbin winder. Mechanism clogged by adjusting idler...
Owner's Manual
Page 51
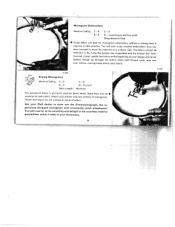
... attachment. Hold both thread ends, and sew over outline, moving hoop slowly and evenly. 7165 46121 Sewing Monograms Machine Setting: E -0 C-2 B-0 D - 2'/ to your design and draw bobbin thread up through the fabric. Attach cord stitcher and sew outlines of letters.
... attachment. Hold both thread ends, and sew over outline, moving hoop slowly and evenly. 7165 46121 Sewing Monograms Machine Setting: E -0 C-2 B-0 D - 2'/ to your design and draw bobbin thread up through the fabric. Attach cord stitcher and sew outlines of letters.

Owner's Manual
Page 57
...Monogram Embroidery . Cording Two-Needle Decorative Sewing. Changing the Needle Upper Threading Operating the Automatic Needle Threader Drawing Up the Bobbin Thread Correct Tension Regulation Regulating the Thread Tension . Contents Foreword Essential Parts of Machine Operation Important Points to Remember . ... Stitch Sewing Zigzag Sewing Setting Machine for Automatic Embroidery Winding the Bobbin Removing the Bobbin Case Inserting a Full Bobbin into Bobbin Case Inserting the Bobbin Case Recommended Needle and Thread Sizes Important Facts about Needles . Fundamentals of Machine ....
...Monogram Embroidery . Cording Two-Needle Decorative Sewing. Changing the Needle Upper Threading Operating the Automatic Needle Threader Drawing Up the Bobbin Thread Correct Tension Regulation Regulating the Thread Tension . Contents Foreword Essential Parts of Machine Operation Important Points to Remember . ... Stitch Sewing Zigzag Sewing Setting Machine for Automatic Embroidery Winding the Bobbin Removing the Bobbin Case Inserting a Full Bobbin into Bobbin Case Inserting the Bobbin Case Recommended Needle and Thread Sizes Important Facts about Needles . Fundamentals of Machine ....


