

Owner's Manual
Page 3
Parts of your select sewing machine 1 Connection socket "foot control with main cord" 2 Main switch 3 Handwheel release disk 4 Handwheel 5 Bobbin winder 6 Lid with stitches 7 Extra spool holder 8 Spool holder with spool cap 9 Take-up lever 10 Needle thread tension dial 11 Threading path 12 Thread... 13 Needle threader (1540) 14 Presser foot holder with presser foot 15 Removable accessory tray 16 Base plate 17 IDT System / Integrated Dual Feed (1540/1530) 18 Needle holder with fixing screw 19 Presser foot lifter 20 Button for "reverse sewing" 21 Stitch length dial 22 Stitch selection 1540 23...
Parts of your select sewing machine 1 Connection socket "foot control with main cord" 2 Main switch 3 Handwheel release disk 4 Handwheel 5 Bobbin winder 6 Lid with stitches 7 Extra spool holder 8 Spool holder with spool cap 9 Take-up lever 10 Needle thread tension dial 11 Threading path 12 Thread... 13 Needle threader (1540) 14 Presser foot holder with presser foot 15 Removable accessory tray 16 Base plate 17 IDT System / Integrated Dual Feed (1540/1530) 18 Needle holder with fixing screw 19 Presser foot lifter 20 Button for "reverse sewing" 21 Stitch length dial 22 Stitch selection 1540 23...

Owner's Manual
Page 5
... before using and before relamping. Do not place in or drop into any adjustments in the needle area, such as threading needle, changing needle, threading bobbin, or changing presser foot, etc. 20. Use only attachments recommended by the manufacturer as contained in the instruction manual. 21. Special care is designed and...
... before using and before relamping. Do not place in or drop into any adjustments in the needle area, such as threading needle, changing needle, threading bobbin, or changing presser foot, etc. 20. Use only attachments recommended by the manufacturer as contained in the instruction manual. 21. Special care is designed and...

Owner's Manual
Page 6
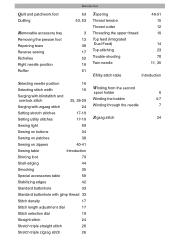
Contents Accessories and needles Accessory tray Appliqué Appliqué foot Bias-tape binder Blind stitch Bobbin case Buttonholes Changing the needle plate Changing the needle Cleaning and oiling Closed overlock stitch Cording foot Covering stitch Darning with... the elastic stitch Darning with the straight stitch Darning Decorative sewing Drawing up the bobbin thread Dropping the feed dog Elastic stitch Elastic stitches Electrical connection Embroidering with a dense zigzag stitch Eyelet embroidery Feather stitch Felling foot ...
Contents Accessories and needles Accessory tray Appliqué Appliqué foot Bias-tape binder Blind stitch Bobbin case Buttonholes Changing the needle plate Changing the needle Cleaning and oiling Closed overlock stitch Cording foot Covering stitch Darning with... the elastic stitch Darning with the straight stitch Darning Decorative sewing Drawing up the bobbin thread Dropping the feed dog Elastic stitch Elastic stitches Electrical connection Embroidering with a dense zigzag stitch Eyelet embroidery Feather stitch Felling foot ...
Owner's Manual
Page 7
... Selecting needle position 16 Selecting stitch width 16 Winding from the second spool holder 6 Serging with blindstitch and overlock stitch 25, 28-29 Winding the bobbin 4-7 Serging with zigzag stitch 24 Winding through the needle 7 Setting stretch stitches 17-19 Setting utility stitches 17-19 Zigzag stitch 24 Sewing light 69...
... Selecting needle position 16 Selecting stitch width 16 Winding from the second spool holder 6 Serging with blindstitch and overlock stitch 25, 28-29 Winding the bobbin 4-7 Serging with zigzag stitch 24 Winding through the needle 7 Setting stretch stitches 17-19 Setting utility stitches 17-19 Zigzag stitch 24 Sewing light 69...

Owner's Manual
Page 11
Operate your Pfaff select Operate your Pfaff select Electrical connection Removable accessory tray Bobbins Bobbin case Threading the needle Needle threader Pulling up the bobbin thread Presser foot lifter Thread cutter Changing the presser foot IDT System/Integrated Dual Feed Changing the needle Needle thread tension Lowering the feed dog Stitch width dial Needle position dial Reverse sewing Stitch length dial Stitch selection 2 3 4-7 8-9 10 11 12 13 12 13 14 15 15 15 16 16 17 17 18-19 1
Operate your Pfaff select Operate your Pfaff select Electrical connection Removable accessory tray Bobbins Bobbin case Threading the needle Needle threader Pulling up the bobbin thread Presser foot lifter Thread cutter Changing the presser foot IDT System/Integrated Dual Feed Changing the needle Needle thread tension Lowering the feed dog Stitch width dial Needle position dial Reverse sewing Stitch length dial Stitch selection 2 3 4-7 8-9 10 11 12 13 12 13 14 15 15 15 16 16 17 17 18-19 1

Owner's Manual
Page 14
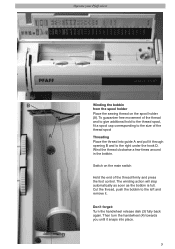
Placing the bobbin Switch off the main switch (2) Place the empty bobbin so that the black pin of the bobbin winder (5) snaps into the slot of the arrow. Push the bobbin to the right Note: The bobbin can only be wound when it stops in the direction of the bobbin. Operate your Pfaff select Preparing the machine for bobbin winding Hold the handwheel (4) firmly and turn the handwheel release disc (3) until it is winding the bobbin. This stops the needle from moving while the machine is moved fully to the right. 4
Placing the bobbin Switch off the main switch (2) Place the empty bobbin so that the black pin of the bobbin winder (5) snaps into the slot of the arrow. Push the bobbin to the right Note: The bobbin can only be wound when it stops in the direction of the bobbin. Operate your Pfaff select Preparing the machine for bobbin winding Hold the handwheel (4) firmly and turn the handwheel release disc (3) until it is winding the bobbin. This stops the needle from moving while the machine is moved fully to the right. 4
Owner's Manual
Page 15
... remove it through opening B and to the right under the hook D. Don't forget: Turn the handwheel release disk (3) fully back again. Operate your Pfaff select B A D Winding the bobbin from the spool holder Place the sewing thread on the main switch Hold the end of the thread firmly and press the foot... control. Cut the thread, push the bobbin to the size of the thread spool Threading Place the thread into place. 5 The winding action will stop automatically as soon as the...
... remove it through opening B and to the right under the hook D. Don't forget: Turn the handwheel release disk (3) fully back again. Operate your Pfaff select B A D Winding the bobbin from the spool holder Place the sewing thread on the main switch Hold the end of the thread firmly and press the foot... control. Cut the thread, push the bobbin to the size of the thread spool Threading Place the thread into place. 5 The winding action will stop automatically as soon as the...
Owner's Manual
Page 16
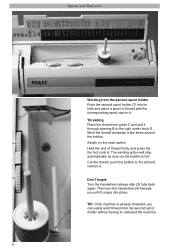
... the thread into guide C and pull it through opening B to the left and remove it. The winding action will stop automatically as soon as the bobbin is already threaded, you until it . Then turn the handwheel (4) towards you can easily wind thread from the second spool holder Push the second spool... corresponding spool cap on the main switch Hold the end of thread firmly and press the the foot control. Cut the thread, push the bobbin to the right under hook D. Don't forget: Turn the handwheel release disk (3) fully back again. TIP: If the machine is full. Wind the thread ...
... the thread into guide C and pull it through opening B to the left and remove it. The winding action will stop automatically as soon as the bobbin is already threaded, you until it . Then turn the handwheel (4) towards you can easily wind thread from the second spool holder Push the second spool... corresponding spool cap on the main switch Hold the end of thread firmly and press the the foot control. Cut the thread, push the bobbin to the right under hook D. Don't forget: Turn the handwheel release disk (3) fully back again. TIP: If the machine is full. Wind the thread ...

Owner's Manual
Page 17
... page 4). 7 Raise presser foot lifter (19). Then wind the thread several times around the bobbin. Pass the thread to right (9). Press the foot control and winding the bobbin. The take -up lever must be positioned at its very top. Don't forget: Make sure to stop the needle from left ...to the right under the guide hook D. Operate your Pfaff select D Winding through the right threading slot (11) ...
... page 4). 7 Raise presser foot lifter (19). Then wind the thread several times around the bobbin. Pass the thread to right (9). Press the foot control and winding the bobbin. The take -up lever must be positioned at its very top. Don't forget: Make sure to stop the needle from left ...to the right under the guide hook D. Operate your Pfaff select D Winding through the right threading slot (11) ...

Owner's Manual
Page 18
Operate your Pfaff select Bobbin Case/Hook Cover Switch off the main switch Hold the side of the material only when sewing decorative seams, buttonholes and darning. 8 Release the lever and remove the empty bobbin. The interlacing should be interlaced between the two fabric pieces. Thread tension To ensure perfect sewing and a durable seam..., the top and bottom thread-tensions must be well adjusted to each other and the threads must be visible from the underside of the bobbin case/hook cover and open it towards you. Removing the...
Operate your Pfaff select Bobbin Case/Hook Cover Switch off the main switch Hold the side of the material only when sewing decorative seams, buttonholes and darning. 8 Release the lever and remove the empty bobbin. The interlacing should be interlaced between the two fabric pieces. Thread tension To ensure perfect sewing and a durable seam..., the top and bottom thread-tensions must be well adjusted to each other and the threads must be visible from the underside of the bobbin case/hook cover and open it towards you. Removing the...

Owner's Manual
Page 19
In doing so, pull the thread sideways through slot A, then under the tension plate B until it will go. Inserting the bobbin case Lift lever F and slide the bobbin case onto the hook pin D as far as it rests in the opening (see arrow). The bobbin case must not fall out of the bobbin case must turn clockwise. Opening E of the hook. 9 Check: Pull the bobbin thread sharply. Operate your Pfaff select Inserting the bobbin Insert the full bobbin into the bobbin case. Check: When you look at the bobbin and pull the thread, the bobbin must face upwards.
In doing so, pull the thread sideways through slot A, then under the tension plate B until it will go. Inserting the bobbin case Lift lever F and slide the bobbin case onto the hook pin D as far as it rests in the opening (see arrow). The bobbin case must not fall out of the bobbin case must turn clockwise. Opening E of the hook. 9 Check: Pull the bobbin thread sharply. Operate your Pfaff select Inserting the bobbin Insert the full bobbin into the bobbin case. Check: When you look at the bobbin and pull the thread, the bobbin must face upwards.

Owner's Manual
Page 22
Pull the needle thread to draw up the bobbin thread Turn off the main switch Raise the presser foot. Operate your Pfaff select Drawing up the bobbin thread. Thread cutter Pull the threads from the back to the left. Bobbin thread Close the bobbin case/hook cover and pull the thread under the presser foot to the front over the thread cutter (12). 12 Hold the needle thread and turn the handwheel towards you until the needle is at the top again and the bobbin thread has formed a loop.
Pull the needle thread to draw up the bobbin thread Turn off the main switch Raise the presser foot. Operate your Pfaff select Drawing up the bobbin thread. Thread cutter Pull the threads from the back to the left. Bobbin thread Close the bobbin case/hook cover and pull the thread under the presser foot to the front over the thread cutter (12). 12 Hold the needle thread and turn the handwheel towards you until the needle is at the top again and the bobbin thread has formed a loop.
Owner's Manual
Page 25
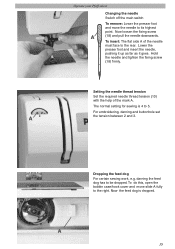
Operate your Pfaff select Changing the needle Switch off the main switch To remove: Lower the presser foot and move slide A fully to the right. Dropping the feed dog For certain sewing work, e.g. To do this, open the bobbin case/hook cover and move the needle to 5. Lower the presser foot and insert...
Operate your Pfaff select Changing the needle Switch off the main switch To remove: Lower the presser foot and move slide A fully to the right. Dropping the feed dog For certain sewing work, e.g. To do this, open the bobbin case/hook cover and move the needle to 5. Lower the presser foot and insert...

Owner's Manual
Page 33
...positions in the range of the same height as the workpiece 23 Perfect tension Too high tension Too low tension Topstitching Straight stitch G (1540)/E (1530, 1520) can be sewn using any of the needle thread tension is secured with a wide zigzag stitch. If you can always guide the ... position dial. B A Sewing aid for topstitching work. The edge guide is inserted into hole A and is described on page 15 and the bobbin thread tension on the needle plate or use the edge guide (standard accessory No.8). Utility stitches and practical sewing Needle thread tension To ensure perfect...
...positions in the range of the same height as the workpiece 23 Perfect tension Too high tension Too low tension Topstitching Straight stitch G (1540)/E (1530, 1520) can be sewn using any of the needle thread tension is secured with a wide zigzag stitch. If you can always guide the ... position dial. B A Sewing aid for topstitching work. The edge guide is inserted into hole A and is described on page 15 and the bobbin thread tension on the needle plate or use the edge guide (standard accessory No.8). Utility stitches and practical sewing Needle thread tension To ensure perfect...
Owner's Manual
Page 45
... topstitching it. Twin needles are particularly suitable for topstitching is advisable to the seam. Don't forget, the higher the bobbin thread tension, the more intense the gathering effect. • Sew a test seam to determine the level of gather.... to thread the twin needle. Use only a stretch needle when sewing stretch material! Utility stitches and practical sewing stitch stitch 1540 G 0 3 1530 E 0 3 1520 E 0 3 3-5 0/1 3-5 0/1 3-5 0/1 1540 G 1530 E 1520 E 0 3-4 0 3-4 0 3-4 3-5 0/1 3-5 0/1 3-5 0/1 Hemming with elastic threads Fine, light fabrics such as Batist, rayon ...
... topstitching it. Twin needles are particularly suitable for topstitching is advisable to the seam. Don't forget, the higher the bobbin thread tension, the more intense the gathering effect. • Sew a test seam to determine the level of gather.... to thread the twin needle. Use only a stretch needle when sewing stretch material! Utility stitches and practical sewing stitch stitch 1540 G 0 3 1530 E 0 3 1520 E 0 3 3-5 0/1 3-5 0/1 3-5 0/1 1540 G 1530 E 1520 E 0 3-4 0 3-4 0 3-4 3-5 0/1 3-5 0/1 3-5 0/1 Hemming with elastic threads Fine, light fabrics such as Batist, rayon ...

Owner's Manual
Page 46
Utility stitches and practical sewing stitch stitch 1540 G 0 6 1530 E 0 6 1520 E 0 6 3-5 0/1 3-5 0/1 3-5 0/1 1540 M 5- Stretch 3-5 0/1 3-5 0/1 3-5 0/1 Gathering with the straight stitch Using a straight stitch, you pull the threads. • The gather can also be sewn one ... sleeves, skirts and valances with elastic thread Sleeve and waist seams can be altered after sewing by pulling the ends of fabric by pulling the bobbin thread. To ensure consistent gathering you pull the thread. • Finally, the thread ends are knotted to secure the gather. The needle must ...
Utility stitches and practical sewing stitch stitch 1540 G 0 6 1530 E 0 6 1520 E 0 6 3-5 0/1 3-5 0/1 3-5 0/1 1540 M 5- Stretch 3-5 0/1 3-5 0/1 3-5 0/1 Gathering with the straight stitch Using a straight stitch, you pull the threads. • The gather can also be sewn one ... sleeves, skirts and valances with elastic thread Sleeve and waist seams can be altered after sewing by pulling the ends of fabric by pulling the bobbin thread. To ensure consistent gathering you pull the thread. • Finally, the thread ends are knotted to secure the gather. The needle must ...

Owner's Manual
Page 47
... by guiding the fabric back and forth evenly in the darning hoop. • Drop the feed dog. • Pull up the bobbin thread and hold the threads when you have finished sewing the damaged area, rotate the fabric again. Tip: If you move ...• When you start sewing. • Darn the damaged area by moving the fabric back and forth. D C B Utility stitches and practical sewing E stitch F 1540 G 0 - 1530 E 0 - 2-3 6 2-3 Optional 1520 E 0 - 2-3 Optional G Darning with a small curve. A • Place the darning work in the prescribed direction while ensuring that each ...
... by guiding the fabric back and forth evenly in the darning hoop. • Drop the feed dog. • Pull up the bobbin thread and hold the threads when you have finished sewing the damaged area, rotate the fabric again. Tip: If you move ...• When you start sewing. • Darn the damaged area by moving the fabric back and forth. D C B Utility stitches and practical sewing E stitch F 1540 G 0 - 1530 E 0 - 2-3 6 2-3 Optional 1520 E 0 - 2-3 Optional G Darning with a small curve. A • Place the darning work in the prescribed direction while ensuring that each ...
Owner's Manual
Page 62
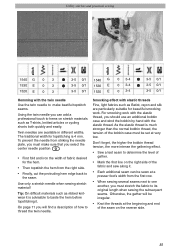
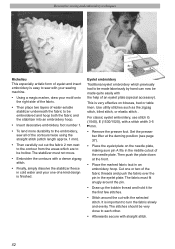
... fabric must not move. • Embroider the contours with straight stitch. 52 The stabilizer must fit snugly around the pin. • Draw up the bobbin thread and hold it for the first few stitches. • Stitch around the cut out the fabric 2 mm next to the contour from the ..., or elastic stitch. . Cut one -of-a-kind design is important to turn the fabric slowly and evenly. For classic eyelet embroidery, use stitch G (1540), E (1530/1520), with your sewing machine. • Using a magic marker, draw your one or two of the fabric threads and push the fabric over the pin...
... fabric must not move. • Embroider the contours with straight stitch. 52 The stabilizer must fit snugly around the pin. • Draw up the bobbin thread and hold it for the first few stitches. • Stitch around the cut out the fabric 2 mm next to the contour from the ..., or elastic stitch. . Cut one -of-a-kind design is important to turn the fabric slowly and evenly. For classic eyelet embroidery, use stitch G (1540), E (1530/1520), with your sewing machine. • Using a magic marker, draw your one or two of the fabric threads and push the fabric over the pin...

Owner's Manual
Page 70
... cording tongue pre-shapes the fabric during sewing. • Gently pull the fabric taut while sewing the pintucks. 60 Accessories and needles stitch 1540 G 0 2,5 1530 E 0 2,5 1520 E 0 2,5 5 Shirring 5 foot 5 Pintuck foot This classic heirloom sewing technique can attach a cording tongue (optional accessory) on the ... become knotted during sewing and produces a moredefined pintuck. This will help to emphasize the pintuck effect, you start on "Bobbin thread tension"). A cording tongue is not used when inserting a gimp thread in the foot. Tip: If you would like to ...
... cording tongue pre-shapes the fabric during sewing. • Gently pull the fabric taut while sewing the pintucks. 60 Accessories and needles stitch 1540 G 0 2,5 1530 E 0 2,5 1520 E 0 2,5 5 Shirring 5 foot 5 Pintuck foot This classic heirloom sewing technique can attach a cording tongue (optional accessory) on the ... become knotted during sewing and produces a moredefined pintuck. This will help to emphasize the pintuck effect, you start on "Bobbin thread tension"). A cording tongue is not used when inserting a gimp thread in the foot. Tip: If you would like to ...

Owner's Manual
Page 80
...;at right. Adjust thread tension. Thread bunching at top or bottom side of oil to the hook. Only use good threads. Check needle and bobbin thread tensions Machine does not feed or feeds irregularly Sewing lint has collected between the Remove needle plate, remove lint feed dog teeth rows with... or blunt. Needle breaks off the main switch. Seam is sewn unevenly The tension needs adjusting Thread is too thick, slubbed or hard The bobbin thread is not properly installed. Needle is bent Needle is too thick or too thin Needle is too thick. Thread up correctly. Use a ...
...;at right. Adjust thread tension. Thread bunching at top or bottom side of oil to the hook. Only use good threads. Check needle and bobbin thread tensions Machine does not feed or feeds irregularly Sewing lint has collected between the Remove needle plate, remove lint feed dog teeth rows with... or blunt. Needle breaks off the main switch. Seam is sewn unevenly The tension needs adjusting Thread is too thick, slubbed or hard The bobbin thread is not properly installed. Needle is bent Needle is too thick or too thin Needle is too thick. Thread up correctly. Use a ...

