

Owner's Manual
Page 1
select 1520 1530 1540 Instruction manual
select 1520 1530 1540 Instruction manual

Owner's Manual
Page 3
Parts of your select sewing machine 1 Connection socket "foot control with main cord" 2 Main switch 3 Handwheel release disk 4 Handwheel 5 Bobbin winder 6 Lid with stitches 7 Extra spool holder 8 Spool holder .../1530) 18 Needle holder with fixing screw 19 Presser foot lifter 20 Button for "reverse sewing" 21 Stitch length dial 22 Stitch selection 1540 23 Carrying handle 24 Stitch selection 1530 & 1520 25 Thread guide 26 Sewing lamp (max. 15 watt) 27 Stitch width dial 28 Needle position dial 29 Needle plate
Parts of your select sewing machine 1 Connection socket "foot control with main cord" 2 Main switch 3 Handwheel release disk 4 Handwheel 5 Bobbin winder 6 Lid with stitches 7 Extra spool holder 8 Spool holder .../1530) 18 Needle holder with fixing screw 19 Presser foot lifter 20 Button for "reverse sewing" 21 Stitch length dial 22 Stitch selection 1540 23 Carrying handle 24 Stitch selection 1530 & 1520 25 Thread guide 26 Sewing lamp (max. 15 watt) 27 Stitch width dial 28 Needle position dial 29 Needle plate
Owner's Manual
Page 7
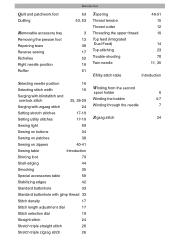
... (Integrated Dual Feed) Top-stitching Trouble-shooting Twin needle 49-51 15 12 10 14 23 70 11, 35 Utility stitch table Introduction Selecting needle position 16 Selecting stitch width 16 Winding from the second spool holder 6 Serging with blindstitch and overlock stitch 25, 28-29 Winding the bobbin 4-7 Serging ... table 58 Stabilizing edges 42 Standard buttonhole 33 Standard buttonhole with gimp thread 33 Stitch density 17 Stitch length adjustment dial 17 Stitch selection dial 19 Straight stitch 24 Stretch triple straight stitch 26 Stretch triple zigzag stitch 26
... (Integrated Dual Feed) Top-stitching Trouble-shooting Twin needle 49-51 15 12 10 14 23 70 11, 35 Utility stitch table Introduction Selecting needle position 16 Selecting stitch width 16 Winding from the second spool holder 6 Serging with blindstitch and overlock stitch 25, 28-29 Winding the bobbin 4-7 Serging ... table 58 Stabilizing edges 42 Standard buttonhole 33 Standard buttonhole with gimp thread 33 Stitch density 17 Stitch length adjustment dial 17 Stitch selection dial 19 Straight stitch 24 Stretch triple straight stitch 26 Stretch triple zigzag stitch 26
Owner's Manual
Page 8
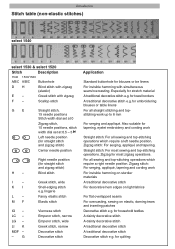
... stitch Elastic stitch IG - For all sewing and top-stitching operations which require a right needle position. Introduction Stitch table (non-elastic stitches) select 1540 select 1530 & select 1520 Stitch Description 1540 1530/1520 A/B/C A/B/C Buttonhole D H Blind stitch with zigzag F - Greek stitch with zigzag (elastic) E - for straight stitch and zigzag stitch) Blind stitch I L - Zigzag for embroidering blouses...
... stitch Elastic stitch IG - For all sewing and top-stitching operations which require a right needle position. Introduction Stitch table (non-elastic stitches) select 1540 select 1530 & select 1520 Stitch Description 1540 1530/1520 A/B/C A/B/C Buttonhole D H Blind stitch with zigzag F - Greek stitch with zigzag (elastic) E - for straight stitch and zigzag stitch) Blind stitch I L - Zigzag for embroidering blouses...

Owner's Manual
Page 9
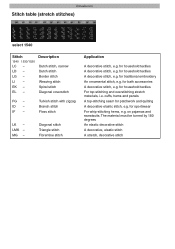
... stitch, 15 needle positions Stitch width knob 0.5 - 5 For sewing elastic bands on elastic materials or seams on sportswear and workwear H - Introduction Stitch table (stretch stitches) select 1540 select 1530 & select 1520 Stitch Description 1540 1530...
... stitch, 15 needle positions Stitch width knob 0.5 - 5 For sewing elastic bands on elastic materials or seams on sportswear and workwear H - Introduction Stitch table (stretch stitches) select 1540 select 1530 & select 1520 Stitch Description 1540 1530...
Owner's Manual
Page 10
... A decorative stitch, e.g. for household textiles For top-stitching and overstitching stretch materials, i.e. LG - for household textiles A decorative stitch, e.g. EL - LD - Introduction Stitch table (stretch stitches) select 1540 Stitch 1540 1530/1520 LC - for sportswear For whip-stitching hems, e.g.
... A decorative stitch, e.g. for household textiles For top-stitching and overstitching stretch materials, i.e. LG - for household textiles A decorative stitch, e.g. EL - LD - Introduction Stitch table (stretch stitches) select 1540 Stitch 1540 1530/1520 LC - for sportswear For whip-stitching hems, e.g.

Owner's Manual
Page 11
Operate your Pfaff select Operate your Pfaff select Electrical connection Removable accessory tray Bobbins Bobbin case Threading the needle Needle threader Pulling up the bobbin thread Presser foot lifter Thread cutter Changing the presser foot IDT System/Integrated Dual Feed Changing the needle Needle thread tension Lowering the feed dog Stitch width dial Needle position dial Reverse sewing Stitch length dial Stitch selection 2 3 4-7 8-9 10 11 12 13 12 13 14 15 15 15 16 16 17 17 18-19 1
Operate your Pfaff select Operate your Pfaff select Electrical connection Removable accessory tray Bobbins Bobbin case Threading the needle Needle threader Pulling up the bobbin thread Presser foot lifter Thread cutter Changing the presser foot IDT System/Integrated Dual Feed Changing the needle Needle thread tension Lowering the feed dog Stitch width dial Needle position dial Reverse sewing Stitch length dial Stitch selection 2 3 4-7 8-9 10 11 12 13 12 13 14 15 15 15 16 16 17 17 18-19 1
Owner's Manual
Page 12
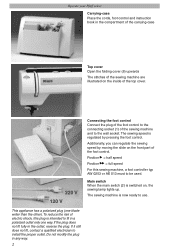
... reduce the risk of electric shock, this sewing machine, a foot controller typ AW 0253 or AE 013 must to install the proper outlet. Operate your Pfaff select Carrying-case Place the cords, foot control and instruction book in the compartment of the carrying-case Top cover Open the folding cover (6) upwards The...
... reduce the risk of electric shock, this sewing machine, a foot controller typ AW 0253 or AE 013 must to install the proper outlet. Operate your Pfaff select Carrying-case Place the cords, foot control and instruction book in the compartment of the carrying-case Top cover Open the folding cover (6) upwards The...
Owner's Manual
Page 13
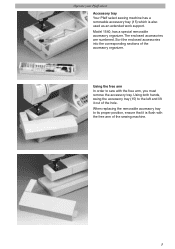
Operate your Pfaff select Accessory tray Your Pfaff select sewing machine has a removable accessory tray (15) which is flush with the free arm, you must remove the accessory tray. Model 1540, has a special ...
Operate your Pfaff select Accessory tray Your Pfaff select sewing machine has a removable accessory tray (15) which is flush with the free arm, you must remove the accessory tray. Model 1540, has a special ...

Owner's Manual
Page 14
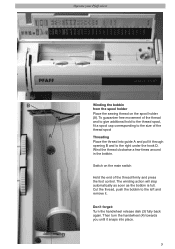
Push the bobbin to the right Note: The bobbin can only be wound when it stops in the direction of the bobbin. This stops the needle from moving while the machine is moved fully to the right. 4 Placing the bobbin Switch off the main switch (2) Place the empty bobbin so that the black pin of the bobbin winder (5) snaps into the slot of the arrow. Operate your Pfaff select Preparing the machine for bobbin winding Hold the handwheel (4) firmly and turn the handwheel release disc (3) until it is winding the bobbin.
Push the bobbin to the right Note: The bobbin can only be wound when it stops in the direction of the bobbin. This stops the needle from moving while the machine is moved fully to the right. 4 Placing the bobbin Switch off the main switch (2) Place the empty bobbin so that the black pin of the bobbin winder (5) snaps into the slot of the arrow. Operate your Pfaff select Preparing the machine for bobbin winding Hold the handwheel (4) firmly and turn the handwheel release disc (3) until it is winding the bobbin.
Owner's Manual
Page 15
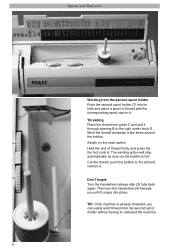
... on the spool holder (8). Cut the thread, push the bobbin to the size of the thread firmly and press the foot control. Operate your Pfaff select B A D Winding the bobbin from the spool holder Place the sewing thread on the main switch Hold the end of the thread spool Threading Place the...
... on the spool holder (8). Cut the thread, push the bobbin to the size of the thread firmly and press the foot control. Operate your Pfaff select B A D Winding the bobbin from the spool holder Place the sewing thread on the main switch Hold the end of the thread spool Threading Place the...
Owner's Manual
Page 16
... the thread clockwise a few times around the bobbin. Switch on it . Cut the thread, push the bobbin to the left and remove it . Operate your Pfaff select C B Winding from the second spool D holder without having to unthread the machine. 6
... the thread clockwise a few times around the bobbin. Switch on it . Cut the thread, push the bobbin to the left and remove it . Operate your Pfaff select C B Winding from the second spool D holder without having to unthread the machine. 6

Owner's Manual
Page 17
... thread into the take -up lever from moving while winding the bobbin (see page 4). 7 Then wind the thread several times around the bobbin. Operate your Pfaff select D Winding through the right threading slot (11) and upwards. Pass the needle thread through the presser foot and downwards; Press the foot control and winding...
... thread into the take -up lever from moving while winding the bobbin (see page 4). 7 Then wind the thread several times around the bobbin. Operate your Pfaff select D Winding through the right threading slot (11) and upwards. Pass the needle thread through the presser foot and downwards; Press the foot control and winding...

Owner's Manual
Page 18
... the underside of the bobbin case/hook cover and open it towards you. The interlacing should be interlaced between the two fabric pieces. Operate your Pfaff select Bobbin Case/Hook Cover Switch off the main switch Hold the side of the material only when sewing decorative seams, buttonholes and darning. 8
... the underside of the bobbin case/hook cover and open it towards you. The interlacing should be interlaced between the two fabric pieces. Operate your Pfaff select Bobbin Case/Hook Cover Switch off the main switch Hold the side of the material only when sewing decorative seams, buttonholes and darning. 8

Owner's Manual
Page 19
In doing so, pull the thread sideways through slot A, then under the tension plate B until it will go. Opening E of the bobbin case must not fall out of the hook. 9 Inserting the bobbin case Lift lever F and slide the bobbin case onto the hook pin D as far as it rests in the opening (see arrow). The bobbin case must face upwards. Check: When you look at the bobbin and pull the thread, the bobbin must turn clockwise. Check: Pull the bobbin thread sharply. Operate your Pfaff select Inserting the bobbin Insert the full bobbin into the bobbin case.
In doing so, pull the thread sideways through slot A, then under the tension plate B until it will go. Opening E of the bobbin case must not fall out of the hook. 9 Inserting the bobbin case Lift lever F and slide the bobbin case onto the hook pin D as far as it rests in the opening (see arrow). The bobbin case must face upwards. Check: When you look at the bobbin and pull the thread, the bobbin must turn clockwise. Check: Pull the bobbin thread sharply. Operate your Pfaff select Inserting the bobbin Insert the full bobbin into the bobbin case.
Owner's Manual
Page 20
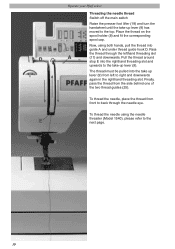
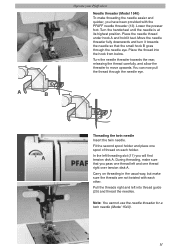
... spool holder (8) and fit the corresponding spool cap. Finally, pass the thread from the side behind one of the two thread guides (25). Operate your Pfaff select Threading the needle thread Switch off the main switch Raise the presser foot lifter (19) and turn the handwheel until the take up lever (9) from...
... spool holder (8) and fit the corresponding spool cap. Finally, pass the thread from the side behind one of the two thread guides (25). Operate your Pfaff select Threading the needle thread Switch off the main switch Raise the presser foot lifter (19) and turn the handwheel until the take up lever (9) from...
Owner's Manual
Page 21
... pass one thread left and one spool of thread on threading in the usual way, but make sure the threads are not twisted with the PFAFF needle threader (13). A B Operate your Pfaff select Needle threader (Model 1540) To make threading the needle easier and quicker, you have been provided with each holder.
... pass one thread left and one spool of thread on threading in the usual way, but make sure the threads are not twisted with the PFAFF needle threader (13). A B Operate your Pfaff select Needle threader (Model 1540) To make threading the needle easier and quicker, you have been provided with each holder.

Owner's Manual
Page 22
Operate your Pfaff select Drawing up the bobbin thread. Hold the needle thread and turn the handwheel towards you until the needle is at the top again and the bobbin thread has formed a loop. Pull the needle thread to draw up the bobbin thread Turn off the main switch Raise the presser foot. Bobbin thread Close the bobbin case/hook cover and pull the thread under the presser foot to the front over the thread cutter (12). 12 Thread cutter Pull the threads from the back to the left.
Operate your Pfaff select Drawing up the bobbin thread. Hold the needle thread and turn the handwheel towards you until the needle is at the top again and the bobbin thread has formed a loop. Pull the needle thread to draw up the bobbin thread Turn off the main switch Raise the presser foot. Bobbin thread Close the bobbin case/hook cover and pull the thread under the presser foot to the front over the thread cutter (12). 12 Thread cutter Pull the threads from the back to the left.

Owner's Manual
Page 23
Operate your Pfaff select Presser foot lifter The presser foot is lowered, the pins of the foot engage in the presser foot holder. Removing the presser foot Turn off ...
Operate your Pfaff select Presser foot lifter The presser foot is lowered, the pins of the foot engage in the presser foot holder. Removing the presser foot Turn off ...
Owner's Manual
Page 24
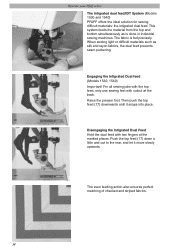
... seam puckering. When sewing light or difficult materials such as is fed precisely. The fabric is done in industrial sewing machines. Operate your Pfaff select The Intigrated dual feed/IDT System (Models 1530 and 1540) PFAFF offers the ideal solution for sewing difficult materials: the intigrated dual feed.
... seam puckering. When sewing light or difficult materials such as is fed precisely. The fabric is done in industrial sewing machines. Operate your Pfaff select The Intigrated dual feed/IDT System (Models 1530 and 1540) PFAFF offers the ideal solution for sewing difficult materials: the intigrated dual feed.


