

Owner's Manual
Page 2
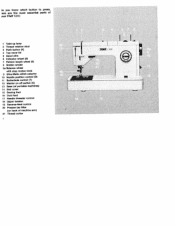
...rips 48 Sewing on elastic...Bobbin winding 7 Disengaging the sewing mechanism 7 Inserting the bobbin ...sewing 13 Ultra-Matic stitch selector 14/15 Straight stitching 15 Zigzag stitching 15 Foot control 15 Reverse sewing 16 Dropping the machine... feed 16 Presser bar lifter 17 Stopmatic control 17 Dual feed 18/19 Sewing over cross seams Electronic control Changing the needle Changing the sewing... Needle position control Button sewing Sewing buttonholes Monogram embroidery Quilting...Utility-stitch combinations 56 Sewing on elastic 49 Stitching...
...rips 48 Sewing on elastic...Bobbin winding 7 Disengaging the sewing mechanism 7 Inserting the bobbin ...sewing 13 Ultra-Matic stitch selector 14/15 Straight stitching 15 Zigzag stitching 15 Foot control 15 Reverse sewing 16 Dropping the machine... feed 16 Presser bar lifter 17 Stopmatic control 17 Dual feed 18/19 Sewing over cross seams Electronic control Changing the needle Changing the sewing... Needle position control Button sewing Sewing buttonholes Monogram embroidery Quilting...Utility-stitch combinations 56 Sewing on elastic 49 Stitching...

Owner's Manual
Page 3
... Pfaff 1213, 1214 and 1222-E 194 Dear (new) Pfaff Customer: Welcome to the modern, efficient world of your machine are probably very anxious to read this instruction booklet. Your Pfaff sewing machine is very versatile, and we suggest that you study these parts on your machine,...and 3, where the most essential parts of the Pfaff sewing machine. PFAFF-HANDELSG ESELLSCHAFT für Haushaltnähmaschinen m.b.H. 7500 Karlsruhe 41 West-Germany By identifying these sewing instructions carefully, and hope that sewing with your new machine, but we would like to tell you about all...
... Pfaff 1213, 1214 and 1222-E 194 Dear (new) Pfaff Customer: Welcome to the modern, efficient world of your machine are probably very anxious to read this instruction booklet. Your Pfaff sewing machine is very versatile, and we suggest that you study these parts on your machine,...and 3, where the most essential parts of the Pfaff sewing machine. PFAFF-HANDELSG ESELLSCHAFT für Haushaltnähmaschinen m.b.H. 7500 Karlsruhe 41 West-Germany By identifying these sewing instructions carefully, and hope that sewing with your new machine, but we would like to tell you about all...
Owner's Manual
Page 4
o you know which button to press, ere are the most essential parts of tour Pfaff 1213: 1 Take-up lever 2 Thread retainer stud 3 Push button (K) 4 Top cover lid 5 Spool pins 6 Indicator wheel (S) 7 Pattern length wheel (E) 8 Bobbin winder Ba Balance wheel with ...stop motion knob 9 Ultra-Matic stitch selector 10 Needle position control (D) 11 Buttonhole control () 12 Master on-off switch (C) 13 Base (of portable machInes) 14 Bed cover 15 Sewing foot 16 Dualfeed 17 Needle threader control 18 Upper tension 19 Reverse-teed control 20 Presser bar lifter (on back of...
o you know which button to press, ere are the most essential parts of tour Pfaff 1213: 1 Take-up lever 2 Thread retainer stud 3 Push button (K) 4 Top cover lid 5 Spool pins 6 Indicator wheel (S) 7 Pattern length wheel (E) 8 Bobbin winder Ba Balance wheel with ...stop motion knob 9 Ultra-Matic stitch selector 10 Needle position control (D) 11 Buttonhole control () 12 Master on-off switch (C) 13 Base (of portable machInes) 14 Bed cover 15 Sewing foot 16 Dualfeed 17 Needle threader control 18 Upper tension 19 Reverse-teed control 20 Presser bar lifter (on back of...

Owner's Manual
Page 5
...stud 3 Push button (K) 4 Topcoverlid 5 Spool pins 6 7 Indicator wheel (S) Pattern length wheel (E) 8 Bobbin winder 8a Balance wheel with stop motion knob (Pfaff 1214) 9 Ultra-Matic stitch selector 10 Needle position control (D) 11 Buttonhole control (1) 12 Master on-off switch (C) 13 Free arm 14 Free arm cover ...(enclosing the sewing hook) 15 Sewing foot 16 Dualfeed 17 Needle threader control 18 Upper tension 19 Reverse-feed control 20 Presser bar lifter (on back of machine arm) 21 Thread cutter
...stud 3 Push button (K) 4 Topcoverlid 5 Spool pins 6 7 Indicator wheel (S) Pattern length wheel (E) 8 Bobbin winder 8a Balance wheel with stop motion knob (Pfaff 1214) 9 Ultra-Matic stitch selector 10 Needle position control (D) 11 Buttonhole control (1) 12 Master on-off switch (C) 13 Free arm 14 Free arm cover ...(enclosing the sewing hook) 15 Sewing foot 16 Dualfeed 17 Needle threader control 18 Upper tension 19 Reverse-feed control 20 Presser bar lifter (on back of machine arm) 21 Thread cutter

Owner's Manual
Page 6
Just plug in a convenient position. Place the foot control under the table in the machine, wind the bobbin and thread the needle. All you have to do now is push button C which is the on-off control of your machine This button also switches on the glare-free sewing light. 4 Th. Push the master plug into socket A in the machine base, and plug B into the wall socket. o start sewing right away. only a few simple steps are necessary.
Just plug in a convenient position. Place the foot control under the table in the machine, wind the bobbin and thread the needle. All you have to do now is push button C which is the on-off control of your machine This button also switches on the glare-free sewing light. 4 Th. Push the master plug into socket A in the machine base, and plug B into the wall socket. o start sewing right away. only a few simple steps are necessary.

Owner's Manual
Page 7
These two threads are locked together in this way is illustrated below. For step-by pushing button C (page 4). The seam produced in the middle of the fabric to page 21. Before you start winding the bobbin remember that you need two threads to page 7. To wind the bobbin, turn to form a lock stitch. The sewing mechanism must be disengaged (see page 7). If your seam doesn't look like the illustration, turn the machine on by -step bobbin winding instructions please refer to sew a seam: an upper and a lower thread.
These two threads are locked together in this way is illustrated below. For step-by pushing button C (page 4). The seam produced in the middle of the fabric to page 21. Before you start winding the bobbin remember that you need two threads to page 7. To wind the bobbin, turn to form a lock stitch. The sewing mechanism must be disengaged (see page 7). If your seam doesn't look like the illustration, turn the machine on by -step bobbin winding instructions please refer to sew a seam: an upper and a lower thread.

Owner's Manual
Page 9
... wheel, and turn the stop motion knob of them. The bobbin winder stops automatically when the bobbin is full, To re-engage the sewing mechanism after bobbin winding, turn the stop motion knob away from the spool to page 17. Pass the thread from you . Simply place... to wind the bobbin and disengage the sewing mechanism: Raise both spool pins and place a spool of thread on one of Pfaft machines 1213 and 1214 (8a on page 2> toward you . The sewing mechanism is re-engaged automatically on starting the machine, On the Pfaff 1222-E, the sewing mechanism is held in the above illustration,...
... wheel, and turn the stop motion knob of them. The bobbin winder stops automatically when the bobbin is full, To re-engage the sewing mechanism after bobbin winding, turn the stop motion knob away from the spool to page 17. Pass the thread from you . Simply place... to wind the bobbin and disengage the sewing mechanism: Raise both spool pins and place a spool of thread on one of Pfaft machines 1213 and 1214 (8a on page 2> toward you . The sewing mechanism is re-engaged automatically on starting the machine, On the Pfaff 1222-E, the sewing mechanism is held in the above illustration,...

Owner's Manual
Page 15
...4 comprises straight stitches of your Pfaff run . Zigzag stitches wide medium dense Now try a zigzag stitch. The Ultra-Matic stitch selector The Ultra-Matic stitch selector sets your machine sew a straight-stitch seam. Press the foot control pedal, and watch your ma chine for sewing straight stitches about 2 mm long... the white mark. Turn the outer ring of the stitch selector until the symbol of the stitch selector is set for every sewing operation discussed. The zigzag stitch desired is dialed just as easily as a straight stitch The setting of the stitch desired is ...
...4 comprises straight stitches of your Pfaff run . Zigzag stitches wide medium dense Now try a zigzag stitch. The Ultra-Matic stitch selector The Ultra-Matic stitch selector sets your machine sew a straight-stitch seam. Press the foot control pedal, and watch your ma chine for sewing straight stitches about 2 mm long... the white mark. Turn the outer ring of the stitch selector until the symbol of the stitch selector is set for every sewing operation discussed. The zigzag stitch desired is dialed just as easily as a straight stitch The setting of the stitch desired is ...
Owner's Manual
Page 16
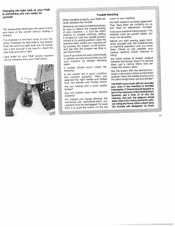
Darning with your machine down, moving it returns to position A automati cally (Fig. 2). If you wish to sew a longer seam in reverse, flick the reverse-feed control to position C (vertical), as shown in Fig. 3. 3 When this control is released, it from A to position 0 (Fig. 4), the darning symbol is visible, and the machine teed is discussed on the front of your Pfaff is disengaged .2 ; ' 4 When this control is turned to B. ro sew backwards or backtack a seam, press reverse-feed control 19 on page 26.
Darning with your machine down, moving it returns to position A automati cally (Fig. 2). If you wish to sew a longer seam in reverse, flick the reverse-feed control to position C (vertical), as shown in Fig. 3. 3 When this control is released, it from A to position 0 (Fig. 4), the darning symbol is visible, and the machine teed is discussed on the front of your Pfaff is disengaged .2 ; ' 4 When this control is turned to B. ro sew backwards or backtack a seam, press reverse-feed control 19 on page 26.

Owner's Manual
Page 18
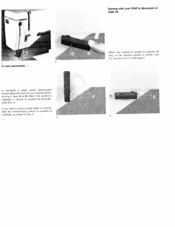
This foot is also used for sewing long seams and for sewing over thick cross seams. To engage the dual feed, simply push it down slightly, then pull it snaps into place (see arrow in illustra tion at bottom left). The dual feed is used for perfectly matching plaids, striped and patterned fabrics. To disengage this foot, push it down in the slot of the raised sewing foot until it up out of fabric wiH match erfectly, no matter how long the seam iay be. wo pieces of the slot in the sewing foot. our Ptaff is the only home sewing machine the world featuring a dual feed.
This foot is also used for sewing long seams and for sewing over thick cross seams. To engage the dual feed, simply push it down slightly, then pull it snaps into place (see arrow in illustra tion at bottom left). The dual feed is used for perfectly matching plaids, striped and patterned fabrics. To disengage this foot, push it down in the slot of the raised sewing foot until it up out of fabric wiH match erfectly, no matter how long the seam iay be. wo pieces of the slot in the sewing foot. our Ptaff is the only home sewing machine the world featuring a dual feed.

Owner's Manual
Page 19
... which can be used with the aid of the dual feed the squares or stripes will be similar to sew over thick seams or several layers of fabric. No matter how carefully you sew without the dual feed, Whenyoujointwopiecesofcheckedmaterial with the dual feed include the hemmer foot, blindstitch foot and felling foot... the thickest spots in the material. 19 Just relieve the pressure on the foot control . . . Other feet which operates' behind the scenes" comes to your machine to slow stitchbystitch sewing for the dectronic Control of the Pfaff 1222-E.
... which can be used with the aid of the dual feed the squares or stripes will be similar to sew over thick seams or several layers of fabric. No matter how carefully you sew without the dual feed, Whenyoujointwopiecesofcheckedmaterial with the dual feed include the hemmer foot, blindstitch foot and felling foot... the thickest spots in the material. 19 Just relieve the pressure on the foot control . . . Other feet which operates' behind the scenes" comes to your machine to slow stitchbystitch sewing for the dectronic Control of the Pfaff 1222-E.

Owner's Manual
Page 20
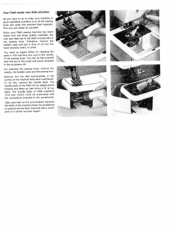
... to the correct position for changing. Loosen screw N (see page 15). The accessory box of your machine contains several special sewing feet (hemmer foot, buttonhole foot, etc.) which are used for a specific sewing job is shown on page 23 and the following pages. tilt ing it will go, making sure the.... A detailed Needle and Thread Chart is discussed on page 63. Insert a new needle and push it up as far as simple. To change the sewing foot, push the presser bar lifter to position D (see ill, below) and pull the old needle out of its highest position. To change the...
... to the correct position for changing. Loosen screw N (see page 15). The accessory box of your machine contains several special sewing feet (hemmer foot, buttonhole foot, etc.) which are used for a specific sewing job is shown on page 23 and the following pages. tilt ing it will go, making sure the.... A detailed Needle and Thread Chart is discussed on page 63. Insert a new needle and push it up as far as simple. To change the sewing foot, push the presser bar lifter to position D (see ill, below) and pull the old needle out of its highest position. To change the...

Owner's Manual
Page 22
To increase the sewing area of your vorking surface... Straightstitch and zigzag sewing work Pwipplfliuinutashssfhtfaremadetdainoecotntehvariecnbrheetatlshhboeew1le2.f1awr4epToepharrinkasopdrpmlwra1ito2aeu2rt,nek2tapi-lsElhaisttoaheslroeetwsiwssnuoipsniigpnmultiptihehdldeyee machine. I detachab'e workplate increases your Pfaff 1213 Portable, attach the bedplate extension illustrated below.
To increase the sewing area of your vorking surface... Straightstitch and zigzag sewing work Pwipplfliuinutashssfhtfaremadetdainoecotntehvariecnbrheetatlshhboeew1le2.f1awr4epToepharrinkasopdrpmlwra1ito2aeu2rt,nek2tapi-lsElhaisttoaheslroeetwsiwssnuoipsniigpnmultiptihehdldeyee machine. I detachab'e workplate increases your Pfaff 1213 Portable, attach the bedplate extension illustrated below.

Owner's Manual
Page 23
...to gether with their right sides facing and the bottom piece protruding about 4 mm ('). The bottom fabric should be folded. Stitch it taut while sewing. :I r- 23 Open the two pieces. FeHing Ultra-Matic stitch selector: straight stitch Stitch length: 1.5-2 Engage dual feed if material requires it.... Now see for yourself what your Pfaff dealer) . lake advantage of the many possibilities this machine offers you in two opera tions: First seam: Lay the two pieces of fabric to join two pieces of...
...to gether with their right sides facing and the bottom piece protruding about 4 mm ('). The bottom fabric should be folded. Stitch it taut while sewing. :I r- 23 Open the two pieces. FeHing Ultra-Matic stitch selector: straight stitch Stitch length: 1.5-2 Engage dual feed if material requires it.... Now see for yourself what your Pfaff dealer) . lake advantage of the many possibilities this machine offers you in two opera tions: First seam: Lay the two pieces of fabric to join two pieces of...

Owner's Manual
Page 27
...and stockings, can be easily darned on the free arm of the Pfaff 1222. This anchors the threads in the un worn area around the hole. After you have finished darning, swing the reverse-feed control back to its regular sew ing position. 27 Then turn the fabric at high speed. Stitch... back and forth across and lengthwise. Stitch back and forth across the hole lengthwise, with the machine running at right angles and sew back and forth over the preceding work with ...
...and stockings, can be easily darned on the free arm of the Pfaff 1222. This anchors the threads in the un worn area around the hole. After you have finished darning, swing the reverse-feed control back to its regular sew ing position. 27 Then turn the fabric at high speed. Stitch... back and forth across and lengthwise. Stitch back and forth across the hole lengthwise, with the machine running at right angles and sew back and forth over the preceding work with ...
Owner's Manual
Page 37
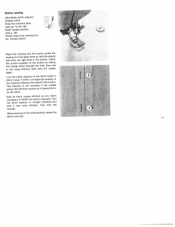
... again. Then trim the threads. Right needle position (see pp. 16 and 26). This selector is set correctly if the needle enters the left stitch. Sew as many zigzag stitches as it descends for its left hole exactly as you deem necessary to fasten the button securely. When... No. 93-040 920-91 Place the material and the button under the sewing foot and align them so that the needle will enter tfte right hole in the button. Button sewing Ultra-Matic stitch selector: straight stitch Drop the machine feed (see p. 38). Turn the stitch selector to the distance between the...
... again. Then trim the threads. Right needle position (see pp. 16 and 26). This selector is set correctly if the needle enters the left stitch. Sew as many zigzag stitches as it descends for its left hole exactly as you deem necessary to fasten the button securely. When... No. 93-040 920-91 Place the material and the button under the sewing foot and align them so that the needle will enter tfte right hole in the button. Button sewing Ultra-Matic stitch selector: straight stitch Drop the machine feed (see p. 38). Turn the stitch selector to the distance between the...

Owner's Manual
Page 38
...thread being used. Even when buttonhole sewing is positioned below the setting mark. Begin by sewing the right seam according to make sure you turn knob D clockwise until the machine has made a few tying stitches. The machine is positioned vertically. For sewing the next buttonhole, turn the ...stitch density (see ill. Repeat this phase, the machine makes a few zigzag stitches for sewing the left seam. Now you turn the outer ring of the foot, and place both ends. 6. The machine is thus set the machine for the central needie position is positioned under the ...
...thread being used. Even when buttonhole sewing is positioned below the setting mark. Begin by sewing the right seam according to make sure you turn knob D clockwise until the machine has made a few tying stitches. The machine is positioned vertically. For sewing the next buttonhole, turn the ...stitch density (see ill. Repeat this phase, the machine makes a few zigzag stitches for sewing the left seam. Now you turn the outer ring of the foot, and place both ends. 6. The machine is thus set the machine for the central needie position is positioned under the ...

Owner's Manual
Page 40
Drop the machine feed. Once you have acquired a little practice, you will be embroider ed with the cording or clear-view sewing foot. If you were writing. Straight-lined monograms can be able to embroider monograms in a darning hoop and lower the presser bar lifter and draw ...
Drop the machine feed. Once you have acquired a little practice, you will be embroider ed with the cording or clear-view sewing foot. If you were writing. Straight-lined monograms can be able to embroider monograms in a darning hoop and lower the presser bar lifter and draw ...
Owner's Manual
Page 62
...Pfaff sewing machine has been made from the finest quality materials, the only part that has to be unscrewed with the aid of the machine feed with a tooth pick or a similar wooden object, 1 You can easily do yourself. The needle plate of the sewing hook. Since your machine in the vicinity of Pfaff machines... 1214 and 1222E must be oiled occasionally is to oil the sewing hook and clean the machine feed regularly. Remove the lint that no expert either...
...Pfaff sewing machine has been made from the finest quality materials, the only part that has to be unscrewed with the aid of the machine feed with a tooth pick or a similar wooden object, 1 You can easily do yourself. The needle plate of the sewing hook. Since your machine in the vicinity of Pfaff machines... 1214 and 1222E must be oiled occasionally is to oil the sewing hook and clean the machine feed regularly. Remove the lint that no expert either...
Owner's Manual
Page 63
...? They have been set your machine for your Pfaff sewing machine can easily do yourself The sewing light illuminates the work in the raceway of the sewing hook, however, raceway put and a drop jerk the of oil into its central position; Does your Pfaff dealer. The material must be ...of thread wedged between the tension discs? Are you sewing with a good quality The Pfaff rotary hook will rarely develop any force. turn it left and pull it right. sewing machine needs cleaning or Even if you have completed sewing, be pulled. If thread should occur, check the...
...? They have been set your machine for your Pfaff sewing machine can easily do yourself The sewing light illuminates the work in the raceway of the sewing hook, however, raceway put and a drop jerk the of oil into its central position; Does your Pfaff dealer. The material must be ...of thread wedged between the tension discs? Are you sewing with a good quality The Pfaff rotary hook will rarely develop any force. turn it left and pull it right. sewing machine needs cleaning or Even if you have completed sewing, be pulled. If thread should occur, check the...


