

Owner's Manual
Page 2
...Straight stitching 15 Zigzag stitching 15 Foot control 15 Reverse sewing 16 Dropping the machine feed 16 Presser bar lifter 17 Stopmatic control 17 Dual feed 18/19 Sewing over cross seams Electronic control Changing the needle Changing the sewing foot Regulating the thread tensions Detachable workplate Felling Hemming Zipper insertion Darning Basting Single-needle cording Shirring with filler thread Overcasting edges Cording Inserting lace Elastic zigzag seam Appliqué work Needle position control Button sewing Sewing buttonholes Monogram embroidery Quilting Edge stitching...
...Straight stitching 15 Zigzag stitching 15 Foot control 15 Reverse sewing 16 Dropping the machine feed 16 Presser bar lifter 17 Stopmatic control 17 Dual feed 18/19 Sewing over cross seams Electronic control Changing the needle Changing the sewing foot Regulating the thread tensions Detachable workplate Felling Hemming Zipper insertion Darning Basting Single-needle cording Shirring with filler thread Overcasting edges Cording Inserting lace Elastic zigzag seam Appliqué work Needle position control Button sewing Sewing buttonholes Monogram embroidery Quilting Edge stitching...
Owner's Manual
Page 4
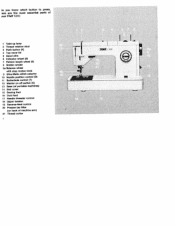
... essential parts of tour Pfaff 1213: 1 Take-up lever 2 Thread retainer stud 3 Push button (K) 4 Top cover lid 5 Spool pins 6 Indicator wheel (S) 7 Pattern length wheel (E) 8 Bobbin winder Ba Balance wheel with stop motion knob 9 Ultra-Matic stitch selector 10 Needle position control (D) 11 Buttonhole control () 12 Master on-off switch (C) 13 Base (of portable machInes) 14 Bed cover 15 Sewing foot 16 Dualfeed 17 Needle threader control 18 Upper tension 19 Reverse-teed control 20 Presser bar lifter (on back of machine aim) 21 Thread cutter 2 ErL...
... essential parts of tour Pfaff 1213: 1 Take-up lever 2 Thread retainer stud 3 Push button (K) 4 Top cover lid 5 Spool pins 6 Indicator wheel (S) 7 Pattern length wheel (E) 8 Bobbin winder Ba Balance wheel with stop motion knob 9 Ultra-Matic stitch selector 10 Needle position control (D) 11 Buttonhole control () 12 Master on-off switch (C) 13 Base (of portable machInes) 14 Bed cover 15 Sewing foot 16 Dualfeed 17 Needle threader control 18 Upper tension 19 Reverse-teed control 20 Presser bar lifter (on back of machine aim) 21 Thread cutter 2 ErL...

Owner's Manual
Page 5
... is how your Pfaff 1214 or 1 222-E looks: 1 Take-up lever 2 Thread retainer stud 3 Push button (K) 4 Topcoverlid 5 Spool pins 6 7 Indicator wheel (S) Pattern length wheel (E) 8 Bobbin winder 8a Balance wheel with stop motion knob (Pfaff 1214) 9 Ultra-Matic stitch selector 10 Needle position control (D) 11 Buttonhole control (1) 12 Master on-off switch (C) 13 Free arm 14 Free arm cover (enclosing the sewing hook) 15 Sewing foot 16 Dualfeed 17 Needle threader control 18 Upper tension 19 Reverse-feed control 20 Presser bar lifter (on back of machine arm) 21 Thread cutter
... is how your Pfaff 1214 or 1 222-E looks: 1 Take-up lever 2 Thread retainer stud 3 Push button (K) 4 Topcoverlid 5 Spool pins 6 7 Indicator wheel (S) Pattern length wheel (E) 8 Bobbin winder 8a Balance wheel with stop motion knob (Pfaff 1214) 9 Ultra-Matic stitch selector 10 Needle position control (D) 11 Buttonhole control (1) 12 Master on-off switch (C) 13 Free arm 14 Free arm cover (enclosing the sewing hook) 15 Sewing foot 16 Dualfeed 17 Needle threader control 18 Upper tension 19 Reverse-feed control 20 Presser bar lifter (on back of machine arm) 21 Thread cutter

Owner's Manual
Page 7
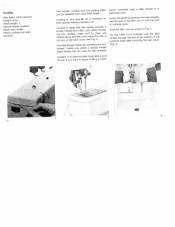
The sewing mechanism must be disengaged (see page 7). To wind the bobbin, turn to sew a seam: an upper and a lower thread. For step-by pushing button C (page 4). These two threads are locked together in this way is illustrated below. If your seam doesn't look like the illustration, turn the machine on by -step bobbin winding instructions please refer to form a lock stitch. Before you start winding the bobbin remember that you need two threads to page 21. The seam produced in the middle of the fabric to page 7.
The sewing mechanism must be disengaged (see page 7). To wind the bobbin, turn to sew a seam: an upper and a lower thread. For step-by pushing button C (page 4). These two threads are locked together in this way is illustrated below. If your seam doesn't look like the illustration, turn the machine on by -step bobbin winding instructions please refer to form a lock stitch. Before you start winding the bobbin remember that you need two threads to page 21. The seam produced in the middle of the fabric to page 7.

Owner's Manual
Page 8
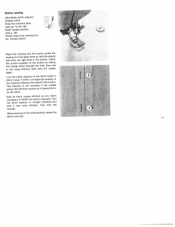
On the Pfaff 1213 remove the bed cover. On Ptaff machines 1214 and 1222E open latch. just like with the bobbin. lift latch K and pull out the bobbin case with the Pfaff 1213 - ro remove the bobbin case. \ Make sure the needle is posiboned above the need'e plato. The bobbin cannot faH out as long as you release the latch, the empty bobbin drops out. When you hold the bobbin case by its open the free-arm cover and swing it toward the left. Then - Lift latch K (see ill.) and pull out the bobbin case with the bobbin.
On the Pfaff 1213 remove the bed cover. On Ptaff machines 1214 and 1222E open latch. just like with the bobbin. lift latch K and pull out the bobbin case with the Pfaff 1213 - ro remove the bobbin case. \ Make sure the needle is posiboned above the need'e plato. The bobbin cannot faH out as long as you release the latch, the empty bobbin drops out. When you hold the bobbin case by its open the free-arm cover and swing it toward the left. Then - Lift latch K (see ill.) and pull out the bobbin case with the bobbin.

Owner's Manual
Page 9
... . I to wind the bobbin and disengage the sewing mechanism: Raise both spool pins and place a spool of thread on the foot control. The sewing mechanism is re-engaged automatically on starting the machine, On the Pfaff 1222-E, the sewing mechanism is full, To re-engage the sewing mechanism after bobbin winding, turn the stop motion knob away from the spool to page 17. Start the bobbin winder by the Stopmatic control. Push lever E against the bobbin, hold...
... . I to wind the bobbin and disengage the sewing mechanism: Raise both spool pins and place a spool of thread on the foot control. The sewing mechanism is re-engaged automatically on starting the machine, On the Pfaff 1222-E, the sewing mechanism is full, To re-engage the sewing mechanism after bobbin winding, turn the stop motion knob away from the spool to page 17. Start the bobbin winder by the Stopmatic control. Push lever E against the bobbin, hold...

Owner's Manual
Page 11
• and to replace the bobbin case in the machine Lift latch K and push the bobbin case onto center stud S, making sure its slot (see arrow) points upwards. Release the latch and press against the bobbin case until you hear it snap into place.
• and to replace the bobbin case in the machine Lift latch K and push the bobbin case onto center stud S, making sure its slot (see arrow) points upwards. Release the latch and press against the bobbin case until you hear it snap into place.

Owner's Manual
Page 15
... stitch selector in the mate rial when you press the foot control pedal, the faster your machine will run at different speeds. The Ultra-Matic stitch selector The Ultra-Matic stitch selector sets your ma chine for sewing straight stitches about 2 mm long (about 12 stitches per inch). For instance, the range from 0 to 4 comprises straight stitches of the stitch desired is set for every sewing operation discussed. Start by numbers...
... stitch selector in the mate rial when you press the foot control pedal, the faster your machine will run at different speeds. The Ultra-Matic stitch selector The Ultra-Matic stitch selector sets your ma chine for sewing straight stitches about 2 mm long (about 12 stitches per inch). For instance, the range from 0 to 4 comprises straight stitches of the stitch desired is set for every sewing operation discussed. Start by numbers...

Owner's Manual
Page 17
...) 1222 material. This position is used when -- The sewing foot is to be pushed to positions B and C. Position C (illustrated below ) is used when the bobbin thread is raised, but the needle remains in case of seam interruptions, when the bobbin becomes empty, or when the bobbin thread breaks. In this lever is lowered. When you how it re turns automatically to its highest posi tion. When you need to turn the fabric...
...) 1222 material. This position is used when -- The sewing foot is to be pushed to positions B and C. Position C (illustrated below ) is used when the bobbin thread is raised, but the needle remains in case of seam interruptions, when the bobbin becomes empty, or when the bobbin thread breaks. In this lever is lowered. When you how it re turns automatically to its highest posi tion. When you need to turn the fabric...

Owner's Manual
Page 20
... needle holder. To change the needle, lower the presser bar lifter and flick it will go, making sure the flat side of your machine contains several special sewing feet (hemmer foot, buttonhole foot, etc.) which are used for changing. The new sewing foot is discussed on page 63. To change the sewing foot, push the presser bar lifter to sew. Now tighten the needle screw. Tighten screw B again before starting to its shank faces toward the back. Loosen screw B until the sewing foot...
... needle holder. To change the needle, lower the presser bar lifter and flick it will go, making sure the flat side of your machine contains several special sewing feet (hemmer foot, buttonhole foot, etc.) which are used for changing. The new sewing foot is discussed on page 63. To change the sewing foot, push the presser bar lifter to sew. Now tighten the needle screw. Tighten screw B again before starting to its shank faces toward the back. Loosen screw B until the sewing foot...

Owner's Manual
Page 21
... screw on page 10. 'The tension dial is located under the top cover of your machine', as was already explained on the bobbin case. Even so, your seam may not look as fol lows; Turn this case, check to the left (L) are set at our factory, using the most popular threads. Always use the same size thread on the bobbin and in Fig. 1. The nor mal tension setting...
... screw on page 10. 'The tension dial is located under the top cover of your machine', as was already explained on the bobbin case. Even so, your seam may not look as fol lows; Turn this case, check to the left (L) are set at our factory, using the most popular threads. Always use the same size thread on the bobbin and in Fig. 1. The nor mal tension setting...
Owner's Manual
Page 30
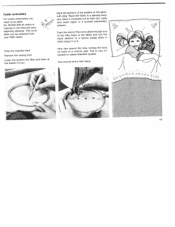
... materials, take a filler thread in the slot of the face cover (see Fig. 1). Cording Ultra-Matic stitch selector: straight stitch Stitch length: 2 Central needle position Insert twin needle. Attach cording foot with two needle threads, a bobbin thread and a filler cord. Hold the filler cord as a trimming on woollens is very popular as shown in Fig. 2. If you prefer a special thread, pearl thread can be used . When thread ing the needles, make sure to trans J I 3 1 Cording on linen goods, dresses...
... materials, take a filler thread in the slot of the face cover (see Fig. 1). Cording Ultra-Matic stitch selector: straight stitch Stitch length: 2 Central needle position Insert twin needle. Attach cording foot with two needle threads, a bobbin thread and a filler cord. Hold the filler cord as a trimming on woollens is very popular as shown in Fig. 2. If you prefer a special thread, pearl thread can be used . When thread ing the needles, make sure to trans J I 3 1 Cording on linen goods, dresses...

Owner's Manual
Page 32
j -: -" 4_ Trim the excess material away close to a mediumwide zigzag stitch in stitch range 6 and sew over the edges of the ma terial and sew it down with straight stitches on the wrong side (4). 3 34 Now turn the stitch selector to the seams on both sides (1). Cut the fabric open under the lace insertion (2), fold the fabric edges back and iron (3). -. hiserting ace Ultra-Matic stitch selector: straight stitch (initially) Stitch length: 1 Attach ordinary sewing foot No. 93-040 910-91. Place the lace on the right side of the lace on the right side. ç:;;
j -: -" 4_ Trim the excess material away close to a mediumwide zigzag stitch in stitch range 6 and sew over the edges of the ma terial and sew it down with straight stitches on the wrong side (4). 3 34 Now turn the stitch selector to the seams on both sides (1). Cut the fabric open under the lace insertion (2), fold the fabric edges back and iron (3). -. hiserting ace Ultra-Matic stitch selector: straight stitch (initially) Stitch length: 1 Attach ordinary sewing foot No. 93-040 910-91. Place the lace on the right side of the lace on the right side. ç:;;

Owner's Manual
Page 35
... largest zigzag stitch in stitch range 6 and sew over the raw edges of the appliqué again, To give the design a raised effect, satin-stitch over the edges of the appliqué on the wrong side. 3. Turn the stitch selector to a dense zigzag stitch in stitch range 9, place the appliqué on the right side of the fabric. 1. Regardless whether you create your own designs or use...
... largest zigzag stitch in stitch range 6 and sew over the raw edges of the appliqué again, To give the design a raised effect, satin-stitch over the edges of the appliqué on the wrong side. 3. Turn the stitch selector to a dense zigzag stitch in stitch range 9, place the appliqué on the right side of the fabric. 1. Regardless whether you create your own designs or use...
Owner's Manual
Page 37
... the holes in the button. Sew one or two tying stitches, then raise the needle again. Button sewing Ultra-Matic stitch selector: straight stitch Drop the machine feed (see p. 38). Sew as many zigzag stitches as it descends for its left hole exactly as you deem necessary to fasten the button securely. This selector is set correctly if the needle enters the left stitch. Then trim the threads. IL ---- • - - Attach clear-view sewing foot...
... the holes in the button. Sew one or two tying stitches, then raise the needle again. Button sewing Ultra-Matic stitch selector: straight stitch Drop the machine feed (see p. 38). Sew as many zigzag stitches as it descends for its left hole exactly as you deem necessary to fasten the button securely. This selector is set correctly if the needle enters the left stitch. Then trim the threads. IL ---- • - - Attach clear-view sewing foot...

Owner's Manual
Page 38
... made a few tying stitches. To set for programmed button hole sewing, make sure that its buttonhole symbol positioned under the white mark (normal position) Lower the foot. Knob D now turns until its sole (see ill above , center). Begin by sewing the right seam according to sew the second bartack. 5, Release control T. above , right>. During this for the first bar. Mark the buttonhole on the fabric. they are out...
... made a few tying stitches. To set for programmed button hole sewing, make sure that its buttonhole symbol positioned under the white mark (normal position) Lower the foot. Knob D now turns until its sole (see ill above , center). Begin by sewing the right seam according to sew the second bartack. 5, Release control T. above , right>. During this for the first bar. Mark the buttonhole on the fabric. they are out...
Owner's Manual
Page 43
This cover plate can be obtained from your seam ripper or a pointed embroidery scissors. Place the fabric in stitch range 5 or 6. Sew around the hole, turning the hoop by hand at each dot, using your Pfaff dealer. Lower the presser bar lifter and draw up the bobbin thread. Now sew around every hole twice. 45 Drop the machine feed. Mark the position of the little holes in the fabric and turn the stitch selector to obtain...
This cover plate can be obtained from your seam ripper or a pointed embroidery scissors. Place the fabric in stitch range 5 or 6. Sew around the hole, turning the hoop by hand at each dot, using your Pfaff dealer. Lower the presser bar lifter and draw up the bobbin thread. Now sew around every hole twice. 45 Drop the machine feed. Mark the position of the little holes in the fabric and turn the stitch selector to obtain...

Owner's Manual
Page 44
...-stitch mechanism makes functional sewing simple The built-in the top cover. tricot, jersey, Helanca and stretch fabrics) or not. To set by the elastic-stitch symbol, Turn knob D until the needle position symbol indi cated on the button is opposite the mark on the dial. //X,x X>,X,XyX Cross stItch D \\ \\ ' , 46 \ç\ç\ç-- ' ' ' ' ' \' ' Ovedock StItCh - Simply push a button to be set your machine for functional stitching, open later or are elastic...
...-stitch mechanism makes functional sewing simple The built-in the top cover. tricot, jersey, Helanca and stretch fabrics) or not. To set by the elastic-stitch symbol, Turn knob D until the needle position symbol indi cated on the button is opposite the mark on the dial. //X,x X>,X,XyX Cross stItch D \\ \\ ' , 46 \ç\ç\ç-- ' ' ' ' ' \' ' Ovedock StItCh - Simply push a button to be set your machine for functional stitching, open later or are elastic...

Owner's Manual
Page 58
... button marked ll1I' Next, combine the blind stitch with the built-in hem stitching design. Additional ornamental effects are made as well. Sew the outer pattern with the zigzag stitch (turning the stitch selector to the right and left position. Make sure the scallops match the pattern sewn previously (see ill.). First border: Sew the center strip of the border with the pattern in stitch range 6) and sew...
... button marked ll1I' Next, combine the blind stitch with the built-in hem stitching design. Additional ornamental effects are made as well. Sew the outer pattern with the zigzag stitch (turning the stitch selector to the right and left position. Make sure the scallops match the pattern sewn previously (see ill.). First border: Sew the center strip of the border with the pattern in stitch range 6) and sew...
Owner's Manual
Page 63
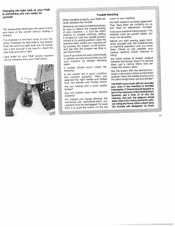
... machine. control to Has the bobbin case been inserted properly? from your Pfaff dealer. If thread should occur, check the tween the tension discs. Whenever you selected the right needle and thread tional or decorative-stitch symbol been pushed? Check to straight e. or darned, we recommend that the presser bar lifter is , push the button on -off button, and see whether your set correctly by itself. 65 Changing the light bulb...
... machine. control to Has the bobbin case been inserted properly? from your Pfaff dealer. If thread should occur, check the tween the tension discs. Whenever you selected the right needle and thread tional or decorative-stitch symbol been pushed? Check to straight e. or darned, we recommend that the presser bar lifter is , push the button on -off button, and see whether your set correctly by itself. 65 Changing the light bulb...


