

Owner's Manual
Page 2
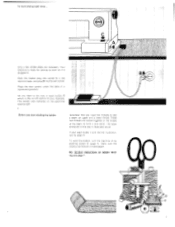
So you know which button to press. here are the most essential parts of your Pfaff 1211: =r 1 Take-up lever 2 Thread retainer stud 3 Eraser button 4 Top cover lid 5 Spool pins 6 Bobbin winder 7 Balance wheel 4- 78 Stop motion knob for engaging and disengaging... Needle threader control 17 Upper tension 18 Reverse-feed control 19 Presser bar lifter (on back of machine arm) 20 Thread cutter 2 4-;atrHs?st~ spa ----Ar") • And this is how your Pfaff 1212 looks: I MU '2'2 - -4- , nrt, ajeCelkoil-s: ) • i I I Take-up cover lid 5 Spout pins 6 Bobbin winder 7 ...
So you know which button to press. here are the most essential parts of your Pfaff 1211: =r 1 Take-up lever 2 Thread retainer stud 3 Eraser button 4 Top cover lid 5 Spool pins 6 Bobbin winder 7 Balance wheel 4- 78 Stop motion knob for engaging and disengaging... Needle threader control 17 Upper tension 18 Reverse-feed control 19 Presser bar lifter (on back of machine arm) 20 Thread cutter 2 4-;atrHs?st~ spa ----Ar") • And this is how your Pfaff 1212 looks: I MU '2'2 - -4- , nrt, ajeCelkoil-s: ) • i I I Take-up cover lid 5 Spout pins 6 Bobbin winder 7 ...
Owner's Manual
Page 3
... middle of your seam doesn't look like the illustration, turn the machine on -off control of the fabric to sew a seam: an upper and a lower thread. Make sure the sewing mechanism is illustrated below. To start winding the bobbin remember that you need two... threads to form a lock stitch. These two threads are necessary. This button also switches on bobbin winding see page 7. A only a few simple steps are locked together in . Your machine is ready for sewing ...
... middle of your seam doesn't look like the illustration, turn the machine on -off control of the fabric to sew a seam: an upper and a lower thread. Make sure the sewing mechanism is illustrated below. To start winding the bobbin remember that you need two... threads to form a lock stitch. These two threads are necessary. This button also switches on bobbin winding see page 7. A only a few simple steps are locked together in . Your machine is ready for sewing ...

Owner's Manual
Page 4
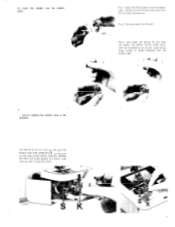
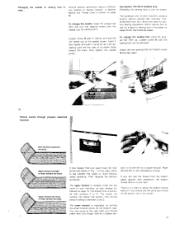
... toward you release the latch, the empty bobbin drops out. Wind the thread clockwise around the bobbin a few times. Lift latch K (see illustration at left . On the Pfaff 1212 open latch. lift latch K and pull out the bobbin case with the Pfaff 1211 - Place the bobbin on bobbin winder disc s where it is re...
... toward you release the latch, the empty bobbin drops out. Wind the thread clockwise around the bobbin a few times. Lift latch K (see illustration at left . On the Pfaff 1212 open latch. lift latch K and pull out the bobbin case with the Pfaff 1211 - Place the bobbin on bobbin winder disc s where it is re...
Owner's Manual
Page 5
and to replace the bobbin case in the machine Lift latch K as far as indicated by an arrow). As you draw the thread, the bobbin should rotate clockwise (as it snap into the bobbin case, making sure its slot (see arrow) points upwards. Release the latch and press ...against the bobbin case until you . Leave about three inches of thread hanging from the top down towards you hear it will go and push the bobbin case onto center stud S, making sure the...
and to replace the bobbin case in the machine Lift latch K as far as indicated by an arrow). As you draw the thread, the bobbin should rotate clockwise (as it snap into the bobbin case, making sure its slot (see arrow) points upwards. Release the latch and press ...against the bobbin case until you . Leave about three inches of thread hanging from the top down towards you hear it will go and push the bobbin case onto center stud S, making sure the...
Owner's Manual
Page 6
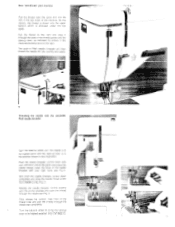
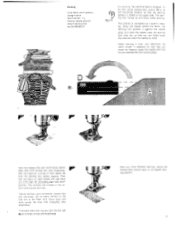
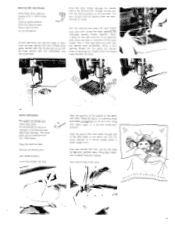
...2 on the right. Turn the balance wheel until the prong reverses and pulls the thread through the needle eye (Fig.3) Fully release the control. take hold of the thread loop and pull the thread through the slots in the thread guides and the take-up lever is in the position shown in the top...the balance wheel to bring the take -up lever, as indicated by arrows in Pfaff needle threader will then thread the needle for you quickly and easily. 4 40;r avo.0"i... 10 Threading the needle with your machine Pull the thread from the spool and into the upper tension which is at the same time ...
...2 on the right. Turn the balance wheel until the prong reverses and pulls the thread through the needle eye (Fig.3) Fully release the control. take hold of the thread loop and pull the thread through the slots in the thread guides and the take-up lever is in the position shown in the top...the balance wheel to bring the take -up lever, as indicated by arrows in Pfaff needle threader will then thread the needle for you quickly and easily. 4 40;r avo.0"i... 10 Threading the needle with your machine Pull the thread from the spool and into the upper tension which is at the same time ...
Owner's Manual
Page 7
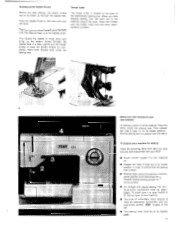
...This causes the needle to move down . • Reverse-feed control 3 must be in its highest point. fp • • 12 CPFArr) 1212 2 F• _.;■O11.... and the sewing foot is at its hori- When you have become well acquainted with your machine. • The knob ...thread Thread cutter Before you start sewing on 1* its lowest position... Flick presser bar lifter 2 (see ill.) to its top surface. • For straight and zigzag sewing, the functional-stitch mechanism must be at its highest point. 13 To make sure it is, push button 4 on the top cover of your Pfaff...
...This causes the needle to move down . • Reverse-feed control 3 must be in its highest point. fp • • 12 CPFArr) 1212 2 F• _.;■O11.... and the sewing foot is at its hori- When you have become well acquainted with your machine. • The knob ...thread Thread cutter Before you start sewing on 1* its lowest position... Flick presser bar lifter 2 (see ill.) to its top surface. • For straight and zigzag sewing, the functional-stitch mechanism must be at its highest point. 13 To make sure it is, push button 4 on the top cover of your Pfaff...
Owner's Manual
Page 11
...The higher the number, the tighter the tension. The normal tension setting is at its shank faces toward the back. A detailed Needle and Thread Chart is just as it up . buttonhole foot. Loosen screw N (see whether the upper or lower tension needs adjusting. push the presser .......... Right (R) and left for various sewing operations. There is regulated by arrows. as the one shown in the needle. sion, or to adjust the bobbin thread tension if you can be removed. Use System 130/705 H needles only. The lower tension is no need to the left (L) are used for a looser...
...The higher the number, the tighter the tension. The normal tension setting is at its shank faces toward the back. A detailed Needle and Thread Chart is just as it up . buttonhole foot. Loosen screw N (see whether the upper or lower tension needs adjusting. push the presser .......... Right (R) and left for various sewing operations. There is regulated by arrows. as the one shown in the needle. sion, or to adjust the bobbin thread tension if you can be removed. Use System 130/705 H needles only. The lower tension is no need to the left (L) are used for a looser...
Owner's Manual
Page 13
... it If f- 1. Draw the fabric into the hemmer toot scroll with 3 or 4 straight stitches. Feed the fabric edge into the hemmer foot by pulling both threads backwards, as instructed above. Place the material under the right half of the seam, raise the zipper foot and open it. Baste the closed zipper...
... it If f- 1. Draw the fabric into the hemmer toot scroll with 3 or 4 straight stitches. Feed the fabric edge into the hemmer foot by pulling both threads backwards, as instructed above. Place the material under the right half of the seam, raise the zipper foot and open it. Baste the closed zipper...
Owner's Manual
Page 14
... hole, first crosswise, then lengthwise. Triangular tears and rips are closely spaced. For darning, the machine feed is visible on the free arm of the Pfaff 1212. Stitch back and forth across and lengthwise. Be sure the stitches are best darned with both hands. It depends on how fast you move the... it against the needle plate, and when the needle rises, the darning foot rises too, so that the darning symbol is dropped. This anchors the threads in vibrator.
... hole, first crosswise, then lengthwise. Triangular tears and rips are closely spaced. For darning, the machine feed is visible on the free arm of the Pfaff 1212. Stitch back and forth across and lengthwise. Be sure the stitches are best darned with both hands. It depends on how fast you move the... it against the needle plate, and when the needle rises, the darning foot rises too, so that the darning symbol is dropped. This anchors the threads in vibrator.

Owner's Manual
Page 15
...presser bar lifter. Attach cording foot No. 93-040915-35. Sheer lawn is obtained by stitch. Slightly ease the upper tension until the needle thread forms small kinks on the cord size). Basting Ultra-Matic stitch selector: straight stitch Stitch length: 4 Central needle position Attach darning foot No....93-040960-91. Sew over the filler cord with both hands and move it with your Pfaff. cm0 , Single-needle cording is known as "satin-stitch seam". Drop the machine feed by turning the reverse-feed control over it evenly...
...presser bar lifter. Attach cording foot No. 93-040915-35. Sheer lawn is obtained by stitch. Slightly ease the upper tension until the needle thread forms small kinks on the cord size). Basting Ultra-Matic stitch selector: straight stitch Stitch length: 4 Central needle position Attach darning foot No....93-040960-91. Sew over the filler cord with both hands and move it with your Pfaff. cm0 , Single-needle cording is known as "satin-stitch seam". Drop the machine feed by turning the reverse-feed control over it evenly...

Owner's Manual
Page 16
...9 in stitch range 8. -7-, '77 • 31 To produce a durable shirring effect, a filler thread is needed_ As with tiller thread Ultra-Matic stitch selector: longest zigzag stitch in stitch range 5 or 6. Inserting a filler thread in this way, a neat edge finish is loosely woven, more durable. 30 '44. If the fabric... makes it more fabric yarns must be caught In the seam. Central needle position Engage Matchmaker foot if material is a cotton thread.Place the filler thread under the groove of the cording foot and sew on the bias: Attach ordinary sewing foot No. 93-040 910-91. ...
...9 in stitch range 8. -7-, '77 • 31 To produce a durable shirring effect, a filler thread is needed_ As with tiller thread Ultra-Matic stitch selector: longest zigzag stitch in stitch range 5 or 6. Inserting a filler thread in this way, a neat edge finish is loosely woven, more durable. 30 '44. If the fabric... makes it more fabric yarns must be caught In the seam. Central needle position Engage Matchmaker foot if material is a cotton thread.Place the filler thread under the groove of the cording foot and sew on the bias: Attach ordinary sewing foot No. 93-040 910-91. ...

Owner's Manual
Page 17
... the other below the disc in the slot of material used with twin needles set from any Pfaff dealer: Three-row cording foot No.93-040 948-31 which is best made with a wool thread. place the filler cord in a can be obtained from 2.4 to 2.8 mm (approx. 3/ 32 ...Attach cording foot (with grooves) and cording plate (with twin needles set from your Pfaff dealer. matching color. If you prefer a special thread. Twin needle, cording foot and cording plate parent materials, take a filler thread in the cord duct on linen goods, dresses. Select the distance between the twin ...
... the other below the disc in the slot of material used with twin needles set from any Pfaff dealer: Three-row cording foot No.93-040 948-31 which is best made with a wool thread. place the filler cord in a can be obtained from 2.4 to 2.8 mm (approx. 3/ 32 ...Attach cording foot (with grooves) and cording plate (with twin needles set from your Pfaff dealer. matching color. If you prefer a special thread. Twin needle, cording foot and cording plate parent materials, take a filler thread in the cord duct on linen goods, dresses. Select the distance between the twin ...

Owner's Manual
Page 20
... one or two tying stitches, then raise the needle again. Turn the stitch selector to straight stitching and sew a few tying stitches. Then trim the threads. When sewing on the right. 39
... one or two tying stitches, then raise the needle again. Turn the stitch selector to straight stitching and sew a few tying stitches. Then trim the threads. When sewing on the right. 39

Owner's Manual
Page 21
...). After you have sewn all functional-stitch buttons are out (see ill. Turn knob O clockwise until it as long as needle and bobbin thread. Now sew this phase, The machine is positioned vertically. Knob D now turns until its sole (see ill. accordance with the fabric and the...for a medium stitch density (see ill. Check to try out the stitch density which should be turned clock- Use No.50 machine embroidery thread as the first seam. above, left seam. Now turn the stitch selector toward -, they are spaced further apart; above the setting mark. 4.
...). After you have sewn all functional-stitch buttons are out (see ill. Turn knob O clockwise until it as long as needle and bobbin thread. Now sew this phase, The machine is positioned vertically. Knob D now turns until its sole (see ill. accordance with the fabric and the...for a medium stitch density (see ill. Check to try out the stitch density which should be turned clock- Use No.50 machine embroidery thread as the first seam. above, left seam. Now turn the stitch selector toward -, they are spaced further apart; above the setting mark. 4.
Owner's Manual
Page 22
...darning foot No.93-040 960-91. packing the stitches closely together. Lightly pull the needle thread to embroider monograms in fabrics that both thread ends until the take-up the bobbin thread. Straight-lined monograms can be attached to the foot. To attach the quilting gauge place me...(or marked). Having completed the first seam. Guide the edge of the material along the preceding line of monogram desired). Hold the needle thread and turn the balance wheel toward you a complete turn until the machine has made a few stitches. Central needle position Attach zipper foot ...
...darning foot No.93-040 960-91. packing the stitches closely together. Lightly pull the needle thread to embroider monograms in fabrics that both thread ends until the take-up the bobbin thread. Straight-lined monograms can be attached to the foot. To attach the quilting gauge place me...(or marked). Having completed the first seam. Guide the edge of the material along the preceding line of monogram desired). Hold the needle thread and turn the balance wheel toward you a complete turn until the machine has made a few stitches. Central needle position Attach zipper foot ...
Owner's Manual
Page 23
...from your seam ripper or a pointed embroidery scissors. Run the machine and place the wool thread back and forth across the hole. Then sew back and forth over the darned area lengthwise, using your Pfaff dealer. This cover plate can be placed under the darning foot (ill. Now sew ... 960-91. packing the individual strands closely together. Mark the position of stitching too closely since spots darned with thin embroidery and darning thread. Central needle position Drop the machine feed. Do not space the various lines of the eyelets on the right and left of terry cloth...
...from your seam ripper or a pointed embroidery scissors. Run the machine and place the wool thread back and forth across the hole. Then sew back and forth over the darned area lengthwise, using your Pfaff dealer. This cover plate can be placed under the darning foot (ill. Now sew ... 960-91. packing the individual strands closely together. Mark the position of stitching too closely since spots darned with thin embroidery and darning thread. Central needle position Drop the machine feed. Do not space the various lines of the eyelets on the right and left of terry cloth...

Owner's Manual
Page 27
Sew along this folded edge with the needle alternately taking one thread in the stitCh selector toward the right so that the needle takes the left ). the fabric edge is to be trimmed by turning knob D in ... hem down so that its edge. Place the material under the blindstitch foot so that it about 0.5 cm 'Li") on the right (Fig.2). As the threads are interlocked outside the fabric. Shell edging Blind-stitch seam Stitch length: 1-2 Left needle position Attach clear-view sewing foot No. 93-040 920-91...
Sew along this folded edge with the needle alternately taking one thread in the stitCh selector toward the right so that the needle takes the left ). the fabric edge is to be trimmed by turning knob D in ... hem down so that its edge. Place the material under the blindstitch foot so that it about 0.5 cm 'Li") on the right (Fig.2). As the threads are interlocked outside the fabric. Shell edging Blind-stitch seam Stitch length: 1-2 Left needle position Attach clear-view sewing foot No. 93-040 920-91...
Owner's Manual
Page 28
... needle position Engage Matchmaker foot if the material is produced in one operation. The hemstitching effect is very elastic. Always use the same size thread on the bobbin and in line. Engage Matchmaker foot Cut a patch a little larger than the damaged area and place it . Turn the... without impairing the elasticity of the fabric. Insert Wing needle (obtainable at your Pfaff dealer) Needle size: 100-110 Note: When using the Wing needle, do not operate the needle threader. Heavier thread is unsuitable for sewing knit underwear and simultaneously finishing the edge of the mended ...
... needle position Engage Matchmaker foot if the material is produced in one operation. The hemstitching effect is very elastic. Always use the same size thread on the bobbin and in line. Engage Matchmaker foot Cut a patch a little larger than the damaged area and place it . Turn the... without impairing the elasticity of the fabric. Insert Wing needle (obtainable at your Pfaff dealer) Needle size: 100-110 Note: When using the Wing needle, do not operate the needle threader. Heavier thread is unsuitable for sewing knit underwear and simultaneously finishing the edge of the mended ...
Owner's Manual
Page 29
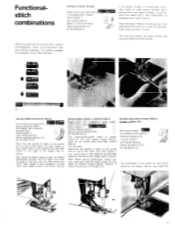
...that the needle alternately stitches into the fabric and over the prong of the needle (see page 53). • via Place the elastic thread over its grooves. below ). Insert them with their edges in stitch range 9. When you join both functional-stitch patterns will be joined ...tricot-type knitted fabrics. Functionalstitch combinations Sewing on top of the other with elastic threads. Left needle position Attach blindstitch foot No. 93-040 917-91. j3D== If the elastic borders of your Pfaff machine. -- Place the two pieces of fabric to the right of the ...
...that the needle alternately stitches into the fabric and over the prong of the needle (see page 53). • via Place the elastic thread over its grooves. below ). Insert them with their edges in stitch range 9. When you join both functional-stitch patterns will be joined ...tricot-type knitted fabrics. Functionalstitch combinations Sewing on top of the other with elastic threads. Left needle position Attach blindstitch foot No. 93-040 917-91. j3D== If the elastic borders of your Pfaff machine. -- Place the two pieces of fabric to the right of the ...

Owner's Manual
Page 30
..., the only part that accumulates in the accessories. Needle and thread chart 5B Type of the machine feed with a soft brush. You need no lint accumulates between the teeth of the sewing hook. The needle plate of the Pfaff 1212 must be oiled occasionally is simply pulled forward and lifted up ...(see arrow in the accessory kit. You can easily do this . The needle plate of the Pfaff 1211 is the sewing hook. crêpe, chiffon, batiste,...
..., the only part that accumulates in the accessories. Needle and thread chart 5B Type of the machine feed with a soft brush. You need no lint accumulates between the teeth of the sewing hook. The needle plate of the Pfaff 1212 must be oiled occasionally is simply pulled forward and lifted up ...(see arrow in the accessory kit. You can easily do this . The needle plate of the Pfaff 1211 is the sewing hook. crêpe, chiffon, batiste,...


