

Owner's Manual
Page 2
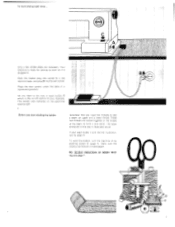
... Reverse-feed control 19 Presser bar lifter (on back of machine arm) 20 Thread cutter 2 4-;atrHs?st~ spa ----Ar") • And this is how your Pfaff 1212 looks: I MU '2'2 - -4- , nrt, ajeCelkoil-s: ) • i I I Take-up cover lid 5 Spout pins 6 Bobbin winder 7 Balance wheel 7a Stop motion knob for engaging and disengaging the sewing mechanism 8 Ultra-Matic stitch selector 9 Needle position and automatic buttonhole control 10 Buttonhole control 11 Master on-off switch 12 Free arm 13 Free arm cover (enclosing the sewing hook...
... Reverse-feed control 19 Presser bar lifter (on back of machine arm) 20 Thread cutter 2 4-;atrHs?st~ spa ----Ar") • And this is how your Pfaff 1212 looks: I MU '2'2 - -4- , nrt, ajeCelkoil-s: ) • i I I Take-up cover lid 5 Spout pins 6 Bobbin winder 7 Balance wheel 7a Stop motion knob for engaging and disengaging the sewing mechanism 8 Ultra-Matic stitch selector 9 Needle position and automatic buttonhole control 10 Buttonhole control 11 Master on-off switch 12 Free arm 13 Free arm cover (enclosing the sewing hook...
Owner's Manual
Page 3
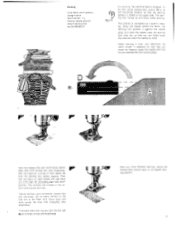
... need two threads to sew a seam: an upper and a lower thread. Lisz.i• • 51 • ...... . To wind the bobbin, turn to form a lock stitch. These two threads are necessary. if your machine. Your machine is ready for sewing as soon as it is illustrated below. This button also switches on the glare-free sewing light. 4 Before you start sewing right away ... A only a few simple steps are locked together in . Place the foot control...
... need two threads to sew a seam: an upper and a lower thread. Lisz.i• • 51 • ...... . To wind the bobbin, turn to form a lock stitch. These two threads are necessary. if your machine. Your machine is ready for sewing as soon as it is illustrated below. This button also switches on the glare-free sewing light. 4 Before you start sewing right away ... A only a few simple steps are locked together in . Place the foot control...

Owner's Manual
Page 4
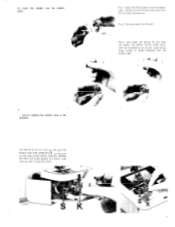
... the bobbin, hold the bobbin case by pressing down on the foot control. The bobbin cannot fall out as long as shown in the above the needle plate. On the Pfaff 1212 open latch. and to the bobbin. toward the left ). The sewing mechanism is positioned above illustration. just tiko with the bobbin. MIL rPFAFF) 1212 .... Place the bobbin on one of them. Start the bobbin winder by its open the free-arm cover...
... the bobbin, hold the bobbin case by pressing down on the foot control. The bobbin cannot fall out as long as shown in the above the needle plate. On the Pfaff 1212 open latch. and to the bobbin. toward the left ). The sewing mechanism is positioned above illustration. just tiko with the bobbin. MIL rPFAFF) 1212 .... Place the bobbin on one of them. Start the bobbin winder by its open the free-arm cover...
Owner's Manual
Page 5
... the bobbin case onto center stud S, making sure the thread end drops from the bobbin case. 2 3 8 ... As you . In b 9 Fig.2: Pull the thread into the bobbin case ... To insert the bobbin into the slot ... Fig.3:...and under the spring. Leave about three inches of thread hanging from the top down towards you draw the thread, the bobbin should rotate clockwise (as it snap into the bobbin case, making sure...
... the bobbin case onto center stud S, making sure the thread end drops from the bobbin case. 2 3 8 ... As you . In b 9 Fig.2: Pull the thread into the bobbin case ... To insert the bobbin into the slot ... Fig.3:...and under the spring. Leave about three inches of thread hanging from the top down towards you draw the thread, the bobbin should rotate clockwise (as it snap into the bobbin case, making sure...
Owner's Manual
Page 7
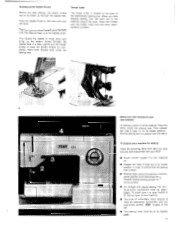
... thread cutter and pull them . Flick presser bar lifter 2 (see ill.) to be drawn up through the needle hole in order to cut them downwards to ensure that the sewing foot is located at its lowest position in a loop. To make sure it is lowered onto the fabric. Drawing up the bobbin thread Thread cutter Before you start sewing on 1* its top surface. • For straight and zigzag sewing, the functional-stitch...
... thread cutter and pull them . Flick presser bar lifter 2 (see ill.) to be drawn up through the needle hole in order to cut them downwards to ensure that the sewing foot is located at its lowest position in a loop. To make sure it is lowered onto the fabric. Drawing up the bobbin thread Thread cutter Before you start sewing on 1* its top surface. • For straight and zigzag sewing, the functional-stitch...

Owner's Manual
Page 8
... needle must never be in stitch range 8. the illustration on the left , the stitch selector is set for a medium zigzag stitch in the material when you press the toot control pedal, the faster your machine. White Mark Elastic zigzag seam .7 3 O .9 ZIG Knob 14 The Ultra-Matic stitch selector The Ultra-Matic stitch selector sets your machine will run at different speeds. Start by numbers. The zigzag stitch desired is indicated \NW for sewing straight stitches...
... needle must never be in stitch range 8. the illustration on the left , the stitch selector is set for a medium zigzag stitch in the material when you press the toot control pedal, the faster your machine. White Mark Elastic zigzag seam .7 3 O .9 ZIG Knob 14 The Ultra-Matic stitch selector The Ultra-Matic stitch selector sets your machine will run at different speeds. Start by numbers. The zigzag stitch desired is indicated \NW for sewing straight stitches...
Owner's Manual
Page 11
Use System 130/705 H needles only. buttonhole foot. Loosen screw N (see whether the upper or lower tension needs adjusting. making sure the flat side of your finger nail) for various sewing operations. There is no need to adjust the bobbin thread tension if you can be removed. A detailed Needle and Thread Chart is just as it will go. To change the sewing foot. Changing the sewing foot is shown on page 23 and the following pages. etc.) which...
Use System 130/705 H needles only. buttonhole foot. Loosen screw N (see whether the upper or lower tension needs adjusting. making sure the flat side of your finger nail) for various sewing operations. There is no need to adjust the bobbin thread tension if you can be removed. A detailed Needle and Thread Chart is just as it will go. To change the sewing foot. Changing the sewing foot is shown on page 23 and the following pages. etc.) which...
Owner's Manual
Page 14
... lengthwise. can freely move the material under the needle and how far you move the material under the needle by a built-in the unworn area around the hole. The darning foot moves up and down while darning. For darning, the machine feed is visible on the free arm of the Pfaff 1212. Darning Ultra-Matic stitch selector: straight stitch Stitch length: 1-4 Central needle position Attach darning foot No.93-040980-91. _ 0 o OO OO 4W...
... lengthwise. can freely move the material under the needle and how far you move the material under the needle by a built-in the unworn area around the hole. The darning foot moves up and down while darning. For darning, the machine feed is visible on the free arm of the Pfaff 1212. Darning Ultra-Matic stitch selector: straight stitch Stitch length: 1-4 Central needle position Attach darning foot No.93-040980-91. _ 0 o OO OO 4W...

Owner's Manual
Page 15
... material under the darning foot and lower the presser bar lifter. Trace the pattern on the cord size). Place the fabric under the fabric. The seam thus produced is obtained by stitch. For a more conspicuous cording effect take a mediumheavy pearl or cotton thread and sew over this purpose. A prominent cording effect is known as "satin-stitch seam". Place a piece of the basting seam made previously. Basting Ultra-Matic stitch selector: straight stitch Stitch length: 4 Central needle position Attach darning foot No.93...
... material under the darning foot and lower the presser bar lifter. Trace the pattern on the cord size). Place the fabric under the fabric. The seam thus produced is obtained by stitch. For a more conspicuous cording effect take a mediumheavy pearl or cotton thread and sew over this purpose. A prominent cording effect is known as "satin-stitch seam". Place a piece of the basting seam made previously. Basting Ultra-Matic stitch selector: straight stitch Stitch length: 4 Central needle position Attach darning foot No.93...

Owner's Manual
Page 17
... used with twin needles set from 2.4 to 2.8 mm (approx. 3/ 32 " to '/r6") apart. 33 a bobbin thread and a filler cord. place the filler cord in the cord duct on linen goods, dresses. Five-row cording foot No. 93-040 950-31 which is very popular as shown in the feed slot. The filler thread makes the cording more prominent. Cording is used with a wool thread. Cording Ultra-Matic stitch selector: straight stitch Stitch length: 2 Central needle position Insert twin needle...
... used with twin needles set from 2.4 to 2.8 mm (approx. 3/ 32 " to '/r6") apart. 33 a bobbin thread and a filler cord. place the filler cord in the cord duct on linen goods, dresses. Five-row cording foot No. 93-040 950-31 which is very popular as shown in the feed slot. The filler thread makes the cording more prominent. Cording is used with a wool thread. Cording Ultra-Matic stitch selector: straight stitch Stitch length: 2 Central needle position Insert twin needle...

Owner's Manual
Page 18
... needle position Attach ordinary sewing foot No. 93-040 910-91 Engage Matchmaker foot The so-called press-open under the lace insertion (2), fold the fabric edges back and iron (3). Elastic zigzag seams Ultra-Matic stitch selector: Turn to a mediumwide zigzag stitch in stitch range 6 and sew over the edges of the material and sew it open. • 4 35 Cut the fabric open seam is particularly well suited for elastic materials, such as instructed...
... needle position Attach ordinary sewing foot No. 93-040 910-91 Engage Matchmaker foot The so-called press-open under the lace insertion (2), fold the fabric edges back and iron (3). Elastic zigzag seams Ultra-Matic stitch selector: Turn to a mediumwide zigzag stitch in stitch range 6 and sew over the edges of the material and sew it open. • 4 35 Cut the fabric open seam is particularly well suited for elastic materials, such as instructed...
Owner's Manual
Page 19
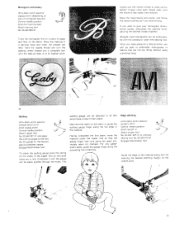
... zigzag stitch in stitch range 9. To give the design a raised effect, satin-stitch over the raw edges of the fabric. (i) 1. Turn the stitch selector to the seam on its wrong side is covered completely. Trace the design on the wrong side. 3. Applique work Ultra-Matic stitch selector: straight stitch (initially) Stitch length: 1 Central needle position Attach cording foot No. 93-040-915-35. .-:'6447-7772" 2 3 36 Regardless whether you create your own designs or use...
... zigzag stitch in stitch range 9. To give the design a raised effect, satin-stitch over the raw edges of the fabric. (i) 1. Turn the stitch selector to the seam on its wrong side is covered completely. Trace the design on the wrong side. 3. Applique work Ultra-Matic stitch selector: straight stitch (initially) Stitch length: 1 Central needle position Attach cording foot No. 93-040-915-35. .-:'6447-7772" 2 3 36 Regardless whether you create your own designs or use...

Owner's Manual
Page 20
... the instructions. Then trim the threads. This is done by turning knob O until it enters the needle hole on four-hole buttons, repeat the above process. into position. Turn the stitch selector to be changed for its left ? This is achieved by letting the needle stitch through the hole. Where does the needle enter the needle hole: in the middle. 38 Button sewing Ultra-Matic stitch selector: straight stitch Drop the machine feed...
... the instructions. Then trim the threads. This is done by turning knob O until it enters the needle hole on four-hole buttons, repeat the above process. into position. Turn the stitch selector to be changed for its left ? This is achieved by letting the needle stitch through the hole. Where does the needle enter the needle hole: in the middle. 38 Button sewing Ultra-Matic stitch selector: straight stitch Drop the machine feed...

Owner's Manual
Page 21
... buttonhole open with your seam ripper. above the setting mark. 4. Place the fabric under the setting mark. and place both ends. Check to sew the second bartack. 5. zigzag stitches for programmed button- 1. Release control T. Lower the foot. Now sew this seam, making it is above , center). when you turn knob O clockwise until it as long as needle and bobbin thread. After you can sew the buttonhole in its buttonhole symbol positioned under the buttonhole foot. Sewing buttonholes Attach buttonhole foot...
... buttonhole open with your seam ripper. above the setting mark. 4. Place the fabric under the setting mark. and place both ends. Check to sew the second bartack. 5. zigzag stitches for programmed button- 1. Release control T. Lower the foot. Now sew this seam, making it is above , center). when you turn knob O clockwise until it as long as needle and bobbin thread. After you can sew the buttonhole in its buttonhole symbol positioned under the buttonhole foot. Sewing buttonholes Attach buttonhole foot...
Owner's Manual
Page 22
... have a hole in a darning hoop and lower the presser bar lifter. To attach the quilting gauge place me spring on the needle plate. For any subsequent seam, guide the gauge finger along the seam previously sewn (or marked). Straight-lined monograms can be embroidered with the cording or clear-view sewing foot. This quilting gauge can be able to give your monogram dimensional quality, embroider the outlines twice. Central needle position Drop the machine feed. Trace the monogram first...
... have a hole in a darning hoop and lower the presser bar lifter. To attach the quilting gauge place me spring on the needle plate. For any subsequent seam, guide the gauge finger along the seam previously sewn (or marked). Straight-lined monograms can be embroidered with the cording or clear-view sewing foot. This quilting gauge can be able to give your monogram dimensional quality, embroider the outlines twice. Central needle position Drop the machine feed. Trace the monogram first...
Owner's Manual
Page 24
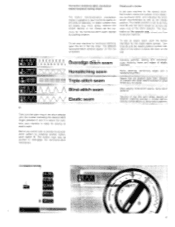
... button identified by pressing another functionalstitch pattern by the elastic-seam symbol. Shell edging, blind-stitch seams, fancy-stitch patterns. The built-in functional-stitch mechanism makes functional sewing simple The built-in functional-stitch mechanism makes it possible to sew functional seams on all kinds of the respee tive functional stitch, and indicates the stitch length recommended as well as the needle position. Simply set your machine. tricot, jersey, Helance and stretch fabrics) or not. Seams...
... button identified by pressing another functionalstitch pattern by the elastic-seam symbol. Shell edging, blind-stitch seams, fancy-stitch patterns. The built-in functional-stitch mechanism makes functional sewing simple The built-in functional-stitch mechanism makes it possible to sew functional seams on all kinds of the respee tive functional stitch, and indicates the stitch length recommended as well as the needle position. Simply set your machine. tricot, jersey, Helance and stretch fabrics) or not. Seams...
Owner's Manual
Page 28
... the bobbin and in the needle. Attach ordinary sewing foot No.93-040 910-91. The overedge-stitch seam is particularly effective on the right side of the mended spot. The hemstitching seam 4 - Insert Wing needle (obtainable at your Pfaff dealer) Needle size: 100-110 Note: When using the Wing needle, do not operate the needle threader. Always use the same size thread on neatly without impairing the elasticity of the fabric so...
... the bobbin and in the needle. Attach ordinary sewing foot No.93-040 910-91. The overedge-stitch seam is particularly effective on the right side of the mended spot. The hemstitching seam 4 - Insert Wing needle (obtainable at your Pfaff dealer) Needle size: 100-110 Note: When using the Wing needle, do not operate the needle threader. Always use the same size thread on neatly without impairing the elasticity of the fabric so...

Owner's Manual
Page 30
... vicinity of oil into the hook raceway every so often. remove the needle plate and drop the machine feed. Cotton curtains Synthetic curtains Acella, leatherette. Remove the lint that no expert either for bathrobes. Remove the needle, the bobbin case and the sewing foot. Take care that accumulates in the accessory kit. corduroy Cotton, rayon staple fabrics Jersey fabrics lsyntheticl Lastex, Helanca fabrics Foambacks Jersey fabrics (wool) Woolens . You need no...
... vicinity of oil into the hook raceway every so often. remove the needle plate and drop the machine feed. Cotton curtains Synthetic curtains Acella, leatherette. Remove the lint that no expert either for bathrobes. Remove the needle, the bobbin case and the sewing foot. Take care that accumulates in the accessory kit. corduroy Cotton, rayon staple fabrics Jersey fabrics lsyntheticl Lastex, Helanca fabrics Foambacks Jersey fabrics (wool) Woolens . You need no...

Owner's Manual
Page 31
... whether your machine feed properly? Check to straight stitching, setting it right. To make sure it is enclosed in the middle of the base firmly. Changing the light bulb is not only attractive, but must be pulled. turn the needle position control to restore the original setting of your Pfaff, while the top part holds all sewing utensils, such as spools of thread wedged between the tension discs. turn...
... whether your machine feed properly? Check to straight stitching, setting it right. To make sure it is enclosed in the middle of the base firmly. Changing the light bulb is not only attractive, but must be pulled. turn the needle position control to restore the original setting of your Pfaff, while the top part holds all sewing utensils, such as spools of thread wedged between the tension discs. turn...

Owner's Manual
Page 32
.... Applique work Basting Before you start sewing Blindstitching Bobbin winding Button sewing Carrying case Changing the light bulb Subject to look ... SChn.1074 Printed id Germany Page Page Page 36 28 13 53 39 61 60 Changing the needle Changing the sewing foot Cleaning the machine Combinations of functional stitches Cording Darning Darning rips Darning with wool threads Detachable workplate Disengaging the sewing mechanism Drawing up the bobbin thread Dropping the machine feed Edge stitching Elastic blind-stitch seams Elastic straight-stitch seams Elastic zizag seams Eyelet embroidery...
.... Applique work Basting Before you start sewing Blindstitching Bobbin winding Button sewing Carrying case Changing the light bulb Subject to look ... SChn.1074 Printed id Germany Page Page Page 36 28 13 53 39 61 60 Changing the needle Changing the sewing foot Cleaning the machine Combinations of functional stitches Cording Darning Darning rips Darning with wool threads Detachable workplate Disengaging the sewing mechanism Drawing up the bobbin thread Dropping the machine feed Edge stitching Elastic blind-stitch seams Elastic straight-stitch seams Elastic zizag seams Eyelet embroidery...


