
Owner's Manual
Page 2
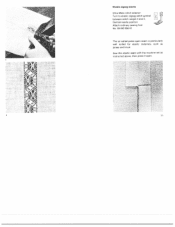
... 54 Reinforcing edges of Pfaff 1196 Coverof Pfaff 1199 Accessories drawer Machine drive Preparations for bobbin winding Removing the bobbin case Bobbin winding Inserting the bobbin Inserting the bobbin case Upper threading Drawing up the bobbin thread Thread cutter Before you start sewing Ultra-Matic stitch selector Zigzag stitching Foot control Reverse sewing Dropping the machine feed Presser bar lifter Changing the needle Changing the sewing foot Regulating the thread tensions Detachable workplate Felling Hemming Zipper insertion Darning Single-needle cording Shirring Overcasting edges...
... 54 Reinforcing edges of Pfaff 1196 Coverof Pfaff 1199 Accessories drawer Machine drive Preparations for bobbin winding Removing the bobbin case Bobbin winding Inserting the bobbin Inserting the bobbin case Upper threading Drawing up the bobbin thread Thread cutter Before you start sewing Ultra-Matic stitch selector Zigzag stitching Foot control Reverse sewing Dropping the machine feed Presser bar lifter Changing the needle Changing the sewing foot Regulating the thread tensions Detachable workplate Felling Hemming Zipper insertion Darning Single-needle cording Shirring Overcasting edges...

Owner's Manual
Page 3
... these parts on your machine, you will always be a pleasure. You are illustrated. By identifying these sewing instructions carefully, and hope that you first take the time to try out your Pfaff will quickly familiarize yourself with your machine are probably very anxious to read this instruction booklet. Your Pfaff sewing machine is very versatile, and we suggest that sewing with your new machine, but...
... these parts on your machine, you will always be a pleasure. You are illustrated. By identifying these sewing instructions carefully, and hope that you first take the time to try out your Pfaff will quickly familiarize yourself with your machine are probably very anxious to read this instruction booklet. Your Pfaff sewing machine is very versatile, and we suggest that sewing with your new machine, but...
Owner's Manual
Page 4
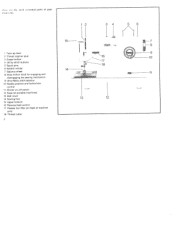
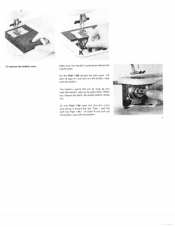
LH moI sr!ntia parts of your 15 7 PAFF .t 8 1 Take-up ever 9 2 Thread retainer stud 16 3 Eraser button 4 Utility-stitch buttons 17 5 Spool pins 6 Bobbin winder 14 7 Balance wheel 8 Stop motion knob for engaging and 1 11 disengaging the sewing mechanism 9 Ultra-Matic stitch selector 10 Needle position and buttonhole control 11 Master on-off switch 12 Base (of portable machines) 13 Bed cover 14 Sewing foot 13 2 15 Upper tension 16 Reverse-feed control 17 Presser bar lifter (on back of machine arm) 18 Thread cutter 2
LH moI sr!ntia parts of your 15 7 PAFF .t 8 1 Take-up ever 9 2 Thread retainer stud 16 3 Eraser button 4 Utility-stitch buttons 17 5 Spool pins 6 Bobbin winder 14 7 Balance wheel 8 Stop motion knob for engaging and 1 11 disengaging the sewing mechanism 9 Ultra-Matic stitch selector 10 Needle position and buttonhole control 11 Master on-off switch 12 Base (of portable machines) 13 Bed cover 14 Sewing foot 13 2 15 Upper tension 16 Reverse-feed control 17 Presser bar lifter (on back of machine arm) 18 Thread cutter 2
Owner's Manual
Page 5
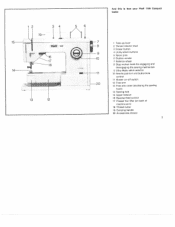
... Pfaff 1199 Compact ooks: 1 34 56 /N 19- 11 i4? 1 - 7 1 Take-up lever 8 2 Thread retainer stud 3 Eraser button 9 4 Utility-stitch buttons 5 Spool pins 6 Bobbin winder 7 Balance wheel 8 Stop motion knob for engaging and disengaging the sewing mechanism 14 9 Ultra-Matic stitch selector 11 10 Needle position and buttonhole control 11 Master on-off switch 2O 12 Free arm 13 Free arm cover (enclosing the sewing hook) 13 12 14 Sewing foot 15 Upper tension 16 Reverse-feed control 17 Presser bar lifter (on back of machine arm...
... Pfaff 1199 Compact ooks: 1 34 56 /N 19- 11 i4? 1 - 7 1 Take-up lever 8 2 Thread retainer stud 3 Eraser button 9 4 Utility-stitch buttons 5 Spool pins 6 Bobbin winder 7 Balance wheel 8 Stop motion knob for engaging and disengaging the sewing mechanism 14 9 Ultra-Matic stitch selector 11 10 Needle position and buttonhole control 11 Master on-off switch 2O 12 Free arm 13 Free arm cover (enclosing the sewing hook) 13 12 14 Sewing foot 15 Upper tension 16 Reverse-feed control 17 Presser bar lifter (on back of machine arm...
Owner's Manual
Page 10
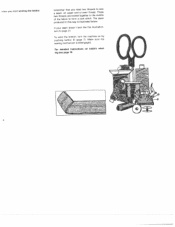
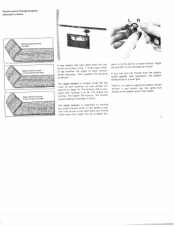
These two threads are locked together in this way is disengaged. If your seam doesnt look like the illustration, turn the machine on bobbin wind ing see page 10. The seam produced in the middle of the fabric to page 21. To wind the bobbin, turn to form a lock stitch. For detailed instructions on by pushing button C (page 7), Make sure the sewing mechanism is illustrated below. eort, you start winding the bobbin remember that you need two threads to sew a seam: an upper and a lower thread.
These two threads are locked together in this way is disengaged. If your seam doesnt look like the illustration, turn the machine on bobbin wind ing see page 10. The seam produced in the middle of the fabric to page 21. To wind the bobbin, turn to form a lock stitch. For detailed instructions on by pushing button C (page 7), Make sure the sewing mechanism is illustrated below. eort, you start winding the bobbin remember that you need two threads to sew a seam: an upper and a lower thread.
Owner's Manual
Page 11
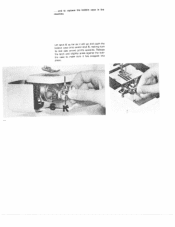
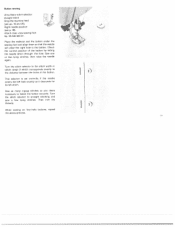
ihe bobbin cannot fall out as long as you release the latch, the empty bobbin drops out. Then - Lift latch K (see ill.> and pull out the bobbin case with the Pfaff 1196 - On the Pfaff 1199 open latch. just like with the bobbin. To remove the bobbin case Make sure the needle is positioned above the needle plate. When you hold the bobbin case by its open the free-arm cover and swing it toward the left. On the Pfaff 1196 remove the bed cover. lift latch K and pull out the bobbin case with the bobbin.
ihe bobbin cannot fall out as long as you release the latch, the empty bobbin drops out. Then - Lift latch K (see ill.> and pull out the bobbin case with the Pfaff 1196 - On the Pfaff 1199 open latch. just like with the bobbin. To remove the bobbin case Make sure the needle is positioned above the needle plate. When you hold the bobbin case by its open the free-arm cover and swing it toward the left. On the Pfaff 1196 remove the bed cover. lift latch K and pull out the bobbin case with the bobbin.
Owner's Manual
Page 14
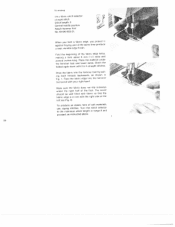
• and to make sure it will go and push the bobbin case onto center stud S, making sure its slot (see arrow) points upwards. Release the latch and slightly press against the bob bin case to replace the bobbin case in the machine Lift latch K as far as it has snapped into place. I
• and to make sure it will go and push the bobbin case onto center stud S, making sure its slot (see arrow) points upwards. Release the latch and slightly press against the bob bin case to replace the bobbin case in the machine Lift latch K as far as it has snapped into place. I
Owner's Manual
Page 19
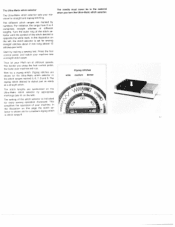
... dialed just as easily as a straight stitch. The stitch lengths are shown on this page the stitch se lector is set for sewing straight stitches about 2 mm long (about 12 stitches per inch). In the illustation on the Ultra-Matic stitch selector in the material when you press the foot control pedal, the faster your Pfaff run . The different stitch ranges are marked by making a sewing test. Start by numbers. The zigzag stitch...
... dialed just as easily as a straight stitch. The stitch lengths are shown on this page the stitch se lector is set for sewing straight stitches about 2 mm long (about 12 stitches per inch). In the illustation on the Ultra-Matic stitch selector in the material when you press the foot control pedal, the faster your Pfaff run . The different stitch ranges are marked by making a sewing test. Start by numbers. The zigzag stitch...
Owner's Manual
Page 22
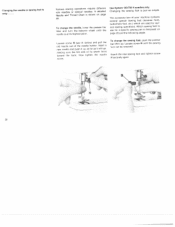
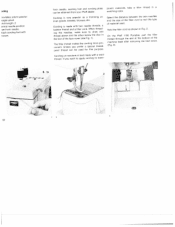
... pull the old needle out of the needle holder, Insert a new needle and push it will go. To change the sewing foot. To change the needle, lower the presser bar lifter and turn the balance wheel until the sewing foot can be removed. push the presser bar lifter up as far as simple. making sure the flat side of your machine contains several special sewing feet (hemmer foot), buttonhole foot, etc.) which are used for a specific sewing job is...
... pull the old needle out of the needle holder, Insert a new needle and push it will go. To change the sewing foot. To change the needle, lower the presser bar lifter and turn the balance wheel until the sewing foot can be removed. push the presser bar lifter up as far as simple. making sure the flat side of your machine contains several special sewing feet (hemmer foot), buttonhole foot, etc.) which are used for a specific sewing job is...
Owner's Manual
Page 23
... you always use the same size thread on the bobbin and in Fig. 1. Turn this case, check to the left (L) are indicated by turning the small knurled screw on page 13 The tension dial is regulated by arrows. The lower tension is pro vided with your thumb rather than your machine, as the one shown in the needle. The normal tension setting is located...
... you always use the same size thread on the bobbin and in Fig. 1. Turn this case, check to the left (L) are indicated by turning the small knurled screw on page 13 The tension dial is regulated by arrows. The lower tension is pro vided with your thumb rather than your machine, as the one shown in the needle. The normal tension setting is located...
Owner's Manual
Page 26
... stitch selector: slraight stitch Stitch length: 2 Central needle position Attach hemmer foot No. 93-040933-31. Turn the stitch selector to the maximum stitch length in range 6 and proceed, as shown in line with 3 or 4 straight stitches. Place the material under the right half of the left toe (Fig. 2). To produce an elastic hem of the fabric edge twice, making a hem about 3 mm (1/a') wide and several inches long. Feed...
... stitch selector: slraight stitch Stitch length: 2 Central needle position Attach hemmer foot No. 93-040933-31. Turn the stitch selector to the maximum stitch length in range 6 and proceed, as shown in line with 3 or 4 straight stitches. Place the material under the right half of the left toe (Fig. 2). To produce an elastic hem of the fabric edge twice, making a hem about 3 mm (1/a') wide and several inches long. Feed...
Owner's Manual
Page 34
... cover. (Fig. 3). ttach cording foot with rooves. 1: Twin needle, cording foot and cording plate can be obtained from your Pfaff dealer. tra-Matic stitch selector: raight stitch itch length: 2 entral needle position sert twin needle. On the Pfaff 1196 Portable. When thread ing the needles, make sure to draw one thread above and the other below the disc in a matching color, Select the distance between the twin needles and the size of material used for this purpose. Cording...
... cover. (Fig. 3). ttach cording foot with rooves. 1: Twin needle, cording foot and cording plate can be obtained from your Pfaff dealer. tra-Matic stitch selector: raight stitch itch length: 2 entral needle position sert twin needle. On the Pfaff 1196 Portable. When thread ing the needles, make sure to draw one thread above and the other below the disc in a matching color, Select the distance between the twin needles and the size of material used for this purpose. Cording...
Owner's Manual
Page 36
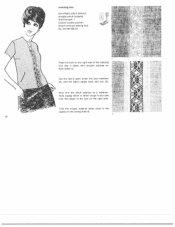
...fabric open under the lace insertion (2), fold the fabric edges back and iron (3). 4 Now turn the stitch selector to the seams on the wrong side (4). 34 vl Place the lace on the rigrit side of the lace on both sides (1). Trim the excess material away close to a mediumwide zigzag stitch in stitch range 6 and sew... over the edges of the material and sew it down with straight stitches on the right side. Inserting ace Ultra-Matic stitch selector: straight stitch (initially) Stitch length: 1 Central needle position Attach ordinary sewing foot ...
...fabric open under the lace insertion (2), fold the fabric edges back and iron (3). 4 Now turn the stitch selector to the seams on the wrong side (4). 34 vl Place the lace on the rigrit side of the lace on both sides (1). Trim the excess material away close to a mediumwide zigzag stitch in stitch range 6 and sew... over the edges of the material and sew it down with straight stitches on the right side. Inserting ace Ultra-Matic stitch selector: straight stitch (initially) Stitch length: 1 Central needle position Attach ordinary sewing foot ...
Owner's Manual
Page 37
Elastic zigzag seams Ultra-Matic stitch selector: Turn to elastic zigzag stitch symbol between stitch ranges 4 and 5. Central needle position Attach ordinary sewing foot No. 93-040 956-91 The so-called press-open . ., , I> 1 I. ,. Sew this elastic seam with the machine set as instructed above, then press it open seam is particularly well suited for elastic materials, such as jersey and tricot.
Elastic zigzag seams Ultra-Matic stitch selector: Turn to elastic zigzag stitch symbol between stitch ranges 4 and 5. Central needle position Attach ordinary sewing foot No. 93-040 956-91 The so-called press-open . ., , I> 1 I. ,. Sew this elastic seam with the machine set as instructed above, then press it open seam is particularly well suited for elastic materials, such as jersey and tricot.
Owner's Manual
Page 39
... the appliqué again. To give the design a raised effect, satin-stitch over the edges of the fabric. 2. Trace the design on the wrong side. 3. Turn the stitch selector to a not100-dense zigzag sttch in stitch range 6 and sew over a filler thread (Fig. 4). Undo the first zigzag seam (Fig. 11 and trim the excess material close to articles, such as wall hangings and table...
... the appliqué again. To give the design a raised effect, satin-stitch over the edges of the fabric. 2. Trace the design on the wrong side. 3. Turn the stitch selector to a not100-dense zigzag sttch in stitch range 6 and sew over a filler thread (Fig. 4). Undo the first zigzag seam (Fig. 11 and trim the excess material close to articles, such as wall hangings and table...
Owner's Manual
Page 41
...). Sew as many zigzag stitches as it descends for its left stitch. Turn the stitch selector to the distance between the holes in the button. Check the correct position of the button by letting the needle stitch through the hole. This selector is set correctly if the needle enters the left hole exactly as you deem necessary to fasten the button securely. Button sewing Ultra-Matic stitch selector; straight stitch Drop the machine feed...
...). Sew as many zigzag stitches as it descends for its left stitch. Turn the stitch selector to the distance between the holes in the button. Check the correct position of the button by letting the needle stitch through the hole. This selector is set correctly if the needle enters the left hole exactly as you deem necessary to fasten the button securely. Button sewing Ultra-Matic stitch selector; straight stitch Drop the machine feed...

Owner's Manual
Page 42
... you until its highest position, and remove the material from the machine. Use No. 50 achine embroidery thread as the first seam. Turn the balance wheel toward you until the second seam C is the right length. E). A). After you until the needle has risen clear of the buttonhole foot and place both ends. We recommend to sew a buttonhole to ease the needle thread tension somewhat. and ro tate...
... you until its highest position, and remove the material from the machine. Use No. 50 achine embroidery thread as the first seam. Turn the balance wheel toward you until the second seam C is the right length. E). A). After you until the needle has risen clear of the buttonhole foot and place both ends. We recommend to sew a buttonhole to ease the needle thread tension somewhat. and ro tate...
Owner's Manual
Page 44
...), entral needle position rep the machine feed. Hold both thread ends until the machine has made a few stitches. Place the material in fabrics that are not too flimsy without using a darning hoop. Hold the needle thread and turn intil the take-up lever is at its highest point. 7 I /çJ Lightly pull the needle thread to embroider monograms in darning hoop and lower the presser bar ifter. Straight-lined monograms can be able to draw up the bobbin thread...
...), entral needle position rep the machine feed. Hold both thread ends until the machine has made a few stitches. Place the material in fabrics that are not too flimsy without using a darning hoop. Hold the needle thread and turn intil the take-up lever is at its highest point. 7 I /çJ Lightly pull the needle thread to embroider monograms in darning hoop and lower the presser bar ifter. Straight-lined monograms can be able to draw up the bobbin thread...
Owner's Manual
Page 48
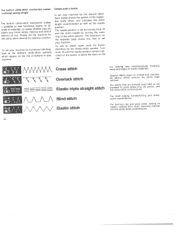
.../ Elastic stitch For sewing and hems and edges of the respec tive utility stitch, and indicates the stitch length recommended as well as the needle position. sewing terry cloth, areas, sewing on the dial. ihe built-in utility-stitch mechanism makes unctional sewing simpe fhe built-in your machine. For seams that are pressed open exposed to set the machine for utility-stitch combinations. For darning rips and worn elastic. Simp'y push a button to...
.../ Elastic stitch For sewing and hems and edges of the respec tive utility stitch, and indicates the stitch length recommended as well as the needle position. sewing terry cloth, areas, sewing on the dial. ihe built-in utility-stitch mechanism makes unctional sewing simpe fhe built-in your machine. For seams that are pressed open exposed to set the machine for utility-stitch combinations. For darning rips and worn elastic. Simp'y push a button to...
Owner's Manual
Page 63
...?h length been set your machine for straight stitching • again. • If trouble should occur, check the fol Attwhreeemetnh, eprtheuellpiteaecnenssiaoronrfowtdhirsefcaasbd?riwcTeodstgrrieepmd obbveee tween the tension discs. Bitoiahnferegifmmzoemr,aecayChcyohhiouneiurnceskeesolttfnapoerewtesreadistetsheiowwctnilhhneeeagutn,nfhituneialnrggdayyaoioonmruuorefkianslnmtienaowlgiwsl. • Even if you or darned, have been set horizontally. They have just sewn we recommend buttonholes that the the master presser on-off button, bar lifter is set correctly...
...?h length been set your machine for straight stitching • again. • If trouble should occur, check the fol Attwhreeemetnh, eprtheuellpiteaecnenssiaoronrfowtdhirsefcaasbd?riwcTeodstgrrieepmd obbveee tween the tension discs. Bitoiahnferegifmmzoemr,aecayChcyohhiouneiurnceskeesolttfnapoerewtesreadistetsheiowwctnilhhneeeagutn,nfhituneialnrggdayyaoioonmruuorefkianslnmtienaowlgiwsl. • Even if you or darned, have been set horizontally. They have just sewn we recommend buttonholes that the the master presser on-off button, bar lifter is set correctly...


