
Pfaff 1196 - 1199 Support Question
Pfaff 1196 - 1199 Support Question
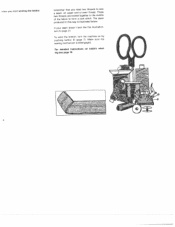
Find answers below for this question about Pfaff 1196 - 1199.Need a Pfaff 1196 - 1199 manual? We have 1 online manual for this item!
Question posted by mdrig81445 on January 6th, 2014
Balance Wheel And Sewing Mechanism Do You Have A Schematic Of How This Goes Back
this has come apart it has a spring I cannot figure out where spring goes?
Current Answers
Related Pfaff 1196 - 1199 Manual Pages
Owner's Manual - Page 2
... wool thread
44
Eyelet embroidery
45
Utility-stitch mechanism
46
Mending hems
48
Darning rips
48
Sewing on elastic
49
Stitching terry cloth
50
Elastic triple straight stitch
51
Shelledging
52
Blindstitching
53
Inserting patches
54
Reinforcing edges of Pfaff 1196 Coverof Pfaff 1199 Accessories drawer Machine drive Preparations for bobbin winding Removing the bobbin...
Owner's Manual - Page 3

...
'9 We suggest that you will always be a pleasure. histructon Book for the Ptaft UtiNtyStitch Sewing Machines 1196 and 1199 Compact
Dear Pfaff Customer:
Welcome to the modern, efficient world of your machine are probably very anxious to try out your new machine, but we would like to tell you about all the wonderful things you first...
Owner's Manual - Page 4
... 4 Utility-stitch buttons
17
5 Spool pins
6 Bobbin winder
14
7 Balance wheel
8 Stop motion knob for engaging and
1
11
disengaging the sewing mechanism
9 Ultra-Matic stitch selector
10 Needle position and buttonhole
control
11 Master on-off switch
12 Base (of portable machines)
13 Bed cover 14 Sewing foot
13
2
15 Upper tension
16 Reverse-feed control...
Owner's Manual - Page 5
Arid this is how your Pfaff 1199 Compact ooks:
1
34
56
/N
19-
11
i4?
1
-
7
1 Take-up lever
8
2 Thread retainer stud
3 Eraser button
9
4 Utility-stitch buttons
5 Spool pins
6 Bobbin winder
7 Balance wheel
8 Stop motion knob for engaging and
disengaging the sewing mechanism
14
9 Ultra-Matic stitch selector
11
10 Needle position and buttonhole
control 11 Master on...
Owner's Manual - Page 8

Slightly pu*;h up the catch in the direction indicated by an arrow and at right. 6
;!sI: [
IiIiillI[
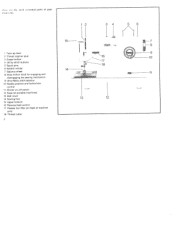
The accessories are arranged in the drawer as illustrated at the same time pull the accessories drawer out of the nitchine below the balance wheel. in lie I halt 1 lJ9 Compact the accessories oniinodated in an accessories drawer
which is located on the right-hand side of the machine.
Owner's Manual - Page 9
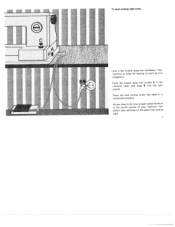
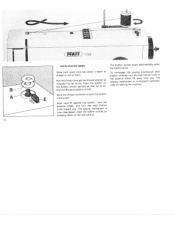
... to do now is push button Cwhich is plugged in the machine base, and plug B into socket A in . Push the master plug into the wall socket. Your machine is ready for sewing as soon as it is the on the glare-free sewing light.
7 Place the foot control under the table in a convenient position...
Owner's Manual - Page 10
... is disengaged. If your seam doesnt look like the illustration, turn the machine on bobbin wind ing see page 10.
To wind the bobbin, turn to page 21. For detailed instructions on by pushing button C (page 7), Make sure the sewing mechanism is illustrated below.
The seam produced in the middle of the fabric...
Owner's Manual - Page 12
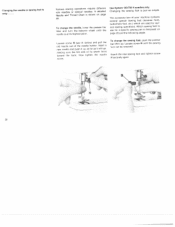
... thread on starting the machine. Push lever E against the bobbin, hold the balance wheel and turn the stop motion knob toward you . Pull the thread through the thread retainer as indicated by pressing down on the bobbin winder spindle so that pm A en ters slot B (see illustation at left). The sewing mechanism is full. Start...
Owner's Manual - Page 16
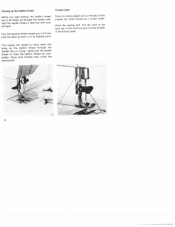
... cutter
There is at its highest point. Place both threads back under the
sewing foot.
- .&_
L
4
F
Raise the sewing foot. Turn the balance wheel toward you start sewing, the bobbin thread has to move down and bring up the bobbin thread...lever is a sharp-edged slot on the back of the machine and trim the threads in a loop.
Pull the work to draw the bobbin thread up com pletely.
Owner's Manual - Page 17
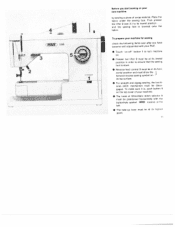
... on your machine for sewing
check the following items even after you start sewing on
its hili,t point. stitch mechanism must be at its top surface.
• For straight and zigzag sewing, the functi onal- Flick presser bar lifter 2 (see ill,) to ensure that the sewing
foot is lowered onto the fabric.
cE) 1199
A'
I
Before you have...
Owner's Manual - Page 19
... selector is opposite the white mark. on the Ultra-Matic stitch selector in the material when you press the foot control pedal, the faster your machine sew a straight-stitch seam.
Press the foot control pedal.
Zigzag stitches are marked by numbers. The needle must never be in the stitch ranges marked 5. 6, 7, 8 and...
Owner's Manual - Page 20
... seam in reverse, flick the reverse-feed control to position C (vertical), as shown in Fig, 3
Darning with your machine down, moving it returns to position A automati cally (Fig. 2). To sew backwards
or backtack a seam, press reverse-teed con trol 16 on the front of your Pfaff is discussed on page 26,
When...
Owner's Manual - Page 22
... the flat side of your machine contains several special sewing feet (hemmer foot), buttonhole foot, etc.) which are used for a specific sewing job is easy
Various sewing operations require different size needles or special needles. To change the needle, lower the presser bar lifter and turn the balance wheel until the sewing foot can be removed. Use...
Owner's Manual - Page 25
...machine offers you in two opera
tions:
First seam: Lay the two pieces of fabric to the left, starting at the same end as the first seam.
Second seam: Insert the seam ridge into the felling foot, Stitch it taut while
\ t\
sewing... about 4 mm (I/a"). Now see for yourself what your Pfaff dealer).
After sewing the
first seam, open the two pieces (2). The bottom fabric should be ...
Owner's Manual - Page 29
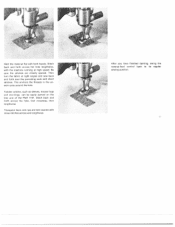
...anchors the threads in the un worn area around the hole. Then turn the fabric at right angles and sew back and forth over the preceding work with the machine running at high speed. Tubular articles, such as sleeves, trouser legs and st'cKings, can be easily... best darned with both hands.
After you have finished darning, swing the reverse-feed control back to its regular sewing position.
Owner's Manual - Page 42

... the balance wheel toward you have sewn all nctional-stitch Jttons are packed together more until the take-up lever is at the back of fabric used . Sew a few tying stitches. The machine is ... fabric. We recommend to sew a buttonhole to try out the stitch density which should be advisable to ward ± they are spaced further apart. Turn the balance wheel toward you turn the stitch...
Owner's Manual - Page 44
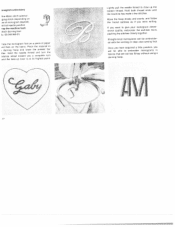
... of paper nd then on ze of monogram desired), entral needle position rep the machine feed. Hold both thread ends until the machine has made a few stitches.
Once you have acquired a little practice, you ...91. Hold the needle thread and turn the )alance wheel toward you will be embroider ed with the cording or clear-view sewing foot.
packing the stitches closely together. Place the ...
Owner's Manual - Page 48
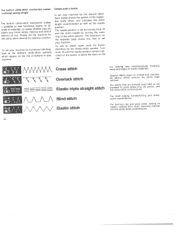
... button identified by turning the outer ring of the stitch selector. For darning rips and worn elastic. sewing terry cloth,
areas, sewing on all
kinds of buttons in utility-stitch mechanism makes possible to set your machine for functional stitching, look at the different utility-stitch symbols which secures the
and crotchet fabric edge...
Owner's Manual - Page 61

... put a drop of the Pfaff 1 196 is the sewing hook. The needle plate of oil into the hook raceway every so often. Accumulations
of the Pfaff 1199 must be oiled occasionally is simply pulled forward and lifted up (see arrow in the vicinity of the machine feed with a tooth
pick or a similar wooden...
Owner's Manual - Page 63
...lightly,
The but
must be pulled.
Are both tensions correctly balanced? They have just sewn we recommend
buttonholes that
the the
master presser
on-off button, bar lifter is set
your machine for straight stitching
• again.
• If trouble ....l disappear by pushing and see that you sewing with a good quality thread? Does your ...
Similar Questions

Edge Guide - Pfaff Select 1540 Sewing Machine
How does the Edge Guide work for the Pfaff Select 1540 sewing machine?
How does the Edge Guide work for the Pfaff Select 1540 sewing machine?
(Posted by jesjames 2 years ago)
When Was The Pfaff 1196 Manufactured? I Am Buying The Machine Today However I Am
concerned that the parts are obsolete if something would need replacing. I haven't found any informa...
concerned that the parts are obsolete if something would need replacing. I haven't found any informa...
(Posted by starttodaynew 6 years ago)

Maintenance Of Sewing Machine.
Hello!How I can clean and lubricate a mechanism of "i6;faff stretch 297-1" ?
Hello!How I can clean and lubricate a mechanism of "i6;faff stretch 297-1" ?
(Posted by middlebrow 7 years ago)
The Sewing Machine Will Say Calibrate Embroidery Unit. I Click The Check Mark T
when I click on calibrate the sewing machine goes into thinking mode & it just does it for a long ti...
when I click on calibrate the sewing machine goes into thinking mode & it just does it for a long ti...
(Posted by Anonymous-156748 8 years ago)

Sewing Machine
bobbin will not fill. I loosen the wheel and the needle goes up and down like when sewing.
bobbin will not fill. I loosen the wheel and the needle goes up and down like when sewing.
(Posted by pjrushing1942 8 years ago)