
Operation Manual
Page 1
Digital Camera Operating Manual To ensure the best performance from your camera, please read the Operating Manual before using the camera.
Digital Camera Operating Manual To ensure the best performance from your camera, please read the Operating Manual before using the camera.

Operation Manual
Page 2
...manual safe, as specified in helping you for display. Please take care, as there are even cases where limitations are for anything other brands or product names are trademarks of registered trademarks of the copyright as items for buying the Pentax Optio S4 Digital Camera.... Images taken with the purpose of Seiko Epson Corporation. Regarding trademarks • The SD logo is a trademark. • PENTAX is a trademark of PENTAX Corporation. • Optio is a trademark of obtaining copyrights also cannot...
...manual safe, as specified in helping you for display. Please take care, as there are even cases where limitations are for anything other brands or product names are trademarks of registered trademarks of the copyright as items for buying the Pentax Optio S4 Digital Camera.... Images taken with the purpose of Seiko Epson Corporation. Regarding trademarks • The SD logo is a trademark. • PENTAX is a trademark of PENTAX Corporation. • Optio is a trademark of obtaining copyrights also cannot...

Operation Manual
Page 5
... and the display screen of the LCD monitor in this manual are recommended every 1 to 2 years in order to maintain high-performance. • When the camera has not been used for this camera. If rain or drops of water get onto the camera, please wipe dry. • Refer to "Precautions When...during travelling). To users of taking pictures) arising from the lens and viewfinder using a blower or clean off dust using extremely high precision technology. Pentax is 0°C to 40°C (32°F to 104°F). • Avoid contact with garbage, dirt, sand, dust, water, toxic gases, salt...
... and the display screen of the LCD monitor in this manual are recommended every 1 to 2 years in order to maintain high-performance. • When the camera has not been used for this camera. If rain or drops of water get onto the camera, please wipe dry. • Refer to "Precautions When...during travelling). To users of taking pictures) arising from the lens and viewfinder using a blower or clean off dust using extremely high precision technology. Pentax is 0°C to 40°C (32°F to 104°F). • Avoid contact with garbage, dirt, sand, dust, water, toxic gases, salt...

Operation Manual
Page 6
... Playback Mode 30 Voice Recorder Mode 31 Setting the Menus 32 How to be Taken During Handling 2 Contents 4 Contents of the Operating Manual 7 Checking the Contents of the Package 8 Names of Parts 9 Names of Operating Parts 10 Getting Started 11 Attaching the Strap 11 Powering the... / MultiMediaCard 16 Initial Settings 18 Setting the Display Language 18 Setting the Home Town 19 Setting the D.S.T. Contents FOR SAFE USE OF YOUR CAMERA 1 Care to Set the Menus 32 Menu List 34 Taking Pictures 36 Setting the Shooting Functions 36 Changing the Mode 36 Selecting the Focus...
... Playback Mode 30 Voice Recorder Mode 31 Setting the Menus 32 How to be Taken During Handling 2 Contents 4 Contents of the Operating Manual 7 Checking the Contents of the Package 8 Names of Parts 9 Names of Operating Parts 10 Getting Started 11 Attaching the Strap 11 Powering the... / MultiMediaCard 16 Initial Settings 18 Setting the Display Language 18 Setting the Home Town 19 Setting the D.S.T. Contents FOR SAFE USE OF YOUR CAMERA 1 Care to Set the Menus 32 Menu List 34 Taking Pictures 36 Setting the Shooting Functions 36 Changing the Mode 36 Selecting the Focus...

Operation Manual
Page 9
...it and follow the instructions. 2 Quick Start 2 This chapter explains the simplest way to take pictures and play back images on the camera or on a TV and how to delete images. 7 7 Settings This chapter explains how to set the relevant functions, including how .../Editing This chapter explains how to be taken when operating the camera. Contents of the Operating Manual This operating manual contains the following chapters. 1 Getting Started 1 This chapter explains what to do after purchasing the camera before you start taking pictures. The meanings of the symbols used...
...it and follow the instructions. 2 Quick Start 2 This chapter explains the simplest way to take pictures and play back images on the camera or on a TV and how to delete images. 7 7 Settings This chapter explains how to set the relevant functions, including how .../Editing This chapter explains how to be taken when operating the camera. Contents of the Operating Manual This operating manual contains the following chapters. 1 Getting Started 1 This chapter explains what to do after purchasing the camera before you start taking pictures. The meanings of the symbols used...
Operation Manual
Page 10
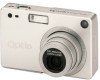
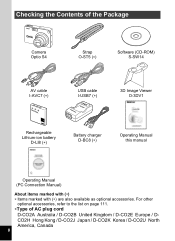
... Kong / D-CO2J Japan / D-CO2K Korea / D-CO2U North America, Canada 8 For other optional accessories, refer to the list on page 111. ∗Type of the Package Camera Optio S4 Strap O-ST5 (∗) Software (CD-ROM) S-SW14 AV cable I-AVC7 (∗) USB cable I-USB7 (∗) 3D Image Viewer O-3DV1 Rechargeable Lithium-ion battery D-LI8 (∗...
... Kong / D-CO2J Japan / D-CO2K Korea / D-CO2U North America, Canada 8 For other optional accessories, refer to the list on page 111. ∗Type of the Package Camera Optio S4 Strap O-ST5 (∗) Software (CD-ROM) S-SW14 AV cable I-AVC7 (∗) USB cable I-USB7 (∗) 3D Image Viewer O-3DV1 Rechargeable Lithium-ion battery D-LI8 (∗...

Operation Manual
Page 17
...open the terminal cover. 2 Connect the DC terminal on the AC adapter to the DC input terminal on the camera, being sure to match the 4 symbols. 3 Connect the AC plug cord to the AC adapter. 4 Plug... the AC plug cord into the power outlet. • Make sure that the camera is turned off when connecting or disconnecting the AC adapter. • Make sure that the AC plug cord and connecting ...8226; When using the AC adapter D-AC8, be sure to read the operation manual accompanying the AC adapter. • When connecting the DC terminals, be sure to match the 4 symbols.
...open the terminal cover. 2 Connect the DC terminal on the AC adapter to the DC input terminal on the camera, being sure to match the 4 symbols. 3 Connect the AC plug cord to the AC adapter. 4 Plug... the AC plug cord into the power outlet. • Make sure that the camera is turned off when connecting or disconnecting the AC adapter. • Make sure that the AC plug cord and connecting ...8226; When using the AC adapter D-AC8, be sure to read the operation manual accompanying the AC adapter. • When connecting the DC terminals, be sure to match the 4 symbols.

Operation Manual
Page 29
... the card adapter into the card slot. (To remove the SD Memory Card / MultiMediaCard from the camera and transfer the data to your PC using another device, refer to the operating manual for the device.) 1Booklet :Viewing Images with your PC Viewing Images with your Macintosh Printing images by ...a printing service Prints of prints can be specified and dates can be ordered in the prints if DPOF (Digital Print Order Format) is set before...
... the card adapter into the card slot. (To remove the SD Memory Card / MultiMediaCard from the camera and transfer the data to your PC using another device, refer to the operating manual for the device.) 1Booklet :Viewing Images with your PC Viewing Images with your Macintosh Printing images by ...a printing service Prints of prints can be specified and dates can be ordered in the prints if DPOF (Digital Print Order Format) is set before...

Operation Manual
Page 31
...mode. (1 p.39) 2 qsz button Changes the focus mode as follows. (1 p.37) Macro mode (1 p.37) Super macro mode (1 p.37) Infinity-landscape mode (1 p.37) Manual focus mode (1 p.38) Move focusing area (1 p.38) 3 Zoom button Changes the size of the subject. (1 p.22) 4 Four-way controller (45) Changes the EV compensation... modes. (1 p.52) The function registered on the four-way controller can be changed in the Fn settings. (1 p.106) Adjusts the ratio when the digital filter is set to Slim Filter on the virtual mode dial. (1 p.60) 5 Four-way controller (23) (2) Selects self-timer mode, remote control ...
...mode. (1 p.39) 2 qsz button Changes the focus mode as follows. (1 p.37) Macro mode (1 p.37) Super macro mode (1 p.37) Infinity-landscape mode (1 p.37) Manual focus mode (1 p.38) Move focusing area (1 p.38) 3 Zoom button Changes the size of the subject. (1 p.22) 4 Four-way controller (45) Changes the EV compensation... modes. (1 p.52) The function registered on the four-way controller can be changed in the Fn settings. (1 p.106) Adjusts the ratio when the digital filter is set to Slim Filter on the virtual mode dial. (1 p.60) 5 Four-way controller (23) (2) Selects self-timer mode, remote control ...

Operation Manual
Page 39
...1 Press the q s or z button in Capture mode. 1 Selecting the Focus Mode Taking Pictures • Focus Mode (No icon) Autofocus mode The camera is focused on the subject in the autofocus area continuously pressing with the shutter release button halfway. Use this mode when the distance to the... Super Macro mode. 37 The camera is focused on the LCD monitor. q Macro mode This mode is approx. 18 cm -50 cm (7 inch -20 inch). s Infinity-landscape mode This mode is used when the distance to Autofocus mode, Infinity-landscape mode and Manual focus mode. • The ...
...1 Press the q s or z button in Capture mode. 1 Selecting the Focus Mode Taking Pictures • Focus Mode (No icon) Autofocus mode The camera is focused on the subject in the autofocus area continuously pressing with the shutter release button halfway. Use this mode when the distance to the... Super Macro mode. 37 The camera is focused on the LCD monitor. q Macro mode This mode is approx. 18 cm -50 cm (7 inch -20 inch). s Infinity-landscape mode This mode is used when the distance to Autofocus mode, Infinity-landscape mode and Manual focus mode. • The ...

Operation Manual
Page 40
Manual Focus When the mode is set to z, the central portion of the picture is enlarged to full screen on the monitor. The central portion of ... the shutter release button. Be sure to check the image on Macro and Super Macro, the range of the picture is not enlarged when the digital zoom is set , press any buttons except the four-way controller (23) or take a picture while looking through the viewfinder when the focus mode is...
Manual Focus When the mode is set to z, the central portion of the picture is enlarged to full screen on the monitor. The central portion of ... the shutter release button. Be sure to check the image on Macro and Super Macro, the range of the picture is not enlarged when the digital zoom is set , press any buttons except the four-way controller (23) or take a picture while looking through the viewfinder when the focus mode is...

Operation Manual
Page 45
... displayed. 3 Use the four-way controller (45) to Lighting (White Balance) You can take the picture. F G H I J K Auto The camera adjusts the white balance automatically. Tungsten Light Use this mode when taking pictures under electric or other tungsten light. Fluorescent Light Use this mode when...the white balance 4 according to the light conditions at the time of shooting. MENU Exit OK Ok The camera is ready to take pictures in natural colors by adjusting the white balance manually. 1 Select [White Balance] on the [A Rec. Mode] menu. 2 Press the four-way controller (5)....
... displayed. 3 Use the four-way controller (45) to Lighting (White Balance) You can take the picture. F G H I J K Auto The camera adjusts the white balance automatically. Tungsten Light Use this mode when taking pictures under electric or other tungsten light. Fluorescent Light Use this mode when...the white balance 4 according to the light conditions at the time of shooting. MENU Exit OK Ok The camera is ready to take pictures in natural colors by adjusting the white balance manually. 1 Select [White Balance] on the [A Rec. Mode] menu. 2 Press the four-way controller (5)....

Operation Manual
Page 46
DISPLAY 3 Press the Display button. MENU Exit Adjust OK Ok The white balance is automatically adjusted, [Adjust] is ready to the menu screen. 4 Press the OK button. The camera is displayed on the [White Balance] screen. Manual Setting 1 Select [K] (manual) on the LCD monitor and the display returns to take the picture. 4 Taking Pictures 44 White Balance AWB 2 Point your camera at a blank sheet of paper so that it fills the screen.
DISPLAY 3 Press the Display button. MENU Exit Adjust OK Ok The white balance is automatically adjusted, [Adjust] is ready to the menu screen. 4 Press the OK button. The camera is displayed on the [White Balance] screen. Manual Setting 1 Select [K] (manual) on the LCD monitor and the display returns to take the picture. 4 Taking Pictures 44 White Balance AWB 2 Point your camera at a blank sheet of paper so that it fills the screen.

Operation Manual
Page 59
The focus is set to fixed position in Autofocus mode. • Only the digital zoom can be used to ON. • Autofocus mode, Infinity-landscape mode and Manual focus mode 4 can be recorded when [Fast Fwd Movie] is not possible in Movie Picture mode. • The LCD monitor cannot be turned off from...
The focus is set to fixed position in Autofocus mode. • Only the digital zoom can be used to ON. • Autofocus mode, Infinity-landscape mode and Manual focus mode 4 can be recorded when [Fast Fwd Movie] is not possible in Movie Picture mode. • The LCD monitor cannot be turned off from...

Operation Manual
Page 76
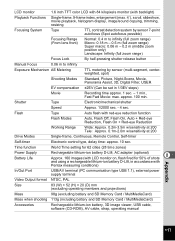
...EV compensation The set EV compensation value is saved. O AE Metering The [AE Metering] setting on the [Rec.Mode] menu is saved. P MF The manual focus position is saved. O 4 White Balance The [White Balance] setting on the [Rec.Mode] menu is saved. Taking Pictures Saving the Settings (Memory) ... not included in [Memory] will also be saved in the settings selected on the # button is set separately in the digital zoom range will be saved when the camera is turned off. Item Description Default Setting Flash The flash mode setting on the menus for each function when the...
...EV compensation The set EV compensation value is saved. O AE Metering The [AE Metering] setting on the [Rec.Mode] menu is saved. P MF The manual focus position is saved. O 4 White Balance The [White Balance] setting on the [Rec.Mode] menu is saved. Taking Pictures Saving the Settings (Memory) ... not included in [Memory] will also be saved in the settings selected on the # button is set separately in the digital zoom range will be saved when the camera is turned off. Item Description Default Setting Flash The flash mode setting on the menus for each function when the...

Operation Manual
Page 77
...button in User mode Flash mode Drive mode Focus mode Manual focus position Recorded pixels Quality White balance Focusing area AE metering Sensitivity Digital zoom Instant review Mode memory Sharpness Saturation Contrast Fn ...p.50 p.51 p.106 75 Flash White Balance 5 Press the four-way controller (45) EV Compensation Digital Zoom to select [Memory]. 3 Press the four-way controller (5). Sensitivity MENU Exit OK Ok 4 ...mode Items registered in Capture mode. 2 Press the four-way controller (23) Rec. Digital Zoom Instant Review Fast Fwd Movie 3D Mode On 2sec Off Parallel [Memory] menu ...
...button in User mode Flash mode Drive mode Focus mode Manual focus position Recorded pixels Quality White balance Focusing area AE metering Sensitivity Digital zoom Instant review Mode memory Sharpness Saturation Contrast Fn ...p.50 p.51 p.106 75 Flash White Balance 5 Press the four-way controller (45) EV Compensation Digital Zoom to select [Memory]. 3 Press the four-way controller (5). Sensitivity MENU Exit OK Ok 4 ...mode Items registered in Capture mode. 2 Press the four-way controller (23) Rec. Digital Zoom Instant Review Fast Fwd Movie 3D Mode On 2sec Off Parallel [Memory] menu ...

Operation Manual
Page 90
... the TV or equipment to which the camera is recommended. Changing the Video Output Format 1 p.103 If you can capture and play back images on a TV or other end of the AV cable to the operating manual for a long time, use of the AC adapter (optional) is connected. 88 Make sure that... both the TV and the camera are turned off before connecting the cable. 61 2 3 Open the terminal cover and connect the...
... the TV or equipment to which the camera is recommended. Changing the Video Output Format 1 p.103 If you can capture and play back images on a TV or other end of the AV cable to the operating manual for a long time, use of the AC adapter (optional) is connected. 88 Make sure that... both the TV and the camera are turned off before connecting the cable. 61 2 3 Open the terminal cover and connect the...

Operation Manual
Page 117
... on Subjects difficult to Auto or b (p.39) not discharge Off The Capture mode is outside the focusing area, aim the camera at target and press shutter release button fully, or use Manual Focus mode. Subject is too close Set focus mode on q (Super Macro). (Macro) or r (Super Macro). Appendix 115 Subject is...
... on Subjects difficult to Auto or b (p.39) not discharge Off The Capture mode is outside the focusing area, aim the camera at target and press shutter release button fully, or use Manual Focus mode. Subject is too close Set focus mode on q (Super Macro). (Macro) or r (Super Macro). Appendix 115 Subject is...

Operation Manual
Page 118
...59 min. 46 sec. (when using a 16MB SD Memory Card 8 White Balance Auto, Daylight, Shade, Tungsten Light, Fluorescent light, Manual Appendix Lens Focal Length 5.8 mm - 17.4 mm (Equivalent to 12×) Viewfinder Type Real-image zoom viewfinder Magnification Diopter Wide 0.28...×, Tele 0.78× -1 m-1 (at 3 m) 116 Main Specifications Type Fully automatic compact-type digital still camera with built-in memory (approx. 11 MB), SD Memory Card / MultiMediaCard (MMC) Image Storage Capacity Quality Level Recorded Pixels 2304×1728...
...59 min. 46 sec. (when using a 16MB SD Memory Card 8 White Balance Auto, Daylight, Shade, Tungsten Light, Fluorescent light, Manual Appendix Lens Focal Length 5.8 mm - 17.4 mm (Equivalent to 12×) Viewfinder Type Real-image zoom viewfinder Magnification Diopter Wide 0.28...×, Tele 0.78× -1 m-1 (at 3 m) 116 Main Specifications Type Fully automatic compact-type digital still camera with built-in memory (approx. 11 MB), SD Memory Card / MultiMediaCard (MMC) Image Storage Capacity Quality Level Recorded Pixels 2304×1728...
Operation Manual
Page 119
.../mechanical shutter Speed Approx. 1/2000 sec. - 4 sec. Flash Type Auto flash with Pentax measuring conditions) In/Out Port USB/AV terminal (PC communication type USB 1.1), external power ... zoom position only) Landscape: Infinity (full zoom range) Focus Lock By half-pressing shutter release button Manual Focus 0.06 m to infinity Exposure Mechanism AE Metering TTL metering by sensor (multi-segment, centerweighted, spot...) Shooting Modes Standard, Picture, Night-Scene, Movie, Panorama Assist, 3D, Digital Filter, USER EV compensation ±2EV (Can be set in accordance with red...
.../mechanical shutter Speed Approx. 1/2000 sec. - 4 sec. Flash Type Auto flash with Pentax measuring conditions) In/Out Port USB/AV terminal (PC communication type USB 1.1), external power ... zoom position only) Landscape: Infinity (full zoom range) Focus Lock By half-pressing shutter release button Manual Focus 0.06 m to infinity Exposure Mechanism AE Metering TTL metering by sensor (multi-segment, centerweighted, spot...) Shooting Modes Standard, Picture, Night-Scene, Movie, Panorama Assist, 3D, Digital Filter, USER EV compensation ±2EV (Can be set in accordance with red...


